
Spring----Bean装配
一、Bean种类
1、普通Bean
<bean id="" class="A"> ;spring直接创建A实例对象并且返回
2、特殊Bean
如果一个Bean实现了 FactoryBean接口,那他就是一个特殊的Bean,当spring实例化这个bean的时候,会调用 getObject() 方法,返回 getObject() 方法返回的值
这种特殊的Bean,我们一般称为FactoryBean,例如ProxyFactoryBean,表示生产proxy的Bean
<bean id="" class="proxyFactoryBean">,获得的是proxyBean。(getObject()方法返回的是proxy)
补充:
FactoryBean:具有工厂生产对象的能力,但是只能生产特定的对象(典型例子SqlSessionFactoryBean),目的就是隐藏复杂的bean的配置
//举一个例子
public class UserFactoryBean implements FactoryBean<User> {
    @Override
    public User getObject() throws Exception {
        //进行复杂的配置
        User user = new User();
        return user;
    }
    @Override
    public Class<?> getObjectType() {
        return null;
    }
    @Override
    public boolean isSingleton() {
        return false;
    }
}
BeanFactory:生产Bean的工厂,可以生产任意Bean。
二、基于XML装配Bean
1、实例化方式
1.1默认构造
<bean id="" class=""> //必须提供构造方法
1.2静态工厂
facatory.class
public  class ServiceFactory {
    public static Service createService(){
        return new ServiceImpl();
    }
}
service.class
public interface Service {
    public void save();
}
serviceImpl.class
public class SaveDaoImpl implements SaveDao {
    public void save(){
        System.out.println("保存完毕");
    }
}
xml
<?xml version="1.0" encoding="UTF-8"?>
<beans xmlns="http://www.springframework.org/schema/beans"
       xmlns:xsi="http://www.w3.org/2001/XMLSchema-instance"
       xmlns:context="http://www.springframework.org/schema/context"
       xsi:schemaLocation="http://www.springframework.org/schema/beans http://www.springframework.org/schema/beans/spring-beans.xsd http://www.springframework.org/schema/context http://www.springframework.org/schema/context/spring-context.xsd">

        <!--createService 生产对象的方法-->
        <bean id="serviceFactory" class="com.test.ServiceFactory" factory-method="createService"></bean>
</beans>
测试
public class Test {
    public static void main(String[] args) {
        ApplicationContext applicationContext = new ClassPathXmlApplicationContext("spring-context.xml");
        Service service = applicationContext.getBean("serviceFactory",Service.class);  //Service.class相当于强转了
        service.save();
    }
}
1.3实例工厂
factroy.class
public  class ServiceFactory {
    public Service createService(){
        return new ServiceImpl();
    }
}
xml
<?xml version="1.0" encoding="UTF-8"?>
<beans xmlns="http://www.springframework.org/schema/beans"
       xmlns:xsi="http://www.w3.org/2001/XMLSchema-instance"
       xmlns:context="http://www.springframework.org/schema/context"
       xsi:schemaLocation="http://www.springframework.org/schema/beans http://www.springframework.org/schema/beans/spring-beans.xsd http://www.springframework.org/schema/context http://www.springframework.org/schema/context/spring-context.xsd">

        <bean id="serviceFactory" class="com.test.ServiceFactory"></bean>
        <bean id="userService" factory-bean="serviceFactory" factory-method="createService"></bean> //指定工厂和方法
</beans>
测试
public class Test {
    public static void main(String[] args) {
        ApplicationContext applicationContext = new ClassPathXmlApplicationContext("spring-context.xml");
        ServiceImpl service = applicationContext.getBean("userService",ServiceImpl.class);
        service.save();
    }
}
2、作用域
用于确定spring创建bean的个数
<?xml version="1.0" encoding="UTF-8"?>
<beans xmlns="http://www.springframework.org/schema/beans"
       xmlns:xsi="http://www.w3.org/2001/XMLSchema-instance"
       xmlns:context="http://www.springframework.org/schema/context"
       xsi:schemaLocation="http://www.springframework.org/schema/beans http://www.springframework.org/schema/beans/spring-beans.xsd http://www.springframework.org/schema/context http://www.springframework.org/schema/context/spring-context.xsd">

        <bean id="userService" class="com.test.ServiceImpl" scope="singleton"></bean>  //singleton单例默认,只存在一个bean,(默认),prototype:多例
</beans>
测试
public class Test{
    public static void main(String[] args) {
        ApplicationContext applicationContext = new ClassPathXmlApplicationContext("spring-context.xml");
        ServiceImpl service = applicationContext.getBean("userService",ServiceImpl.class);
        ServiceImpl service2 = applicationContext.getBean("userService",ServiceImpl.class);
        System.out.println(service);
        System.out.println(service2);
    }
}
3、生命周期
3.1初始化和销毁
目标bean
public class ServiceImpl implements Service {
    public void save(){
        System.out.println("save");
    }
    public void init(){
        System.out.println("初始化");
    }
    public void destroy(){
        System.out.println("销毁");
    }
}
xml
<?xml version="1.0" encoding="UTF-8"?>
<beans xmlns="http://www.springframework.org/schema/beans"
       xmlns:xsi="http://www.w3.org/2001/XMLSchema-instance"
       xmlns:context="http://www.springframework.org/schema/context"
       xsi:schemaLocation="http://www.springframework.org/schema/beans http://www.springframework.org/schema/beans/spring-beans.xsd http://www.springframework.org/schema/context http://www.springframework.org/schema/context/spring-context.xsd">

        <bean id="userService" class="com.test.ServiceImpl" init-method="init" destroy-method="destroy"></bean> //配值初始化和销毁方法
</beans>
测试
public class Test{
    public static void main(String[] args) throws NoSuchMethodException, InvocationTargetException, IllegalAccessException {
        ApplicationContext applicationContext = new ClassPathXmlApplicationContext("spring-context.xml");
        ServiceImpl service = applicationContext.getBean("userService",ServiceImpl.class);
        System.out.println(service);
        applicationContext.getClass().getMethod("close").invoke(applicationContext); //当容器关闭了,才会调用destory方法

        //如果不用反射
        //ClassPathXmlApplicationContext applicationContext = new ClassPathXmlApplicationContext("spring-context.xml");
        //ServiceImpl service = applicationContext.getBean("userService",ServiceImpl.class);
        //System.out.println(service);
        //applicationContext.close();
    }
}
要求:该bean需要是单例模式和容器需要调用close方法,destory方法才会被执行。
3.2BeanPostProcessor(后处理bean)
容器中所有的 bean 被初始化前后会调用者两个方法,如果有多个接口实现了BeanPostProcessor,这些接口中的方法都会被执行
import org.springframework.beans.BeansException;
import org.springframework.beans.factory.config.BeanPostProcessor;

import java.lang.reflect.InvocationHandler;
import java.lang.reflect.Method;
import java.lang.reflect.Proxy;

public class MyBeanPostProcessor implements BeanPostProcessor {
    public Object postProcessBeforeInitialization(Object bean, String beanName) throws BeansException {
        System.out.println("before:"+beanName);
        return bean;
    }
    public Object postProcessAfterInitialization(final Object bean, String beanName) throws BeansException {
        System.out.println("after:"+beanName);
        return Proxy.newProxyInstance( //如果需要对执行的方法进行特殊的处理,例如写入日志等等。如果没有特别需求,可以直接 return bean;
                MyBeanPostProcessor.class.getClassLoader(),
                bean.getClass().getInterfaces(),
                new InvocationHandler() {
            public Object invoke(Object proxy, Method method, Object[] args) throws Throwable {
                System.out.println("开启事务");
                //执行目标代码
                Object invoke = method.invoke(bean, args);
                System.out.println("结束事务");
                return invoke;
            }
        });
    }
}
xml
<?xml version="1.0" encoding="UTF-8"?>
<beans xmlns="http://www.springframework.org/schema/beans"
       xmlns:xsi="http://www.w3.org/2001/XMLSchema-instance"
       xmlns:context="http://www.springframework.org/schema/context"
       xsi:schemaLocation="http://www.springframework.org/schema/beans http://www.springframework.org/schema/beans/spring-beans.xsd http://www.springframework.org/schema/context http://www.springframework.org/schema/context/spring-context.xsd">

        <bean id="userService" class="com.test.ServiceImpl" init-method="init" destroy-method="destroy"></bean> //查看之前写的ServiceImpl
        <bean class="com.test.MyBeanPostProcessor"></bean> //只需要添加一个class就可以监听bean的初始化了
</beans>
测试
import org.springframework.context.ApplicationContext;
import org.springframework.context.support.ClassPathXmlApplicationContext;

import java.lang.reflect.InvocationTargetException;

public class Test{
    public static void main(String[] args) throws NoSuchMethodException, InvocationTargetException, IllegalAccessException {
        ApplicationContext applicationContext = new ClassPathXmlApplicationContext("spring-context.xml");
        Service service = applicationContext.getBean("userService",Service.class);  //Service.class,不能是ServiceImpl.class
        service.save();
        applicationContext.getClass().getMethod("close").invoke(applicationContext); //当容器关闭了,才会调用destory方法
    }
}
3.3属性依赖注入
3.3.1构造方法注入
public class User {
    private Integer uid;
    private String username;
    private Integer age;

    public User(Integer uid, String username) {
        super();
        this.uid = uid;
        this.username = username;
    }
    public User(String username, Integer age) {
        super();
        this.username = username;
        this.age = age;
    }

    @Override
    public String toString() {
        return "User{" +
                "uid=" + uid +
                ", username='" + username + '\'' +
                ", age=" + age +
                '}';
    }
}
xml
<bean id="user" class="com.test.User">
        <constructor-arg index="0" type="java.lang.String" value="1"></constructor-arg>
        <constructor-arg index="1" type="java.lang.Integer" value="2"></constructor-arg>
</bean>
测试
ApplicationContext applicationContext = new ClassPathXmlApplicationContext("spring-context.xml");
User user = (User) applicationContext.getBean("user");
System.out.println(user);
3.3.2setter方法注入
public class Person {
    public String name;
    public Address addr;

    public Address getAddr() {
        return addr;
    }

    public void setAddr(Address addr) {
        this.addr = addr;
    }

    public String getName() {
        return name;
    }

    public void setName(String name) {
        this.name = name;
    }

    @Override
    public String toString() {
        return "Person{" +
                "name='" + name + '\'' +
                ", addr=" + addr +
                '}';
    }
}
public class Address {
    private String addr;

    public String getAddr() {
        return addr;
    }

    public void setAddr(String addr) {
        this.addr = addr;
    }

    @Override
    public String toString() {
        return "Address{" +
                "addr='" + addr + '\'' +
                '}';
    }
}
xml
    <bean id="user" class="com.test.User">
        <constructor-arg index="0" type="java.lang.String" value="1"></constructor-arg>
        <constructor-arg index="1" type="java.lang.Integer" value="2"></constructor-arg>
    </bean>

    <bean id="person" class="com.test.Person">
        <property name="name" value="小明"></property>
<!--        <property name="name">-->
<!--            <value>小明</value>-->
<!--        </property>-->
        <property name="addr" ref="homeAddrId"></property>
<!--        <property name="addr">-->
<!--            <ref bean="homeAddrId"/>-->
<!--        </property>-->
    </bean>
    <bean id="homeAddrId" class="com.test.Address">
        <property name="addr" value="北京"></property>
    </bean>
补充
SpEL[了解]
对<property>进行统一编程,所有的内容都使用value
格式:<property name="" value="#{表达式}">
#{123}、#{'jack'} : 数字、字符串
#{beanId} :另一个bean引用
#{beanId.propName} :操作数据
#{beanId.toString()} :执行方法
#{T(类).字段|方法} :静态方法或字段
    <!--
        <property name="cname" value="#{'jack'}"></property>
        <property name="cname" value="#{customerId.cname.toUpperCase()}"></property> 通过另一个bean,获得属性,调用的方法
        <property name="cname" value="#{customerId.cname?.toUpperCase()}"></property> ?. 如果对象不为null,将调用方法
    -->
    <bean id="customerId" class="com.itheima.f_xml.d_spel.Customer">
        <property name="cname" value="#{customerId.cname?.toUpperCase()}"></property>  //?:表示如果是空,就不转换大写
        <property name="pi" value="#{T(java.lang.Math).PI}"></property>
    </bean>
3.3.3 集合注入
public class CollData {
    private String[] array;
    private List<Integer> list;
    private Set<String> set;
    private Map<String,String> map;
    private Properties properties;

    public void setMap(Map<String, String> map) {
        this.map = map;
    }

    public void setProperties(Properties properties) {
        this.properties = properties;
    }

    public void setSet(Set<String> set) {
        this.set = set;
    }

    public void setList(List<Integer> list) {
        this.list = list;
    }

    public void setArray(String[] array) {
        this.array = array;
    }

    @Override
    public String toString() {
        return "CollData{" +
                "array=" + Arrays.toString(array) +
                ", list=" + list +
                ", set=" + set +
                ", map=" + map +
                ", properties=" + properties +
                '}';
    }
}
xml
<bean id="collData" class="com.test.CollData">
        <property name="array">
            <array>
                <value>sdf</value>
                <value>sdf</value>
            </array>
        </property>
        <property name="list">
            <list>
                <value>1</value>
                <value>2</value>
                <value>3</value>
            </list>
        </property>
        <property name="set">
            <set>
                <value>sdf</value>
                <value>sdf</value>
            </set>
        </property>
        <property name="map">
            <map>
                <entry key="name" value="小明"></entry>
                <entry>
                    <key><value>age</value></key>
                    <value>10</value>
                </entry>
            </map>
        </property>
        <property name="properties">
            <props>
                <prop key="name">小明</prop>
                <prop key="age">10</prop>
            </props>
        </property>
    </bean>
三、基于注解装配Bean
在之前
需要生成一个spring-context.xml,来配置bean
<?xml version="1.0" encoding="UTF-8"?>
<beans xmlns="http://www.springframework.org/schema/beans"
        xmlns:xsi="http://www.w3.org/2001/XMLSchema-instance"
        xsi:schemaLocation="
        http://www.springframework.org/schema/beans http://www.springframework.org/schema/beans/spring-beans.xsd">

        <bean id="springContext" class="com.zy.myshop.comment.until.MyApplicationContext" />

        <bean id="getuserImpl" class="com.zy.myshop.dao.impl.GetUserImpl"></bean>

        <bean id="userLoginimpl" class="com.zy.myshop.service.impl.UserLoginImpl"></bean>
</beans>
对于 DI 使用注解,将不再需要在 Spring 配置文件中声明 Bean 实例。Spring 中使用注解, 需要在原有 Spring 运行环境基础上再做一些改变
需要在 Spring 配置文件中配置组件扫描器,用于在指定的基本包中扫描注解。
<?xml version="1.0" encoding="UTF-8"?>
<beans xmlns="http://www.springframework.org/schema/beans"
       xmlns:xsi="http://www.w3.org/2001/XMLSchema-instance"
       xmlns:context="http://www.springframework.org/schema/context"
       xsi:schemaLocation="http://www.springframework.org/schema/beans http://www.springframework.org/schema/beans/spring-beans.xsd http://www.springframework.org/schema/context http://www.springframework.org/schema/context/spring-context.xsd">

        //<bean id="springContext" class="com.zy.myshop.comment.until.MyApplicationContext" />

        <context:annotation-config />                            //xml和注解混和使用,就是如果bean用xml配置,依赖注入使用注解的话,如果不加上这句,会出现注解不生效
        <context:component-scan base-package="com.zy.myshop"/>   //组件扫描,扫描含有注解的类
</beans>
说明:schema命名空间
命名空间声明
默认:xmlns=""
显示:xmlns:别名="",例如xmlns:context
确定schema xsd 文件位置
xsi:schemaLocation="名称 位置 名称2 位置2......."(成对)
3.1 注解(解放xml装配bean):
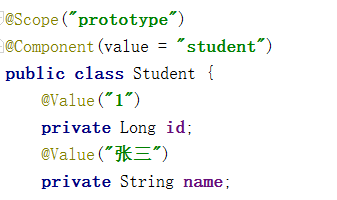
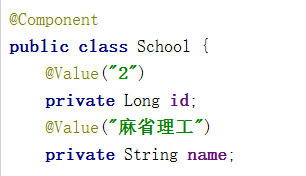
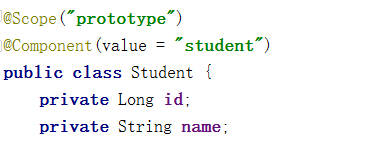
@Component: 需要在类上使用注解 @Component,该注解的 value 属性用于指定该 bean 的 id 值。(像一般工具类等的注解)
取代<bean class=""> @Compose("id") 取代<bean id="" class="">
下面是web开发@component衍生注解(功能一样)
@Repository: 用于对 DAO 实现类进行注解 (数据访问层)
@Service : 用于对 Service 实现类进行注解 (逻辑业务层)
@Controller: 用于对 Controller 实现类进行注解 (视图层)
@RestController: 用于对 Controller 实现类进行注解,不再返回视图,全部必须返回json数据,不需要再加上@ResponseBody注解(表示返回的数据为json格式)
3.2 依赖注入(给bean添加属性)
3.2.1 普通值
@Value
需要在属性上使用注解 @Value,该注解的 value 属性用于指定要注入的值。
application.xml配置,需要扫描到配置文件
<context:property-placeholder location="classpath:sms.properties"></context:property-placeholder>
3.2.2 引用值
方式1:按类型注入
@Autowired
前提:一个接口只有一个实现类
需要在域属性上使用注解 @Autowired,该注解默认使用 按类型自动装配 Bean 的方式。
使用该注解完成属性注入时,类中无需 setter。当然,若属性有 setter,则也可将其加到 setter 上。

方式2:按名称注入
@Autowired
@Qualifier("名称")
方式3:按名称注入
@Resource("名称")
需要在域属性上使用注解 @Resource,该注解有一个 name 属性,可以创建指定的 bean
@Resource(name = "userService")
private UserService userService;
3.2.3作用域
@Scope
需要在类上使用注解 @Scope,其 value 属性用于指定作用域。默认为 singleton。
3.2.4初始化和销毁
方式1:@PostConstruct
在方法上使用 @PostConstruct 相当于初始化
@PostConstruct
public void myInit(){
    System.out.println("初始化");
}
@PreDestroy
public void myDestory(){
    System.out.println("销毁");
}
方式二:xml配置(略)
方式三:@Bean注解,指定初始化方法和销毁方法
//指定User对象初始化和销毁方法
@Bean(destroyMethod = "",initMethod = "")
public User user(){

}
3.3基本使用(示例)
注意此时有一个spring-aop包很重要,maven中依赖的sprint-context包包含了spring-aop包
dao
public interface StudentDao {
    void save();
}
daoImpl
@Repository("studentDao")
public class StudentDaoImpl implements StudentDao {
    @Override
    public void save() {
        System.out.println("保存数据");
    }
}
service
public interface StudentService {
    public void save();
}
serviceImpl
@Service
public class StudentServiceImpl implements StudentService{

    @Autowired
    @Qualifier(value = "studentDao") //按名字注入(Dao必须指定名字)
    //@Resource(name = "studentDao") //这一句可以代替上面两句
    private StudentDao dao;

    @Override
    public void save() {
        System.out.println("调用dao");
        dao.save();
    }
}
controller
import org.springframework.beans.factory.annotation.Autowired;
import org.springframework.stereotype.Controller;
import javax.annotation.PostConstruct;
import javax.annotation.PreDestroy;


@Controller(value = "studentController")
public class StudentController{

    @Autowired //按照类型注入
    private StudentService service;

    public void save(){
        System.out.println("调用service");
        service.save();
    }

    @PostConstruct
    public void myInit(){
        System.out.println("初始化");
    }
    @PreDestroy
    public void myDestory(){
        System.out.println("销毁");
    }
}
xml
<?xml version="1.0" encoding="UTF-8"?>
<beans xmlns="http://www.springframework.org/schema/beans"
       xmlns:xsi="http://www.w3.org/2001/XMLSchema-instance"
       xmlns:context="http://www.springframework.org/schema/context"
       xsi:schemaLocation="http://www.springframework.org/schema/beans http://www.springframework.org/schema/beans/spring-beans.xsd http://www.springframework.org/schema/context http://www.springframework.org/schema/context/spring-context.xsd">

    <context:component-scan base-package="com.test"></context:component-scan>
</beans>
测试
public class Test{
    public static void main(String[] args) throws NoSuchMethodException, InvocationTargetException, IllegalAccessException {
        ApplicationContext applicationContext = new ClassPathXmlApplicationContext("spring-context.xml");
        StudentController StudentController = ((StudentController) applicationContext.getBean("studentController"));
        StudentController.save();

        applicationContext.getClass().getMethod("close").invoke(applicationContext);
    }
}
3.4 补充
MyapplicationContext
import org.apache.commons.lang3.Validate;
import org.slf4j.Logger;
import org.slf4j.LoggerFactory;
import org.springframework.beans.BeansException;
import org.springframework.beans.factory.DisposableBean;
import org.springframework.context.ApplicationContext;
import org.springframework.context.ApplicationContextAware;
import org.springframework.context.support.ClassPathXmlApplicationContext;
//public class MyApplicationContext {
// public static ApplicationContext applicationContext = new ClassPathXmlApplicationContext("spring-context.xml");;
//}
public class MyApplicationContext implements ApplicationContextAware, DisposableBean {
public static final Logger logger = LoggerFactory.getLogger(MyApplicationContext.class);
private static ApplicationContext applicationContext;
public static ApplicationContext getApplicationContext() {
assertContextInjected();
return applicationContext;
}
public void destroy() throws Exception {
logger.debug("清空 applicationContext");
System.out.println("清空application.....");
applicationContext = null;
}
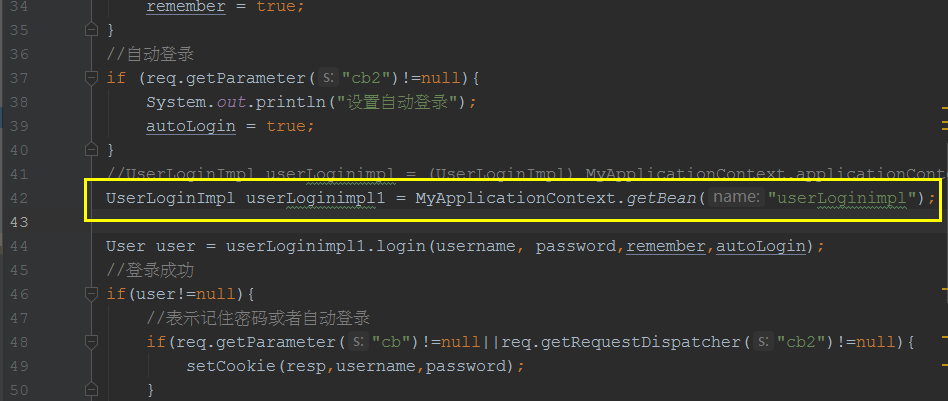
public static <T> T getBean(String name) {
assertContextInjected();
logger.info("getbean");
System.out.println("getBean........");
return (T) applicationContext.getBean(name);
}
public static <T> T getBean(Class<T> clazz) {
assertContextInjected();
return applicationContext.getBean(clazz);
}
public void setApplicationContext(ApplicationContext applicationContext) throws BeansException {
logger.info("加载 application");
System.out.println("加载application");
MyApplicationContext.applicationContext = applicationContext;
}
private static void assertContextInjected() {
Validate.validState(applicationContext != null, "applicationContext 属性未注入,请在 spring-context.xml 配置中定义 SpringContext");
}
}
在托管的类上使用注解

注解与 XML 配置的区别
注解的好处是,配置方便,直观。但其弊端也显而易见:以硬编码的方式写入到了 Java 代码中,其修改是需要重新编译代码的。
XML 配置方式的最大好处是,对其所做修改,无需编译代码,只需重启服务器即可将新的配置加载。
若注解与 XML 同用,XML 的优先级要高于注解。这样做的好处是,需要对某个 Bean 做修改,只需修改配置文件即可。
