Spring Boot----基础
1、简介
spring boot优点
快速创建独立运行的Spring项目以及与主流框架集成
使用嵌入式的Servlet容器,应用无需打成WAR包
starters自动依赖与版本控制,(如果我们想用web工能,只需要导入web的started,如果MyBatis,只需要MyBatis的starts,里面自动帮我们配置了所有的依赖)
大量的自动配置,简化开发,也可修改默认值无需配置XML
无代码生成,开箱即用
准生产环境的运行时应用监控
与云计算的天然集成
由于提出了微服务的概念,如果按照传统的模式开发,各个模块xml配置导入jar包,服务器环境配置等等耗费时间人力,所以spring boot为分布式应用构建起到了很好的作用。各个应用的互相调用,我们使用spring cloud,分布式之间的数据处理我们使用spring cloud data flow。
一个简单项目(使用maven工程创建):
1、导入包
    <!--父项目:管理spring应用里所有依赖的版本,以后导入依赖包就不需要写版本号(如果父项目没有管理的包,自己还是需要些版本号的)-->
    <parent>
        <groupId>org.springframework.boot</groupId>
        <artifactId>spring-boot-starter-parent</artifactId>
        <version>2.1.7.RELEASE</version>
        <relativePath/> <!-- lookup parent from repository -->
    </parent>

    <properties>
        <project.build.sourceEncoding>UTF-8</project.build.sourceEncoding>
        <project.reporting.outputEncoding>UTF-8</project.reporting.outputEncoding>
        <java.version>1.8</java.version>
    </properties>


    <dependencies>
        <!--spring-boot-starter:场景启动器,帮我们导入web模块正常运行所依赖的所有组件-->
        <dependency>
            <groupId>org.springframework.boot</groupId>
            <artifactId>spring-boot-starter-web</artifactId>
        </dependency>

        <dependency>
            <groupId>org.springframework.boot</groupId>
            <artifactId>spring-boot-starter-test</artifactId>
            <scope>test</scope>
        </dependency>
    </dependencies>

    <!--将项目打包一个可以执行的jar包(里面包含了tomcat服务器(嵌入式,所以spring boot不支持jsp))-->
    <build>
        <plugins>
            <plugin>
                <groupId>org.springframework.boot</groupId>
                <artifactId>spring-boot-maven-plugin</artifactId>
            </plugin>
        </plugins>
    </build>
2、添加spring boot主程序
/*主程序类*/
@SpringBootApplication
public class MainApplication {
    public static void main(String[] args) {
        SpringApplication.run(MainApplication.class,args);
    }
}
详解
@SpringBootConfiguration:Spring Boot的配置类;
标注在某个类上,表示这是一个Spring Boot的配置类;
@Configuration:配置类上来标注这个注解;配置类==配置文件;配置类也是容器中的一个组件;@Component
@EnableAutoConfiguration:开启自动配置功能;
以前我们需要配置的东西,Spring Boot帮我们自动配置;@EnableAutoConfiguration告诉SpringBoot开启自动配置功能;这样自动配置才能生效;
@AutoConfigurationPackage:自动配置包,将主配置类(@SpringBootApplication标注的类)的所在包及下面所有子包里面的所有组件扫描到Spring容器;(如果Controller比主程序(application)高一个目录,默认情况Controller是扫描不到的)
@lmport(AutoConfigurationPackages.Registrar.class):Spring的底层注解@lmport,给容器中导入一个组件;由AutoConfigurationPackages.Registrar.class来指定导入那些组件
@Import(AutoConfigurationImportSelector.class)
AutoConfigurationlmportSelector:导入哪些组件的选择器;通过(public String[] selectImports(AnnotationMetadata annotationMetadata))这个方法,将所有需要导入的组件以全类名的方式返回;这些组件就会被添加到容器中;
@Import 会给容器中导入非常多的自动配置类(xxxAutoConfiguration);就是给容器中导入这个场景需要的所有组件,并配置好这些组件;有了自动配置类,免去了我们手动编写配置注入功能组件等的工作;
List<String> configurations = SpringFactoriesLoader.loadFactoryNames(getSpringFactoriesLoaderFactoryClass(),
      getBeanClassLoader());
Spring Boot在启动的时候从类路径下的META-INF/spring.factories中获取EnableAutoConfiguration指定的值,将这些值作为自动配置类导入到容器中,自动配置类就生效,帮我们进行自动配置工
作;以前我们需要自己配置的东西,自动配置类都帮我们配置;
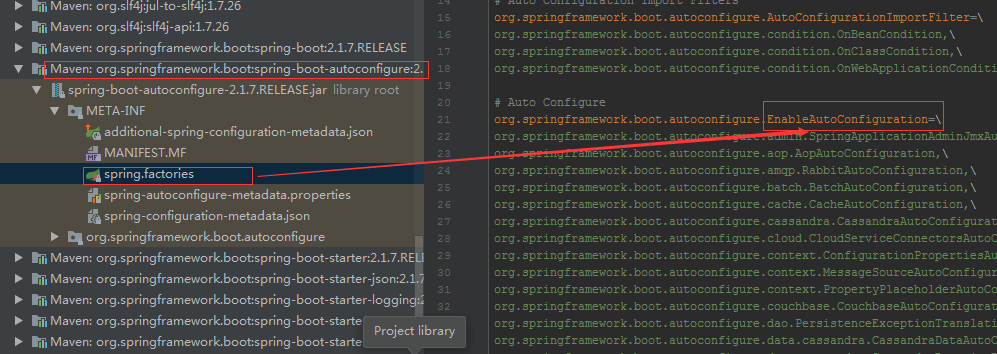
J2EE的整体整合解决方案和自动配置都在C:\Users\zhengyan\.m2\repository\org\springframework\boot\spring-boot-autoconfigure\2.1.7.RELEASE\spring-boot-autoconfigure-2.1.7.RELEASE.jar!\org\springframework\boot\autoconfigure
3、添加Controller
@RestController
public class LoginController {
    @RequestMapping(value = "login")
    public String  login2(){
        return "login"; //返回是一个字符串,原因是@RestController集成了@ResponseBody
    }
}
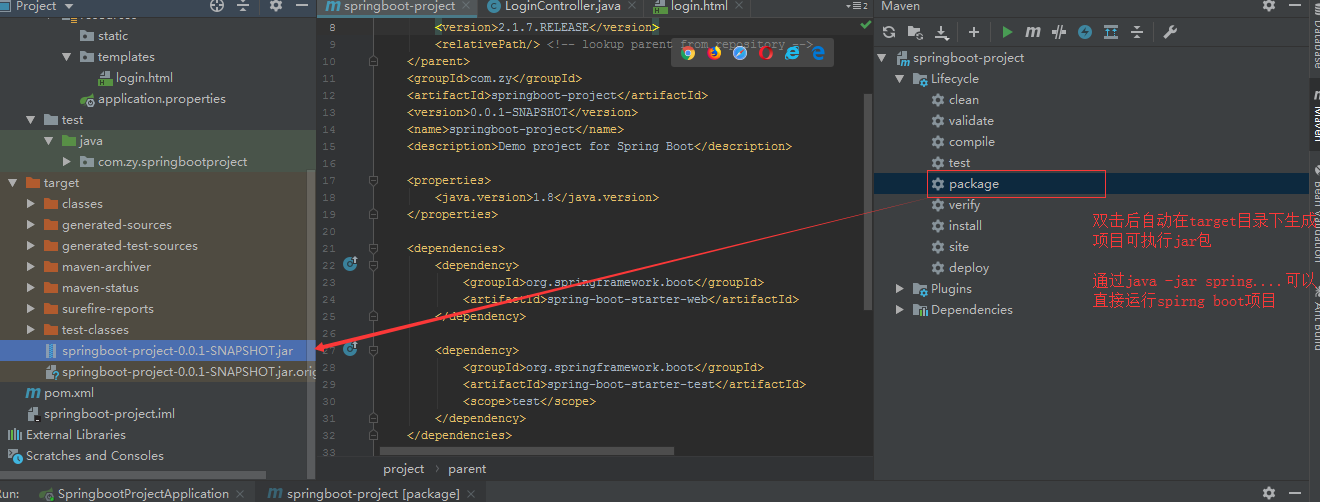
将spring boot打包成jar包:
1、首先maven里面依赖一个插件
    <build>
        <plugins>
            <plugin>
                <groupId>org.springframework.boot</groupId>
                <artifactId>spring-boot-maven-plugin</artifactId>
            </plugin>
        </plugins>
    </build>
2、双击 package
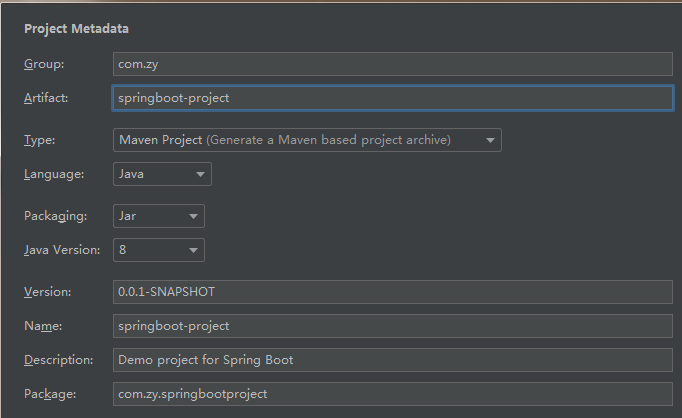
使用 Spring Initializr 创建Spring Boot工程:
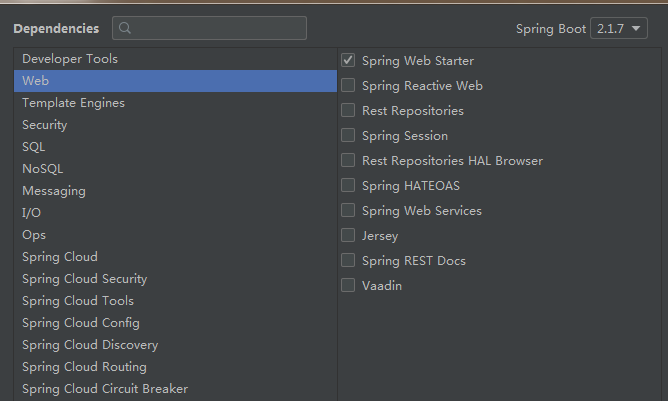
可以选择其他的模块,我们这只选择web
IDEA会联网,从Spring Boot官方网站生成出这个项目 (http://start.spring.io/starter.zip)
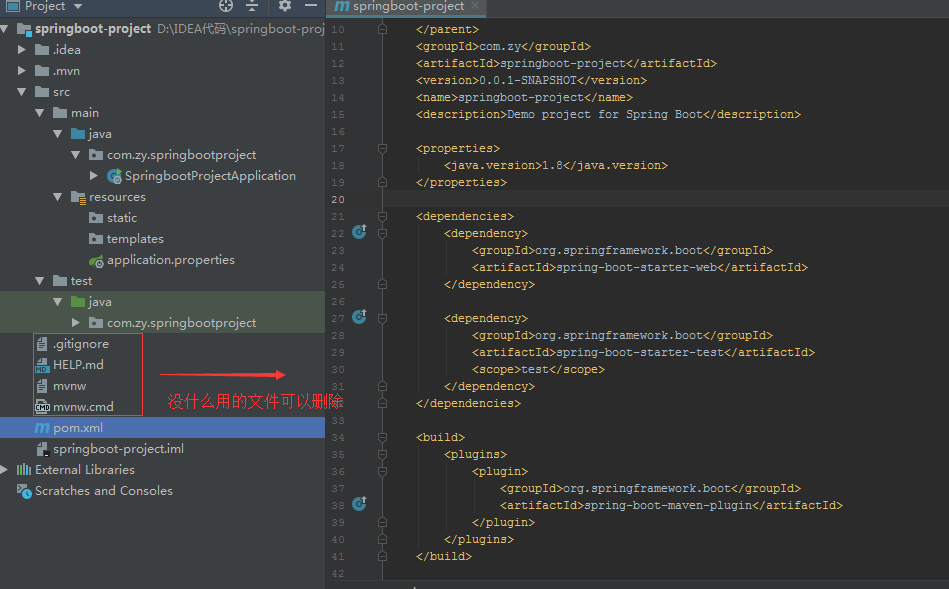
目录结构
resources文件夹中目录结构
static:保存所有的静态资源;js css images;
templates:保存所有的模板页面;(Spring Boot默认jar包使用嵌入式的Tomcat,默认不支持JSP页面);可以使用模板引擎(freemarker、thymeleaf);
application.properties:Spring Boot应用的全局配置文件(名字固定),可以自己配置来覆盖Spring Boot默认的配置。
java配置文件的配置和读取 :
spring boot 所有的配置:https://docs.spring.io/spring-boot/docs/2.1.7.RELEASE/reference/html/common-application-properties.html
在 src\main\resources下application.properties,配置
server.port=9090
server.context-path=/boot  //项目访问文件位置
可以将application.properties修改为application.yml,配置(yml和yaml后缀都可以)
YAML:以数据为中心,比json和xml更适合做配置文件
server:
  port: 9090
  servlet:
    context-path: /boot  #设置虚拟目录
#    path: "*.html"      #没有成功
YAML和properites的优先级
加载顺序是 yml > yaml > properties,后加载的会覆盖先加载的,一定的
对于优先级,可能是这样描述的,后加载的文件优先级高(不确定)
YAML语法
1、基本语法
k: v :表示一个键值对(注意 ":"和"v"之间需要有一个空格)
属性和值大小写敏感
2、值的写法
值是 普通字符串
k: v :v就按照字面值来写,字符串默认不加单引号或者双引号
“v” 双引号,提供转义序列
name: "zy \n" //会输出zy 换行,就是双引号不会去转义特殊字符,\n 输出就变成了换行了
‘v’ 单引号, 当不需要转义时,单引号样式很有用。
name: 'zy \n' 会输出 zy \n,就是单引号会将 \n转义成 \\n,\\n 输出就成了 \n 普通字符了
值是 对象/Map
k: v :对象还是k: v的形式
user:
  name: zy
  age: 18
行内写法
user: {name: zy,age: 18}
值是 数组(List,set)
用 - 值 表示数组中的一个元素
animal:
  - dog
  - cat
  - pig
行类写法
animal: [dog,cat,pig]
@ConfigurationProperties读取配置文件和java对象绑定
导入配置文件处理器(目的:在写yml或者properties的时候会出现提示,如果不配置也可以)
<dependency>
            <groupId>org.springframework.boot</groupId>
            <artifactId>spring-boot-configuration-processor</artifactId>
            <optional>true</optional>
</dependency>
User
/**
 * 将配置文件中的每一个属性映射到这个对象中
 * 使用 @ConfigurationProperties注解将yml中的配置和该对象进行绑定
 * prefix: 指定yml配置中的key,该key下的配置会和该对象进行绑定
 * @Component:使用注解将User装配到spring 容器中
 *
 */
@Component
@ConfigurationProperties(prefix = "user")
public class User {
    private String username;
    private Date date;
    private Dog dog;
    private Map<Integer,String> map;
    private List<String> list;
    //省略get、set方法
)
Dog
public class Dog {
    private String name;
}
application.yml
user:
  username: zy
  date: 2019/01/01
  dog:
    name: wangzi
  map: {1: v1,2: v2}
  list:
    - a
    - b
    - c
如果使用 application.properties,参考下面配置
user.username=zy
user.date=2019/01/01
#注意如果user.list=[a,b],那么[a,b,c]就是一个整体了
user.list=a,b,c
user.map.1=v1
user.dog.name=旺仔
Spring Boot 单元测试
@RunWith(SpringRunner.class)

@SpringBootTest
public class SpringbootProjectApplicationTests {
    @Autowired
    private User user;
    @Test
    public void contextLoads() {
        System.out.println(user);
    }
}
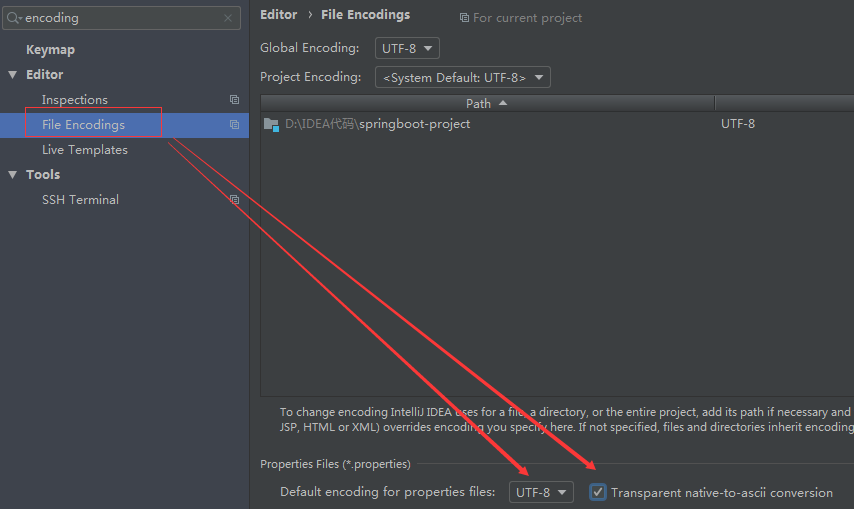
如果使用application.properties出现乱码(配置下面的,如果还是出现乱码,将application.properties文件删除重新创建)
@Value读取配置文件和java对象绑定
@Value解决了依赖注入的问题,本质上我们可以使用xml配置bean,并将属性注入进去(麻烦)
使用的时候需要在配置文件中添加<context:property-placeholder ignore-unresolvable="true" location="classpath:jdbc.properties,classpath:sms.properties"/>
读取yml的方式和properties方式一样,通过 "."
@Component
@Data
public class User {
    @Value("${user.username}") //使用配置文件的
    private String username;
    @Value("2019/01/01")       //自定义value
    private Date date;
    @Value("#{1+1}")          //spring 表达式
@ConfigurationProperties和@Value的区别

松散绑定指的是
实体类:
private String userName;

yml:
user:
  userName: zy  //属性可以被注入
或者
user:
  user-name: zy //属性也可以被注入(@Value("user-name")不等于@Value("userName"))
JSR303数据校验
对于@configurationProperties,数据的注入会验证
@Component
@Data
@ConfigurationProperties(prefix = "user")
@Validated //需要添加
public class User {
    @Email
    private String userName;
}
对于@value,不支持,数据不会被验证
@Component
@Data
@Validated
public class User {
    @Email
    @Value("${user.username}")
    private String userName;
}
复杂类型封装
@value不能取出配置中的Map,List等复杂数据,会报错
@Value("${user.map}")
private Map<Integer,String> map;
@PropertySource
1、在resource下创建test.properties
user.UserName=true
2、定义配置,可以读取指定的配置文件(不是全局的,不能以yml做后缀),但是注意会被全局配置文件application.yml和application.properties覆盖掉。
@ConfigurationProperties(prefix = "user")
@PropertySource(value = "classpath:test.properties")
@Component
@Data
public class User {
    //@Value("${user.username}")
    private String userName;
3、使用
public class A{
    @Autowired
    ConstantConfig constantConfig;

    public void t(){
         constantConfig.getUserName();
    }
}
给spring 容器添加组件
1、@ImportResource
可以用它来导入spring配置文件(利用xml配置给spring 容器添加组件),让其生效(spring boot不推荐使用)
@ImportResource(value = {"classpath:spring-context.xml"})
@SpringBootApplication
public class SpringbootProjectApplication {
    public static void main(String[] args) {
        SpringApplication.run(SpringbootProjectApplication.class, args);
    }
}
2、使用配置类
/*@configuration:指明当前类是一个配置类;就是来替代之前的Spring配置文件*/
@Configuration
public class MyAppConfig {
    /*将方法的返回值添加到容器中;容器中这个组件默认的id就是方法名*/
    @Bean
    public LocalValidatorFactoryBean validator(){
        LocalValidatorFactoryBean localValidatorFactoryBean = new LocalValidatorFactoryBean();
        return localValidatorFactoryBean;
    }
}
替换xml来装配 Bean
<?xml version="1.0" encoding="UTF-8"?>
<beans xmlns="http://www.springframework.org/schema/beans"
       xmlns:xsi="http://www.w3.org/2001/XMLSchema-instance"
       xsi:schemaLocation="http://www.springframework.org/schema/beans http://www.springframework.org/schema/beans/spring-beans.xsd">

    <bean id="validator" class="org.springframework.validation.beanvalidation.LocalValidatorFactoryBean"/>
</beans>
配置文件占位符
占位符获取之前配置的值,如果没有可以是用:指定默认值
user.age=${random.int}          //可以写一个随机数
user.name=${persion.test}       //如果persion.test不存在,那么user.name="${persion.test}"
user.name=${perison.test:test}  //如果persion.test不存在,那么user.name="test"
Profile
1、编写多个Profile文件,文件名格式:application-(profile}.properties/yml,例如
application-dev.properties    //指定开发环境中使用该配置
application-prod.properties   //指定生产环境中使用该配置
1.2、激活该配置(在application.properties/yml 插入spring.profiles.active=dev)
spring.profiles.active=dev  //以这个配置中端口号为主(dev中的配置会覆盖全局配置,就是全局配置优先加载)
server.port=8081
1.2、如果使用yml,我们还可以使用yml的文档块来指定激活那个配置(使用"---"来分割不同的配置文件,此时分割的不同文档就相当于一个application-dev/prod.yml,下面IDEA配置也可以识别到这个配置)
server:
  port: 8081
spring:
  profiles:
    active: prod   //指定激活下面的那个配置
---
server:
  port: 8082
spring:
  profiles: prod
---
server:
  port: 8083
spring:
  profiles: dev
1.2、启动项目指定参数,在项目配置中(--spring.profiles.active=dev)

1.2 当将这个项目打包成jar包的时候,可以使用命令的形式java -jar spring.xxx.jar --spring.profiles.active=dev 运行jar包(指定了配置文件),【这个和上面的IEDA方式是一样的,启动的时候指定参数】

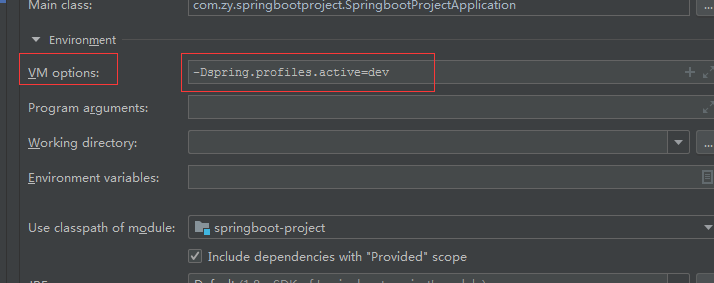
1,2 通过虚拟机参数,在项目配置中(-Dspring.profiles.active=dev)
spring.config.location
如果我们项目已经打包好了,我们有添加了一些配置,我们可以通过这个命令,让项目指定加载本地磁盘的配置文件。
java -jar spring.xx.jar spring.config.location=G:/application.properties //如果这个文件不和项目同级(同级的话参考spring外部文件配置)
spring boot内部配置文件位置以及加载顺序
优先级高(会覆盖下面的配置,真实)
-file:/config/        //在当前项目下创建config目录,在目录下创建application.yml(这个文件是不打包的)
-file./               //在当前项目下创建application.yml(注意这个文件也是不打包的)
-classpath:/config/   //在resources目录下创建config目录,将配置文件放进去
-classpath:/          //resources目录
低
注意,可能优先级高,不代表优先启动,优先级高,可能是说明配置优先
spring boot 内部加外部配置文件加载顺序
1、使用命令行修改配置参数,例如,多个配置用空格分开(优先级最高)
java -jar spring.xx.jar --server.port=8087
2. SPRING APPLICATION JSON中的属性。 SPRING_APPLICATION—JSON是以JSON格式配置在系统环境变量中的内容。
3. java:comp/env中的JNDI 属性。
4. Java的系统属性, 可以通过System.getProperties()获得的内容。
5 操作系统的环境变量 。
6 通过random.*配置的随机属性。
7、jar包外部的application-(profile}.properties或application.yml(带spring.profile)配置文件
8、jar包内部的application-{profile}.properties或application.yml(带spring.profile)配置文件
9、jar包外部的application.properties或application.yml(不带spring.profile)配置文件
10、jar包内部的application.properties或application.yml(不带spring.profile)配置文件
在jar包外部写一个application.properties,也同样会被识别(带profile的配置需要在全局配置中定义)
11、@Configuration注解类上的@PropertySource
12、通过SpringApplication.setDefaultProperties指定的默认属性
单元测试:
import org.junit.Before;
import org.junit.Test;
import org.junit.runner.RunWith;
import org.springframework.beans.factory.annotation.Autowired;
import org.springframework.boot.test.context.SpringBootTest;
import org.springframework.boot.test.web.client.TestRestTemplate;
import org.springframework.boot.web.server.LocalServerPort;
import org.springframework.http.ResponseEntity;
import org.springframework.test.context.junit4.SpringRunner;

import java.net.URL;

import static org.hamcrest.CoreMatchers.equalTo;
import static org.junit.Assert.assertThat;

@RunWith(SpringRunner.class)
@SpringBootTest(classes = DemoApplication.class, webEnvironment = SpringBootTest.WebEnvironment.RANDOM_PORT)  //为了装载application.yml 配置的
public class HelloSpringBootApplicationTests {

    @LocalServerPort
    private int port;

    private URL base;

    @Autowired
    private TestRestTemplate template;

    @Before
    public void setUp() throws Exception {
        this.base = new URL("http://localhost:" + port + "/");
    }

    @Test
    public void contextLoads() {
        ResponseEntity<String> response = template.getForEntity(base.toString(), String.class);
        assertThat(response.getBody(), equalTo("hellow"));  //断言返回值是不是hellow
    }

}
自定义 Banner:
我们在 src/main/resources 目录下新建一个 banner.txt
通过 http://patorjk.com/software/taag 网站生成字符串,将网站生成的字符复制到 banner.txt 中,再次运行这个程序(可以直接将下面的图案复制到banner.txt文件中)
${AnsiColor.BRIGHT_RED}
////////////////////////////////////////////////////////////////////
//                          _ooOoo_                               //
//                         o8888888o                              //
//                         88" . "88                              //
//                         (| ^_^ |)                              //
//                         O\  =  /O                              //
//                      ____/`---'\____                           //
//                    .'  \\|     |//  `.                         //
//                   /  \\|||  :  |||//  \                        //
//                  /  _||||| -:- |||||-  \                       //
//                  |   | \\\  -  /// |   |                       //
//                  | \_|  ''\---/''  |   |                       //
//                  \  .-\__  `-`  ___/-. /                       //
//                ___`. .'  /--.--\  `. . ___                     //
//              ."" '<  `.___\_<|>_/___.'  >'"".                  //
//            | | :  `- \`.;`\ _ /`;.`/ - ` : | |                 //
//            \  \ `-.   \_ __\ /__ _/   .-` /  /                 //
//      ========`-.____`-.___\_____/___.-`____.-'========         //
//                           `=---='                              //
//      ^^^^^^^^^^^^^^^^^^^^^^^^^^^^^^^^^^^^^^^^^^^^^^^^^^        //
//            佛祖保佑       永不宕机     永无BUG                  //
////////////////////////////////////////////////////////////////////
日志配置:
Spring Boot 对各种日志框架都做了支持,我们可以通过配置来修改默认的日志的配置 默认情况下,Spring Boot 使用 Logback 作为日志框架
application.yml添加配置
logging:
  file: ../logs/spring-boot-hello.log
  level.org.springframework.web: DEBUG
关闭特定的自动配置:
如果我们不需要自动配置
关闭特定的自动配置使用 @SpringBootApplication 注解的 exclude 参数即可,这里以关闭数据源的自动配置为例
@SpringBootApplication(exclude = {DataSourceAutoConfiguration.class})
springBoot一些配置的修改:
spring.mvc.date-format=yyyy/MM/dd HH:mm:ss //默认格式化时间的修改


