
vue语法初探
课前须知
知识储备:html、JavaScript、css(node、npm、webpack)
课程介绍
进阶式:
- 基础:生命周期函数 条件循环渲染指令、页面样式修饰语法···
- 组件:全局&局部、数据传递、插槽基础···
- 动画:单组件元素、列表&状态动画、CSS和JS动画···
- 高级扩展语法:Mixin混入、Vue的自定义指令、Teleport传送门···
- Composition API:产生背景、setup函数、响应式引用···
- 生态全家桶:vueCLI脚手架、大型工程、vue-Router、vue-X···
课程收获
- 理解运用vue3 原理 代码设计能力
- 移动端开发能力
- 公司级别项目
以 Visual Studio Code为例,
hello world
<!DOCTYPE html>
<html lang="en">
<head>
    <meta charset="UTF-8">
    <meta name="viewport" content="width=device-width, initial-scale=1.0">
    <title>hello world</title>
    <script src="https://unpkg.com/vue@next"></script>
</head>
<body>
    <div id="root"></div>
</body>
<script>
    Vue.createApp({                         #我要创建一个vue实例
        template: '<div>hello world</div>'  #在root这个元素里展示模板
    }).mount('#root');                      #让实例作用于root这个元素
</script>
</html>
倒计时(修改后半)
<body>
    <div id="root"></div>
</body>
<script>
    Vue.createApp({
        data(){
            return{
                content:1
            }
        },
        mounted(){
            setInterval(()=>{
                this.content += 1;
            },1000)
        },
        template: '<div>{{content}}</div>'
    }).mount('#root');
</script>
</html>
字符串反转和内容隐藏
  Vue.createApp({
        data(){
            return{
                content:'hello world'
            }
        },
        methods:{
          handleBtnClick() {
            this.content = this.content.split('').reverse().join('');
          }
},
        template: `
        <div>
            {{content}}
            <button v-on:click="handleBtnClick">反转</button>
            </div>
        `
    }).mount('#root');
</script>
</html>
对 vue指令 “v-on” 其 “绑定(click)事件” 并 定义在 methods 里
Vue.createApp({
        data(){
            return{
                show : true
            }
        },
        methods:{
          handleBtnClick() {
            this.show = !this.show ;
          }
},
        template: `
        <div>
            <span v-if="show">你看见我啦</span>
            <button v-on:click="handleBtnClick">你看不见我!</button>
            </div>
        `
    }).mount('#root');
</script>
</html>
操作效果如下
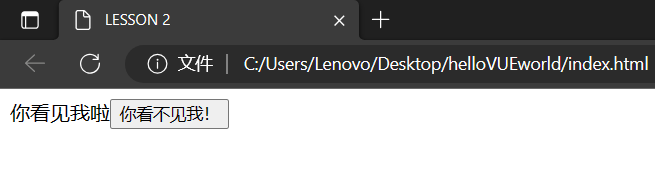
介绍 “v-if”指令 ,定义 show 变量用以控制显示与否
span标签到底存不存在取决于 show 值
todolist 小功能——循环和双向绑定
Vue.createApp({
        data(){
            return{
                list:['hello','world','dell','lee']
            }
        },

        template: `
          <ul>
           <li>hello</li>
           <li>world</li>
           <li>dell</li>
           <li>lee</li>
          </ul>
        `
    }).mount('#root');
</script>
</html>
将
内的部分替换为:
`template: ``
<ul>
<li v-for="item of list">{{item}} test </li>
</ul> ```
显示效果(除“test”字样)一致。
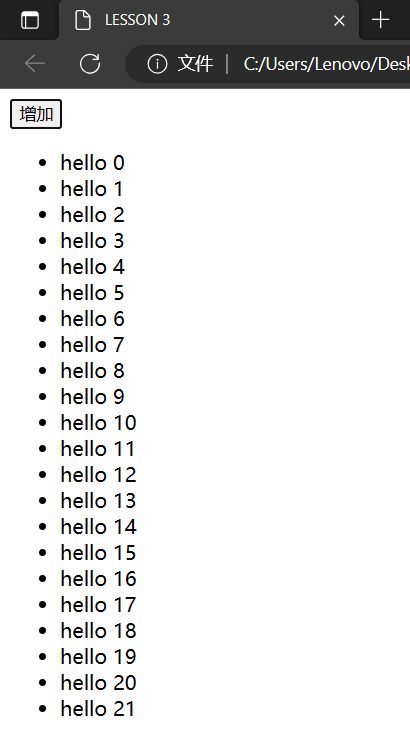
若:
<ul>
</ul>
则可如图示打印出下标

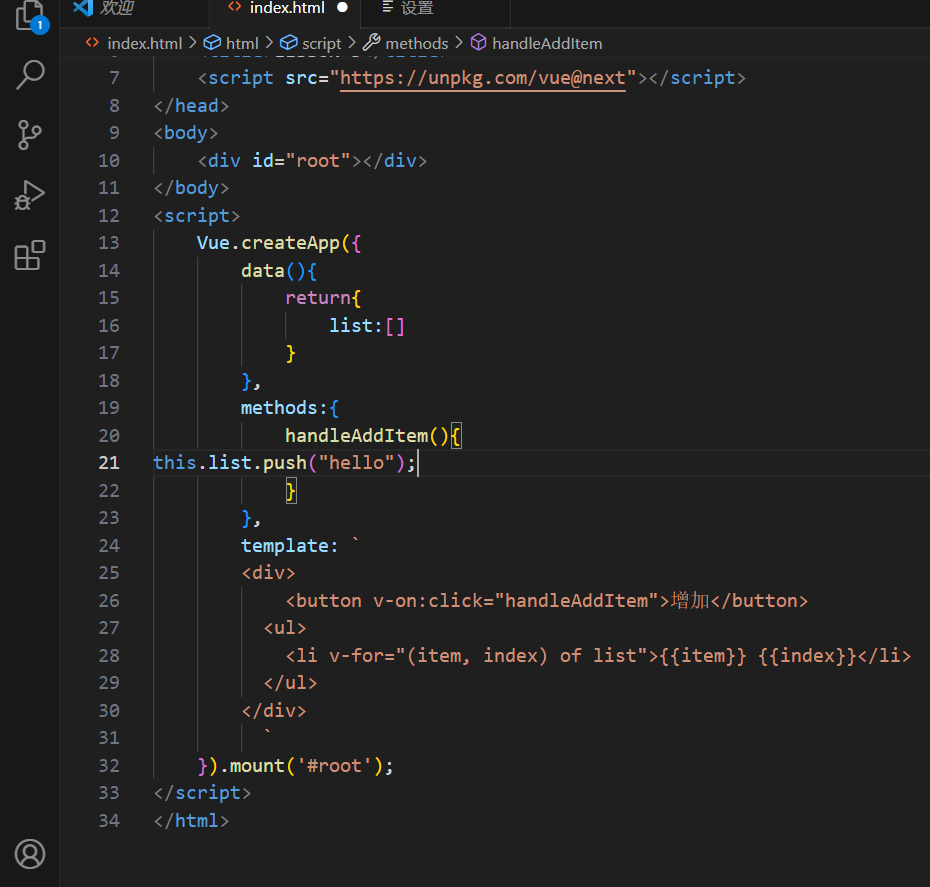
 Vue.createApp({
        data(){
            return{
                inputValue:'',                                     定义一个空值
                list:[]
            }
        },
        methods:{
            handleAddItem(){
this.list.push("hello");
            }
        },
        template: `
        <div>
            <input v-model="inputValue" />                          双向绑定,此处的inputvalue变化引起data里同名的变化
            <button v-on:click="handleAddItem">增加</button>
          <ul>
            <li v-for="(item, index) of list">{{item}} {{index}}</li>
          </ul>
        </div>
          `
    }).mount('#root');
组件概念——对todolist拆解
Vue.createApp({
        data(){
            return{
                inputValue:'',
                list:[]
            }
        },
        methods:{
            handleAddItem(){

            this.list.push(this.inputValue);
            this.inputValue = '';
            }
        },
        template: `
        <div>
            <input v-model="inputValue" />
            <button v-on:click="handleAddItem"
            v-on:click="handleAddItem"
            v-bind:title="inputValue"                                  bind指令:希望title属性和某数据绑定
            >
            增加</button>
          <ul>
            <li v-for="(item, index) of list">{{item}} {{index}}</li>
          </ul>
        </div>
          `
    }).mount('#root');
鼠标放在button上会展示输入框的内容: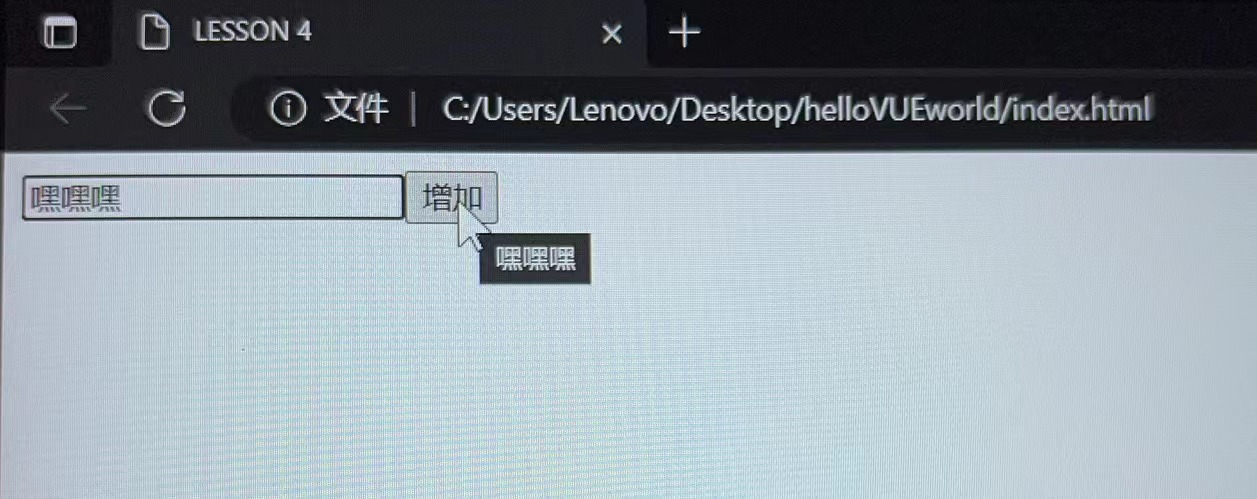
“前端要拆组件”,组件就是页面上的一部分,可以是input框,可以是button···
 const app = Vue.createApp({
        data(){
            return{
                inputValue:'',
                list:[]
            }
        },
        methods:{
            handleAddItem(){

            this.list.push(this.inputValue);
            this.inputValue = '';
            }
        },
        template: `
        <div>
            <input v-model="inputValue" />
            <button
            v-on:click="handleAddItem"
            v-bind:title="inputValue"
            >
            增加</button>
          <ul>
            <todo-item v-for="(item, index) of list"/>
                    </ul>
        </div>
          `
    });
    app.component('todo-item',
    {
        template:'<div>hello world</div>'
    }
    );
    app.mount('#root');
</script>
</html>


【推荐】国内首个AI IDE,深度理解中文开发场景,立即下载体验Trae
【推荐】编程新体验,更懂你的AI,立即体验豆包MarsCode编程助手
【推荐】抖音旗下AI助手豆包,你的智能百科全书,全免费不限次数
【推荐】轻量又高性能的 SSH 工具 IShell:AI 加持,快人一步
· TypeScript + Deepseek 打造卜卦网站:技术与玄学的结合
· Manus的开源复刻OpenManus初探
· AI 智能体引爆开源社区「GitHub 热点速览」
· C#/.NET/.NET Core技术前沿周刊 | 第 29 期(2025年3.1-3.9)
· 从HTTP原因短语缺失研究HTTP/2和HTTP/3的设计差异