Hook
## 钩子 函数
def module_hook(module: nn.Module, input: Tensor, output: Tensor):
# For nn.Module objects only.

def tensor_hook(grad: Tensor):
# For Tensor objects only.
# Only executed during the *backward* pass!

## 将 钩子 注册到 主体上
torch.tensor.register_hook(tensor_hook)                 # 主体是 tensor
torch.nn.Module.register_forward_hook(module_hook)      # 主题是 module
torch.nn.Module.register_forward_pre_hook(module_hook)  # 主题是 module
torch.nn.Module.register_backward_hook(module_hook)     # 主题是 module
钩子函数的 输入 输出 相对固定
torch.tensor.register_hook
PyTorch采用动态图的设计理念,在计算过程中,除叶子节点外,其他节点在计算完毕后会被释放,无法获取计算结果,此时可以用 hook 获取非叶子节点;
也可以用 hook 改变 叶子节点的值;
import torch
from torch import nn

hook_list = []
def tensor_hook(grad):
    hook_list.append(grad)

def tensor_hook2(grad):
    # 改变叶子节点梯度的值
    grad *= 1000000

x = torch.tensor([2.], requires_grad=True)
w = torch.tensor([1.], requires_grad=True)

a = torch.add(x, w)
b = w + 1
y = torch.mul(a, b)
print(y)        # tensor([6.], grad_fn=<MulBackward0>)
print(a.requires_grad, b.requires_grad, y.requires_grad)    # True True True

##### 不加hook,除了叶子节点,其他节点的梯度全部释放
# y.backward()
# print(x.grad, w.grad, a.grad, b.grad, y.grad)   # tensor([2.]) tensor([5.]) None None None

##### 加上hook,除了叶子节点,被加上hook的节点梯度被保存在我们指定的地方,list中
handle = a.register_hook(tensor_hook)
# handle2 = a.register_hook(tensor_hook2)
y.backward(retain_graph=True)
print(x.grad, w.grad, a.grad, b.grad, y.grad)   # tensor([2.]) tensor([5.]) None None None
print('hook_list: ', hook_list)                 # hook_list:  [tensor([2.])]

#### 删除hook
handle.remove()
print('hook_list: ', hook_list)
torch.nn.Module.register_forward_hook
示例,用 hook 获取最终的 feature map
import torch
import torchvision
import cv2 as cv
from torch import nn
import numpy as np
from PIL import Image

test_transforms = torchvision.transforms.Compose([
            torchvision.transforms.Resize(size=224),
            torchvision.transforms.CenterCrop(size=224),
            torchvision.transforms.ToTensor(),
            torchvision.transforms.Normalize(mean=(0.485, 0.456, 0.406),
                                             std=(0.229, 0.224, 0.225))
        ])

conv_hook_list = []


class MyModule(nn.Module):
    def __init__(self):
        super(MyModule, self).__init__()

        model = torchvision.models.vgg16(pretrained=True)
        print(list(model.named_children()))
        self.feature = model.features
        self.feature.register_forward_hook(self.conv_hook)  # 在moudle上注册 hook
        self.pool = model.avgpool
        self.classifier_middle = model.classifier[:-1]
        self.classifier_fc = model.classifier[-1]

    def conv_hook(self, module, input, output):
        conv_hook_list.append(output)

    def forward(self, x):
        feat = self.feature(x)
        print('feat.shape: ', feat.shape)
        x = self.pool(feat)
        x = x.view(1, -1)
        x = self.classifier_middle(x)
        y = self.classifier_fc(x)
        return y


model = MyModule()
model.eval()

img = Image.open('desk.png').convert('RGB')
x = test_transforms(img)
x = torch.unsqueeze(x, 0)
print('x.shape: ', x.shape)
y = model(x)

print('conv_hook_list[0].shape: ', conv_hook_list[0].shape)

features = conv_hook_list[0]
剩下的hook不太常用,可自行研究,大同小异
CAM
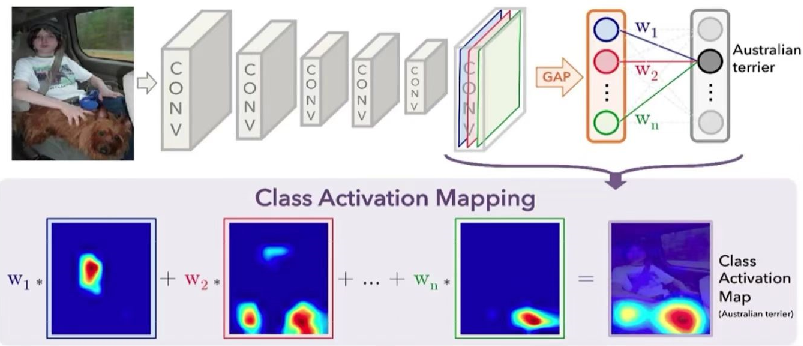
CAM的全称是Class Activation Mapping或Class Activation Map,即类激活映射或类激活图。
论文《Learning Deep Features for Discriminative Localization》发现了CNN分类模型的一个有趣的现象:
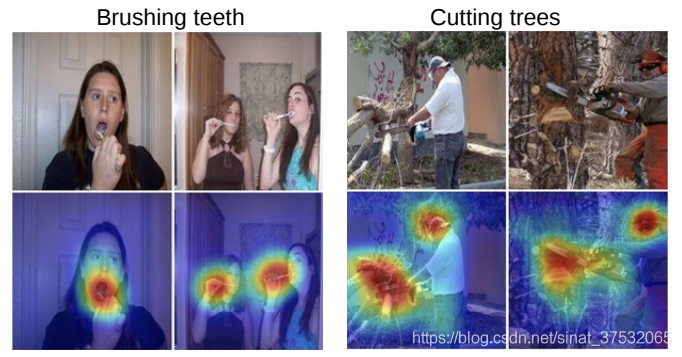
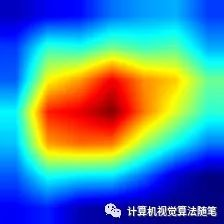
CNN的最后一层卷积输出的特征图,对其通道进行加权叠加后,其激活值(ReLU激活后的非零值)所在的区域,即为图像中的物体所在区域。
而将这一叠加后的单通道特征图覆盖到输入图像上,即可高亮图像中物体所在位置区域。
该文章作者将实现这一现象的方法命名为类激活映射,并将特征图叠加在原始输入图像上生成的新图片命名为类激活图。
Hook注册实现CAM
使用pytorch的hook注册, 取出网络某中间层feature map
(为啥用hook? 因为pytorch是动态图结构, 计算后的节点会被释放. 想要取出某中间结构, 需手动注册获取),
结合weighted_softmax, 点乘得到CAM(Class Activation Mapping)和heatmap.
以 resnet18 为例
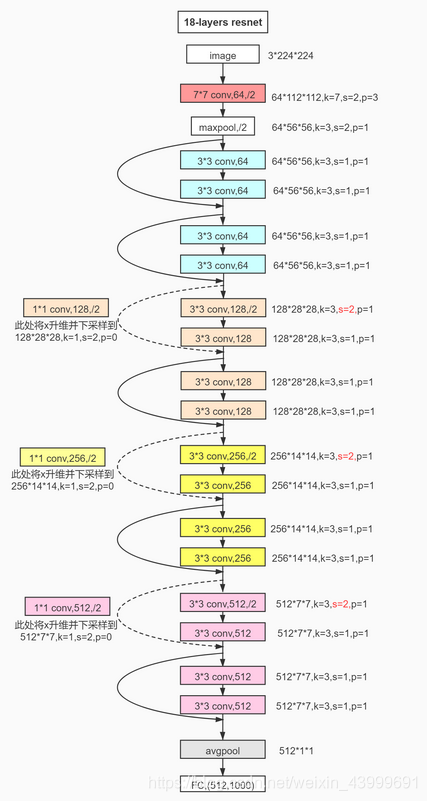
import numpy as np
import cv2
import torch
from PIL import Image
from torchvision import models, transforms
from torch.autograd import Variable
from torch.nn import functional as F


def hook_feature(module, input, output):  # hook注册, 响应图提取
    print("hook input", input[0].shape)
    features_blobs.append(output.data.cpu().numpy())

def returnCAM(feature_conv, weight_softmax, class_idx, size_upsample):
    # 生成CAM图: 输入是feature_conv和weight_softmax
    bz, nc, h, w = feature_conv.shape
    # feature_conv和weight_softmax 点乘(.dot)得到cam
    print(weight_softmax[class_idx].shape, feature_conv.reshape((nc, h * w)).shape)   # (512,) (512, 49)
    cam = weight_softmax[class_idx].dot(feature_conv.reshape((nc, h * w)))
    cam = cam.reshape(h, w)
    cam = cam - np.min(cam)
    cam_img = cam / np.max(cam)
    cam_img = np.uint8(255 * cam_img)
    output_cam = cv2.resize(cam_img, size_upsample)
    return output_cam


if __name__ == '__main__':
    size_upsample = (224, 224)
    # 1. imput image process
    normalize = transforms.Normalize(
        mean=[0.485, 0.456, 0.406],
        std=[0.229, 0.224, 0.225])
    preprocess = transforms.Compose([
        transforms.Resize(size_upsample),
        transforms.ToTensor(),
        normalize])
    img_name = 'car.png'
    img_pil = Image.open(img_name).convert('RGB')
    img = cv2.imread(img_name)
    img_tensor = preprocess(img_pil)
    img_variable = Variable(img_tensor.unsqueeze(0))

    # 2. 导入res18 pretrain, 也可自行定义net结构然后导入.pth
    net = models.resnet18(pretrained=True)
    # net = models.resnet18(pretrained=False)
    # net.load_state_dict(torch.load('./resnet18-f37072fd.pth'), strict=True)
    net.eval()
    # print(net)

    # 3. 获取特定层的feature map
    # 3.1. hook the feature extractor
    features_blobs = []
    finalconv_name = 'layer4'   # 最后一个卷积模块
    # 对layer4层注册, 把layer4层的输出加入features
    net._modules.get(finalconv_name).register_forward_hook(hook_feature)
    print(net._modules)

    # 3.2. 得到weight_softmax
    params = list(net.parameters())  # 将参数变换为列表 按照weights bias 排列 池化无参数
    print(params)
    weight_softmax = np.squeeze(params[-2].data.numpy())  # 提取softmax 层的参数 (weights,-1是bias)
    print('weight_softmax.shape', weight_softmax.shape)     # (1000, 512)

    # 4. imput img inference
    logit = net(img_variable)
    h_x = F.softmax(logit, dim=1).data.squeeze()
    probs, idx = h_x.sort(0, True)
    probs = probs.numpy()
    idx = idx.numpy()
    print(idx.shape)        # (1000,)

    # features_blobs[0], weight_softmax点乘得到CAM
    # CAMs = returnCAM(features_blobs[0], weight_softmax, [idx[2], idx[3]], size_upsample)
    CAMs = returnCAM(features_blobs[0], weight_softmax, idx[0], size_upsample)
    # CAMs = returnCAM(features_blobs[0], weight_softmax, [idx[-2], idx[-1]], size_upsample)

    # 将图片和CAM拼接在一起展示定位结果结果
    img = cv2.resize(img, size_upsample)
    height, width, _ = img.shape
    # 生成热度图
    heatmap = cv2.applyColorMap(cv2.resize(CAMs, (width, height)), cv2.COLORMAP_JET)
    cv2.imwrite('./heatmap.jpg', heatmap)
    result = heatmap * 0.3 + img * 0.5
    cv2.imwrite('./CAM.jpg', result)
CAM的缺点
注意,上面的代码我用 resnet18 举例,那其他模型是否可以呢,很遗憾,不行;
因为 CAM 需要在 feature map 后 接 global avg pooling,然后接1层全连接,否则就不太好计算CAM了
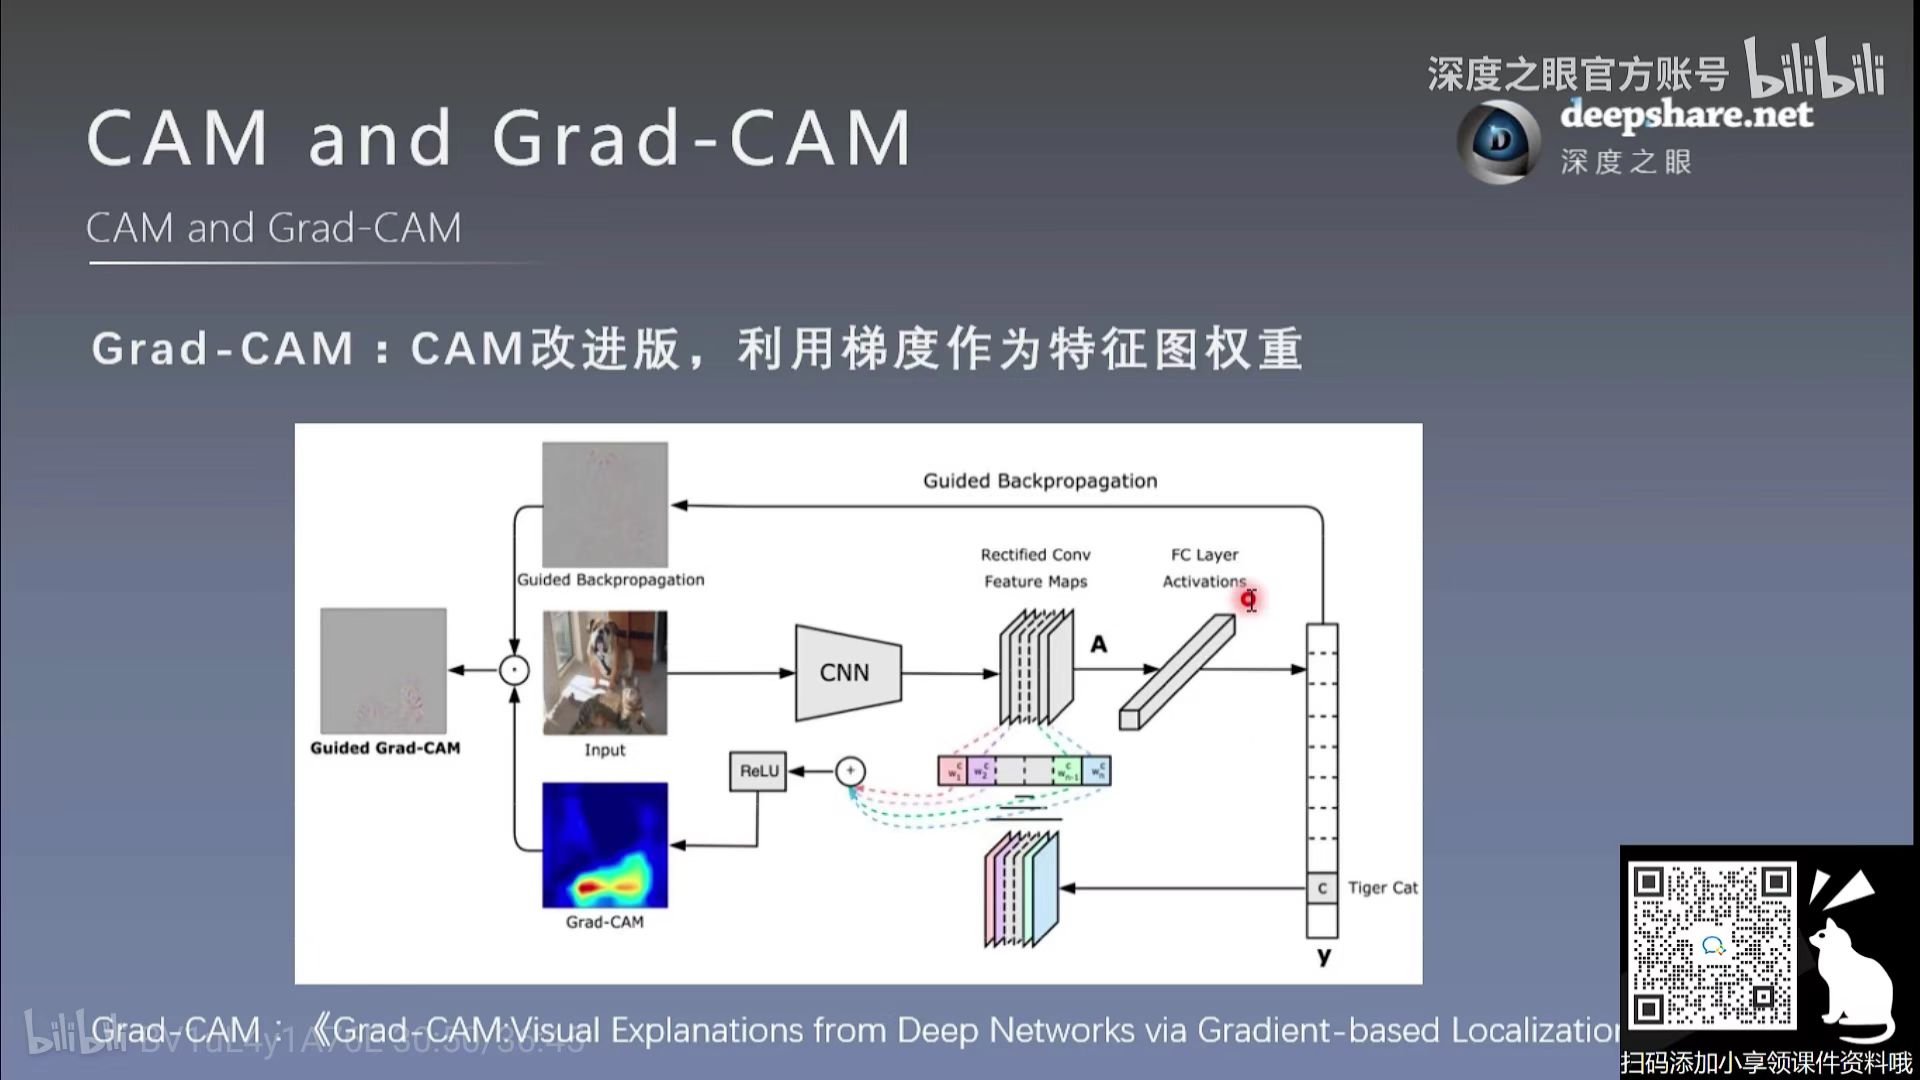
Grad-CAM
解决了CAM的缺点
CAM分析
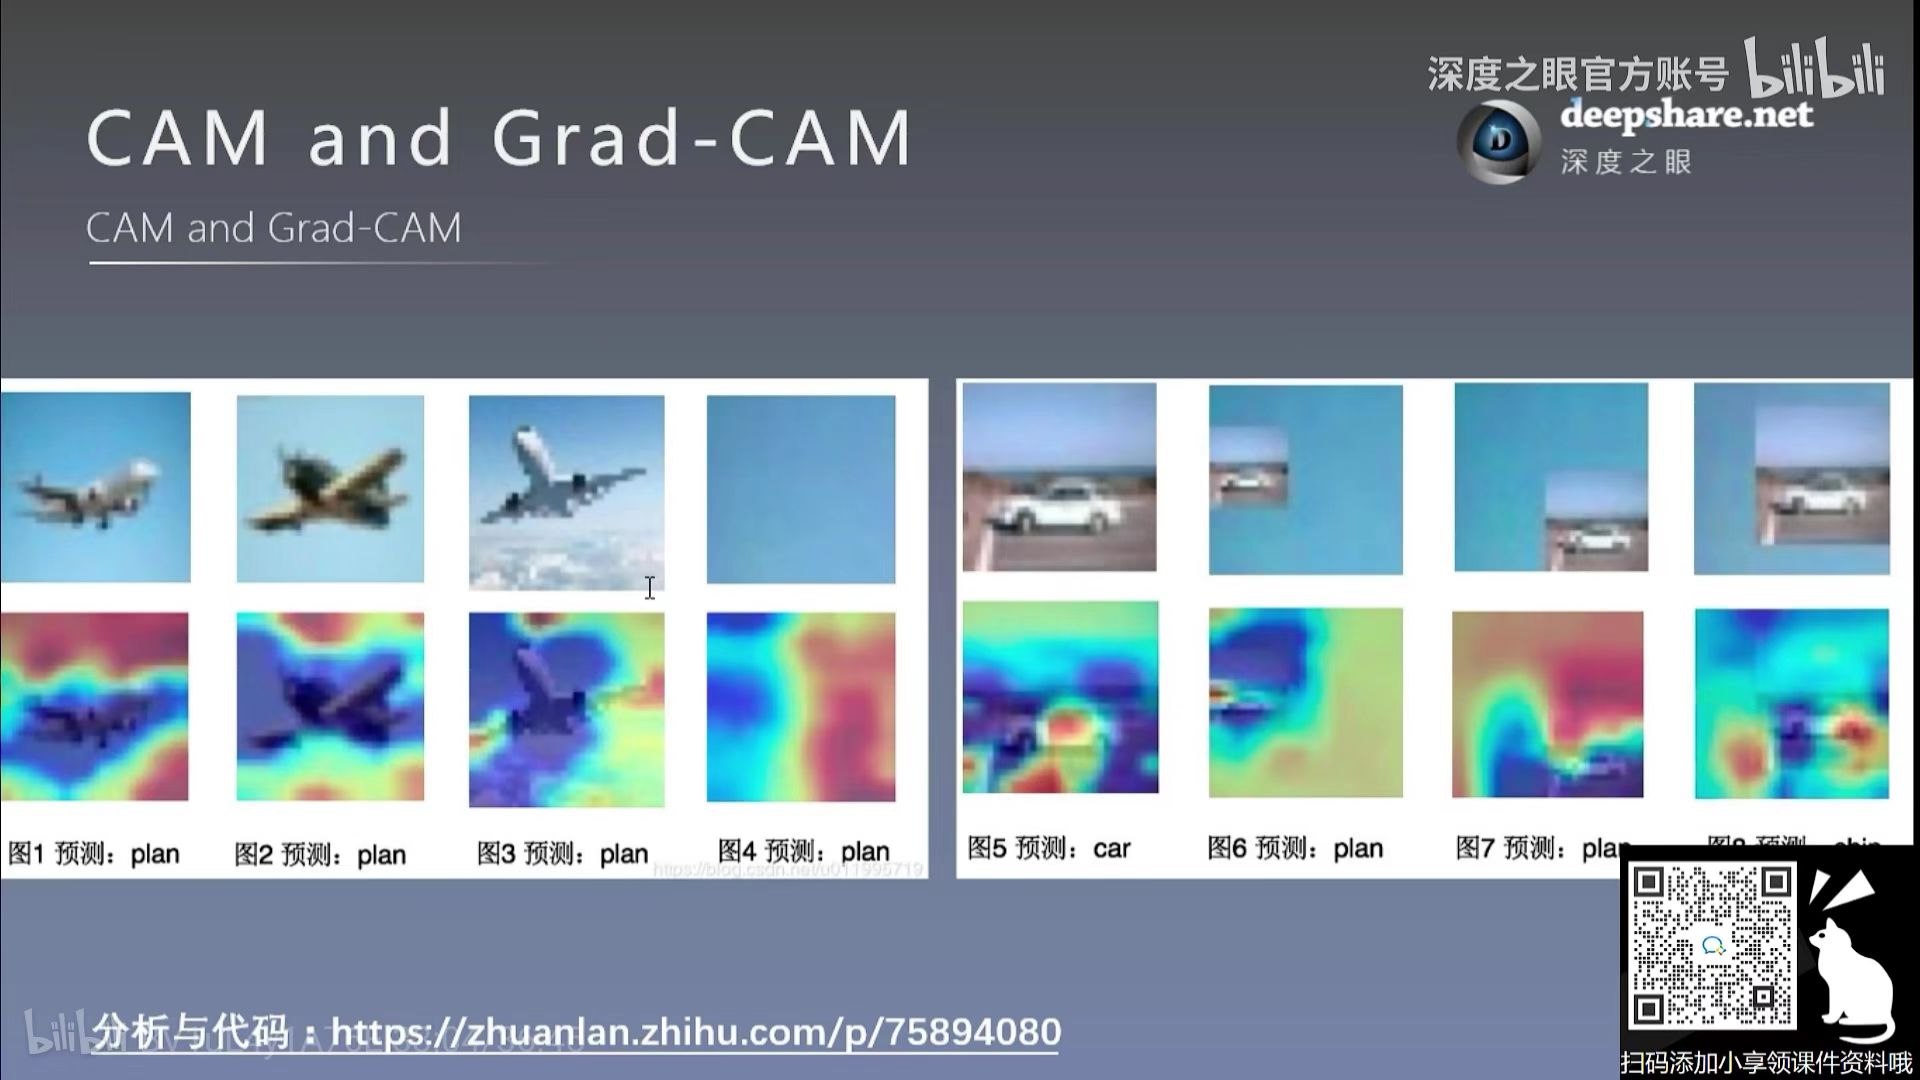
通过CAM分析,我们发现一些有意思的东西,比如 模型在识别飞机时,并没有关注 飞机本身,二是关注到了蓝天,因为飞机常常与天空是一起的
参考资料:
https://mp.weixin.qq.com/s/3mz7RyfBdOmY8WyZtr739w pytorch-hook注册: 生成feature map可视化热力图
https://www.jianshu.com/p/fd2f09dc3cc9 CAM系列(一)之CAM(原理讲解和PyTorch代码实现)
https://zhuanlan.zhihu.com/p/267800207 PyTorch中Hook的简单使用
https://zhuanlan.zhihu.com/p/339718510 Python函数进阶: Hook 钩子函数
https://www.jianshu.com/p/69e57e3526b3 PyTorch之HOOK——获取神经网络特征和梯度的有效工具


 浙公网安备 33010602011771号