相似变换
相似变换:等距变换+均匀尺度缩放;
等距变换:平移+旋转,所谓平移旋转其实就是 wx+b,w 和 b 组成变换矩阵
在等距变换中,角度、平行性、垂直性 不发生变换
SimilarityTransform 用法
这是一个类
class SimilarityTransform(EuclideanTransform):
    def __init__(self, matrix=None, scale=None, rotation=None,
                 translation=None):
参数解释:
matrix:可选,(3,3)齐次变换矩阵,即 相似变换矩阵
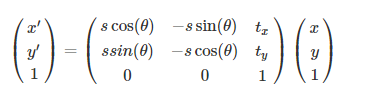
    Has the following form::

        X = a0 * x - b0 * y + a1 =
          = s * x * cos(rotation) - s * y * sin(rotation) + a1
        Y = b0 * x + a0 * y + b1 =
          = s * x * sin(rotation) + s * y * cos(rotation) + b1

    where ``s`` is a scale factor and the homogeneous transformation matrix is::
        [[a0  b0  a1]
         [b0  a0  b1]
         [0   0    1]]
scale:缩放因子
rotation:旋转角度,逆时针,以弧度表示角度
translation: 平移参数(tx, ty)
相关方法
    def estimate(self, src, dst):
        """
        Parameters
        ----------
        src : (N, 2) array
            Source coordinates.
        dst : (N, 2) array
            Destination coordinates.

        Returns
        -------
        success : bool
            True, if model estimation succeeds.
        """
从一组对应点(源点、目标点)估计变换矩阵
示例代码1
from skimage import transform as trans
import numpy as np
src = np.array([
    [38.2946, 51.6963],
    [73.5318, 51.5014],
    [56.0252, 71.7366],
    [41.5493, 92.3655],
    [70.7299, 92.2041] ], dtype=np.float32)
dst = np.array([
    [38.2946, 51.6963],
    [73.5318, 51.5014],
    [56.0252, 71.7366],
    [41.5493, 92.3655],
    [70.7299, 92.2041] ], dtype=np.float32)
tform = trans.SimilarityTransform()
res =tform.estimate(dst, src)
M = tform.params
print(res)
print(M)
获取变换矩阵用 params
[[ 1.00000004e+00  0.00000000e+00 -2.47753889e-06]
 [ 0.00000000e+00  1.00000004e+00 -3.17953211e-06]
 [ 0.00000000e+00  0.00000000e+00  1.00000000e+00]]
示例代码2
from skimage import io,data
from skimage import transform as tf
import matplotlib.pylab as plt

### 原图
img = data.camera()
io.imshow(img)
plt.show()

### 相似变换
tform = tf.SimilarityTransform(scale=1.5,rotation=np.deg2rad(10),translation=(10,12))
img1 = tf.warp(img,tform)
io.imshow(img1)
plt.show()

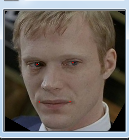
人脸对齐
在人脸识别时,有时候 检测到的人脸是 倾斜的,此时需要把脸扶正,这就叫人脸对齐;
人脸对齐有很多方法,相似变换只是最简单的一种;
大体思路
人脸检测时会识别到 人脸关键点,这是 相似变换的源点;
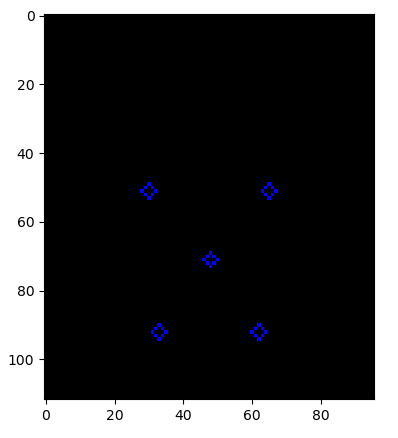
假设我们最后要截取一张(112,96)大小的正脸,那么人脸的五个关键点分别在什么位置才算是正脸呢?所以我们需要五个参考点,作为 目标点;
根据 N 组 源点、目标点得到变换矩阵;
把整张脸 乘以 变换矩阵 得到 变换后的 正脸;
import numpy as np
import cv2
import matplotlib.pylab as plt
from skimage import transform

################### 人脸关键点标注 ###################
landmark = np.array([[153, 244, 215, 214, 292, 252, 196, 292, 346, 300]])
landmark = np.reshape(landmark, (2, 5)).T
print(landmark)

img = cv2.imread('wt.jpg')
for point in landmark:
    cv2.circle(img, tuple(point), 2, (0, 0, 255))

cv2.imshow('img', img)
cv2.waitKey(10000)

################### 标准脸的关键点 ###################
REFERENCE_FACIAL_POINTS = np.array([
    [30.29459953,  51.69630051],
    [65.53179932,  51.50139999],
    [48.02519989,  71.73660278],
    [33.54930115,  92.3655014],
    [62.72990036,  92.20410156]
], np.float32)

# Lets create a empty image|
empty_img = np.zeros((112,96,3), np.uint8)

for point in REFERENCE_FACIAL_POINTS:
    cv2.circle(empty_img, tuple(point), 2, (0, 0, 255))

plt.figure(figsize=(5, 5))
plt.imshow(empty_img)
plt.show()

################### 把人脸1和标准脸对齐 ###################
#### 变换矩阵
trans = transform.SimilarityTransform()
res = trans.estimate(landmark, REFERENCE_FACIAL_POINTS)
M = trans.params
print(res)          # True
print(M)        # 变换矩阵
# [[  0.29581306  -0.16732268  28.26420688]
#  [  0.16732268   0.29581306 -47.51195016]
#  [  0.           0.           1.        ]]

#### 人脸对齐
print(M[:2, :])
new_img = cv2.warpAffine(img, M[:2, :], dsize=(120, 120))
cv2.imshow('new_img', new_img)
cv2.waitKey(1000000)

最后一张就是 对齐后 的人脸
参考资料:
https://blog.csdn.net/C_chuxin/article/details/100546657 skimage库的transform.SimilarityTransform()用法
https://www.jianshu.com/p/57c440af5760 人脸对齐
https://zhuanlan.zhihu.com/p/61343643 从零开始搭建人脸识别系统(二):人脸对齐


 浙公网安备 33010602011771号