虚拟环境
虚拟环境就是创建一个 隔离 的 python 环境,在这个环境里可以安装 python 所需的各种包,并使得这些包与 系统里的 python 不相干;
常用于版本管理;
手动创建 Virtualenv 环境
本文以 linux 系统为例,windows 大同小异,掌握精髓
首先,安装 virtualenv
pip install virtualenv
安装完成后,virtualenv 出现在 python 的 bin 目录下

你可以建立 软连接 链接到 /usr/bin 下,也可以每次使用都切到 /usr/lib/python27/bin 下
注意:virtualenv 的使用不受 pip 版本 制约
创建虚拟环境
先看看 virtualenv 的参数
[root@hadoop10 python27]# bin/virtualenv --help
Usage: virtualenv [OPTIONS] DEST_DIR

Options:
  --version             show program's version number and exit
  -h, --help            show this help message and exit
  -v, --verbose         Increase verbosity.
  -q, --quiet           Decrease verbosity.
  -p PYTHON_EXE, --python=PYTHON_EXE
                        The Python interpreter to use, e.g.,
                        --python=python3.5 will use the python3.5 interpreter
                        to create the new environment.  The default is the
                        interpreter that virtualenv was installed with
                        (/usr/bin/python)
  --clear               Clear out the non-root install and start from scratch.
  --no-site-packages    DEPRECATED. Retained only for backward compatibility.
                        Not having access to global site-packages is now the
                        default behavior.
  --system-site-packages
                        Give the virtual environment access to the global
                        site-packages.
  --always-copy         Always copy files rather than symlinking.
  --relocatable         Make an EXISTING virtualenv environment relocatable.
                        This fixes up scripts and makes all .pth files
                        relative.
  --no-setuptools       Do not install setuptools in the new virtualenv.
  --no-pip              Do not install pip in the new virtualenv.
  --no-wheel            Do not install wheel in the new virtualenv.
  --extra-search-dir=DIR
                        Directory to look for setuptools/pip distributions in.
                        This option can be used multiple times.
  --download            Download pre-installed packages from PyPI.
  --no-download, --never-download
                        Do not download pre-installed packages from PyPI.
  --prompt=PROMPT       Provides an alternative prompt prefix for this
                        environment.
  --setuptools          DEPRECATED. Retained only for backward compatibility.
                        This option has no effect.
  --distribute          DEPRECATED. Retained only for backward compatibility.
                        This option has no effect.
  --unzip-setuptools    DEPRECATED.  Retained only for backward compatibility.
                        This option has no effect.
用 virtualenv 命令创建虚拟环境,在 命令后 直接加 虚拟环境的名字 即可
bin/virtualenv pyspark-env
在当前路径创建虚拟环境,并且虚拟环境会自动安装 pip 之类的库

virtualenv -p /usr/bin/python27 venv
注意:在创建环境时 可指定 python 版本
激活虚拟环境
虚拟环境需要先激活才能使用
[root@hadoop10 python27]# source pyspark-env/bin/activate
(pyspark-env) [root@hadoop10 python27]#
(pyspark-env) [root@hadoop10 python27]#
可以看到进入虚拟环境了,(pyspark-env),后面的命令都在 虚拟环境 中执行了;
也就是说你后续的所有操作都在 虚拟环境 中了,跟 系统的 python 隔绝了,随便折腾吧;
如你可以用 pip 安装包,各种操作与常规操作无异;
注意
虽然在创建 虚拟环境 的时候不包含任何 系统 py 的包,但是在 虚拟环境内 pip 安装包的时候,总是提示已经有了,且是 系统 py 内已经有了,无法安装,此时可如下操作强行安装
(pyspark-ml-env) [root@hadoop10 pyspark-ml-env]# pip install --ignore-installed numpy
关闭虚拟环境
折腾够了,就关了吧
(pyspark-env) [root@hadoop10 python27]# deactivate
[root@hadoop10 python27]#
在虚拟环境中直接运行 deactivate ,就退出来了
删除虚拟环境
用完就删了吧,免得后面乱套了
rm -rf pyspark-env
PyCharm 创建 Virtualenv 环境
首先,思考一下 环境 和 项目的关系,我们日常开发需要创建 一个环境,再创建N个项目,让项目在该环境上运行,代码才能跑起来
环境管理
show all 可以 展示 所有 已经 创建的 环境

所有 环境 列表,可以 增加、删除、编辑 等

不同项目下 创建的环境 都在这里
环境创建
方式一:
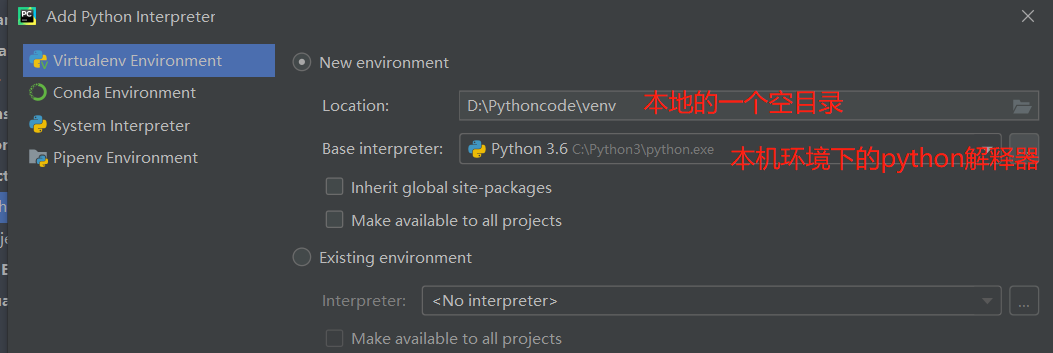
通过上述 环境管理 的 添加 按钮 创建环境
方式二:
其实和方式一相同,只是 入口不同


注意,这个 base interpreter 最好是 设置了环境变量的 python 解释器
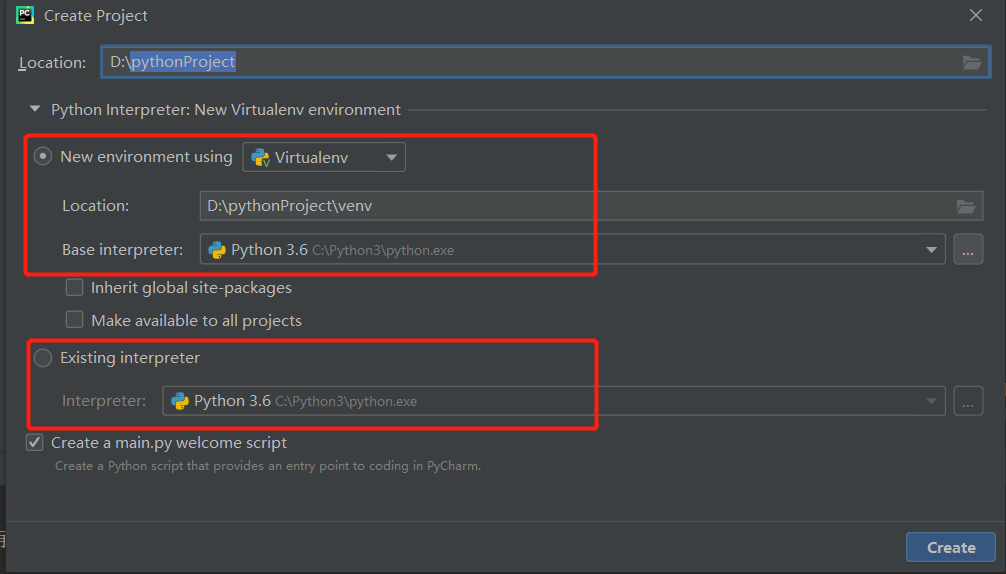
方式三:直接创建项目,同时 创建环境,也可以在此时 绑定 已经存在的环境


环境 与 项目 绑定
方式一:在项目下打开 环境管理,选择一个环境,即可将 该环境 与项目绑定
方式二:在 创建项目时,选择一个环境
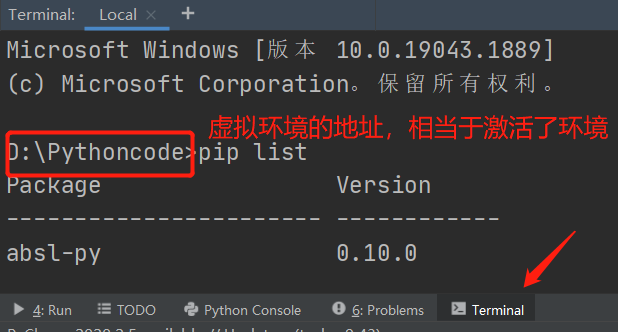
环境使用
下图只是一种方式,还有其他方式方法,用法很灵活,此处不做赘述

还不懂 上 b站 搜 pycharm创建虚拟环境 佛系|少年 试试
还有一个工具 virtualenvwrapper,更强大,可以自己了解下
参考资料:
https://www.cnblogs.com/technologylife/p/6635631.html
https://www.jianshu.com/p/b8638271017d win 和 linux
https://www.liaoxuefeng.com/wiki/1016959663602400/1019273143120480 廖雪峰
https://virtualenv.pypa.io/en/latest/userguide/#making-environments-relocatable 官网
https://www.cnblogs.com/283383765pw/p/10669572.html Windows下Python的虚拟环境


【推荐】国内首个AI IDE,深度理解中文开发场景,立即下载体验Trae
【推荐】编程新体验,更懂你的AI,立即体验豆包MarsCode编程助手
【推荐】抖音旗下AI助手豆包,你的智能百科全书,全免费不限次数
【推荐】轻量又高性能的 SSH 工具 IShell:AI 加持,快人一步
· 记一次.NET内存居高不下排查解决与启示
· 探究高空视频全景AR技术的实现原理
· 理解Rust引用及其生命周期标识(上)
· 浏览器原生「磁吸」效果!Anchor Positioning 锚点定位神器解析
· 没有源码,如何修改代码逻辑?
· 全程不用写代码,我用AI程序员写了一个飞机大战
· DeepSeek 开源周回顾「GitHub 热点速览」
· 记一次.NET内存居高不下排查解决与启示
· MongoDB 8.0这个新功能碉堡了,比商业数据库还牛
· .NET10 - 预览版1新功能体验(一)