SpringMVC集成Thymeleaf
一、项目配置
以前在SpringBoot中使用过Thymeleaf,感觉非常好用,可是现在准备做一个ssm的项目,里面需要集成一个前端模版引擎。为什么选择Thymeleaf,他有以下好处
- Thymeleaf 在有网络和无网络的环境下皆可运行,即它可以让美工在浏览器查看页面的静态效果,也可以让程序员在服务器查看带数据的动态页面效果。这是由于它支持 html 原型,然后在 html 标签里增加额外的属性来达到模板+数据的展示方式。浏览器解释 html 时会忽略未定义的标签属性,所以 thymeleaf 的模板可以静态地运行;当有数据返回到页面时,Thymeleaf 标签会动态地替换掉静态内容,使页面动态显示。
- Thymeleaf 开箱即用的特性。它提供标准和spring标准两种方言,可以直接套用模板实现JSTL、 OGNL表达式效果,避免每天套模板、该jstl、改标签的困扰。同时开发人员也可以扩展和创建自定义的方言。
- Thymeleaf 提供spring标准方言和一个与 SpringMVC 完美集成的可选模块,可以快速的实现表单绑定、属性编辑器、国际化等功能。
1、项目结构
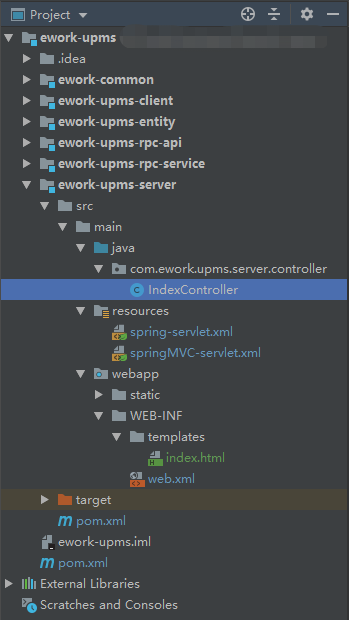
2、父pom.xml
<properties>
        <spring.version>4.3.20.RELEASE</spring.version>
        <thymeleaf.version>3.0.6.RELEASE</thymeleaf.version>
    </properties>

    <!-- 依赖声明 -->
    <dependencyManagement>
        <dependencies>

            <!-- SpringMVC 依赖配置-->
            <dependency>
                <groupId>org.springframework</groupId>
                <artifactId>spring-webmvc</artifactId>
                <version>${spring.version}</version>
            </dependency>
            <!-- SpringMVC 依赖配置-->

            <!-- Thymeleaf 依赖配置-->
            <dependency>
                <groupId>org.thymeleaf</groupId>
                <artifactId>thymeleaf-spring4</artifactId>
                <version>${thymeleaf.version}</version>
            </dependency>
            <!-- Thymeleaf 依赖配置-->
        </dependencies>
    </dependencyManagement>
3、pom.xml
    <dependencies>

        <!-- junit -->
        <dependency>
            <groupId>junit</groupId>
            <artifactId>junit</artifactId>
            <version>4.11</version>
            <scope>test</scope>
        </dependency>
        <!-- junit -->

        <!-- SpringMVC 依赖配置-->
        <dependency>
            <groupId>org.springframework</groupId>
            <artifactId>spring-webmvc</artifactId>
        </dependency>
        <!-- SpringMVC 依赖配置-->

        <!-- Thymeleaf 依赖配置-->
        <dependency>
            <groupId>org.thymeleaf</groupId>
            <artifactId>thymeleaf-spring4</artifactId>
        </dependency>
        <!-- Thymeleaf 依赖配置-->

    </dependencies>
4、web.xml
<!DOCTYPE web-app PUBLIC
        "-//Sun Microsystems, Inc.//DTD Web Application 2.3//EN"
        "http://java.sun.com/dtd/web-app_2_3.dtd" >
<web-app xmlns="http://java.sun.com/xml/ns/javaee"
         xmlns:xsi="http://www.w3.org/2001/XMLSchema-instance"
         xsi:schemaLocation="http://java.sun.com/xml/ns/javaee http://java.sun.com/xml/ns/javaee/web-app_3_0.xsd"
         version="3.0">
    <display-name>upms-server</display-name>

    <!-- Spring的配置-->
    <context-param>
        <param-name>contextConfigLocation</param-name>
        <param-value>classpath*:spring-servlet.xml</param-value>
    </context-param>
    <listener>
        <listener-class>org.springframework.web.context.ContextLoaderListener</listener-class>
    </listener>

    <!-- springMVC的核心控制器 -->
    <servlet>
        <servlet-name>springMVC</servlet-name>
        <servlet-class>org.springframework.web.servlet.DispatcherServlet</servlet-class>
        <init-param>
            <param-name>contextConfigLocation</param-name>
            <param-value>classpath*:springMVC-servlet.xml</param-value>
        </init-param>
        <load-on-startup>1</load-on-startup>
    </servlet>
    <servlet-mapping>
        <servlet-name>springMVC</servlet-name>
        <url-pattern>/</url-pattern>
    </servlet-mapping>

</web-app>
二、Controller控制器及jsp页面
1、index.html
<html  xmlns:th="http://www.thymeleaf.org" >
<head>
    <meta charset="UTF-8" />
    <script type="text/javascript" src="static/js/jquery.min.js" th:src="@{/static/js/jquery.min.js}" ></script>
    <title>index</title>
    <script th:inline="javascript"> var ctx = [[@{/}]]; </script>
</head>
<body>
    我是Index页
    <a th:href= "@{/hello}"> hello</a>
</body>
</html>
记住不要忘记jquery哦!
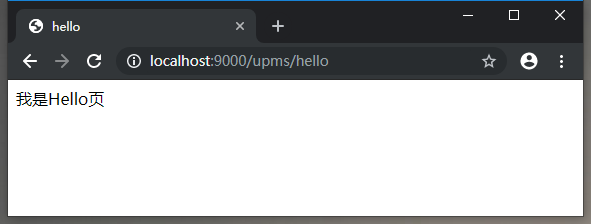
2、hello.html
<html  xmlns:th="http://www.thymeleaf.org" >
<head>
    <meta charset="UTF-8" />
    <script type="text/javascript" src="static/js/jquery.min.js" th:src="@{/static/js/jquery.min.js}" ></script>
    <title>hello</title>
</head>
<body>

    我是Hello页

</body>
</html>
三、运行效果图
1、index页面

2、hello页面
这样SpringMVC + Thymeleaf就集成成功了!