

|NO.Z.00378|——————————|CloudNative|——|KuberNetes&CI/CD.V16|——|Jenkins.v04|图形化创建Jenkinsfile.v01|
一、图形化创建pipeline:Jenkinsfile
### --- 使用Blue Ocean生成pipeline:Jenkinsfile
~~~ # 创建一个流水线项目,使用pipeline创建流水线模板
~~~ 不支持写kubernetes模板,需要把编译的容器的模板加进去
~~~ Environment:添加环境变量
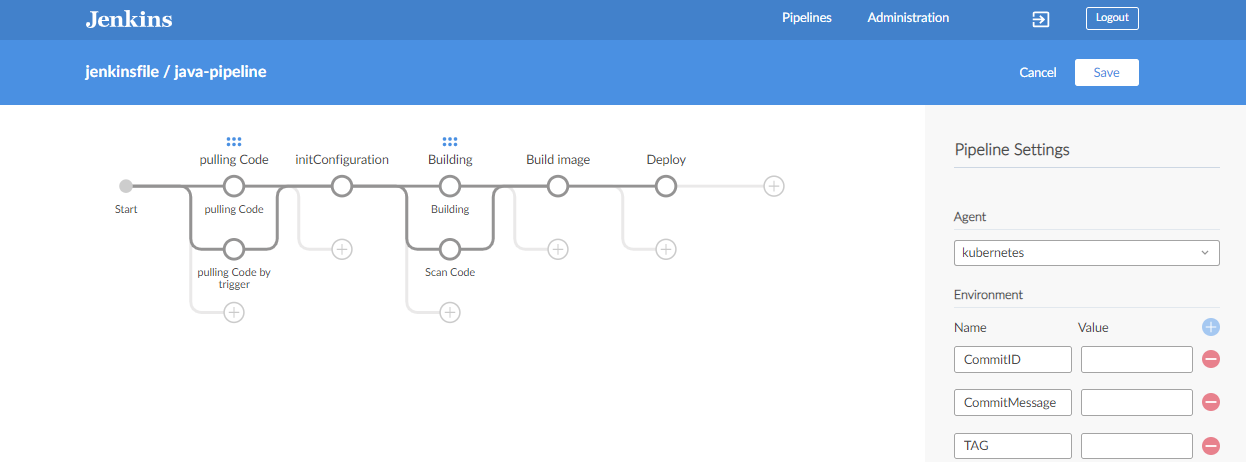
~~~ 进入jenkins——>Dashboard——>jenkinsfile——>master——>Open Blue Ocean——>Edit——>
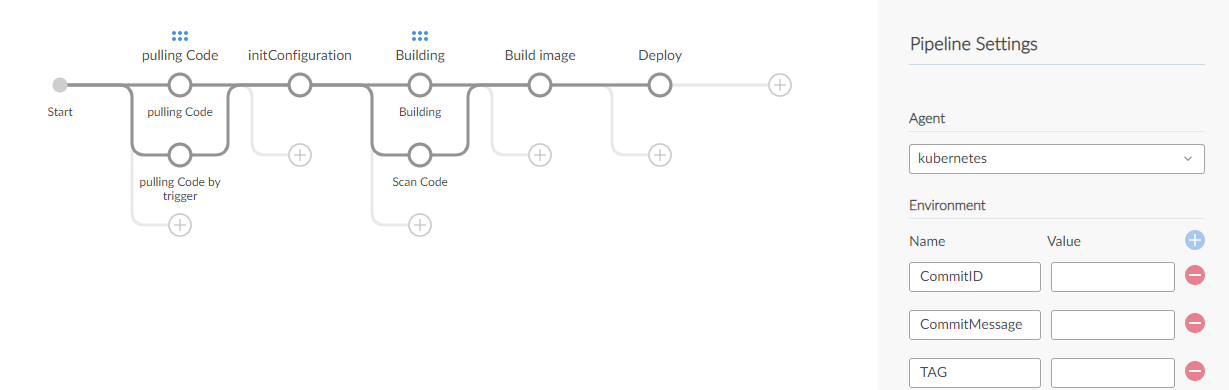
~~~ ——>Pipeline Settings——>Agents:kubernetes
~~~ ——>添加环境变量:Environment:
~~~ ——>CommitID
~~~ ——>CommitMessage
~~~ ——>TAG二、流水线的执行结构
三、图形化构建Jenkinsfile流程——添加步骤:
### --- 步骤一:获取代码仓库的项目,自动触发构建

~~~     # git地址:使用变量获取
~~~     # Credentialsld凭证ID:7a1ce79d-acbe-443c-b500-0971c05b9cdf:gitlab key凭证ID
~~~     步骤一:加号+——>Name your stage:pulling Code——>Add step:Git
~~~     ——>Url:"${REPO_URL}"——>Branch:"${BRANCH}"——>取消对勾:Changelog
~~~     ——>Credentialsld:7a1ce79d-acbe-443c-b500-0971c05b9cdf——>返回键——>
### --- 步骤二:手动触发Jenkins进行构建——>和步骤一平级
~~~ # 步骤二:
~~~ 加号+——>Name your stage:pulling Code by trigger ——>Add step:Git
~~~ ——>Url:"${REPO_URL}"——>Branch:${env.gitlabBranch}——>取消对勾:Changelog
~~~ ——>Credentialsld:7a1ce79d-acbe-443c-b500-0971c05b9cdf——>返回键——>### --- 步骤三:生成的镜像就是唯一的标签
~~~ # 步骤三:
~~~ 加号+——>Name your stage:initConfiguration
~~~ ——>Add step:Run arbitrary Pipeline script——>返回键——>
~~~ CommitID = sh(returnStdout: true, script: "git log -n 1 --pretty=format:'%h'").trim()
~~~ CommitMessage = sh(returnStdout: true, script: "git log -1 --pretty=format:'%h : %an %s'").trim()
~~~ def curDate = sh(script: "date '+%Y%m%d-%H%M%S'", returnStdout: true).trim()
~~~ TAG = curDate[0..14] + "-" + CommitID + "-" + BRANCH~~~ # 注:
~~~ ——>println "初始化一些配置变量"
~~~ ——>CommitMessage = sh(returnstdout: true, script: "git log -1 --pretty=format:'%h : %an %s' ").trim()
~~~ # 注:把日志打印出来
~~~ ——>CommitID = sh(returnstdout: true, script: "git log -1 --pretty=format:'%h' ").trim() ~~~ # 注:获取哈希值
~~~ ——>def curDate = sh(returnstdout: true, script: "date '+%Y%m%d-%H%M%S' ").trim()
~~~ # 注:获取时间生成标签
~~~ # 注:init获取到git项目的一些信息,比如提交人是谁,根据提交人,时间生成一个tag
~~~ # 注:Run arbitrary Pipeline script:触发了一个shell命令,是一个全局的信息
~~~ ——>TAG = curDate[0..14] + '-" + CommitID + "-" + BRANCH### --- 步骤四:代码编译构建
~~~ # 步骤四:加号+——>Name your stage:Building——>
~~~ ——>Add step:Shell Script——>
~~~ """
~~~ echo "Building Project..."
~~~ ${BUILD_COMMAND}
~~~ """
~~~ ——>Add step:Run build steps in a container——>Name:build——>Shell:空——>返回键——>### --- 步骤五:代码扫描
~~~ # 部署五:
~~~ 并行:加号+——>Name your stage:Scan Code——>Add step:Shell Script——>返回键——>
~~~ echo "Scan Code"### --- 步骤六:根据dockerfile生成镜像
~~~ # 步骤六:
~~~ 加号+——>Name your stage:Build image
~~~ ——>Add step:Bind credentials to variables
~~~ Bindings*
~~~ This property type is not supported
~~~ ——>Add step:Run build steps in a container——>Name:docker——>Shell:空
~~~ ——>Add step:Shell Script
~~~ """
~~~ docker build -t ${HARBOR_ADDRESS}/${REGISTRY_DIR}/${IMAGE_NAME}:${TAG} .
~~~ docker login -u ${Username} -p ${Password} ${HARBOR_ADDRESS}
~~~ docker push ${HARBOR_ADDRESS}/${REGISTRY_DIR}/${IMAGE_NAME}:${TAG}
~~~ """
~~~ ——>返回键——>### --- 步骤七:部署流水线
~~~ 步骤七:加号+——>Name your stage:Deploy
~~~ ——>Add step:Run build steps in a container——>Name:kubectl——>Shell:空
~~~ ——>Add step:Shell Script——>
~~~ """
~~~ cat ${KUBECONFIG_PATH} > /tmp/1.yaml
~~~ /usr/local/bin/kubectl config use-context ${CLUSTER} --kubeconfig=/tmp/1.yaml
~~~ export KUBECONFIG=/tmp/1.yaml
~~~ /usr/local/bin/kubectl set image ${DEPLOY_TYPE} -l ${DEPLOY_LABEL} ${CONTAINER_NAME}=${HARBOR_ADDRESS}/${REGISTRY_DIR}/${IMAGE_NAME}:${TAG} -n ${NAMESPACE}
~~~ """
~~~ ——>返回键——>四、相关代码模板
### --- initConfiguration / Run arbitrary Pipeline script

CommitID = sh(returnStdout: true, script: "git log -n 1 --pretty=format:'%h'").trim()
          CommitMessage = sh(returnStdout: true, script: "git log -1 --pretty=format:'%h : %an  %s'").trim()
          def curDate = sh(script: "date '+%Y%m%d-%H%M%S'", returnStdout: true).trim()
          TAG = curDate[0..14] + "-" + CommitID + "-" + BRANCH
### --- Building / Shell Script
"""
echo "Building Project..."
${BUILD_COMMAND}
"""### --- Scan Code / Shell Script
echo "Scan Code"### --- Build image / Shell Script
"""
docker build -t ${HARBOR_ADDRESS}/${REGISTRY_DIR}/${IMAGE_NAME}:${TAG} .
docker login -u ${Username} -p ${Password} ${HARBOR_ADDRESS}
docker push ${HARBOR_ADDRESS}/${REGISTRY_DIR}/${IMAGE_NAME}:${TAG}
"""### --- Deploy / Shell Script
"""
cat ${KUBECONFIG_PATH} > /tmp/1.yaml
/usr/local/bin/kubectl config use-context ${CLUSTER} --kubeconfig=/tmp/1.yaml
export KUBECONFIG=/tmp/1.yaml
/usr/local/bin/kubectl set image ${DEPLOY_TYPE} -l ${DEPLOY_LABEL} ${CONTAINER_NAME}=${HARBOR_ADDRESS}/${REGISTRY_DIR}/${IMAGE_NAME}:${TAG} -n ${NAMESPACE}
"""五、保存创建的流水线并推送到gitlab上,替换jenkinsfile模板
### --- 保存创建的流水线项目

~~~     保存——>Save——>Description:first commit——>Commit to new branch:java-pipeline
~~~     通过gitlab查看推送的Jenkinsfile
### --- 更新Jenkinsfile配置文件到gitlab上(使用下面的模板)
~~~ 进入gitlab——>kubernetes-guide——>jenkinsfile——>java-pipeline分支——>Jenkinsfile——>Web IDE——>拷贝pipeline模板——>commint
~~~ 进入jenkins——>Dashboard——>jenkinsfile——>java-pipeline——>Open Blue Ocean——>java-pipeline六、查看生成的流水线结构
Walter Savage Landor:strove with none,for none was worth my strife.Nature I loved and, next to Nature, Art:I warm'd both hands before the fire of life.It sinks, and I am ready to depart
——W.S.Landor


【推荐】国内首个AI IDE,深度理解中文开发场景,立即下载体验Trae
【推荐】编程新体验,更懂你的AI,立即体验豆包MarsCode编程助手
【推荐】抖音旗下AI助手豆包,你的智能百科全书,全免费不限次数
【推荐】轻量又高性能的 SSH 工具 IShell:AI 加持,快人一步
· 无需6万激活码!GitHub神秘组织3小时极速复刻Manus,手把手教你使用OpenManus搭建本
· Manus爆火,是硬核还是营销?
· 终于写完轮子一部分:tcp代理 了,记录一下
· 别再用vector<bool>了!Google高级工程师:这可能是STL最大的设计失误
· 单元测试从入门到精通