

|NO.Z.00067|——————————|^^ 构建 ^^|——|Linux&Nginx&反向代理.V03|——|反向代理|负载调用|实现HTTPS|
一、nginx反向代理
### --- 实验5、nginx的反向代理
### --- 代理和反向代理:
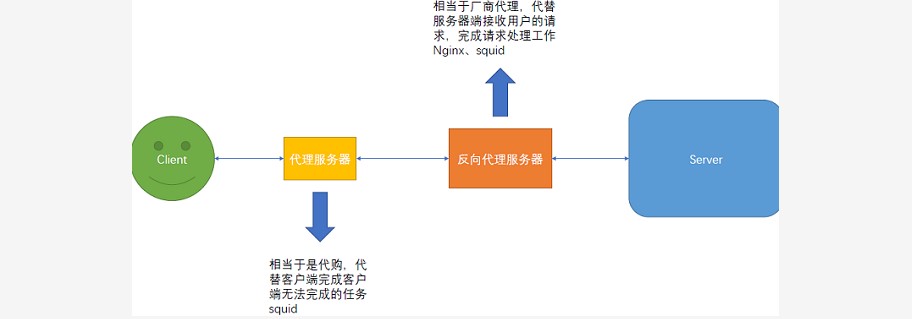
~~~ #代理:
~~~ 找别人代理你去完成一件你完不成的事(代购),代理的对象是客户端
~~~ #反向代理:
~~~ 替厂家买东西的人叫做反向代理(烟酒代理)代理的对象是服务器端
~~~ 在另外一台机器上安装apache,启动并填写测试页面
~~~ 在nginx服务器的配置文件中添加(写在某一个网站的server标签内)### --- 实验环境:
centos7.x_server11:10.10.10.11:nginx // 反向代理服务器
centos7.x_server12:10.10.10.12:apache // 真实提供服务服务器[root@server12 ~]# yum install -y httpd
[root@server12 ~]# vim /var/www/html/index.html
www.httpd12.com
[root@server12 ~]# systemctl start httpd.service
[root@server12 ~]# systemctl enable httpd.service[root@server11 ~]# vim /usr/local/nginx/conf/nginx.conf
server {
listen 80;
server_name blog.atyanqi.com;
index index.html index.htm index.php;
root html/blog;
access_log logs/blog-access.log main;
location ~ \.php$ {
root html/blog;
fastcgi_pass 127.0.0.1:9000;
fastcgi_index index.php;
fastcgi_param SCRIPT_FILENAME /scripts$fastcgi_script_name;
include fastcgi.conf;
}
location / {
proxy_pass http://10.10.10.12:80; // 此处填写apache服务器的IP地址
}
} ### --- 重启nginx,并使用客户端访问测试
[root@server11 ~]# nginx -t
[root@server11 ~]# pkill -HUP nginx
[root@server11 ~]# elinks http://blog.atyanqi.com
www.httpd12.com // 访问到的并不是blog的文件地址,而是apache的页面地址,实现反向代理定义。主要是保护真实服务器的隐藏,更安全。二、nginx负载调用(负载均衡)
### --- 实验6:负载调用(负载均衡)
### --- 实验环境:

centos7.x_server11:10.10.10.11:nginx    			// 反向代理服务器
centos7.x_server12:10.10.10.12:apache // 真实提供服务服务器(理论上12和13的apache页面是一致的,为了实验需要,我们写入不同的页面信息,来验证。
centos7.x_server12:10.10.10.13:apache // 真实提供服务服务器### --- 开启并设置两台12 & 13的主机
~~~ 安装apache并设置不同的index.html页面内容(设置不同页面是为了看实验效果)
[root@server13 ~]# yum install -y httpd
[root@server13 ~]# vim /var/www/html/index.html
www.httpd13.com
[root@server13 ~]# systemctl start httpd
[root@server13 ~]# systemctl enable httpd### --- 负载均衡(load balance)其意思就是将任务分摊到多个操作单元上进行执行,
~~~ 例如web服务器,FTP服务器,企业关键应用服务器和其他关键任务服务器等,
~~~ 从而共同完成工作任务。
### --- 使用默认的rr轮询算法,修改nginx配置文件
[root@server11 ~]# vim /usr/local/nginx/conf/nginx.conf
upstream blog { // 写在location标签外面
server 10.10.10.12:80;
server 10.10.10.13:80;
}
server {
listen 80;
server_name blog.atyanqi.com;
index index.html index.htm index.php;
root html/blog;
access_log logs/blog-access.log main;
location ~ \.php$ {
root html/blog;
fastcgi_pass 127.0.0.1:9000;
fastcgi_index index.php;
fastcgi_param SCRIPT_FILENAME /scripts$fastcgi_script_name;
include fastcgi.conf;
}
location / { // 修改自带的location/的标签,将原内容删除,添加下列两项
proxy_pass http://blog; // 添加反向代理,代理地址填写upstream声明的名字
proxy_set_header Host $host; // 重写请求头部,保证网站所有页面都可以访问成功
}
}
server {
listen 80;
server_name bbs.atyanqi.com;
index index.html index.htm index.php;
root html/bbs;
access_log logs/bbs-access.log main;
location ~ \.php$ {
root html/bbs;
fastcgi_pass 127.0.0.1:9000;
fastcgi_index index.php;
fastcgi_param SCRIPT_FILENAME /scripts$fastcgi_script_name;
include fastcgi.conf;
}
} ### --- 重启nginx,并使用客户端反问测试
[root@server11 ~]# nginx -t
[root@server11 ~]# pkill -HUP nginx
[root@server11 ~]# curl blog.atyanqi.com
www.httpd12.com // 一次12:说明负载均衡配置OK
[root@server11 ~]# curl blog.atyanqi.com
www.httpd13.com // 一次13:说明负载均衡配置OK### --- 拓展补充:rr算法实现加权轮询(后期集群在将更多算法类型和功能)
upstream bbs{
server 10.10.10.12:80 weight=1;
server 10.10.10.13:80 weight=2;
}### --- 加权重测试
[root@server11 ~]# vim /usr/local/nginx/conf/nginx.conf
}
upstream blog {
server 10.10.10.12:80 weight=1;
server 10.10.10.13:80 weight=2;
}[root@server11 ~]# nginx -t
[root@server11 ~]# pkill -HUP nginx
[root@server11 ~]# curl blog.atyanqi.com // 13两次,12一次,说明权重配置OK
www.httpd13.com
[root@server11 ~]# curl blog.atyanqi.com
www.httpd13.com
[root@server11 ~]# curl blog.atyanqi.com
www.httpd12.com三、nginx实现https
### --- 实验7:nginx实现https(证书+rewrite)

~~~		安装nginx时,需要将--with-http_ssl_module模块开启
~~~		在对应要进行加密的server标签中添加以下内容开启SSL
[root@server11 ~]# vim /usr/local/nginx/conf/nginx.conf
server {
listen 80;
server_name bbs.atyanqi.com;
index index.html index.htm index.php;
root html/bbs;
access_log logs/bbs-access.log main;
location ~ \.php$ {
root html/bbs;
fastcgi_pass 127.0.0.1:9000;
fastcgi_index index.php;
fastcgi_param SCRIPT_FILENAME /scripts$fastcgi_script_name;
include fastcgi.conf;
}
ssl on;
ssl_certificate /usr/local/nginx/conf/ssl/atyanqi.crt;
ssl_certificate_key /usr/local/nginx/conf/ssl/atyanqi.key;
ssl_session_timeout 5m;
ssl_protocols TLSv1 TLSv1.1 TLSv1.2;
ssl_prefer_server_ciphers on;
ssl_ciphers "EFCDH+CHACHA20:EECDH+CHACHA20-draft:EECDH+AES128:EFCDH+AES256:RSA+AES256:EECDH+3DES:RSA+3DES:!MD5";
}### --- 生成证书和秘钥文件
[root@server11 ~]# mkdir /usr/local/nginx/conf/ssl/
[root@server11 ~]# cd /usr/local/nginx/conf/ssl/
~~~ 注意:在实验环境中可以用命令生成测试,在生产环境中必须要在https证书厂商注册
[root@server11 ssl]# openssl genrsa -out atyanqi.key 1024
Generating RSA private key, 1024 bit long modulus
..............................++++++
...........++++++
e is 65537 (0x10001)### --- 建立服务器私钥,生成RSA秘钥
[root@server11 ssl]# openssl req -new -key atyanqi.key -out atyanqi.csr
Country Name (2 letter code) [XX]:CN
State or Province Name (full name) []:BJ
Locality Name (eg, city) [Default City]:BJ
Organization Name (eg, company) [Default Company Ltd]:atyanqi
Organizational Unit Name (eg, section) []:YJS
Common Name (eg, your name or your server's hostname) []:bbs.atyanqi.com
Email Address []:
A challenge password []:
An optional company name []:### --- 生成签字证书
~~~ 需要依输入国家,地区,组织,email,最重要的是有一个common name,可以写你的名字或者域名,如果为了https申请,这个必须和域名吻合,否则会引发浏览器警报,生成的csr文件交给CA签名后形成服务端自己的证书。
[root@server11 ssl]# openssl x509 -req -days 365 -sha256 -in atyanqi.csr -signkey atyanqi.key -out atyanqi.crt
Signature ok
subject=/C=CN/ST=BJ/L=BJ/O=atyanqi/OU=YJS/CN=bbs.atyanqi.com
Getting Private key### --- 将私钥和证书复制到指定位置
[root@server11 ssl]# cp atyanqi.crt /usr/local/nginx/conf/ssl/atyanqi.crt
[root@server11 ssl]# cp atyanqi.key /usr/local/nginx/conf/ssl/atyanqi.key### --- 设置http自动跳转https功能
~~~ 原有的server标签修改监听端口#新增以下server标签(利用虚拟主机+rewrite的功能)
[root@server11 ssl]# vim /usr/local/nginx/conf/nginx.conf
server {
listen 443;
server_name bbs.atyanqi.com;
index index.html index.htm index.php;
root html/bbs;
access_log logs/bbs-access.log main;
location ~ \.php$ {
root html/bbs;
fastcgi_pass 127.0.0.1:9000;
fastcgi_index index.php;
fastcgi_param SCRIPT_FILENAME /scripts$fastcgi_script_name;
include fastcgi.conf;
}
ssl on;
ssl_certificate /usr/local/nginx/conf/ssl/atyanqi.crt;
ssl_certificate_key /usr/local/nginx/conf/ssl/atyanqi.key;
ssl_session_timeout 5m;
ssl_protocols TLSv1 TLSv1.1 TLSv1.2;
ssl_prefer_server_ciphers on;
ssl_ciphers "EFCDH+CHACHA20:EECDH+CHACHA20-draft:EECDH+AES128:EFCDH+AES256:RSA+AES256:EECDH+3DES:RSA+3DES:!MD5";
}
server { // 添加该规则
listen 80;
server_name bbs.atyanqi.com;
rewrite ^(.*)$ https://bbs.atyanqi.com permanent;
root html/bbs;
index index.html index.htm;
}### --- 重启nginx,并测试
[root@server11 ssl]# nginx -t
[root@server11 ssl]# pkill -HUP nginx
#修改windows的hosts配置文件C:\Windows\System32\drivers\etc
10.10.10.11 bbs.atyanqi.com // 写入该内容
#通过Chrome访问:bbs.tyanqi.com // 会显示你与此网站建立的连接不安全
bbs.atyanqi.com // 可以正常访问
#点击红叉——>不安全的网络连接——>更多信息——>安全——>查看证书会显示创建时写入的证书信息Walter Savage Landor:strove with none,for none was worth my strife.Nature I loved and, next to Nature, Art:I warm'd both hands before the fire of life.It sinks, and I am ready to depart
——W.S.Landor
分类:
cdv007-network


【推荐】国内首个AI IDE,深度理解中文开发场景,立即下载体验Trae
【推荐】编程新体验,更懂你的AI,立即体验豆包MarsCode编程助手
【推荐】抖音旗下AI助手豆包,你的智能百科全书,全免费不限次数
【推荐】轻量又高性能的 SSH 工具 IShell:AI 加持,快人一步
· 无需6万激活码!GitHub神秘组织3小时极速复刻Manus,手把手教你使用OpenManus搭建本
· Manus爆火,是硬核还是营销?
· 终于写完轮子一部分:tcp代理 了,记录一下
· 别再用vector<bool>了!Google高级工程师:这可能是STL最大的设计失误
· 单元测试从入门到精通