

|NO.Z.00038|——————————|^^ 构建 ^^|——|Nagios构建.V4|——|3台server|
一、添加windows10监控主机:配置Windows端监控
### --- 配置Windows端监控

~~~     被监控端安装NSClient++-0.3.8-Win32.msi
~~~     安装完成后修改配置文件NSC.ini把需要的库都打开
~~~     在监控服务器修改nagios配置文件nagios.cfg
### --- 安装Windows组件NSClient++-0.3.8-x64.msi
### --- windows是多少位的就安装多少位的;.msi是Windows的安装方式。
~~~ NSClient++-0.3.8-x64.msi——>双击打开——>NEXT——>同意它的协议
~~~ ——>安装目录——>有没有新的,采用旧的安装:默认NEXT
~~~ ——>监控空服务器的地址;加密:不加密:开启所有的监控类型:NEXT——>install
~~~ ——>开启——>start service:打对勾——>END
[root@server11 ~]sz NSClient++-0.3.8-x64.msi### --- 在HA-server1下:10.10.10.11下修改配置文件
### --- 配置Windows监控模板
### --- :%s/winserver/windows10/g ### --- 也可以使用批量替换,把winserver替换为windows10
[root@server11 ~]# vim /usr/local/nagios/etc/objects/windows.cfg // 配置Windows监控模板
define host{
use windows-server // 第一个用到的模板是windows-server模板,已经在我们的模板中出现,所以不需要更改。
host_name windows10 // 定义主机名
alias My Windows Server // 别名就不更改了
address 10.10.10.240 // 地址
}
define hostgroup{ // 组里必须存在Windows,Windows监控必须存在
hostgroup_name windows-servers
alias Windows Servers
}
define service{
use generic-service
host_name windows10 // hostname我们上面改了windows10,与上面的名字必须匹配
service_description NSClient++ Version // NSClient模板必须存在
check_command check_nt!CLIENTVERSION
}
define service{ // 定义启动的时间
use generic-service
host_name windows10 // 名称与上面的保持一致
service_description Uptime
check_command check_nt!UPTIME
}
define service{ // 定义当前的CPU负载
use generic-service
host_name windows10 // 名称保持一致
service_description CPU Load
check_command check_nt!CPULOAD!-l 5,80,90
}
#define service{ // 在IIS里非常重要的模块,windows7/windows10是没有这个模块的。会报错,所以删除掉。
# use generic-service
# host_name windows10
# service_description W3SVC // 在IIS里非常重要的模块,
# check_command check_nt!SERVICESTATE!-d SHOWALL -l W3SVC // check_nt就是监控这个服务是否正常的。
# }### --- 修改nagios主配置文件
~~~ //当然也可以监控其它的参数,有上千万个监控模块,可以参考nagios的官方模板。
[root@server11 ~]# vim /usr/local/nagios/etc/nagios.cfg // 修改主配置文件
cfg_file=/usr/local/nagios/etc/objects/windows.cfg // 把这个主配置文件打开,调用windows.cfg;告诉它主机的地址以及监控对象类型,然后把这个windows.cfg链接到主配置文件中,让它添加索引。### --- 检测当前的配置文件是否正常。
[root@server11 ~]# /usr/local/nagios/bin/nagios -v /usr/local/nagios/etc/nagios.cfg
Total Warnings: 0
Total Errors: 0 // 正确,没有问题
### --- 重启nagios服务
[root@server11 ~]# service nagios restart### --- 添加windows10监控主机:配置Windows端监控
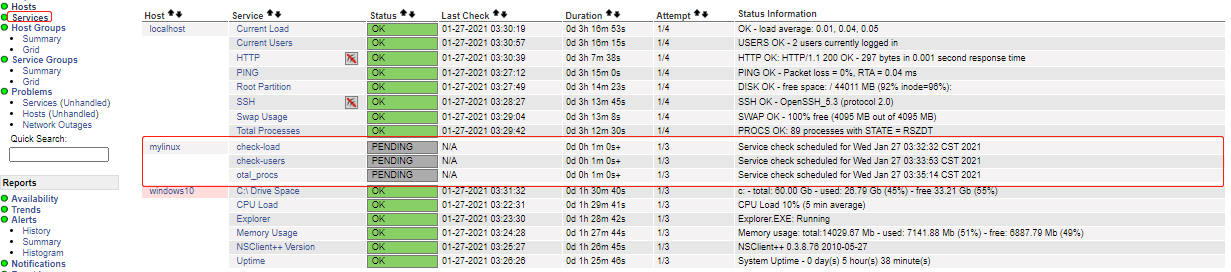
~~~ 通过Chrome下http://10.10.10.11/nagios/
~~~ Current Status——>Hosts——>windows10:PENDING(就绪状态)
二、添加linux监控主机:配置Linux端监控
### --- 配置Linux端监控
### --- 安装openssl及openssl-devel
### --- 在HA-server1:10.10.10.11下执行部署
### --- nrpe插件是通过openssl这个软件包进行所谓的对策加密的,以及被动的加密的,所以需要安装一下openssl以及openssl-devel

[root@server11 ~]# yum install -y openssl openssl-devel
Install       6 Package(s)
Total download size: 1.9 M
Installed size: 4.8 M
Installed:
  openssl-devel.x86_64 0:1.0.1e-48.el6
Dependency Installed:
  keyutils-libs-devel.x86_64 0:1.4-5.el6   krb5-devel.x86_64 0:1.10.3-57.el6   libcom_err-devel.x86_64 0:1.41.12-22.el6   libselinux-devel.x86_64 0:2.0.94-7.el6
  libsepol-devel.x86_64 0:2.0.41-4.el6
Complete!
### --- 安装部署linux主机配置
### --- 在HA-server2下:10.10.10.12下查看配置文件说明
### --- 在HA-server1下推送nagios-3.3.1.tar.gz的包文件
[root@server11 ~]# scp nagios.iso root@10.10.10.12:/root/
[root@server12 ~]# mkdir /iso
[root@server12 ~]# mount -o loop nagios.iso /iso/
[root@server12 ~]# cp -a /iso/* .### --- 安装openssl-openssl-devel
[root@server12 ~]# yum install -y openssl openssl-devel
Install 7 Package(s)
Total download size: 2.0 M
Installed size: 4.9 M
Installed:
openssl-devel.x86_64 0:1.0.1e-48.el6
Dependency Installed:
keyutils-libs-devel.x86_64 0:1.4-5.el6 krb5-devel.x86_64 0:1.10.3-57.el6 libcom_err-devel.x86_64 0:1.41.12-22.el6 libselinux-devel.x86_64 0:2.0.94-7.el6
libsepol-devel.x86_64 0:2.0.41-4.el6 zlib-devel.x86_64 0:1.2.3-29.el6 ### --- 创建用户
[root@server12 ~]# useradd nagios### --- 为了安装nrpe,先安装nagios-plugins-1.4.15.tar.gz插件
[root@server12 ~]# tar -zxvf nagios-plugins-1.4.14.tar.gz
[root@server12 ~]# cd nagios-plugins-1.4.14
[root@server12 nagios-plugins-1.4.14]# ./configure --with-nagios-user=nagios --with-nagios-group=nagios
[root@server12 nagios-plugins-1.4.14]# make all && make install
~~~输出参数
make[1]: Leaving directory `/root/nagios-plugins-1.4.14/po'
make[1]: Entering directory `/root/nagios-plugins-1.4.14'
make[2]: Entering directory `/root/nagios-plugins-1.4.14'
make[2]: Nothing to be done for `install-exec-am'.
make[2]: Nothing to be done for `install-data-am'.
make[2]: Leaving directory `/root/nagios-plugins-1.4.14'
make[1]: Leaving directory `/root/nagios-plugins-1.4.14'### --- 安装nrpe
[root@server12 ~]# tar -zxvf nrpe-2.8.1.tar.gz
[root@server12 ~]# cd nrpe-2.8.1
[root@server12 nrpe-2.8.1]# ./configure --enable-ssl --with-ssl-lib=/usr/lib64/ //--enable-ssl:开启ssl加密 --with-ssl-lib=/usr/lib64/:指定lib库文件地址
General Options:
-------------------------
NRPE port: 5666
NRPE user: nagios
NRPE group: nagios
Nagios user: nagios
Nagios group: nagios[root@server12 nrpe-2.8.1]# make all
[root@server12 nrpe-2.8.1]# make install-plugin // 向plugin里写入对应的调用方式以及脚本
[root@server12 nrpe-2.8.1]# make install-daemon // 安装守护进程也就是启动命令
[root@server12 nrpe-2.8.1]# make install-daemon-config // 安装守护进程的配置模板### --- 配置nrpe信息
[root@server12 nrpe-2.8.1]# vim /usr/local/nagios/etc/nrpe.cfg
allowed_hosts=10.10.10.11,127.0.0.1 // 添加监控服务器的地址,逗号隔开,代表两个都启用。
[root@server12 nrpe-2.8.1]# /usr/local/nagios/bin/nrpe -c /usr/local/nagios/etc/nrpe.cfg -d //-c指定配置文件,-p表示daemon的方式去运行,就是守护进程的方式去运行~~~ 查看启动状态:
[root@server12 nrpe-2.8.1]# netstat -anpt |grep :5666
tcp 0 0 0.0.0.0:5666 0.0.0.0:* LISTEN 20683/nrpe ## --- 在HA-server1:10.10.10.11下配置
### --- 服务器端安装nrpe插件
[root@server11 ~]# tar -zxvf nrpe-2.8.1.tar.gz // 两边版本必须一致
[root@server11 ~]# cd nrpe-2.8.1
[root@server11 nrpe-2.8.1]# ./configure --enable-ssl --with-ssl-lib=/usr/lib64/
[root@server11 nrpe-2.8.1]# make all
[root@server11 nrpe-2.8.1]# make install-plugin### --- 定义linux.cfg
~~~ 定义对应的调用方式
[root@server11 nrpe-2.8.1]# cd /usr/local/nagios/etc/objects/
[root@server11 objects]# cp -a windows.cfg linux.cfg[root@server11 objects]# vim linux.cfg
define host{
use linux-server
host_name mylinux
alias My linux Server
address 10.10.10.12
}
#define hostgroup{ // 主机组就不需要了,因为我们就借助一台演示使用,就不需要主机组了,linux里是可以不借用组的。
# hostgroup_name windows-servers ; The name of the hostgroup
# alias Windows Servers ; Long name of the group
# }
define service{
use generic-service
host_name mylinux
service_description check-load
check_command check_nrpe!check_load
}
define service{
use generic-service
host_name mylinux
service_description check-users
check_command check_nrpe!check_users
}
define service{
use generic-service
host_name mylinux
service_description otal_procs
check_command check_nrpe!check_total_procs
}### --- commands.cfg定义外部构建nrpe
[root@server11 ~]# vi /usr/local/nagios/etc/objects/commands.cfg
define command{
command_name check_nrpe
command_line $USER1$/check_nrpe -H $HOSTADDRESS$ -c $ARG1$
}### --- 主配置文件中定义linux
[root@server11 ~]# vi /usr/local/nagios/etc/nagios.cfg
cfg_file=/usr/local/nagios/etc/objects/windows.cfg
cfg_file=/usr/local/nagios/etc/objects/linux.cfg // 定义一下linux的cfg文件地址### --- 检测当前的配置文件有没有错误
[root@server11 objects]# /usr/local/nagios/bin/nagios -v /usr/local/nagios/etc/nagios.cfg
Total Warnings: 0
Total Errors: 0
### --- 重启nagios服务
[root@server11 ~]# service nagios restart三、在Chrome下http://10.10.10.11/nagios/查看监控状态
Walter Savage Landor:strove with none,for none was worth my strife.Nature I loved and, next to Nature, Art:I warm'd both hands before the fire of life.It sinks, and I am ready to depart
——W.S.Landor
分类:
cdv001-lbchac


【推荐】国内首个AI IDE,深度理解中文开发场景,立即下载体验Trae
【推荐】编程新体验,更懂你的AI,立即体验豆包MarsCode编程助手
【推荐】抖音旗下AI助手豆包,你的智能百科全书,全免费不限次数
【推荐】轻量又高性能的 SSH 工具 IShell:AI 加持,快人一步
· 无需6万激活码!GitHub神秘组织3小时极速复刻Manus,手把手教你使用OpenManus搭建本
· Manus爆火,是硬核还是营销?
· 终于写完轮子一部分:tcp代理 了,记录一下
· 别再用vector<bool>了!Google高级工程师:这可能是STL最大的设计失误
· 单元测试从入门到精通