

在centos7通过docker安装tensorflow
下载anaconda3https://mirrors.tuna.tsinghua.edu.cn/anaconda/archive/
1.安装anaconda3
a.执行命令bash Anaconda3-4.4.0-Linux-x86_64.sh ,开始安装过程,这里提示接下来是许可协议,不用任何输入,直接Enter回车继续
b.输入yes接受许可协议
1 2 3 4 5 6 | cryptographyA Python library which exposes cryptographic recipes and primitives.Do you approve the license terms? [yes|no]>>> yes |
c.输入anaconda3的安装位置
Anaconda3 will now be installed into this location:
/root/anaconda3

  - Press ENTER to confirm the location
  - Press CTRL-C to abort the installation
  - Or specify a different location below

[/root/anaconda3] >>> /opt/module/anaconda3
d.修改.bashrc脚本将Anaconda目录添加到PATH中
installing: conda-4.3.21-py36_0 ...
installing: conda-env-2.6.0-0 ...
Python 3.6.1 :: Continuum Analytics, Inc.
creating default environment...
installation finished.
Do you wish the installer to prepend the Anaconda3 install location
to PATH in your /root/.bashrc ? [yes|no]
[no] >>> yes
刷新.bashrc文件
source /root/.bashrc
注:最好也配置一下/etc/profile文件,这样所有用户都可以用了,添加如下:
export PATH="/opt/module/anaconda3/bin:$PATH"
检测python的版本:
[jianyuan@slave2 root]$ python --version
Python 3.6.5 :: Anaconda, Inc.
2.安装tensorflow
安装tensorflow有pip安装方法和docker安装方法,我采用后者安装。
Docker 使用容器创建虚拟环境,以便将 TensorFlow 安装结果与系统的其余部分隔离开来。TensorFlow 程序在此虚拟环境中运行,该环境能够与其主机共享资源(访问目录、使用 GPU、连接到互联网等)。
Docker 是在 Linux 上启用 TensorFlow GPU 支持的最简单方法,因为只需在主机上安装 NVIDIA® GPU 驱动程序,而不必安装 NVIDIA® CUDA® 工具包。
(1)安装docker
a.卸载旧版本的docker
旧版本的docker叫做docker或者docker-engine,如果安装了的话,卸载它们和它们的依赖。
[jianyuan@slave2 root]$ sudo yum remove docker \
>                   docker-client \
>                   docker-client-latest \
>                   docker-common \
>                   docker-latest \
>                   docker-latest-logrotate \
>                   docker-logrotate \
>                   docker-engine
如果yum提示这些安装包都没有安装那就完成。如下:

[sudo] jianyuan 的密码:
已加载插件:fastestmirror, langpacks
参数 docker 没有匹配
参数 docker-client 没有匹配
参数 docker-client-latest 没有匹配
参数 docker-common 没有匹配
参数 docker-latest 没有匹配
参数 docker-latest-logrotate 没有匹配
参数 docker-logrotate 没有匹配
参数 docker-engine 没有匹配
不删除任何软件包
b.使用仓库安装
先安装yum-utils(它可提供使用yum-config-manager)和设置稳定的仓库
sudo yum install -y yum-utils

 sudo yum-config-manager \
    --add-repo \
    https://download.docker.com/linux/centos/docker-ce.repo
c.安装docker驱动
直接安装最新版本的或者安装指定版本的
1)安装最新版本
sudo yum install docker-ce docker-ce-cli containerd.io
如果提示接受GPG密钥,确定是否是060A 61C5 1B55 8A7F 742B 77AA C52F EB6B 621E 9F35,如果是,就接受。
2)安装特定版本的docker引擎
为了安装指定版本的docker,在repo中列出可用的版本,然后选择安装
以下是按照版本号从高到底排列出来的可用版本docker(部分版本)
[jianyuan@slave2 root]$  yum list docker-ce --showduplicates | sort -r

已加载插件:fastestmirror, langpacks
已安装的软件包
可安装的软件包
 * updates: mirror01.idc.hinet.net
 * extras: mirrors.nju.edu.cn
docker-ce.x86_64            3:20.10.6-3.el7                    docker-ce-stable
docker-ce.x86_64            3:20.10.6-3.el7                    @docker-ce-stable
docker-ce.x86_64            3:20.10.5-3.el7                    docker-ce-stable
docker-ce.x86_64            3:20.10.4-3.el7                    docker-ce-stable
docker-ce.x86_64            3:20.10.3-3.el7                    docker-ce-stable
docker-ce.x86_64            3:20.10.2-3.el7                    docker-ce-stable
docker-ce.x86_64            3:20.10.1-3.el7                    docker-ce-stable
docker-ce.x86_64            3:20.10.0-3.el7                    docker-ce-stable
docker-ce.x86_64            3:19.03.9-3.el7                    docker-ce-stable
docker-ce.x86_64            3:19.03.8-3.el7                    docker-ce-stable
docker-ce.x86_64            3:19.03.7-3.el7                    docker-ce-stable
docker-ce.x86_64            3:19.03.6-3.el7                    docker-ce-stable
docker-ce.x86_64            3:19.03.5-3.el7                    docker-ce-stable
docker-ce.x86_64            3:19.03.4-3.el7                    docker-ce-stable
docker-ce.x86_64            3:19.03.3-3.el7                    docker-ce-stable
这个返回列表取决于哪个仓库可用和你的centos版本。
通过完全限定包名安装特定版本,包名加起始于第一个冒号直到第一个连字符(-)被连字符分隔的版本号(第二列),例如docker-ce-18.09.1
sudo yum install docker-ce-<VERSION_STRING> docker-ce-cli-<VERSION_STRING> containerd.io
d.启动docker
[jianyuan@slave2 root]$ sudo systemctl start docker
e.通过运行hello-world镜像验证是否安装成功。
[jianyuan@slave2 root]$ sudo docker run hello-world
Unable to find image 'hello-world:latest' locally
latest: Pulling from library/hello-world
b8dfde127a29: Pull complete
Digest: sha256:f2266cbfc127c960fd30e76b7c792dc23b588c0db76233517e1891a4e357d519
Status: Downloaded newer image for hello-world:latest

Hello from Docker!
This message shows that your installation appears to be working correctly.

To generate this message, Docker took the following steps:
 1. The Docker client contacted the Docker daemon.
 2. The Docker daemon pulled the "hello-world" image from the Docker Hub.
    (amd64)
 3. The Docker daemon created a new container from that image which runs the
    executable that produces the output you are currently reading.
 4. The Docker daemon streamed that output to the Docker client, which sent it
    to your terminal.

To try something more ambitious, you can run an Ubuntu container with:
 $ docker run -it ubuntu bash

Share images, automate workflows, and more with a free Docker ID:
 https://hub.docker.com/

For more examples and ideas, visit:
 https://docs.docker.com/get-started/
以上命令下载一个测试镜像并在一个容器中运行它,当这个容器运行时,它打印一些信息然后退出。
docker引擎已经安装好并且运行了,你需要在命令前加sudo来运行docker命令。如果你想普通没有特权的用户也可以运行docker命令的话,请进行以下设置:
(因为docker的守护进程绑定的是Unix套接字而不是TCP端口,Unix套接字默认所以root用户的,而其他用户只能通过sudo访问它。docker守护进程通常以root用户运行。
如果你不想在docker命令的前面加sudo也可以运行docker命令的话,创建一个叫docker的Unix组,然后向改组添加组成员。当docer的守护进程运行的时候,守护进程就创建一个docker组成员可以访问的Unix套接字)
注意:docker组授予的权限等同于root用户
创建docker组并添加成员:
sudo groupadd docker
sudo usermod -aG docker jianyuan
激活对组的更改
newgrp docker
验证没有sudo也可以运行docker命令
[jianyuan@slave2 root]$ docker run hello-world

Hello from Docker!
This message shows that your installation appears to be working correctly.

To generate this message, Docker took the following steps:
 1. The Docker client contacted the Docker daemon.
 2. The Docker daemon pulled the "hello-world" image from the Docker Hub.
    (amd64)
 3. The Docker daemon created a new container from that image which runs the
    executable that produces the output you are currently reading.
 4. The Docker daemon streamed that output to the Docker client, which sent it
    to your terminal.

To try something more ambitious, you can run an Ubuntu container with:
 $ docker run -it ubuntu bash

Share images, automate workflows, and more with a free Docker ID:
 https://hub.docker.com/

For more examples and ideas, visit:
 https://docs.docker.com/get-started/
设置开机启动docker
[jianyuan@slave2 root]$ sudo systemctl enable docker.service
[sudo] jianyuan 的密码:
Created symlink from /etc/systemd/system/multi-user.target.wants/docker.service to /usr/lib/systemd/system/docker.service.
[jianyuan@slave2 root]$ sudo systemctl enable containerd.service
Created symlink from /etc/systemd/system/multi-user.target.wants/containerd.service to /usr/lib/systemd/system/containerd.service.
(2)如需在centos7上启用 GPU 支持,要安装 NVIDIA Docker (如果没有nvidia GPU跳过此步)
a.安装前验证:
验证你的系统是否有支持cuda能力的GPU
$lspci | grep -i nvidia
如果没有看到任何信息,在命令行输入update-pciids(通常在/sbin中找到)更新由linux维护的PCI硬件数据库数据库并且重新运行上一条命令(lspci | grep -i nvidia)
如果你的显卡是nvidia的而且它在https://developer.nvidia.com/cuda-gpus中列出,那么你的显卡支持CUDA
验证你有一个支持的linux版本
因为CUDA开发工具只支持一些linux发行版本,它们在CUDA工具包发布说明中列出。
为了确定你运行的发行版本和版本号,在命令行输入以下命令:
$ uname -m && cat /etc/*release
你会看到类似以下的输出
NAME="CentOS Linux"
VERSION="7 (Core)"
ID="centos"
ID_LIKE="rhel fedora"
VERSION_ID="7"
PRETTY_NAME="CentOS Linux 7 (Core)"
ANSI_COLOR="0;31"
CPE_NAME="cpe:/o:centos:centos:7"
HOME_URL="https://www.centos.org/"
BUG_REPORT_URL="https://bugs.centos.org/"

CENTOS_MANTISBT_PROJECT="CentOS-7"
CENTOS_MANTISBT_PROJECT_VERSION="7"
REDHAT_SUPPORT_PRODUCT="centos"
REDHAT_SUPPORT_PRODUCT_VERSION="7"

CentOS Linux release 7.9.2009 (Core)
CentOS Linux release 7.9.2009 (Core)
验证系统已经安装了gcc
使用CUDA工具包开发需要gcc编译器,它不是运行CUDA应用程序所必须的,它通常作为linux安装的一部分安装,在大多数情况与linux支持版本安装的gcc版本可以正常工作,在命令行输入以下内容确定是否已经安装了gcc。
$ gcc --version
CUDA驱动要求安装驱动时就安装内核头和开发包,就算驱动被重建时也一样。例如你现在运行的内核版本是3.17.4-301,那么3.17.4-301版本的内核头和开发包必须要安装。而runfile安装不执行包验证,如果当前没有正确安装这些包的版本的话,RPM和Deb的驱动安装会尝试安装内核头和开发包。然而,这会安装这些包的最新版本,这可能会不匹配你现在运行的里linux版本,因此最好的安装方式是在安装CUDA驱动之前手动确定正确的内核头和开发头版本,即使你改变内核版本的时候,查看内核版本的命令:
uname -r
安装与当前系统匹配的内核头和开发包:
$ sudo yum install kernel-devel-$(uname -r) kernel-headers-$(uname -r)
b.在centos7上使用包管理器安葬NVIDIA驱动
在一些情况下,安装nvidia驱动你需要安装一些额外的依赖。
sudo yum install -y tar bzip2 make automake gcc gcc-c++ pciutils elfutils-libelf-devel libglvnd-devel iptables firewalld vim bind-utils wget
满足DKMS对EPEL的外部依赖
sudo yum install -y https://dl.fedoraproject.org/pub/epel/epel-release-latest-7.noarch.rpm
安装CUDA存储库公共GPG密钥
$ distribution=rhel7
设置CUDA网络仓库
$ ARCH=$( /bin/arch )
$ sudo yum-config-manager --add-repo http://developer.download.nvidia.com/compute/cuda/repos/$distribution/${ARCH}/cuda-$distribution.repo
CUDA驱动要求安装驱动时就安装内核头和开发包,就算驱动被重建时也一样。例如你现在运行的内核版本是4.4.0,那么4.4.0版本的内核头和开发包必须要安装。对于centos7,确定你系统有来自centos仓库的正确的linux内核源
$ sudo yum install -y kernel-devel-$(uname -r) kernel-headers-$(uname -r)
更新仓库缓存和使用nvidia-driver-latest-dkms元包安装驱动程序
$ sudo yum clean expire-cache
$ sudo yum install -y nvidia-driver-latest-dkms
(3)安装CUDA
a.满足第三方依赖
满足DKMS依赖;nvidia驱动的PRM包依赖其他扩展包,例如DKMS和libvdpau。这些包只能在如EPEL的第三方获取。在安装NVIDIA驱动RPM包前这些第三方库必须添加到包管理器数据库中,否则丢失的依赖项将阻止安装继续进行。
使EPEL可用:
yum install https://dl.fedoraproject.org/pub/epel/epel-release-latest-7.noarch.rpm
使可选的库可用:
subscription-manager repos --enable=rhel-7-workstation-optional-rpms
如果提示bash: subscription-manager: 未找到命令...用以下命令解决:
wget -O /etc/yum.repos.d/epel-rhsm.repo http://repos.fedorapeople.org/repos/candlepin/subscription-manager/epel-subscription-manager.repo

yum install subscription-manager -y
c.如果有需要解决用户的xorg.conf:
驱动依赖一个自动产生的在/etc/X11/xorg.conf的文件xorg.conf,如果有一个自定义的xorg.conf文件,此功能将被禁用,驱动程序可能无法工作,你可以尝试移除已经存在的xorg.conf或者添加/etc/X11/xorg.conf.d/00-nvidia.conf到xorg.conf。对于具有重要GPU配置的系统,xorg.conf文件可能需要手动调整。
d.安装meta-data库(二选一)
使用本地库安装:
$ sudo rpm --install cuda-repo-<distro>-<version>.<architecture>.rpm
使用网络库安装:
$ sudo yum-config-manager --add-repo https://developer.download.nvidia.com/compute/cuda/repos/rhel7/x86_64/cuda-rhel7.repo
e.清除yum库缓存:
$ sudo yum clean expire-cache
f.安装cuda:
$ sudo yum install nvidia-driver-latest-dkms
$ sudo yum install cuda
$ sudo yum install cuda-drivers
g.安装cuda后的执行
安装后的执行分为三部分:强制的、推荐的和可选的。
强制执行的:
1)环境设置
PATH变量需要包含export PATH=/usr/local/cuda-11.2/bin${PATH:+:${PATH}}。Nsight Compute之在rpm/deb的安装方法中移到了/opt/nvidia/nsight-compute/,当使用.run方法安装的时候它仍然在/usr/local/cuda-11.2/。添加/usr/local/cuda-11.2/bin${PATH:+:${PATH}}到PATH中:
$ export PATH=/usr/local/cuda-11.2/bin${PATH:+:${PATH}}
推荐执行的:
1)安装持久化进程
NVIDIA在Linux上提供了一个用户空间守护进程来支持CUDA作业运行时的驱动状态持久化。守护进程方法提供了一个优雅和健壮的解决持久化模块的问题。
在root用户下输入以下命令可以安装NVIDIA持久化守护进程:
$ /usr/bin/nvidia-persistenced --verbose
这个命令应该在启动时运行
2)安装可写样例
为了修改、编译和运行这些示例,安装这些示例时必须具有写权限,提供以下简便的安装脚本:
$ cuda-install-samples-11.2.sh /opt/module/
这个脚本时使用cuda-samples-11-2包安装的,cuda-samples-11-2包只在/usr/local/cuda-11.2/samples中安装了一个只读副本。
3)验证安装
在继续之前,确定CUDA工具包可以找到可正确以CUDA-capable硬件通信很重要。为了做到这些,你需要编译和运行一些样例程序。
注意:确定PATH变量并且如果是使用runfile方法安装的LD_LIBRARY_PATH变量正确设置。
如果您装了驱动,确定加载的驱动版本是正确的,如果你没有安装驱动或者是使用如L4T等不会加载驱动到每个内核模块里的操作系统,跳过此步。
当驱动被加载的时候,可以使用以下命令找到;
$ cat /proc/driver/nvidia/version
注意:这条命令在iGPU/dGPU系统无效
通过在终端输入nvcc -v可以检测CUDA工具包的版本,nvcc命令运行编译CUDA程序的驱动程序,它为c语言代码调用gcc编译而CUDA代码调用NVIDIA PTX编译。
NVIDIA CUDA工具包包括源代码形式的示例程序。你应该通过修改~/NVIDIA_CUDA-11.2_Samples和typing make的方法编译它。生成的二进制文件在~/NVIDIA_CUDA-11.2_Samples/bin下。
运行二进制文件
编译过后,找到并运行~/NVIDIA_CUDA-11.2_Samples下的deviceQuery,如果CUDA软件正确安装和配置那么deviceQuery运行的结果应该以下图类似:
确切的外观和输出的行数可能以你的系统不一样,最重要的输出是驱动被找到(第一行高亮显示),驱动匹配了你系统中的一个(第二行高亮),以及测试通过(最后一行高亮)。
如果CUDA-capable驱动和CUDA驱动被安装了但是deviceQuery报告没有cuda设备,这可能意味着缺失/dev/nvidia*文件或者错误的权限。在启动SELinux的系统上,你需要暂时关闭这一安全特征以运行deviceQuery:
$ setenforce 0
运行bandwidthTest程序验证系统能与CUDA-capable驱动正确通信,输出结果如下:
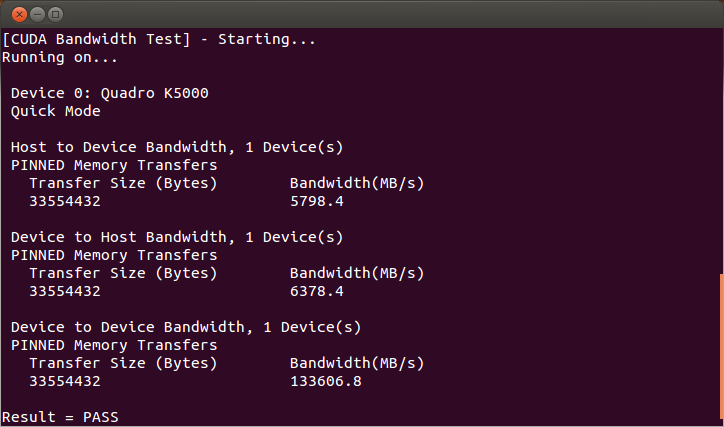
注意:对cuda设备的测量值将因系统而异,最要的是获得了测量值和倒数第二行确定了所有必要的测试已经通过。
如果测试没有通过,确定你的系统有CUDA-capable NVIDIA GPU和确保正确安装。
安装sight Eclipse插件
$ /usr/local/cuda-11.2/bin/nsight_ee_plugins_manage.sh install <eclipse-dir>
选择执行的:
安装第三方库:
$ sudo yum install freeglut-devel libX11-devel libXi-devel libXmu-devel \
    make mesa-libGLU-devel
(4)下载Tensorflow Docker映像
您可以一次使用多个变体。例如,以下命令会将 TensorFlow 版本映像下载到计算机上:
docker pull tensorflow/tensorflow                     # latest stable release
docker pull tensorflow/tensorflow:devel-gpu           # nightly dev release w/ GPU support
docker pull tensorflow/tensorflow:latest-gpu-jupyter  # latest release w/ GPU support and Jupyter
参考资料:
https://tensorflow.google.cn/install/docker
https://docs.nvidia.com/datacenter/tesla/tesla-installation-notes/index.html#centos7
https://docs.nvidia.com/cuda/cuda-installation-guide-linux/index.html#mandatory-post
https://docs.nvidia.com/cuda/cuda-installation-guide-linux/index.html#pre-installation-actions
https://blog.csdn.net/u012369535/article/details/95652339
https://blog.csdn.net/a18563862293/article/details/102205737


【推荐】国内首个AI IDE,深度理解中文开发场景,立即下载体验Trae
【推荐】编程新体验,更懂你的AI,立即体验豆包MarsCode编程助手
【推荐】抖音旗下AI助手豆包,你的智能百科全书,全免费不限次数
【推荐】轻量又高性能的 SSH 工具 IShell:AI 加持,快人一步
· AI与.NET技术实操系列:向量存储与相似性搜索在 .NET 中的实现
· 基于Microsoft.Extensions.AI核心库实现RAG应用
· Linux系列:如何用heaptrack跟踪.NET程序的非托管内存泄露
· 开发者必知的日志记录最佳实践
· SQL Server 2025 AI相关能力初探
· 震惊!C++程序真的从main开始吗?99%的程序员都答错了
· 【硬核科普】Trae如何「偷看」你的代码?零基础破解AI编程运行原理
· 单元测试从入门到精通
· winform 绘制太阳,地球,月球 运作规律
· 上周热点回顾(3.3-3.9)