vue 父子组件通信
vue 父子组件通信,如下图
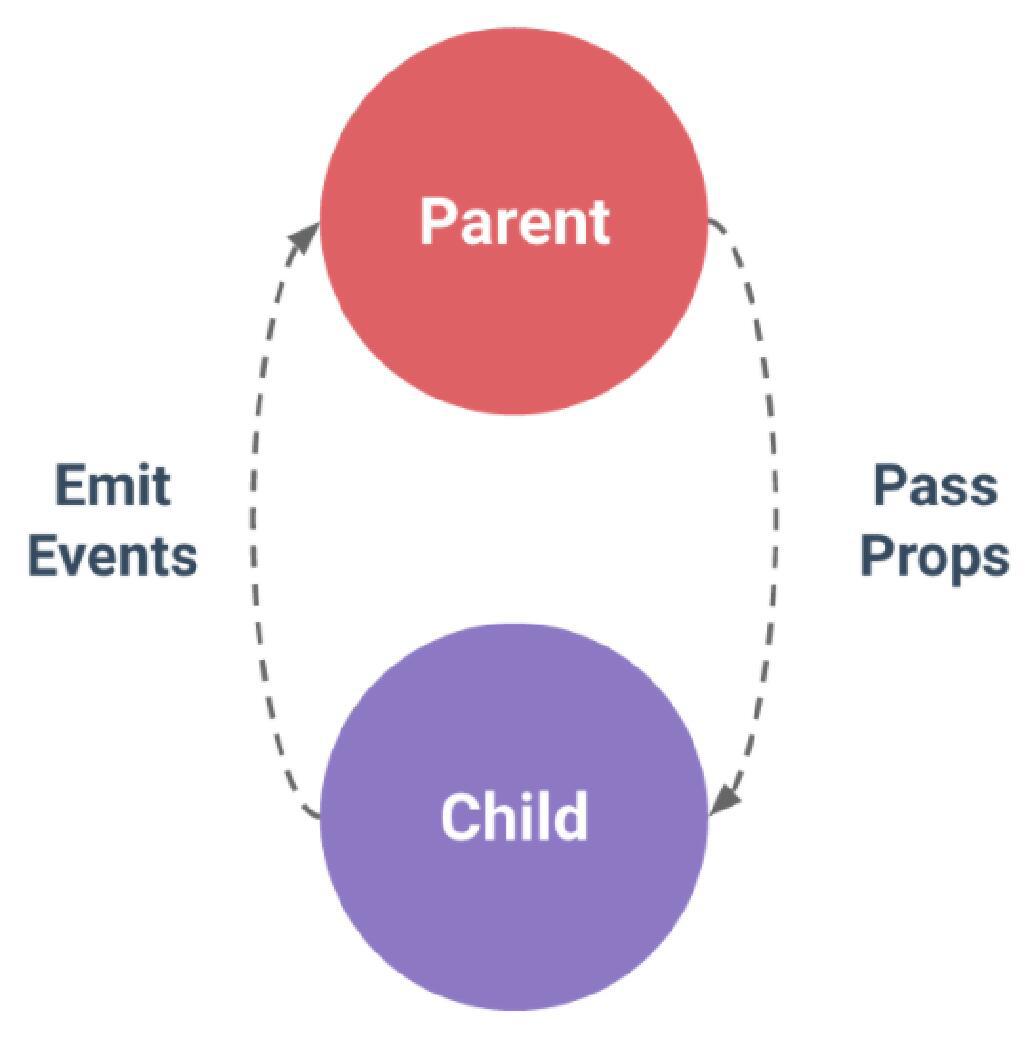
父组件通过 props 向下传递数据给子组件,子组件通过 events 给父组件发送消息
子组件的 props 选项能够接收来自父组件数据,但由于 props 是单向绑定的,所以只能是父组件向子组件传递,不能子组件向父组件传递
子组件通过触发事件来通知父组件改变数据
代码示例如下
首先定义父组件 parent-component.vue
1 2 3 4 5 6 7 8 9 10 11 12 13 14 15 16 17 18 19 20 21 22 23 24 25 26 27 28 29 30 31 32 33 34 35 | <template> <div> <div> <label>父组件</label> </div> <div> <input type="text" v-model="message" placeholder="请输入内容"> <button class="size" @click="show">显示</button> </div> </div></template> <script> export default { data (){ return { message: '' } }, methods: { show(){ alert(this.message) } } }</script> <style>.size { width: 200px}</style> |
其次定义子组件 child-component.vue
1 2 3 4 5 6 7 8 9 10 11 12 13 14 15 16 | <template> <div> <div> <label>子组件</label> </div> <div> <span>来自父组件的消息:{{msg}}</span> </div> </div></template> <script>export default { props: ['msg']}</script> |
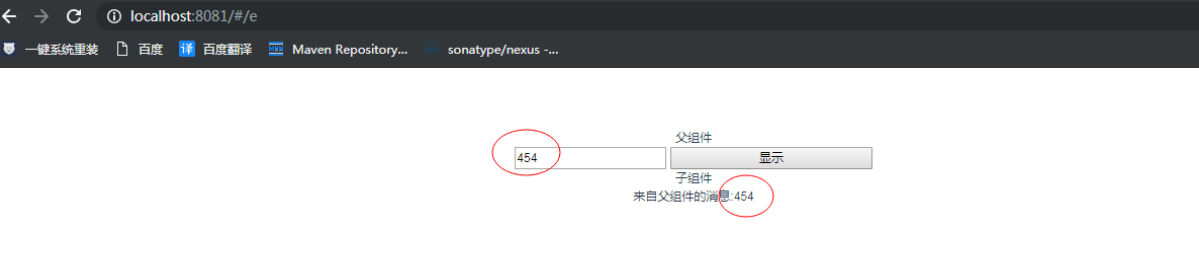
父组件向子组件传递数据
定义完成后,在父组件中引入子组件
1 2 3 4 5 6 7 8 9 10 11 12 13 14 15 16 17 18 19 20 21 22 23 24 25 26 27 28 29 30 31 32 33 34 35 36 37 38 39 40 | <template> <div> <div> <label>父组件</label> </div> <div> <input type="text" v-model="message" placeholder="请输入内容"> <button class="size" @click="show">显示</button> </div> <ChildComponent :msg="message"></ChildComponent> </div></template> <script>import ChildComponent from './child-component'export default { components:{ ChildComponent }, data (){ return { message: '' } }, methods: { show(){ alert(this.message) } } }</script> <style>.size { width: 200px}</style> |
运行后效果如下图,实现了父组件向子组件的单向数据传递
子组件向父组件传递数据
修改子组件代码如下
1 2 3 4 5 6 7 8 9 10 11 12 13 14 15 16 17 18 19 20 21 22 23 24 25 26 27 28 29 30 | <template> <div> <div> <label>子组件</label> </div> <div> <span>来自父组件的消息:{{msg}}</span> <br> <input type="text" v-model="text"> <button @click="sendMessage">向父组件发送消息</button> </div> </div></template> <script>export default { props: ['msg'], data (){ return { text: '' } }, methods: { sendMessage(){ this.$emit('receiveMessage', this.text) } }}</script> |
修改父组件代码如下
1 2 3 4 5 6 7 8 9 10 11 12 13 14 15 16 17 18 19 20 21 22 23 24 25 26 27 28 29 30 31 32 33 34 35 36 37 38 39 40 41 42 | <template> <div> <div> <label>父组件</label> </div> <div> <input type="text" v-model="message" placeholder="请输入内容"> <button class="size" @click="show">显示</button> </div> <ChildComponent :msg="message" @receiveMessage='receiveMessage'></ChildComponent> </div></template> <script>import ChildComponent from './child-component'export default { components:{ ChildComponent }, data (){ return { message: '' } }, methods: { show(){ alert(this.message) }, receiveMessage(message){ console.log(message) } } }</script> <style>.size { width: 200px}</style> |
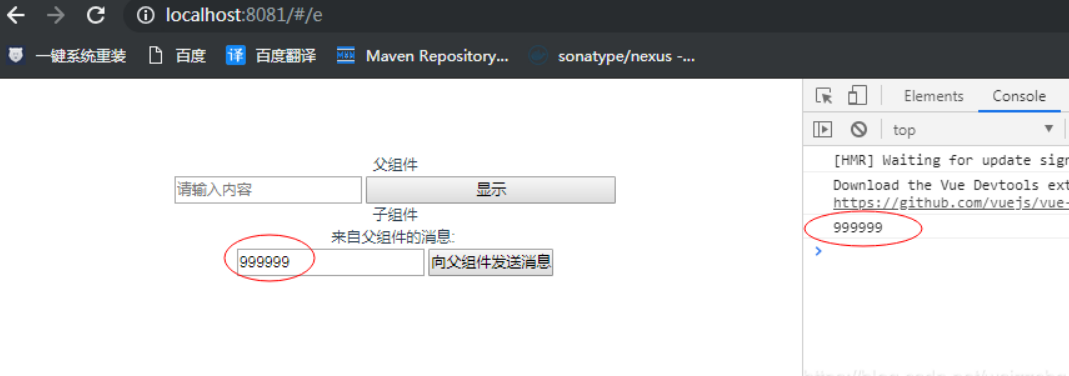
运行如下
输入框输入 999999,点击按钮,控制台打印出 999999,实现了子组件向父组件通信


【推荐】国内首个AI IDE,深度理解中文开发场景,立即下载体验Trae
【推荐】编程新体验,更懂你的AI,立即体验豆包MarsCode编程助手
【推荐】抖音旗下AI助手豆包,你的智能百科全书,全免费不限次数
【推荐】轻量又高性能的 SSH 工具 IShell:AI 加持,快人一步
· TypeScript + Deepseek 打造卜卦网站:技术与玄学的结合
· Manus的开源复刻OpenManus初探
· AI 智能体引爆开源社区「GitHub 热点速览」
· 三行代码完成国际化适配,妙~啊~
· .NET Core 中如何实现缓存的预热?