韦东山2440-学习笔记-设备树
简单上手
1. 环境搭建
按照资料建立的开发环境,遇到个问题
VFS: Mounted root (yaffs filesystem) on device 31:4.
Freeing unused kernel memory: 200K
This architecture does not have kernel memory protection.
Run /linuxrc as init process
Kernel panic - not syncing: Attempted to kill init! exitcode=0x00000200

CPU: 0 PID: 1 Comm: linuxrc Not tainted 4.19.0-rc3 #2
Hardware name: SMDK2440
[<c00106d4>] (unwind_backtrace) from [<c000dca0>] (show_stack+0x10/0x18)
[<c000dca0>] (show_stack) from [<c04dfdfc>] (dump_stack+0x18/0x24)
[<c04dfdfc>] (dump_stack) from [<c0019ce4>] (panic+0xc0/0x25c)
[<c0019ce4>] (panic) from [<c001b5c8>] (do_exit+0x9cc/0xa04)
[<c001b5c8>] (do_exit) from [<c001c1e8>] (do_group_exit+0x0/0xb4)
[<c001c1e8>] (do_group_exit) from [<c0009000>] (ret_fast_syscall+0x0/0x50)
Exception stack(0xc3833fa8 to 0xc3833ff0)
3fa0:                   00000000 b6f9dba7 00000002 be9c0840 00000001 00000000
3fc0: 00000000 b6f9dba7 b6f9db80 00000001 00000000 be9c0a74 b6fa6594 be9c0a68
3fe0: be9c0a6c be9c0820 b6f95904 b6f9584c
---[ end Kernel panic - not syncing: Attempted to kill init! exitcode=0x000002
 ]---
根据资料说法,必须使用低版本的libc,因为高版本的libc不支持arm9。
因为 libc 和 gcc 是一套,所以
编译APP时,使用低版本 arm-linux-gcc-4.3.2.tar.bz2
编译kernel时,使用高版本 arm-linux-gnueabi-4.9xx
在构建rootfs时需要注意,除了使用 arm-linux-gcc-4.3.2 编译 busyxbox外,此gcc配套有多套libc,
root@ubuntu:~/2440/8设备树# ls /usr/local/arm/4.3.2/arm-none-linux-gnueabi/libc/
armv4t  etc  lib  sbin  thumb2  usr
选择 armv4t 指令集的。
代码测试
/dts-v1/;

/ {
        model = "SMDK24440";
        compatible = "samsung,smdk2440";
        #address-cells = <0x1>;  // 所有子节点的reg属性 内存地址用一个32位描述
        #size-cells = <0x1>; // 所有子节点的reg属性 内存大小用1个32位描述

        memory@30000000 {
                device_type = "memory";
                reg = <0x30000000 0x4000000>;
        };

        chosen {
                bootargs = "noinitrd root=/dev/mtdblock4 rw init=/linuxrc console=ttySAC0,115200";
        };

        led@56000050 {
                compatible = "jz2440,led"; // 本device_node会创建platform_device,使用 "jz2440,led" 进行匹配
                reg = <0x56000050 0x8>;// 起始地址 0x56000050 ,内存大小8字节
                pin = <5>; // 自定义一个属性pin,pin属性和 reg属性不同,reg是预定义属性,会被创建成 platform_device的 内存类型 的resource,而pin属性与platform_device无关
        };

};
生成 dtb
./scripts/dtc/dtc -I dts -O dtb -o jz2440.dtb jz2440.dts
#include <linux/cdev.h>
#include <linux/platform_device.h>
#include <linux/io.h>
#include <linux/of.h>
#include <linux/of_device.h>
#include <linux/platform_device.h>
#include <linux/module.h>
#include <linux/init.h>
#include <linux/dma-mapping.h>
#include <linux/bootmem.h>
#include <linux/err.h>
#include <linux/slab.h>
#include <linux/uaccess.h>
#include <linux/device.h>
#include <linux/mm.h>
#include <linux/fs.h>
#include <linux/module.h>

static unsigned int *gpfcon;
static unsigned int *gpfdat;
static unsigned int pin;
static struct class *led_class;
static dev_t dev;

static ssize_t
led_write (struct file *fp, const char __user *user,
                size_t sz, loff_t *offset)
{
        unsigned int val, ret;

        ret = copy_from_user(&val, user, sz);
        if (val == 1)
                *gpfdat &= ~(1 << pin);
        else
                *gpfdat |= (1 << pin);

        return 0;
}

static int
led_open (struct inode *inode, struct file *fp)
{
        printk("led open\n");
        *gpfcon &= ~(0x3 << 2 * pin);
        *gpfcon |= (1 << 2*pin);

        return 0;
}

static const struct file_operations led_ops = {
        .owner = THIS_MODULE,
        .open = led_open,
        .write = led_write,
};

// 当总线的match匹配时,调用
static int
led_drv_probe(struct platform_device *pdev)
{
        struct resource *res;
        struct cdev *cdev;

        printk("led probe.\n");

        // 从platform_device中获得寄存器地址
        res = platform_get_resource(pdev, IORESOURCE_MEM, 0);
        if (res == NULL) {
                printk("Failed to get reg resource\n");
                return -1;
        }
        printk("res->start : 0x%x, res->end : 0x%x\n", res->start, res->end);

        // 从 device_node 中获得要操作的pin编号
        if (of_property_read_u32(pdev->dev.of_node, "pin", &pin) != 0) {
                printk("Failed to get pin resource\n");
                return -1;
        }
        printk("pin : %d\n", pin);

        gpfcon = ioremap(res->start, res->end - res->start + 1);
        gpfdat = gpfcon + 1;

        // cdev
        alloc_chrdev_region(&dev, 0, 1, "led");
        cdev = cdev_alloc();
        cdev->owner = THIS_MODULE;
        cdev->ops = &led_ops;
        cdev_add(cdev, dev, 1);

        // 自动创建设备节点
        led_class = class_create(THIS_MODULE, "led");

        device_create(led_class, NULL, dev, NULL, "led%d", pin);

        return 0;
}

// 当已经匹配的 dev 或 drv  调用 platform_xxx_unregister 时,调用此函数
static int
led_drv_remove(struct platform_device *pdev)
{
        printk("led remove.\n");

        device_destroy(led_class, dev);
        class_destroy(led_class);
        unregister_chrdev(MAJOR(dev), "led"); // 释放设备号 和 cdev
        iounmap(gpfcon);

        return 0;
}

static const struct of_device_id led_match_table[] = {
        { .compatible = "jz2440,led" },
        { }
};
MODULE_DEVICE_TABLE(of, led_match_table);

static struct platform_driver led_drv = {
        .probe  = led_drv_probe,
        .remove = led_drv_remove,
        .driver = {
                .name   = "led",
                .of_match_table = led_match_table,
        },
};

static int __init
led_init(void)
{
        platform_driver_register(&led_drv);
        return 0;
}

static void __exit
led_exit(void)
{
        platform_driver_unregister(&led_drv);
}

module_init(led_init);
module_exit(led_exit);

MODULE_LICENSE("GPL");
2. dts
[memory reservations]  // 格式为 /memreserve/ <address> <length>;
/ {
   [property defintion]
   [child nodes]
};

property 格式1:
[label:] property-name = value [,value,value ...];
value的可选格式
<0x1 0x2 0x3 0x4> // 32位数据的数组,任意长度
"字符串"
[00 11 22] // byte string,16进制表示一个或多个byte,空格可以省略

property 格式2(没有值):
[label:] property-name;

devicetree node 格式:
[label:] node-name[@unit-address] {
   [properties defintions]
   [child nodes]
};
2.1 特殊的默认属性
dts中有很多特殊的节点和属性,他们的用法是内核预定义的,需要参考手册
a.根节点:
#address-cells    // 在它的子节点reg属性中,使用多少个u32整数来描述地址
#size-cells       // 在它的子节点reg属性中,使用多少个u32整数来描述内存大小

compatible        // 指定内核中哪个machine_desc可以支持本设备

model             // 如果两个板子配置基本相同,则compatible是一样的
                  // 那么就用model在分辨
2.2 如何引用节点做属性
a. phandle,phandle取值不能和其他节点的phandle重复
pic@10000000 {
   phandle = <1>;
   interrupt-controller;
};

another-device-node {
   interrupt-parent = <1>; // 引用上述节点
};
b. label,label本质是phandle
PIC:pic@10000000 {
   interrupt-controller;
};

another-device-node {
   interrupt-parent = <&PIC>; // 引用上述节点
};
2.3 节点的同名属性重写
在 jz2440.dtsi中
/ {
   ...
   LED:led {
      compatible = "jz2440,led";
      pin = <0x1>;
   };
}
在 jz2440.dts中
#include "jz2440.dtsi"

&LED {  // 重写 label为 LED 的节点
   pin = <0x2>;  // 重新 pin 属性
}
则最终LED节点为
/ {
   ...
   LED:led {
      compatible = "jz2440,led";
      pin = <0x2>;
   };
}
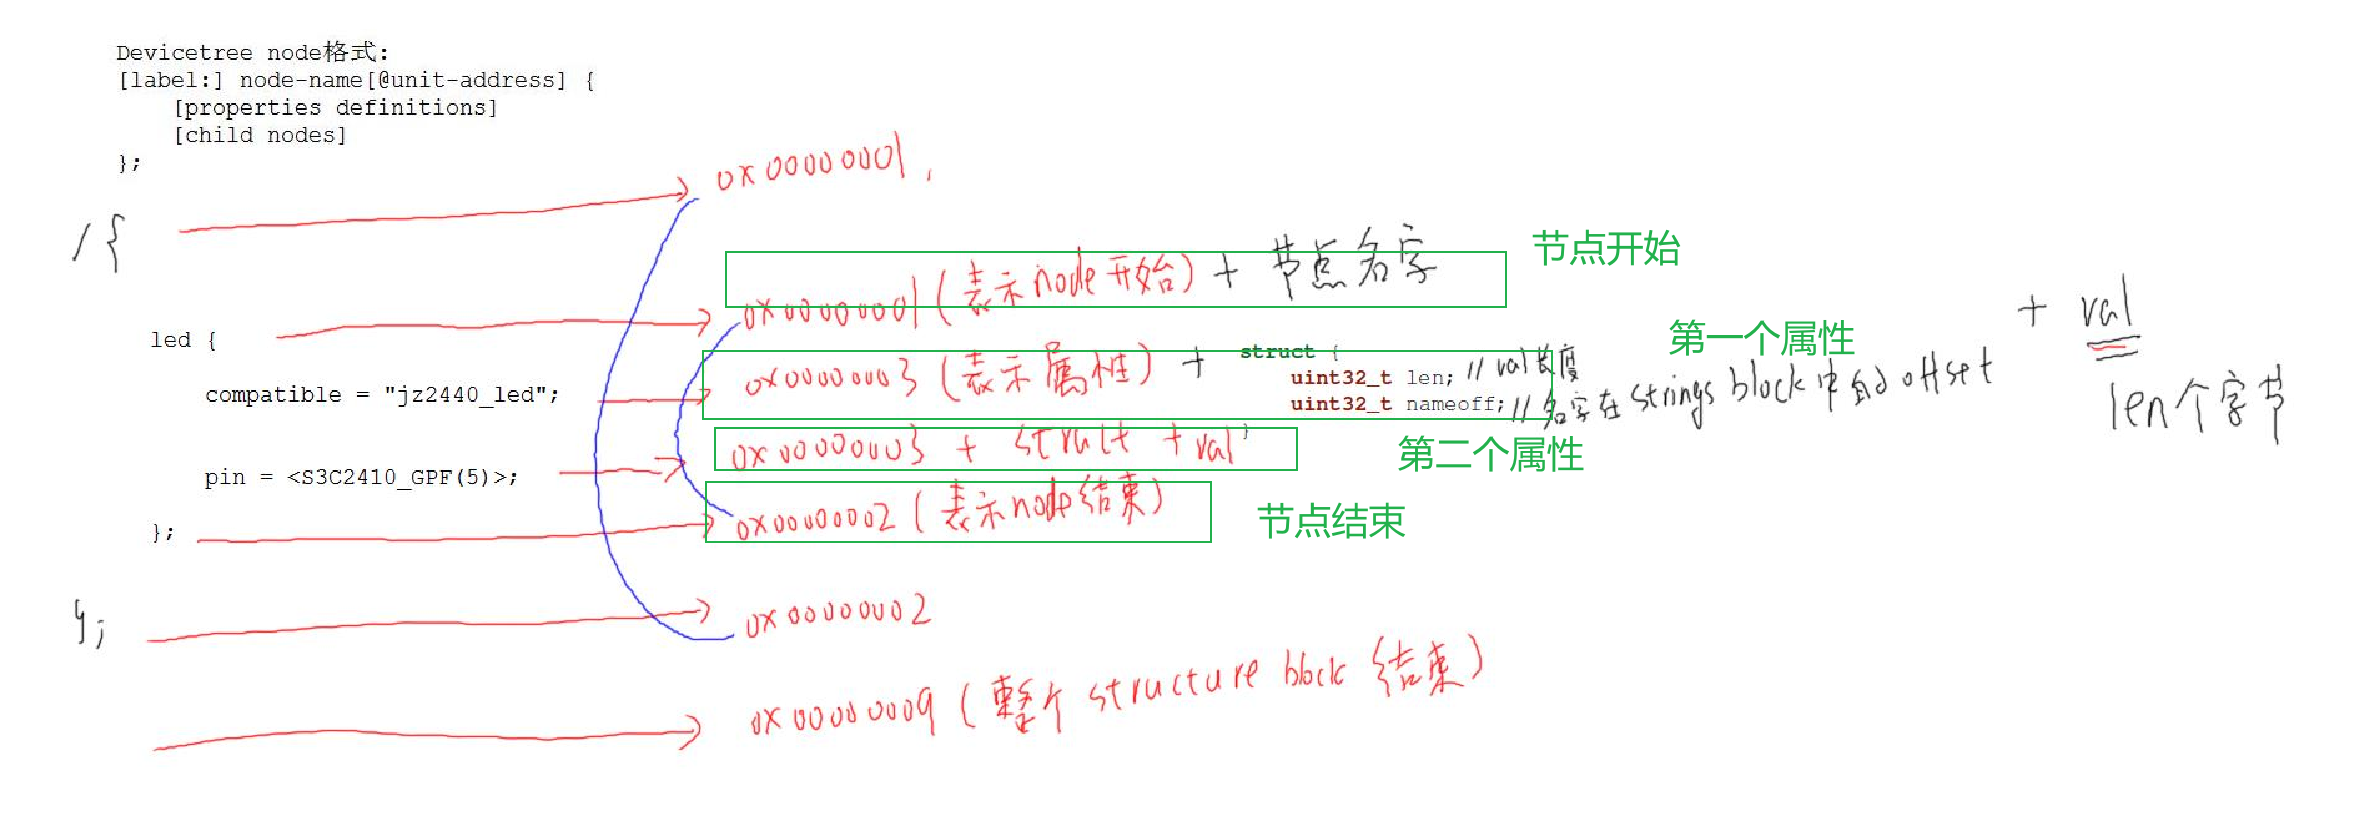
3. dtb格式
整体布局
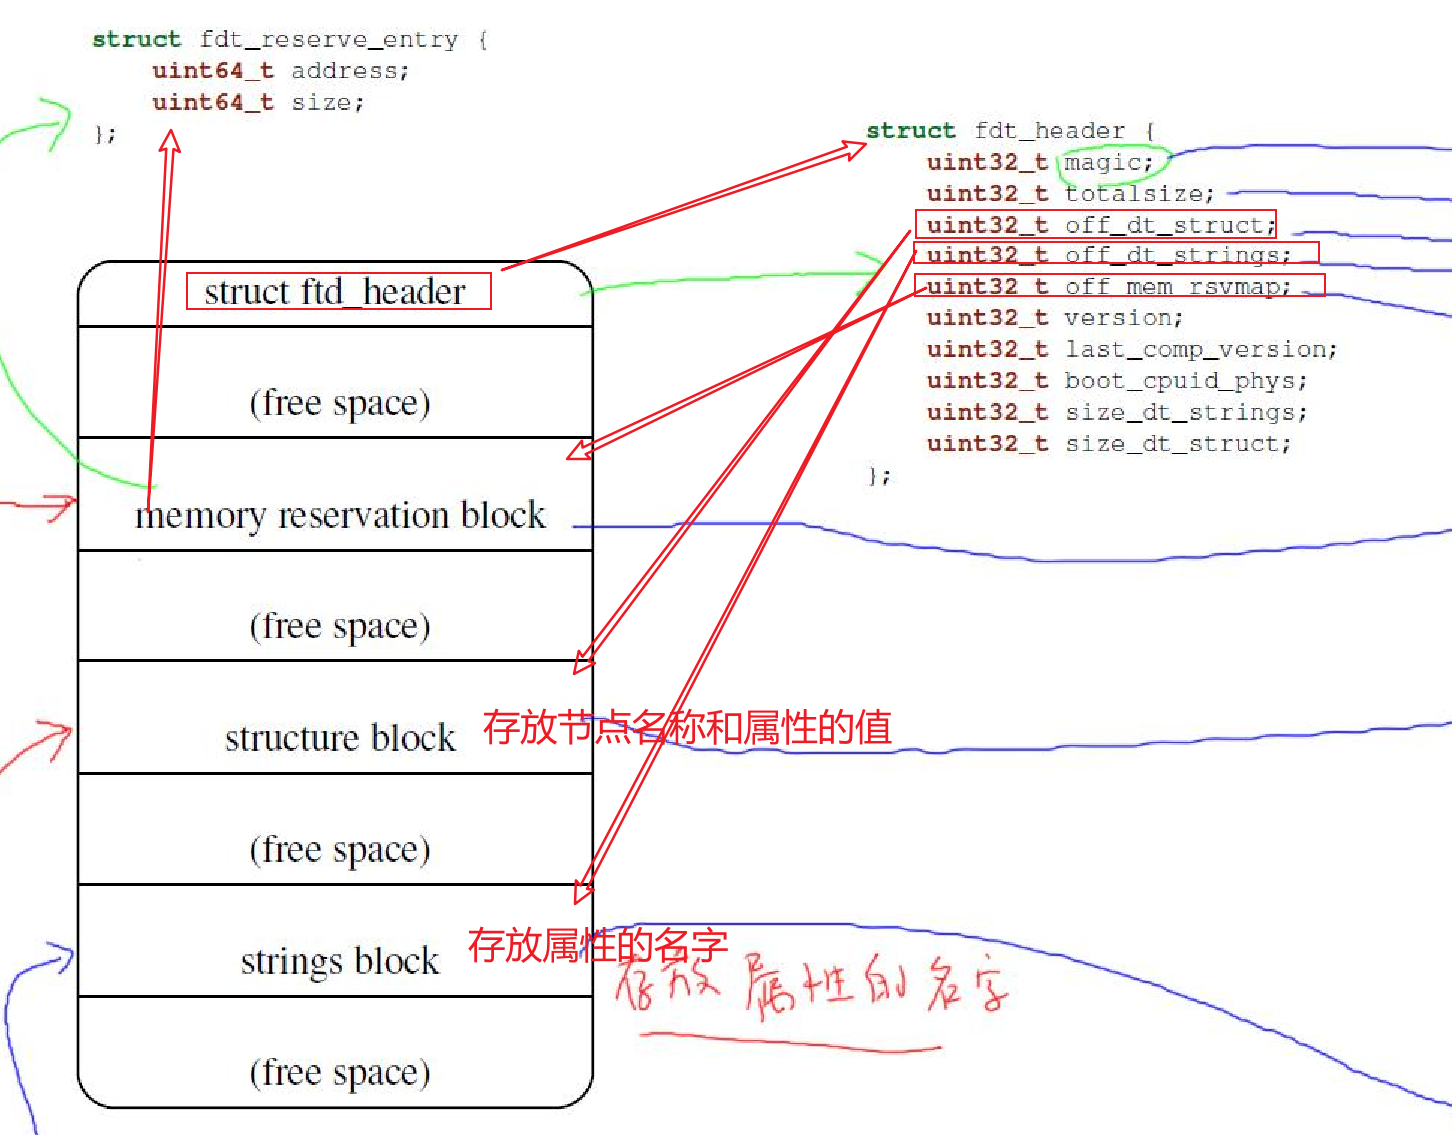
structure block
4. kernel如何处理dtb
4.1 获得dtb的地址
bootloader 启动内核时,会设置 r0, r1, r3 寄存器
r0 设置为0
r1 设置为 machine_id (当使用设备树时,内核忽略此参数)
r2 设置为ATAGS 或 DTB 的开始地址
bootloader给内核传参有两种方法
ATAGS 或 DTB
下面只分析内核如何获得DTB地址
根据head.S可知
内核把bootloader传来的 r1的值(machine_id) 赋给了C变量 __machine_arch_type
内核把bootloader传来的 r2的值(ATAGS或DTB的地址) 赋给了C变量 __atags_pointer
4.2 通过设备树确定machine_desc
没有dtb时,kernel通过 machine_id 决定使用哪个 machine_desc。
使用dtb时,通过比较根节点的 compatible 属性,决定使用哪个 machine_desc.
那么kernel使用什么与compatible属性比较呢?
任意的板子在kernel中都有定义 struct machine_desc 结构,其中的 dt_compat 就是此machine_desc支持的 compatible
#define MACHINE_START(_type, _name)         \
static const struct machine_desc __mach_desc_##_type    \
__used                          \
__attribute__((__section__(".arch.info.init"))) = { \
    .name       = _name,

#define MACHINE_END             \
};

  static const char *eznps_compat[] __initconst = {
      "ezchip,arc-nps",
      NULL,
  };

  MACHINE_START(NPS, "nps")
      .dt_compat  = eznps_compat,
      .init_early = eznps_early_init,
  MACHINE_END
确定machine_desc代码分析
start_kernel
   setup_arch
      setup_machine_fdt(__atags_pointer)
         early_init_dt_verify(phys_to_virt(dt_phys)))   // 将dtb的物理地址转换为虚拟地址,检查dtb,包括检查dtb头部,校验
            initial_boot_params = params; // 用全局变量 initital_boot_params 记录 dtb 的虚拟地址
         of_flat_dt_match_machine  // 根据dtb的compatible属性,找到最优 mdesc
涉及全局变量
initital_boot_params 记录 dtb 的虚拟地址,起始地址
4.3 从设备树中获得运行时配置信息、
有哪些运行时信息
/dts-v1/;

/ {
        model = "SMDK24440";
        compatible = "samsung,smdk2440";
        #address-cells = <0x1>;  // reg 使用一个32位表示地址
                                 // 有时当需要表示64位地址,则设置为 2
                                 // reg通过两个32位的cell组合得到64位地址
        #size-cells = <0x1>;     // reg 使用一个32位表示大小

        memory@30000000 {     // 配置信息,用于告诉内核内存的起始地址和大小
                device_type = "memory";
                reg = <0x30000000 0x4000000>; // 起始地址 0x30000000 ,大小0x4000000
        };

        chosen {
                bootargs = "noinitrd root=/dev/mtdblock4 rw init=/linuxrc console=ttySAC0,115200";  // 配置信息,内核启动参数
        };

        led@56000050 {
                compatible = "jz2440,led";
                reg = <0x56000050 0x8>;
                pin = <5>;
        };

};
处理配置信息的代码分析
start_kernel
setup_arch
setup_machine_fdt(__atags_pointer)
early_init_dt_verify // 检查dtb
of_flat_dt_match_machine // 确定 machine_desc
early_init_dt_scan_nodes // 扫描配置信息
of_scan_flat_dt(early_init_dt_scan_chosen, boot_command_line); // 遍历设备树
// 对每个节点使用 early_init_dt_scan_chosen,
//直到 early_init_dt_scan_chosen 返回非0
early_init_dt_scan_chosen
depth == 1 && (strcmp(uname, "chosen") == 0 // 必须是根节点的 chosen节点
of_get_flat_dt_prop(node, "bootargs", &l); // 获得chosen节点的 bootargs属性
strlcpy(data, p, min((int)l, COMMAND_LINE_SIZE)); // 将bootargs属性拷贝到全局变量 boot_command_line
of_scan_flat_dt(early_init_dt_scan_root, NULL);
early_init_dt_scan_root // 读取根节点的 #address-cells #size-cells
dt_root_size_cells = OF_ROOT_NODE_SIZE_CELLS_DEFAULT; //默认值为 1
dt_root_addr_cells = OF_ROOT_NODE_ADDR_CELLS_DEFAULT;
prop = of_get_flat_dt_prop(node, "#size-cells", NULL); // 读取#size-cells属性
dt_root_size_cells = be32_to_cpup(prop); // 转换字节序并存储到全局变量dt_root_size_cells
prop = of_get_flat_dt_prop(node, "#address-cells", NULL);
dt_root_addr_cells = be32_to_cpup(prop);
of_scan_flat_dt(early_init_dt_scan_memory, NULL); // 扫描/memory节点
early_init_dt_scan_memory
type == NULL || strcmp(type, "memory") != 0 // 过滤其他节点
reg = of_get_flat_dt_prop(node, "reg", &l); // 读取reg属性
base = dt_mem_next_cell(dt_root_addr_cells, ®); // 结合 #address-cells 分析得到内存的起始地址
size = dt_mem_next_cell(dt_root_size_cells, ®);
涉及全局变量
boot_command_line 存储 bootargs
dt_root_size_cells 存储 根节点的 #size-cells属性
dt_root_addr_cells 存储 根节点的 #address-cells属性
4.4 展开dtb创建device node
  struct property {
      char    *name;
      int length;
      void    *value;
      struct property *next;
  #if defined(CONFIG_OF_DYNAMIC) || defined(CONFIG_SPARC)
      unsigned long _flags;
  #endif
  #if defined(CONFIG_OF_PROMTREE)
      unsigned int unique_id;
  #endif
  #if defined(CONFIG_OF_KOBJ)
      struct bin_attribute attr;
  #endif
  };


  struct device_node {
      const char *name;
      const char *type;
      phandle phandle;
      const char *full_name;
      struct fwnode_handle fwnode;

      struct  property *properties;
      struct  property *deadprops;    /* removed properties */
      struct  device_node *parent;
      struct  device_node *child;
      struct  device_node *sibling;
  #if defined(CONFIG_OF_KOBJ)
      struct  kobject kobj;
  #endif
      unsigned long _flags;
      void    *data;
  #if defined(CONFIG_SPARC)
      const char *path_component_name;
      unsigned int unique_id;
      struct of_irq_controller *irq_trans;
  #endif
  };
start_kernel
   setup_arch
      unflatten_device_tree
         __unflatten_device_tree(initial_boot_params, NULL, &of_root,
                     early_init_dt_alloc_memory_arch, false); // 分配内存建议树形结构
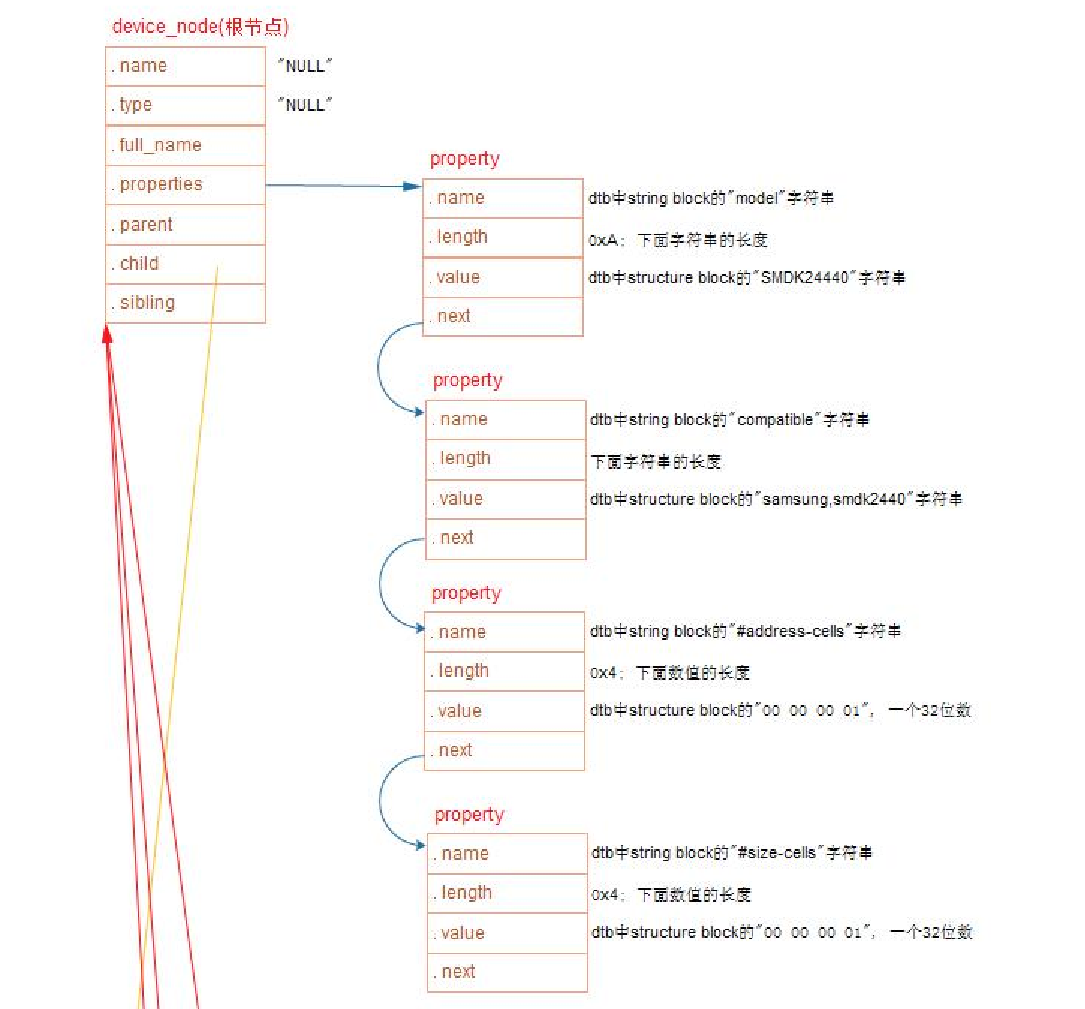
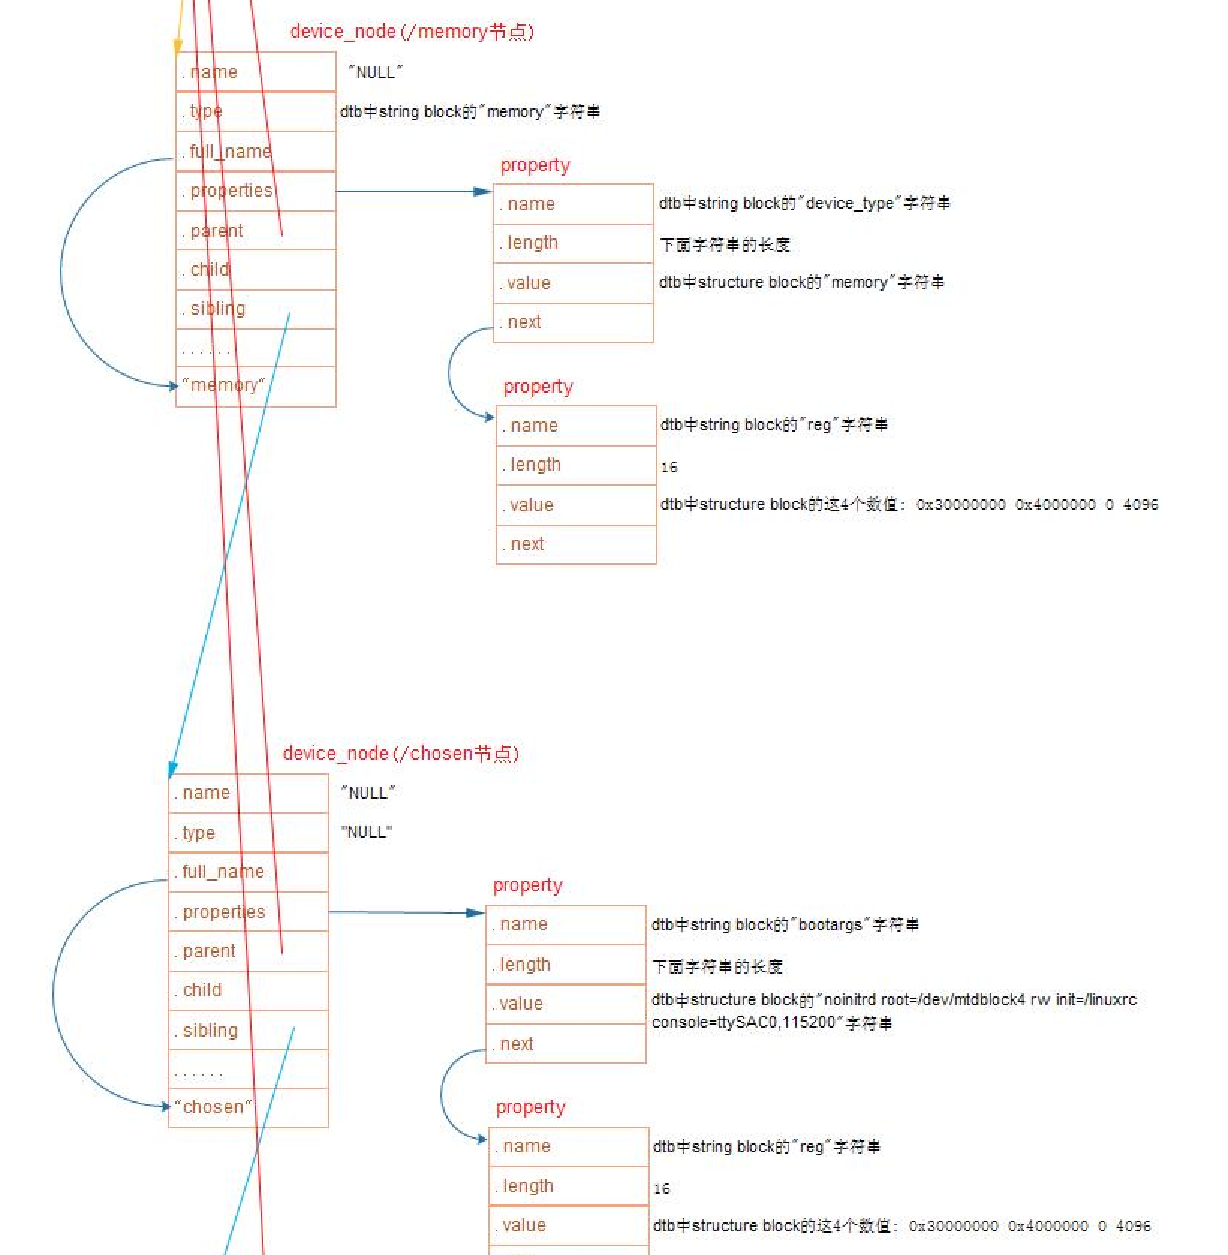

这个device_node树和 dtb会常驻内存。
4.4 device_node 转换成 platform_device
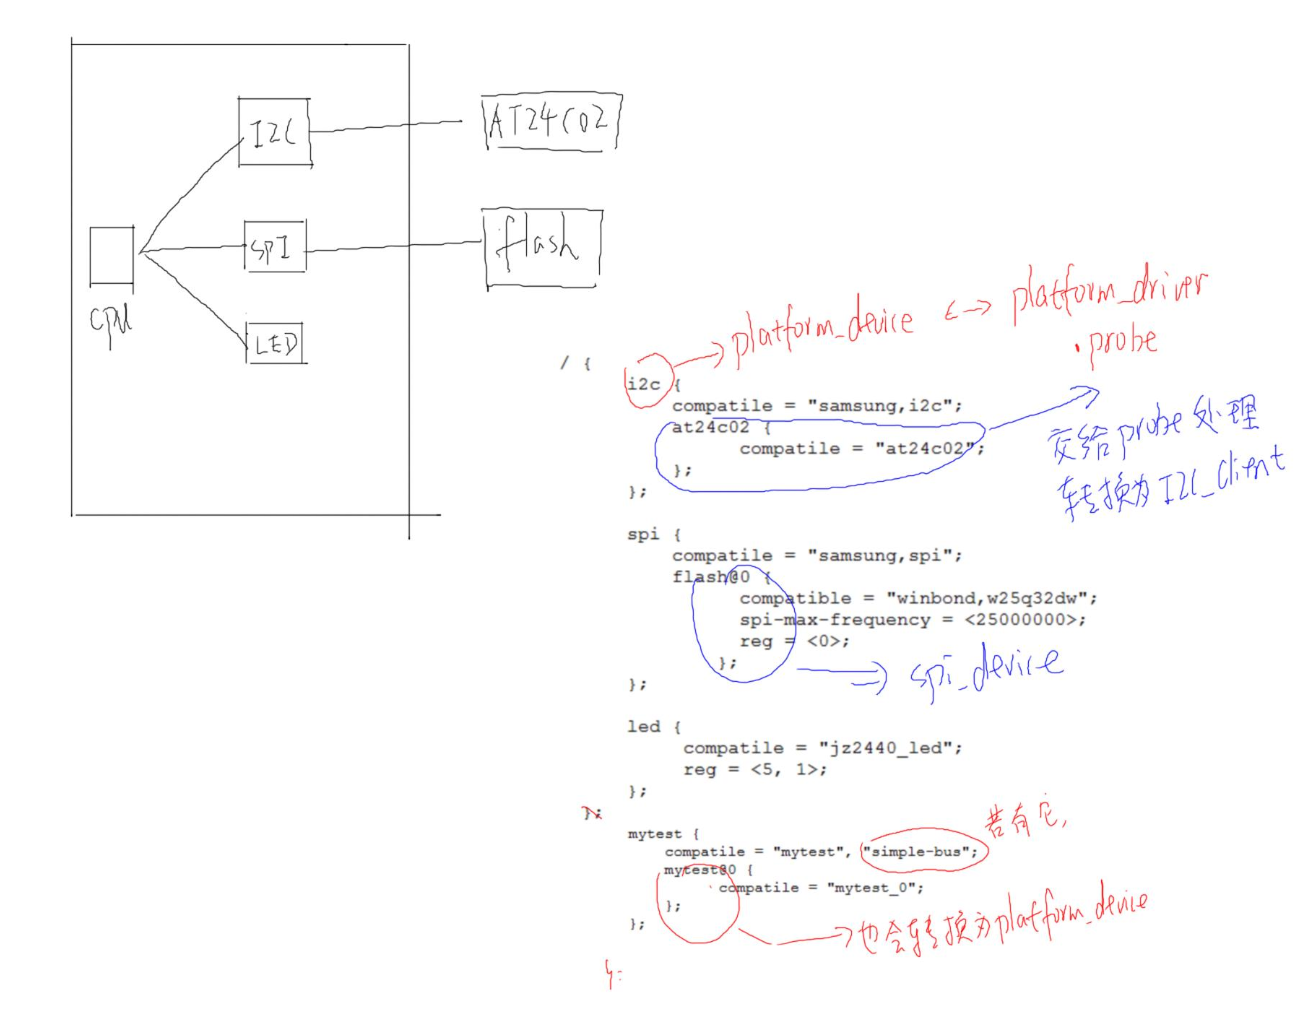
4.4.1 哪些device_node 被转换为platform_device
如果device_node 转换为platform_device,则能和 platform_driver 匹配,所以哪些节点需要这个机制呢?
要转换为platform_device,设备必须是CPU能直接访问内存的,所以有些总线上的设备是一定满足的,那些总线为 "simple-bus","simple-mfd","isa","arm,amba-bus" 。
而有些总线不满足,如 i2c spi,但这些控制器本身是CPU可访问内存的,所以这些控制器会被转为 platform_device,并调用他们的 probe,
在他们的probe中,需要自己决定自己的子节点转换为什么类型。
大致规则
a. 节点属性必须包含 compatible 属性
b. 根节点下的子节点,若包含 compatible 属性,则被转换为 platform_device
c. 根节点的子节点的compatible属性若有 "simple-bus","simple-mfd","isa","arm,amba-bus" 则其子节点被转换为 platform_device
d. 其他根节点的子节点的子节点是否转为platform_device为其父节点的probe函数决定
示例
4.4.2 如何转换
a. platform_device如何确保能存储device_node的所有属性值?
  struct resource {
      resource_size_t start;   // reg属性 地址起始值
      resource_size_t end;     // reg属性 起始地址值 + 地址大小值 - 1
      const char *name;
      unsigned long flags;
      unsigned long desc;
      struct resource *parent, *sibling, *child;
  };


  struct platform_device {
      const char  *name;
      int     id;
      bool        id_auto;
      struct device   dev;          // device_node其他属性值,platform_device不直接保存
                                    // 而通过device间接找到device_node,以获得其他属性
      u32     num_resources;
      struct resource *resource;    // resource 是数组,可以存放内存,中断类型的属性值

      const struct platform_device_id *id_entry;
      char *driver_override; /* Driver name to force a match */

      /* MFD cell pointer */
      struct mfd_cell *mfd_cell;

      /* arch specific additions */
      struct pdev_archdata    archdata;
  };

  struct device {
      struct device       *parent;

      struct device_private   *p;

      struct kobject kobj;

      ...
      struct device_node  *of_node; /* associated device tree node */
      ....
};
所以将 device_node 节点转换为 platform_device 的思路是:
遍历device_node树,将对于符合转换条件的节点创建 platform_device,并分析device_node属性,创建resource填充属性,创建platform_device->device = device_node。
of_platform_default_populate_init 完成节点转换,此函数被链接到init_call表中,在do_initcall被调用
  const struct of_device_id of_default_bus_match_table[] = {
      { .compatible = "simple-bus", },
      { .compatible = "simple-mfd", },
      { .compatible = "isa", },
  #ifdef CONFIG_ARM_AMBA
      { .compatible = "arm,amba-bus", },
  #endif /* CONFIG_ARM_AMBA */
      {} /* Empty terminated list */
  };

of_platform_default_populate_init
   of_platform_default_populate(NULL, NULL, NULL);
      of_platform_populate(NULL, of_default_bus_match_table, NULL, NULL);
          root = root ? of_node_get(root) : of_find_node_by_path("/");    // 找到root节点
          for_each_child_of_node(root, child)   // 遍历根节点的所有子节点
             of_platform_bus_create(child, matches, lookup, parent, true);
                if (strict && (!of_get_property(bus, "compatible", NULL))) // 如果该子节点没有compatible属性则检查下一个
                   return 0;
                if (of_device_is_compatible(bus, "arm,primecell")) { // 如果此总线节点(根节点的子节点)兼容 arm,primecell
                   of_amba_device_create(bus, bus_id, platform_data, parent); // 创建 amba_device
                   return 0;  // 返回检查下一个总线节点
                }

               of_platform_device_create_pdata(bus, NULL, NULL, NULL);  // 创建本总线节点的 platform_device
                   struct platform_device *dev = of_device_alloc(np, bus_id, parent);
                      struct platform_device *dev = platform_device_alloc("", PLATFORM_DEVID_NONE); // 创建platform_device和其下的device。
                      while (of_address_to_resource(np, num_reg, &temp_res) == 0) num_reg++; // 对IO,irq资源进行计数
                      rc = of_address_to_resource(np, i, res); // 将 IO 属性和 IRQ属性 设置到 platform_device的 resource
                      dev->dev.of_node = of_node_get(np); // 建立platform_device和 device_node 的关联

               if (!dev || !of_match_node(matches, bus)) // 不和of_default_bus_match_table匹配,则不为内存直接映射的总线,本分支遍历结束
                  return 0;     // 该总线下子节点是否转换,怎么转换由总线的probe决定

               for_each_child_of_node(bus, child) // 遍历子节点,递归此过程
                  of_platform_bus_create(child, matches, lookup, &dev->dev, strict);
非内存直接映射的设备总线处理,以I2C为例
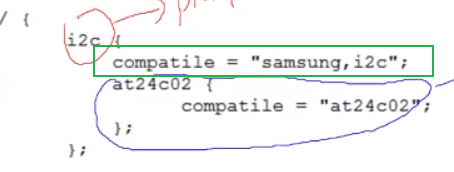
由于IIC总线的compatible没有 "simple-bus","simple-mfd","isa",所以不会递归展开其子节点,
IIC driver的probe负责展开其子节点
s3c24xx_i2c_probe
   i2c_add_numbered_adapter
      __i2c_add_numbered_adapter
         i2c_register_adapter
            of_i2c_register_devices
               bus = of_get_child_by_name(adap->dev.of_node, "i2c-bus"); // 以总线节点为遍历根节点
               for_each_available_child_of_node(bus, node) { // 遍历所有的 device_node 子节点
               client = of_i2c_register_device(adap, node); // 将 device_node 转换为 struct i2c_client 设备
                  of_i2c_get_board_info(&adap->dev, node, &info); // 从device_node 中获得 属性信息
                  client = i2c_new_device(adap, &info);  // 创建struct i2c_client 设备
专门分析下reg属性的解析
of_address_to_resource
    of_get_address(dev, index, &size, &flags); // 根据index找到 device_node->properties 中目标属性的的地址
       bus->count_cells(dev, &na, &ns); // 根据父device_node获得#address-cells #size-cells,用于解析本节点的reg属性
       prop = of_get_property(dev, bus->addresses, &psize); // 获得"reg" 或 "assigned-addresses" 属性
       for (i = 0; psize >= onesize; psize -= onesize, prop += onesize, i++) // reg属性类似于数组类型,有多个元素,遍历以获得目标元素
          if (i == index) {
             *size = of_read_number(prop + na, ns); // 获得 地址大小
             if (flags)
                *flags = bus->get_flags(prop);  // 获得
             return prop;        // 获得 物理起始地址
          }
   of_property_read_string_index(dev, "reg-names", index, &name); // 如果使用了 "reg-names" 属性,作为 resource 的名称
   __of_address_to_resource
      if (flags & IORESOURCE_MEM)
         taddr = of_translate_address(dev, addrp);
      else if (flags & IORESOURCE_IO)
          taddr = of_translate_ioport(dev, addrp, size);
      r->start = taddr;
      r->end = taddr + size - 1;  // 需要r->end并非哨兵
      r->flags = flags;
      r->name = name ? name : dev->full_name;
5. 根文件系统中查看设备树,方便调试
a. /sys/firmware/fdt        // 原始dtb文件

hexdump -C /sys/firmware/fdt

b. /sys/firmware/devicetree // 以目录结构程现的dtb文件, 根节点对应base目录, 每一个节点对应一个目录, 每一个属性对应一个文件

c. /sys/devices/platform    // 系统中所有的platform_device, 有来自设备树的, 也有来有.c文件中注册的
   对于来自设备树的platform_device,
   可以进入 /sys/devices/platform/<设备名>/of_node 查看它的设备树属性

d.  /proc/device-tree 是链接文件, 指向 /sys/firmware/devicetree/base
6. 设备树函数接口
include/linux/目录下有很多of开头的头文件:
dtb -> device_node -> platform_device
a. 处理DTB
of_fdt.h           // dtb文件的相关操作函数, 我们一般用不到, 因为dtb文件在内核中已经被转换为device_node树(它更易于使用)

b. 处理device_node
of.h               // 提供设备树的一般处理函数, 比如 of_property_read_u32(读取某个属性的u32值), of_get_child_count(获取某个device_node的子节点数)
of_address.h       // 地址相关的函数, 比如 of_get_address(获得reg属性中的addr, size值)
of_match_device(从matches数组中取出与当前设备最匹配的一项)
of_dma.h           // 设备树中DMA相关属性的函数
of_gpio.h          // GPIO相关的函数
of_graph.h         // GPU相关驱动中用到的函数, 从设备树中获得GPU信息
of_iommu.h         // 很少用到
of_irq.h           // 中断相关的函数
of_mdio.h          // MDIO (Ethernet PHY) API
of_net.h           // OF helpers for network devices.
of_pci.h           // PCI相关函数
of_pdt.h           // 很少用到
of_reserved_mem.h  // reserved_mem的相关函数

c. 处理 platform_device
of_platform.h      // 把device_node转换为platform_device时用到的函数,
                   // 比如of_device_alloc(根据device_node分配设置platform_device),
                   //     of_find_device_by_node (根据device_node查找到platform_device),
                   //     of_platform_bus_probe (处理device_node及它的子节点)
of_device.h        // 设备相关的函数, 比如 of_match_device


【推荐】国内首个AI IDE,深度理解中文开发场景,立即下载体验Trae
【推荐】编程新体验,更懂你的AI,立即体验豆包MarsCode编程助手
【推荐】抖音旗下AI助手豆包,你的智能百科全书,全免费不限次数
【推荐】轻量又高性能的 SSH 工具 IShell:AI 加持,快人一步
· DeepSeek 开源周回顾「GitHub 热点速览」
· 物流快递公司核心技术能力-地址解析分单基础技术分享
· .NET 10首个预览版发布:重大改进与新特性概览!
· AI与.NET技术实操系列(二):开始使用ML.NET
· 单线程的Redis速度为什么快?