从模型坐标到屏幕坐标
在 3D 引擎中,场景通常被描述为三维空间中的模型或对象,每个模型对象由许多三维顶点组成。最终,这些模型对象将在平面屏幕上呈现和显示。
渲染场景始终相对于摄像机,因此,还必须相对于摄像机的视图定义场景的顶点。了解一下这个转换过程是相当有必要的。
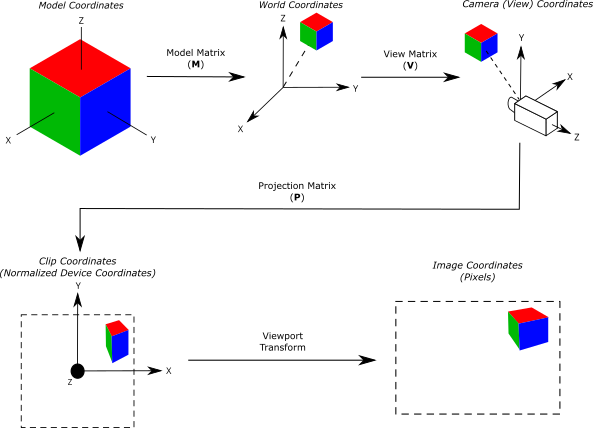
一般从模型坐标到我们可看到在屏幕中的坐标要经过4步变化。
- 模型坐标 -> 世界坐标
- 世界坐标-> 相机坐标
- 相机坐标 -> NDC
- NDC > 屏幕坐标
NDC是Normalized Device Coordinates 的缩写,所谓Normalized Device就是指xyz三个轴向都是-1到1的空间

在 Webgl绘制图形时,顶点着色器将处理每个顶点,期望在剪辑空间中定义顶点的位置。模型视图投影是一系列常见的矩阵转换,可应用于模型空间中定义的顶点,将其转换为剪辑空间,然后可以对其进行栅格化。
定义矩阵
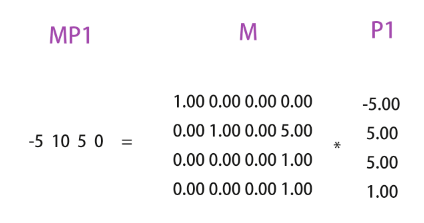
P1 = 模型中的点 point matrix
{
 -5.00
  5.00
  5.00
  1.00
}
M = 模型世界坐标 world matrix
{
  1.00 0.00 0.00 0.00
  0.00 1.00 0.00 5.00
  0.00 0.00 0.00 1.00
  0.00 0.00 0.00 1.00
}
世界向偏移5个单位,使结果看起来有意义。一般世界坐标是0,0,0。
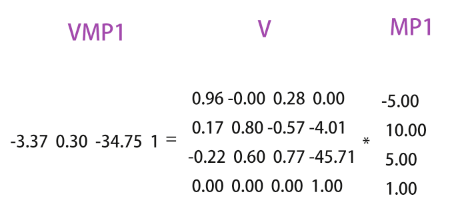
V = 相机 camera matrix invert
{
  0.96 -0.00  0.28  0.00
  0.17  0.80 -0.57 -4.01
 -0.22  0.60  0.77 -45.71
  0.00  0.00  0.00  1.00
}
P = 投影坐标 camera projection matrix
{
  1.50  0.00  0.28  0.00
  0.00  2.75  0.00  0.00
  0.00  0.00 -1.20 -22.00
  0.00  0.00 -1.00  0.00
}
W = 视口坐标 camera projection matrix
{
701.50      0.00    0.00  701.50
  0.00   -384.00    0.00  384.00
  0.00      0.00    0.00    0.00
  0.00      0.00    0.00    1.00
}
在上述矩阵准备好后,后续可进行计算。
转换
第一步 模型坐标 -> 世界坐标
计算出P1在模型世界位置MP1
MP1 = M * P1

第二步 世界坐标-> 相机坐标
计算出P1在相机中的位置VMP1
VMP1 = V*MP1

第三步 相机投影坐标-> NDC
- 计算出P1在相机中的位置PVMP1
- 将4Dvector转为3Dvector,获得 NDC
PVMP1= P*VMP1
NDC = PVMP1 / PVMP1.W // -0.15 0.02 0.57 1.00

第四步 NDC > 屏幕坐标

通过上述四步获取最终视口中的坐标599px,393px。
示例
通过代码角度更容易理解上述过程
/*
    立方体:
  - 大小 10x10x10
  - 世界坐标 (0, 5, 0)

  桔色小球的坐标,在立方体的左上角,(-5, 5, 5)
*/

// cube.position.y = 5
// cube.add(sphere)
// sphere.position.set(-5, 5, 5)

const point = sphere.position.clone(); // (-5, 5, 5)
console.log("point=", point);

//
// A: Model -> World
//

const M = cube.matrixWorld;
console.log("Model (World) Matrix", M);
point.applyMatrix4(M);
console.log("world-space point=", point);

//
// B: World -> Camera (aka View)
//

const V = camera.matrixWorldInverse;
console.log("View Matrix", V);
point.applyMatrix4(V);
console.log("view-space point=", point);

//
// C: Camera -> NDC
//

const P = camera.projectionMatrix;
console.log("Projection Matrix", P);
point.applyMatrix4(P);
console.log("clip coordinates", point);

//
// D: NDC -> Screen
//

const W = new THREE.Matrix4();
const { x: WW, y: WH } = renderer.getSize(new THREE.Vector2());
W.set(
  WW / 2, 0, 0, WW / 2,
  0, -WH / 2, 0, WH / 2,
  0, 0, 0.5, 0.5,
  0, 0, 0, 1
);
console.log("Window Matrix", W);
point.applyMatrix4(W);
console.log("window coordinates", point);
用一张图更容易看懂这个过程:

相关的文章
https://webgl2fundamentals.org/webgl/lessons/zh_cn/webgl-matrix-naming.html
https://jsantell.com/model-view-projection/


【推荐】国内首个AI IDE,深度理解中文开发场景,立即下载体验Trae
【推荐】编程新体验,更懂你的AI,立即体验豆包MarsCode编程助手
【推荐】抖音旗下AI助手豆包,你的智能百科全书,全免费不限次数
【推荐】轻量又高性能的 SSH 工具 IShell:AI 加持,快人一步
· 被坑几百块钱后,我竟然真的恢复了删除的微信聊天记录!
· 没有Manus邀请码?试试免邀请码的MGX或者开源的OpenManus吧
· 【自荐】一款简洁、开源的在线白板工具 Drawnix
· 园子的第一款AI主题卫衣上架——"HELLO! HOW CAN I ASSIST YOU TODAY
· Docker 太简单,K8s 太复杂?w7panel 让容器管理更轻松!
2020-04-03 typescript 中 d.ts module 与 namespace 区别