
一台机器git配置gitlab和github两个账号和邮箱
背景
由于公司使用gitlab部署私有代码库,个人有需求查看github的开源代码,如果配置全局的账号密码会冲突。所以有必要生成两个id_rsa.pub密钥分别配置到github和gitlab的ssh密钥中去。
步骤
- 下载git和tortoisegit
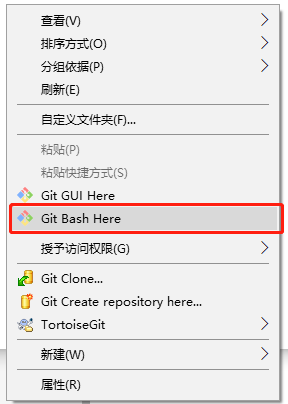
- 在空文件夹右键“Git Bash Here”,如图所示,进去git bash界面。
- 设置无密码登录
a.生成第1个git无密码登录的id_rsa
ssh-keygen -t rsa -f ~/.ssh/id_rsa_1 -C “第1个邮箱”
如图所示,直接回车即可

b.生成第2个git无密码登录的id_rsa
ssh-keygen -t rsa -f ~/.ssh/id_rsa_2 -C “第2个邮箱”
- 此时能在~/.ssh/config文件中看到第一个邮箱的配置,添加第二个邮箱配置。
vim ~/.ssh/config
# 该文件用于配置私钥对应的服务器
# first user
Host git@github.com
HostName https://github.com
User 用户名
IdentityFile ~/.ssh/id_1

# second user
Host git@gitlab.10101111.com
HostName http://gitlab.10101111.com
User 用户名
IdentityFile ~/.ssh/id_rsa_2
- 将id_rsa_1.pub和id_rsa_2.pub分别配置到github.com和gitlab.10101111.com的ssh密钥配置中。
在github找到“Settings->SSH and GPG keys”添加id_rsa_1.pub;在gitlab.10101111.com找到“设置->SSH密钥”添加id_rsa_2.pub。
 - 取消git的全局配置(如果之前就有配置的情况下)
git config --global --unset user.name “XXX”
git config --global --unset user.email "xxx@xx.com"
查看是否取消成功
git config --global -l
如图下图所示,如果没有用户名和邮箱就代表取消了全局配置了。

- 执行ssh识别
(1)#Start the ‘ssh-agent.exe’ process
eval $(ssh-agent -s)
(2)#install the SSH keys
ssh-add ~/.ssh/id_rsa_1
ssh-add ~/.ssh/id_rsa_2
(3)# show all id_rsa
ssh-add -l

注意:
1、如果ssh-add这步报错:Could not open a connection to your authentication agent.
需要先启动ssh-agent,也就是上面的第一个步骤。
参考链接:https://stackoverflow.com/questions/17846529/could-not-open-a-connection-to-your-authentication-agent
2、如果执行ssh-add -l报错:Could not open a connection to your authentication agent.
需要先将密钥添加,也就是上述的第二步。
参考链接:https://stackoverflow.com/questions/26505980/github-permission-denied-ssh-add-agent-has-no-identities
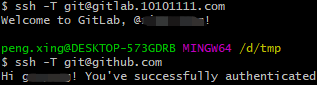
8. 测试是否能无密码连接成功
ssh -T git@gitlab.10101111.com
ssh -T git@github.com

 浙公网安备 33010602011771号