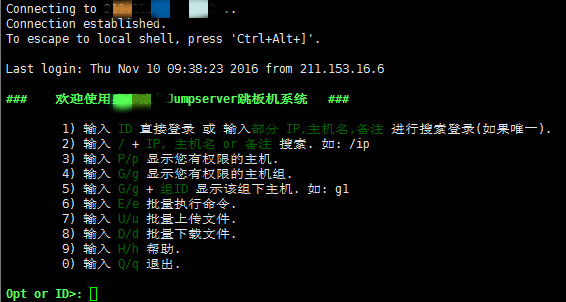
那就用pthon来写个跳板机吧
1、需求
命令行模式的堡垒机简单需求:
- 管理员为用户在服务器上创建账号(将公钥放置服务器,或者使用用户名密码)
- 用户登陆堡垒机,输入堡垒机用户名密码,显示当前用户管理的服务器列表
- 用户选择服务器,并自动登陆
- 执行操作并同时将用户操作记录
2、程序设计
程序一:
1、后台管理
- 堡垒机上创建用户和密码(堡垒机root封装的类,UserProfile表)
- .bashrc
/usr/bin/python3 /data/bastion.py
exit
2、后台管理
- 服务器上创建用户和密码 或 公钥上传
- 服务器账号 -> 人 关联
程序二:
3、用户登录
说明:用户使用xsehll登陆的时候,触发登陆脚本例如:

- ssh 堡垒机用户名@堡垒机IP
- 获取当前用户 os.environ['USER']
- 获取当前用户的主机列表
- 获取选中的主机下的所有用户
- 选择任何一个用户
3、实现思路

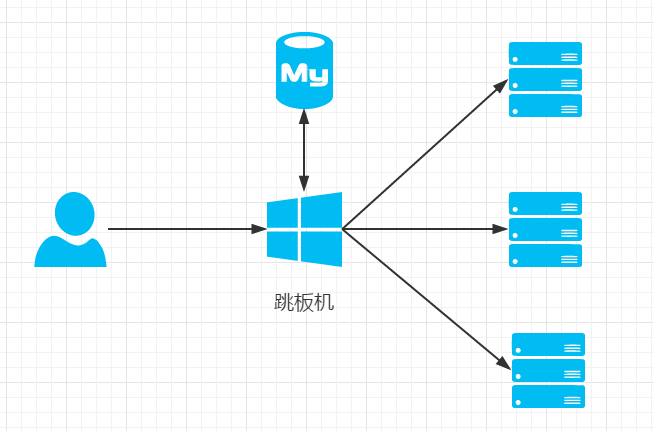
堡垒机执行流程:
- 管理员为用户在服务器上创建账号(将公钥放置服务器,或者使用用户名密码)
- 用户登陆堡垒机,输入堡垒机用户名密码,现实当前用户管理的服务器列表
- 用户选择服务器,并自动登陆
- 执行操作并同时将用户操作记录
注:配置.brashrc实现ssh登陆后自动执行脚本,如:/usr/bin/python /home/wupeiqi/menu.py
那么需要用到的点:
- 1、使用 ORM/Schema Type/SQL Expression Language/Engine/ConnectionPooling/Dialect 所有组件对数据进行操作。根据类创建对象,对象转换成SQL,执行SQL。
- 2、paramiko模块,基于SSH用于连接远程服务器并执行相关操作。
具体实现流程:
- 设计表机构
- 创建表结构
- 利用paramiko模块去实现跳板机底层的ssh连接并执行相关操作
- 将底层的连接封装成跳板机用户对指定主机组和用户的操作并记录日志
4、表结构设计
1、主机表
记录服务器主机名、IP、端口。

2、主机用户表
记录唯一ID号主机对于的用户名、连接方式、连接凭证。这里需要用外键关联一下主机表的ID。

3、跳板机用户表
记录跳板机的用户名/密码。

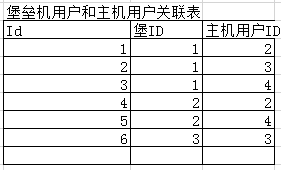
4、跳板机用户和主机用户关联表
记录跳板机用户和服务主机用户的对应关系。

5、日志记录表
记录跳板机用户的命令操作日志。


 1 #!/usr/bin/env python
 2 # -*- coding:utf-8 -*-
 3
 4 from sqlalchemy import create_engine, and_, or_, func, Table
 5 from sqlalchemy.ext.declarative import declarative_base
 6 from sqlalchemy import Column, Integer, String, ForeignKey, UniqueConstraint, DateTime
 7 from sqlalchemy.orm import sessionmaker, relationship
 8
 9 Base = declarative_base()  # 生成一个SqlORM 基类
10
11
12 class Host(Base):
13     __tablename__ = 'host'
14     id = Column(Integer, primary_key=True, autoincrement=True)
15     hostname = Column(String(64), unique=True, nullable=False)
16     ip_addr = Column(String(128), unique=True, nullable=False)
17     port = Column(Integer, default=22)
18
19
20 class HostUser(Base):
21     __tablename__ = 'host_user'
22     id = Column(Integer, primary_key=True, autoincrement=True)
23     username = Column(String(64), unique=True, nullable=False)
24     AuthTypes = [
25         ('p', 'SSH/Password'),
26         ('r', 'SSH/KEY'),
27     ]
28     auth_type = Column(String(16))
29     cert = Column(String(255))
30
31     host_id = Column(Integer, ForeignKey('host.id'))
32
33     __table_args__ = (
34         UniqueConstraint('host_id', 'username', name='_host_username_uc'),
35     )
36
37
38 class Group(Base):
39     __tablename__ = 'group'
40     id = Column(Integer, primary_key=True, autoincrement=True)
41     name = Column(String(64), unique=True, nullable=False)
42
43
44 class UserProfile(Base):
45     __tablename__ = 'user_profile'
46     id = Column(Integer, primary_key=True, autoincrement=True)
47     username = Column(String(64), unique=True, nullable=False)
48     password = Column(String(255), nullable=False)
49
50
51 class Group2UserProfile(Base):
52     __tablename__ = 'group_2_user_profile'
53     id = Column(Integer, primary_key=True, autoincrement=True)
54     user_profile_id = Column(Integer, ForeignKey('user_profile.id'))
55     group_id = Column(Integer, ForeignKey('group.id'))
56     __table_args__ = (
57         UniqueConstraint('user_profile_id', 'group_id', name='ux_user_group'),
58     )
59
60
61 class Group2HostUser(Base):
62     __tablename__ = 'group_2_host_user'
63     id = Column(Integer, primary_key=True, autoincrement=True)
64     host_user_id = Column(Integer, ForeignKey('host_user.id'))
65     group_id = Column(Integer, ForeignKey('group.id'))
66     __table_args__ = (
67         UniqueConstraint('group_id', 'host_user_id', name='ux_group_host_user'),
68     )
69
70
71 class UserProfile2HostUser(Base):
72     __tablename__ = 'user_profile_2_host_user'
73     id = Column(Integer, primary_key=True, autoincrement=True)
74     host_user_id = Column(Integer, ForeignKey('host_user.id'))
75     user_profile_id = Column(Integer, ForeignKey('user_profile.id'))
76     __table_args__ = (
77         UniqueConstraint('user_profile_id', 'host_user_id', name='ux_user_host_user'),
78     )
79
80
81 class AuditLog(Base):
82     __tablename__ = 'audit_log'
83     id = Column(Integer, primary_key=True, autoincrement=True)
84
85     action_choices2 = [
86         (u'cmd', u'CMD'),
87         (u'login', u'Login'),
88         (u'logout', u'Logout'),
89     ]
90     action_type = Column(String(16))
91     cmd = Column(String(255))
92     date = Column(DateTime)
93     user_profile_id = Column(Integer, ForeignKey('user_profile.id'))
94     host_user_id = Column(Integer, ForeignKey('host_user.id'))
95
96 表结构示例
5、利用paramiko模块实现ssh连接
5.1、paramiko实现ssh连接基础:
http://www.cnblogs.com/yangliheng/p/6344528.html
5.2、SshClient 封装 Transport:
基于用户名密码连接:
 1 import paramiko
 2
 3 transport = paramiko.Transport(('hostname', 22))
 4 transport.connect(username='wupeiqi', password='123')
 5
 6 ssh = paramiko.SSHClient()
 7 ssh._transport = transport
 8
 9 stdin, stdout, stderr = ssh.exec_command('df')
10 print stdout.read()
11
12 transport.close()
基于公钥密钥连接:
 1 import paramiko
 2
 3 private_key = paramiko.RSAKey.from_private_key_file('/home/auto/.ssh/id_rsa')
 4
 5 transport = paramiko.Transport(('hostname', 22))
 6 transport.connect(username='wupeiqi', pkey=private_key)
 7
 8 ssh = paramiko.SSHClient()
 9 ssh._transport = transport
10
11 stdin, stdout, stderr = ssh.exec_command('df')
12
13 transport.close()

 1 import paramiko
 2 from io import StringIO
 3
 4 key_str = """-----BEGIN RSA PRIVATE KEY-----
 5 MIIEpQIBAAKCAQEAq7gLsqYArAFco02/55IgNg0r7NXOtEM3qXpb/dabJ5Uyky/8
 6 NEHhFiQ7deHIRIuTW5Zb0kD6h6EBbVlUMBmwJrC2oSzySLU1w+ZNfH0PE6W6fans
 7 H80whhuc/YgP+fjiO+VR/gFcqib8Rll5UfYzf5H8uuOnDeIXGCVgyHQSmt8if1+e
 8 7hn1MVO1Lrm9Fco8ABI7dyv8/ZEwoSfh2C9rGYgA58LT1FkBRkOePbHD43xNfAYC
 9 tfLvz6LErMnwdOW4sNMEWWAWv1fsTB35PAm5CazfKzmam9n5IQXhmUNcNvmaZtvP
10 c4f4g59mdsaWNtNaY96UjOfx83Om86gmdkKcnwIDAQABAoIBAQCnDBGFJuv8aA7A
11 ZkBLe+GN815JtOyye7lIS1n2I7En3oImoUWNaJEYwwJ8+LmjxMwDCtAkR0XwbvY+
12 c+nsKPEtkjb3sAu6I148RmwWsGncSRqUaJrljOypaW9dS+GO4Ujjz3/lw1lrxSUh
13 IqVc0E7kyRW8kP3QCaNBwArYteHreZFFp6XmtKMtXaEA3saJYILxaaXlYkoRi4k8
14 S2/K8aw3ZMR4tDCOfB4o47JaeiA/e185RK3A+mLn9xTDhTdZqTQpv17/YRPcgmwz
15 zu30fhVXQT/SuI0sO+bzCO4YGoEwoBX718AWhdLJFoFq1B7k2ZEzXTAtjEXQEWm6
16 01ndU/jhAasdfasdasdfasdfa3eraszxqwefasdfadasdffsFIfAsjQb4HdkmHuC
17 OeJrJOd+CYvdEeqJJNnF6AbHyYHIECkj0Qq1kEfLOEsqzd5nDbtkKBte6M1trbjl
18 HtJ2Yb8w6o/q/6Sbj7wf/cW3LIYEdeVCjScozVcQ9R83ea05J+QOAr4nAoGBAMaq
19 UzLJfLNWZ5Qosmir2oHStFlZpxspax/ln7DlWLW4wPB4YJalSVovF2Buo8hr8X65
20 lnPiE41M+G0Z7icEXiFyDBFDCtzx0x/RmaBokLathrFtI81UCx4gQPLaSVNMlvQA
21 539GsubSrO4LpHRNGg/weZ6EqQOXvHvkUkm2bDDJAoGATytFNxen6GtC0ZT3SRQM
22 WYfasdf3xbtuykmnluiofasd2sfmjnljkt7khghmghdasSDFGQfgaFoKfaawoYeH
23 C2XasVUsVviBn8kPSLSVBPX4JUfQmA6h8HsajeVahxN1U9e0nYJ0sYDQFUMTS2t8
24 RT57+WK/0ONwTWHdu+KnaJECgYEAid/ta8LQC3p82iNAZkpWlGDSD2yb/8rH8NQg
25 9tjEryFwrbMtfX9qn+8srx06B796U3OjifstjJQNmVI0qNlsJpQK8fPwVxRxbJS/
26 pMbNICrf3sUa4sZgDOFfkeuSlgACh4cVIozDXlR59Z8Y3CoiW0uObEgvMDIfenAj
27 98pl3ZkCgYEAj/UCSni0dwX4pnKNPm6LUgiS7QvIgM3H9piyt8aipQuzBi5LUKWw
28 DlQC4Zb73nHgdREtQYYXTu7p27Bl0Gizz1sW2eSgxFU8eTh+ucfVwOXKAXKU5SeI
29 +MbuBfUYQ4if2N/BXn47+/ecf3A4KgB37Le5SbLDddwCNxGlBzbpBa0=
30 -----END RSA PRIVATE KEY-----"""
31
32 private_key = paramiko.RSAKey(file_obj=StringIO(key_str))
33 transport = paramiko.Transport(('10.0.1.40', 22))
34 transport.connect(username='wupeiqi', pkey=private_key)
35
36 ssh = paramiko.SSHClient()
37 ssh._transport = transport
38
39 stdin, stdout, stderr = ssh.exec_command('df')
40 result = stdout.read()
41
42 transport.close()
43
44 print(result)
5.3、Ssh连接demo:

 1 #!/usr/bin/env python
 2 # -*- coding:utf-8 -*-
 3 import paramiko
 4 import uuid
 5
 6 class Haproxy(object):
 7
 8     def __init__(self):
 9         self.host = '172.0.2.19'
10         self.port = 21345
11         self.username = 'ylh'
12         self.pwd = '123'
13         self.__k = None
14
15     def create_file(self):
16         file_name = str(uuid.uuid4())
17         with open(file_name,'w') as f:
18             f.write('sb')
19         return file_name
20
21     def run(self):
22         self.connect()
23         self.upload()
24         self.rename()
25         self.close()
26
27     def connect(self):
28         transport = paramiko.Transport((self.host,self.port))
29         transport.connect(username=self.username,password=self.pwd)
30         self.__transport = transport
31
32     def close(self):
33
34         self.__transport.close()
35
36     def upload(self):
37         # 连接,上传
38         file_name = self.create_file()
39
40         sftp = paramiko.SFTPClient.from_transport(self.__transport)
41         # 将location.py 上传至服务器 /tmp/test.py
42         sftp.put(file_name, '/home/wupeiqi/tttttttttttt.py')
43
44     def rename(self):
45
46         ssh = paramiko.SSHClient()
47         ssh._transport = self.__transport
48         # 执行命令
49         stdin, stdout, stderr = ssh.exec_command('mv /home/wupeiqi/tttttttttttt.py /home/wupeiqi/ooooooooo.py')
50         # 获取命令结果
51         result = stdout.read()
52
53
54 ha = Haproxy()
55 ha.run()
6、Python操作Mysql数据库
Python 操作 Mysql 模块的安装
Python 操作 Mysql 模块的安装
|
1
2
3
4
5
|
linux: yum install MySQL-pythonwindow: http://files.cnblogs.com/files/wupeiqi/py-mysql-win.zip |
SQL基本使用
http://www.cnblogs.com/yangliheng/p/6270392.html
Python Mysql Api
1、插入数据
2、删除数据
3、修改数据
4、查数据
7、跳板机代码目录
Go_Jump/
|-- bin/
|   |-- manager.py
|   |-- manager.py

|-- foo/
|   |-- tests/
|   |   |-- __init__.py
|   |   |-- test_main.py
|   |
|   |-- __init__.py
|   |-- main.py
|
|-- docs/
|   |-- conf.py
|   |-- abc.rst
|
|-- setting.py
|-- requirements.txt
|-- README
8、跳板机简单流程图
9、完整代码git地址
https://github.com/yangliheng


