

centernet的数据增强操作--仿射变换
https://blog.csdn.net/yang332233/article/details/110164808?ops_request_misc=%257B%2522request%255Fid%2522%253A%2522166988875516782428685782%2522%252C%2522scm%2522%253A%252220140713.130102334.pc%255Fblog.%2522%257D&request_id=166988875516782428685782&biz_id=0&utm_medium=distribute.pc_search_result.none-task-blog-2blogfirst_rank_ecpm_v1~rank_v31_ecpm-3-110164808-null-null.nonecase&utm_term=centernet&spm=1018.2226.3001.4450
其实在这里也分析过。奈何当初写的代码不知道哪里去了;
先看下效果图:

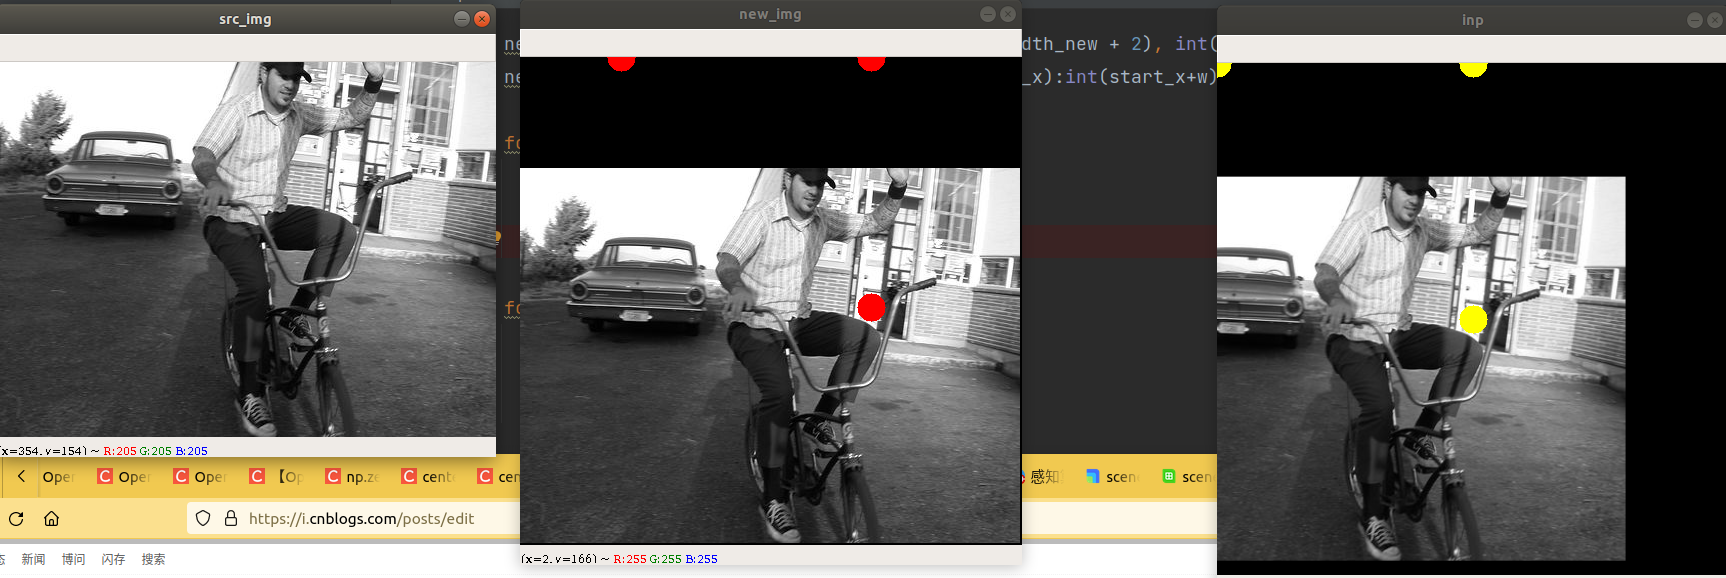
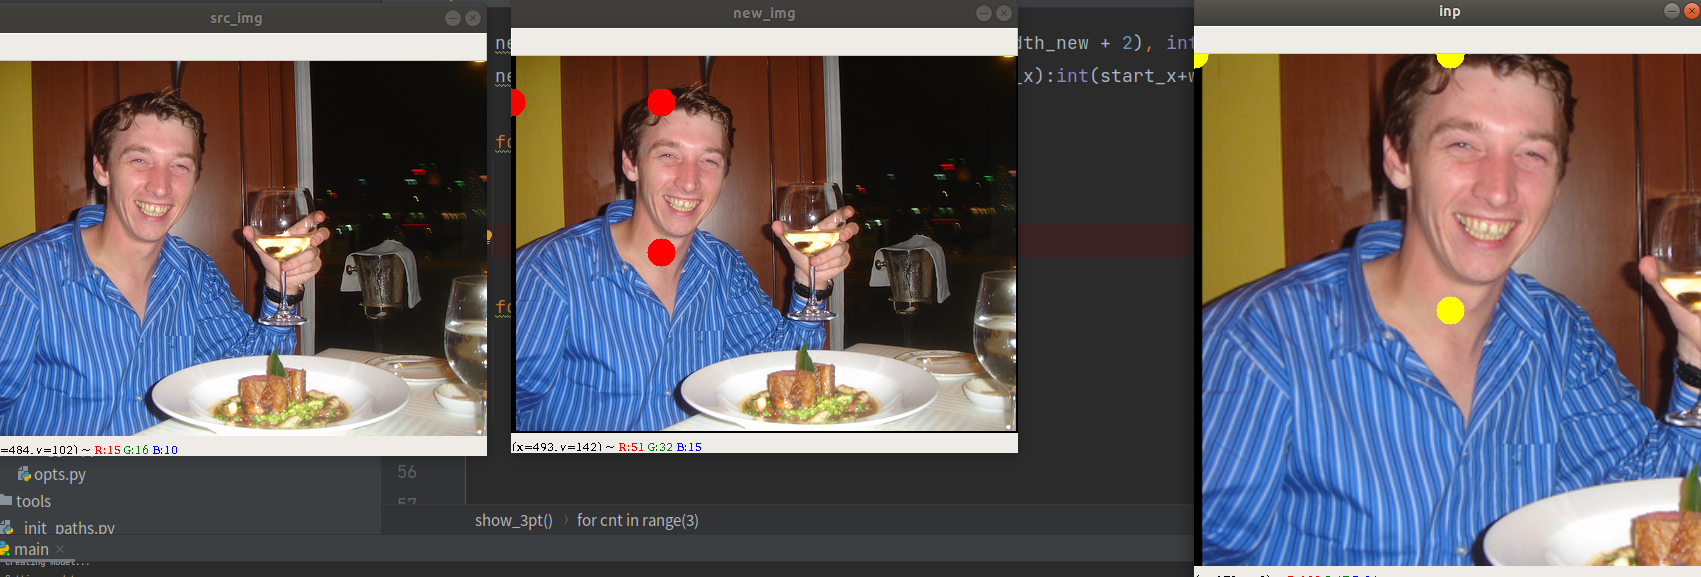
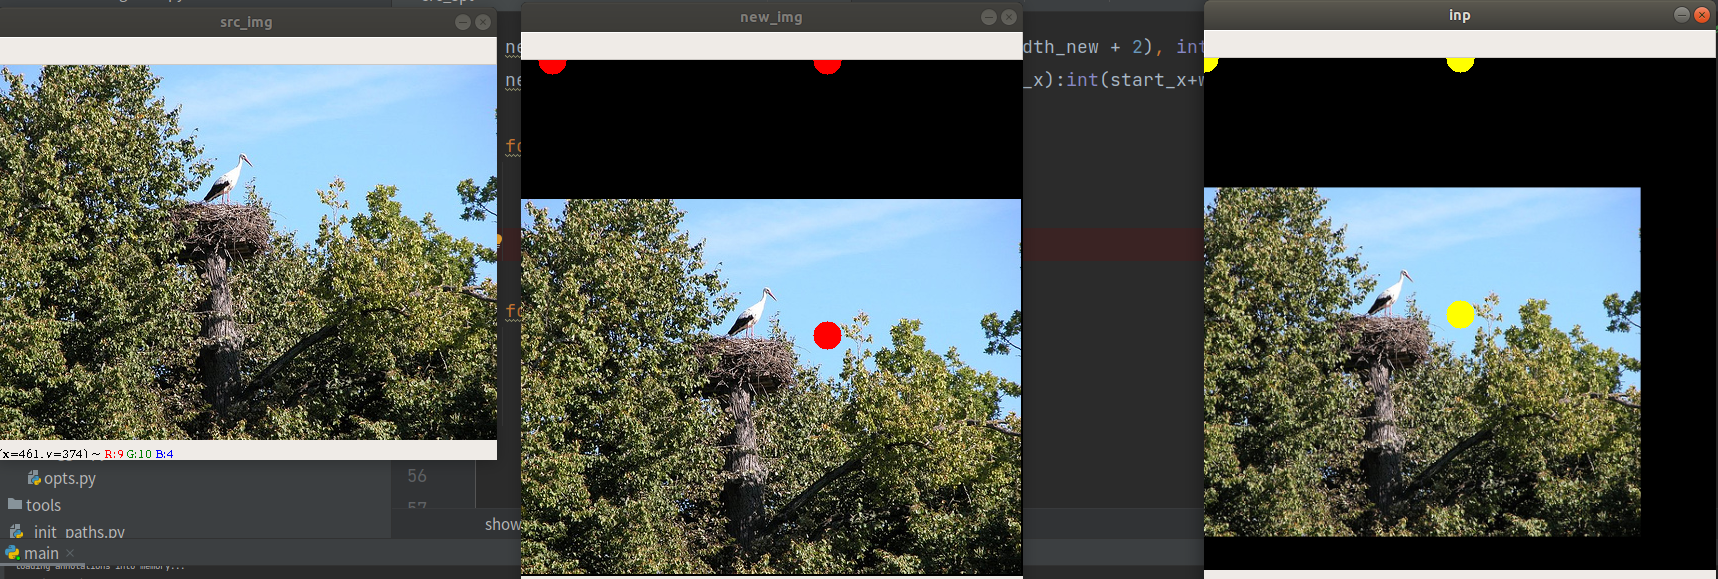
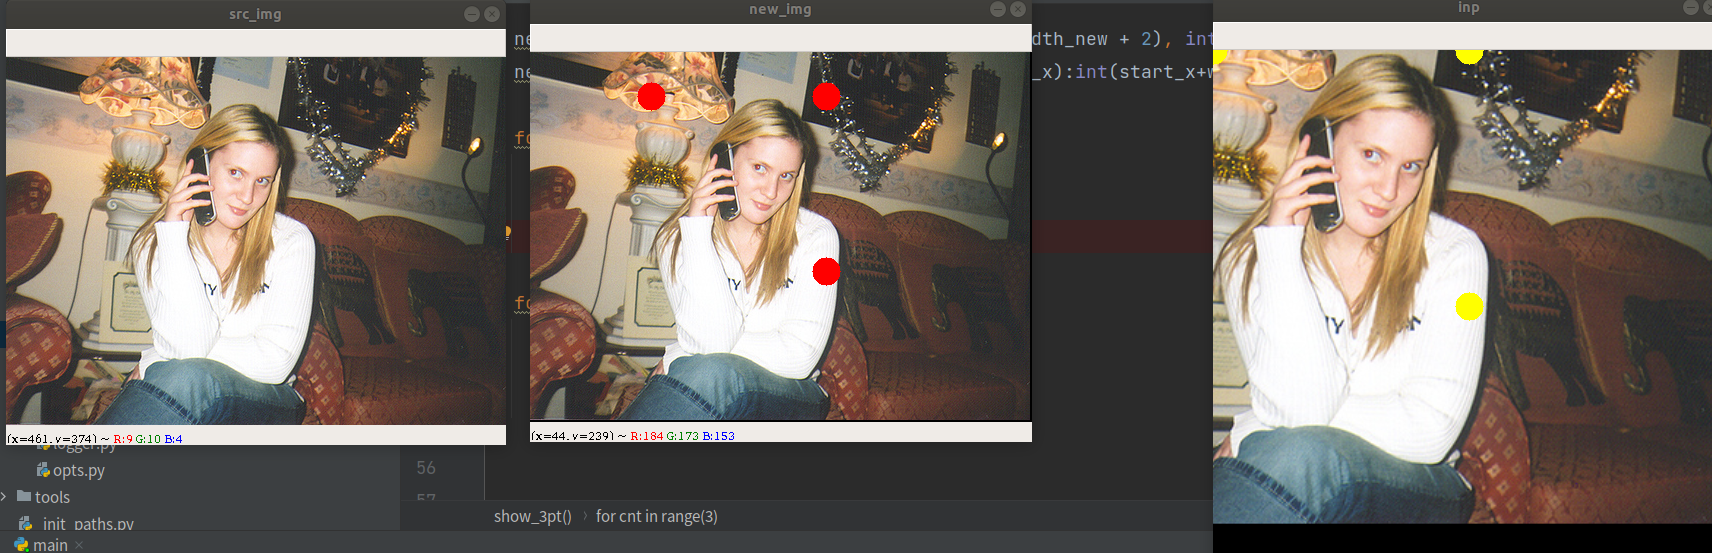
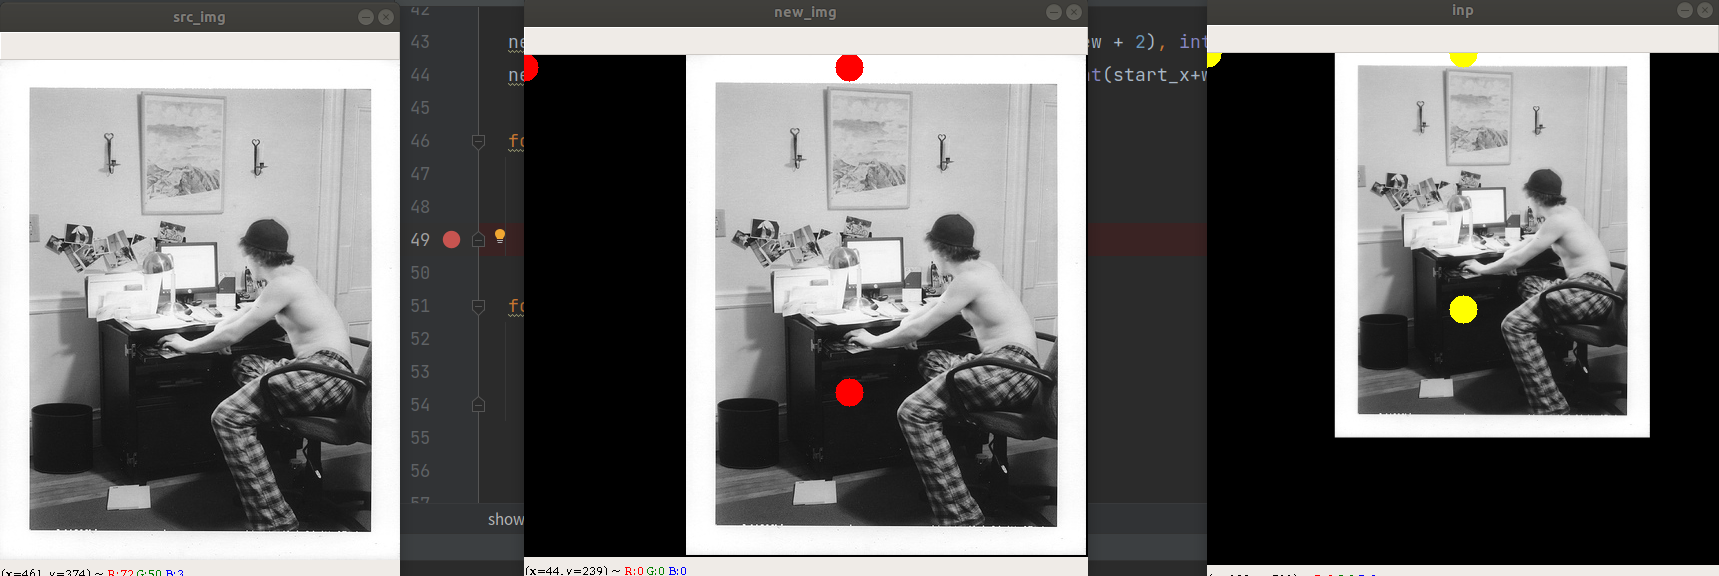
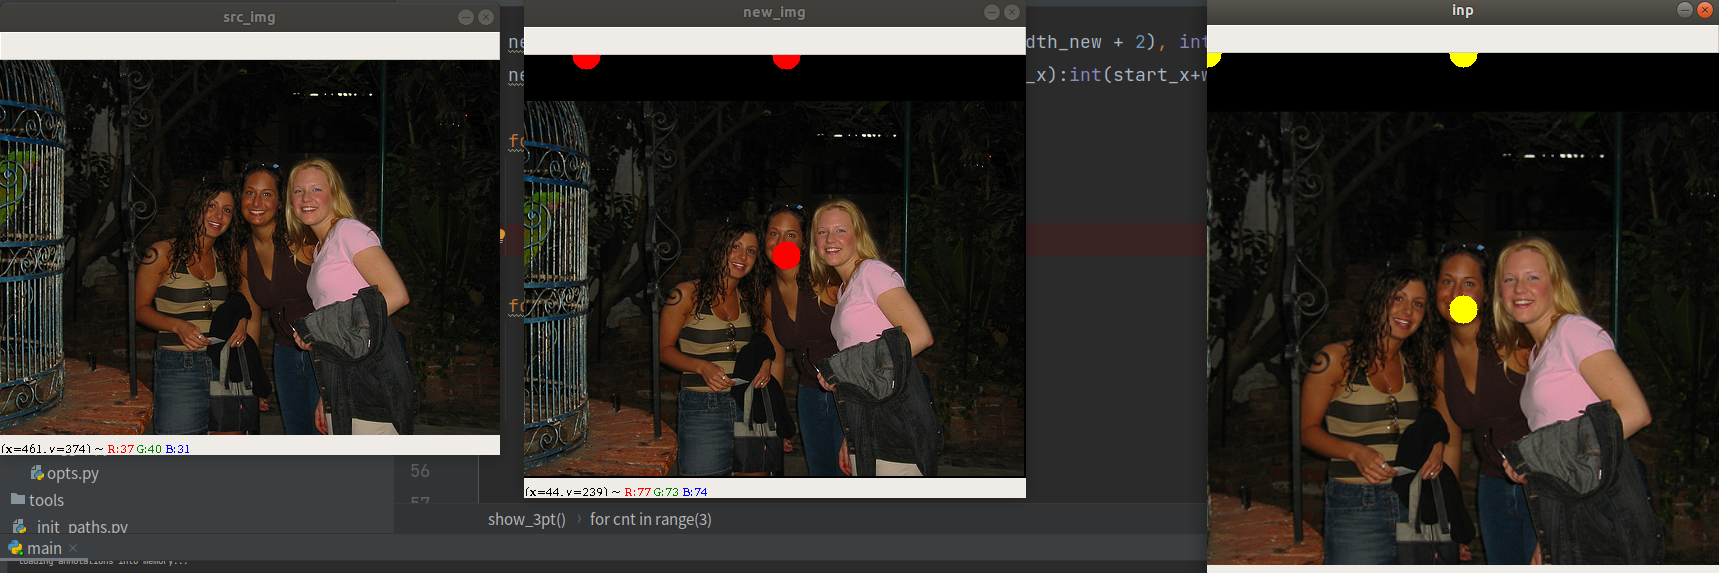
从图上可以看到,在原图随机确定的三个点都映射到变换之后的图,然后这三点包围的外接矩形区域在仿射变换之后都是肯定在的。整体呈现出平移缩放放大的效果。
放大的效果

缩小的效果

总结:放大就是点间距很小,缩放就是点间距大!
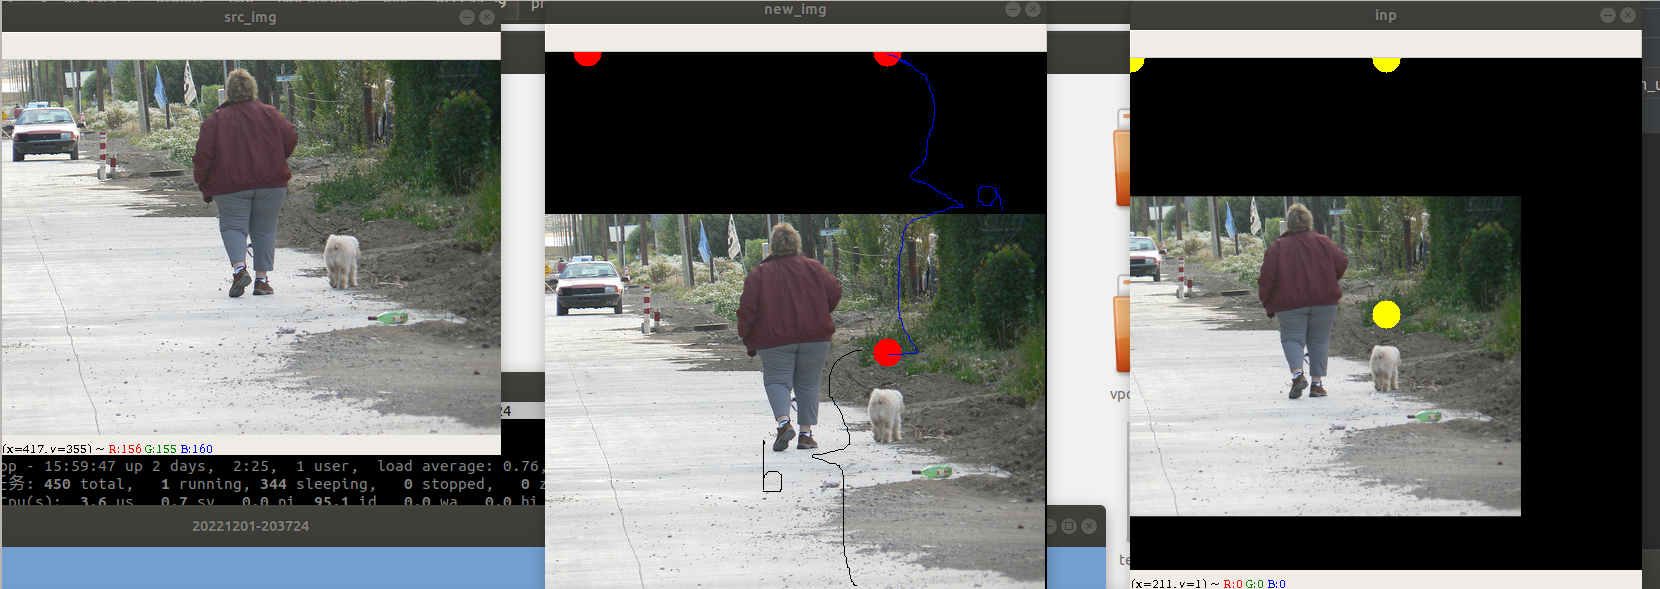
如果a的距离大于b的,那么表现出来的就是缩放
画图改动代码如下:
在CenterNet-master/src/lib/utils/image.py复制函数get_affine_transform,返回src和dst三对点。
def get_affine_transform_point_src_dst(center,
                         scale,
                         rot,
                         output_size,
                         shift=np.array([0, 0], dtype=np.float32),
                         inv=0):
    if not isinstance(scale, np.ndarray) and not isinstance(scale, list):
        scale = np.array([scale, scale], dtype=np.float32)

    scale_tmp = scale
    src_w = scale_tmp[0]
    dst_w = output_size[0]
    dst_h = output_size[1]

    rot_rad = np.pi * rot / 180
    src_dir = get_dir([0, src_w * -0.5], rot_rad)
    dst_dir = np.array([0, dst_w * -0.5], np.float32)

    src = np.zeros((3, 2), dtype=np.float32)
    dst = np.zeros((3, 2), dtype=np.float32)
    src[0, :] = center + scale_tmp * shift
    src[1, :] = center + src_dir + scale_tmp * shift
    dst[0, :] = [dst_w * 0.5, dst_h * 0.5]
    dst[1, :] = np.array([dst_w * 0.5, dst_h * 0.5], np.float32) + dst_dir

    src[2:, :] = get_3rd_point(src[0, :], src[1, :])
    dst[2:, :] = get_3rd_point(dst[0, :], dst[1, :])

    if inv:
        trans = cv2.getAffineTransform(np.float32(dst), np.float32(src))
    else:
        trans = cv2.getAffineTransform(np.float32(src), np.float32(dst))

    return trans, src, dst
在/CenterNet-master/src/lib/datasets/sample/ctdet.py中,画图, 添加show_3pt函数
from __future__ import absolute_import
from __future__ import division
from __future__ import print_function

import torch.utils.data as data
import numpy as np
import torch
import json
import cv2
import os
from utils.image import flip, color_aug
from utils.image import get_affine_transform, affine_transform, get_affine_transform_point_src_dst
from utils.image import gaussian_radius, draw_umich_gaussian, draw_msra_gaussian
from utils.image import draw_dense_reg
import math

def show_3pt(src_img, inp, src_3pt, dst_3pt):
  h,w,c = src_img.shape
  x = src_3pt[:, 0]
  y = src_3pt[:, 1]
  min_x = np.min(x)
  min_y = np.min(y)

  width_new = w
  height_new = h
  if min_x < 0:
    width_new += (-min_x)
    src_3pt[:, 0] = src_3pt[:, 0] + (-min_x)

  if min_y < 0:
    height_new += (-min_y)
    src_3pt[:, 1] = src_3pt[:, 1] + (-min_y)

  start_x, start_y = 0, 0
  if min_x < 0:
    start_x = -min_x
  if min_y < 0:
    start_y = -min_y

  new_img = np.zeros([int(height_new + 2), int(width_new + 2), int(c)], dtype=np.uint8)
  new_img[int(start_y): int(start_y+h), int(start_x):int(start_x+w), :] = src_img.astype(np.uint8)

  for cnt in range(3):
    pt = (src_3pt[cnt][0], src_3pt[cnt][1])
    # print("pt=", pt)
    cv2.circle(new_img, pt, 14, (0, 0, 255), -1)

  for cnt in range(3):
    pt = (dst_3pt[cnt][0], dst_3pt[cnt][1])
    # print("pt=", pt)
    cv2.circle(inp, pt, 14, (0, 255, 255), -1)


  cv2.imshow("new_img", new_img)
  cv2.imshow("inp", inp)
  cv2.imshow("src_img", src_img)
  cv2.waitKey(0)
在这里调用:
  def __getitem__(self, index):
    img_id = self.images[index]
    file_name = self.coco.loadImgs(ids=[img_id])[0]['file_name']
    img_path = os.path.join(self.img_dir, file_name)
    ann_ids = self.coco.getAnnIds(imgIds=[img_id])
    anns = self.coco.loadAnns(ids=ann_ids)
    num_objs = min(len(anns), self.max_objs)

    img = cv2.imread(img_path)

    height, width = img.shape[0], img.shape[1]
    c = np.array([img.shape[1] / 2., img.shape[0] / 2.], dtype=np.float32)
    if self.opt.keep_res:#False
      input_h = (height | self.opt.pad) + 1
      input_w = (width | self.opt.pad) + 1
      s = np.array([input_w, input_h], dtype=np.float32)
    else:
      s = max(img.shape[0], img.shape[1]) * 1.0
      input_h, input_w = self.opt.input_h, self.opt.input_w

    flipped = False
    if self.split == 'train':
      if not self.opt.not_rand_crop:#yes
        s = s * np.random.choice(np.arange(0.6, 1.4, 0.1))
        w_border = self._get_border(128, img.shape[1])
        h_border = self._get_border(128, img.shape[0])
        c[0] = np.random.randint(low=w_border, high=img.shape[1] - w_border)
        c[1] = np.random.randint(low=h_border, high=img.shape[0] - h_border)
      else:
        sf = self.opt.scale
        cf = self.opt.shift
        c[0] += s * np.clip(np.random.randn()*cf, -2*cf, 2*cf)
        c[1] += s * np.clip(np.random.randn()*cf, -2*cf, 2*cf)
        s = s * np.clip(np.random.randn()*sf + 1, 1 - sf, 1 + sf)

      if np.random.random() < self.opt.flip:
        flipped = True
        img = img[:, ::-1, :]
        c[0] =  width - c[0] - 1


    trans_input, src_3pt, dst_3pt = get_affine_transform_point_src_dst(
      c, s, 0, [input_w, input_h])
    inp = cv2.warpAffine(img, trans_input,
                         (input_w, input_h),
                         flags=cv2.INTER_LINEAR)

    show_3pt(img, inp, src_3pt, dst_3pt)
这里其实关键的是确定三对点。两个关键参数c和s
    s = max(img.shape[0], img.shape[1]) * 1.0
    if self.split == 'train':
      if not self.opt.not_rand_crop:#yes
        s = s * np.random.choice(np.arange(0.6, 1.4, 0.1))
        w_border = self._get_border(128, img.shape[1])
        h_border = self._get_border(128, img.shape[0])
        c[0] = np.random.randint(low=w_border, high=img.shape[1] - w_border) #w_border = 128
        c[1] = np.random.randint(low=h_border, high=img.shape[0] - h_border) #h_border = 128
这里的c就是代表center的意思,图像周围去掉128内圈就是c的范围, s是图像最长边然后随机的乘以[0.6,1.4,0.1]
这三对点第一个点就是c为中心点
def get_affine_transform_point_src_dst(center,
                         scale,
                         rot,
                         output_size,
                         shift=np.array([0, 0], dtype=np.float32),
                         inv=0):
    if not isinstance(scale, np.ndarray) and not isinstance(scale, list):
        scale = np.array([scale, scale], dtype=np.float32)

    scale_tmp = scale
    src_w = scale_tmp[0]
    dst_w = output_size[0]
    dst_h = output_size[1]

    rot_rad = np.pi * rot / 180
    src_dir = get_dir([0, src_w * -0.5], rot_rad)
    dst_dir = np.array([0, dst_w * -0.5], np.float32)

    src = np.zeros((3, 2), dtype=np.float32)
    dst = np.zeros((3, 2), dtype=np.float32)
    src[0, :] = center + scale_tmp * shift
    src[1, :] = center + src_dir + scale_tmp * shift
    dst[0, :] = [dst_w * 0.5, dst_h * 0.5]
    dst[1, :] = np.array([dst_w * 0.5, dst_h * 0.5], np.float32) + dst_dir

    src[2:, :] = get_3rd_point(src[0, :], src[1, :])
    dst[2:, :] = get_3rd_point(dst[0, :], dst[1, :])

    if inv:
        trans = cv2.getAffineTransform(np.float32(dst), np.float32(src))
    else:
        trans = cv2.getAffineTransform(np.float32(src), np.float32(dst))

    return trans, src, dst
然后第二个点是沿着c向上src_w * -0.5
src_dir = get_dir([0, src_w * -0.5], rot_rad)

src[1, :] = center + src_dir + scale_tmp * shift
dst[1, :] = np.array([dst_w * 0.5, dst_h * 0.5], np.float32) + dst_dir
这里看到图片有黑边就是因为这里的src_w * -0.5大于c的y,就导致y-0.5×src_w为负数。
第三对点
def get_3rd_point(a, b):
    direct = a - b
    return b + np.array([-direct[1], direct[0]], dtype=np.float32)


src[2:, :] = get_3rd_point(src[0, :], src[1, :])
dst[2:, :] = get_3rd_point(dst[0, :], dst[1, :])
这里是根据前面2个点来计算得到的。这里其实很简单,比如src_pt[0]=[500,500], src_pt[1]=[500,250]
那么direct=[0, 250]
return( [500,250] + [-250, 0])
即[250,250]
有没有发现!这里其实就是之前0-->1的时候向上偏移了比如h,然后这里在1的基础上又向左偏移h。
所以,以上就是三对点产生的过程!
这里需要注意的是不管在原图上面怎么弄,偏移的量就是对应映射后图的一半。就是第一点就是映射到中心点。
还有就是放大的效果,在原图中会有截断的效果,其他他们是有值参与计算的,只不过越界了,因为固定输出比如512,当时你计算出来是600就不显示了!
所以在centernet那里,后面会有截断!
      bbox[:2] = affine_transform(bbox[:2], trans_output)
      bbox[2:] = affine_transform(bbox[2:], trans_output)
      bbox[[0, 2]] = np.clip(bbox[[0, 2]], 0, output_w - 1)
      bbox[[1, 3]] = np.clip(bbox[[1, 3]], 0, output_h - 1)
      h, w = bbox[3] - bbox[1], bbox[2] - bbox[0]
      if h > 0 and w > 0:
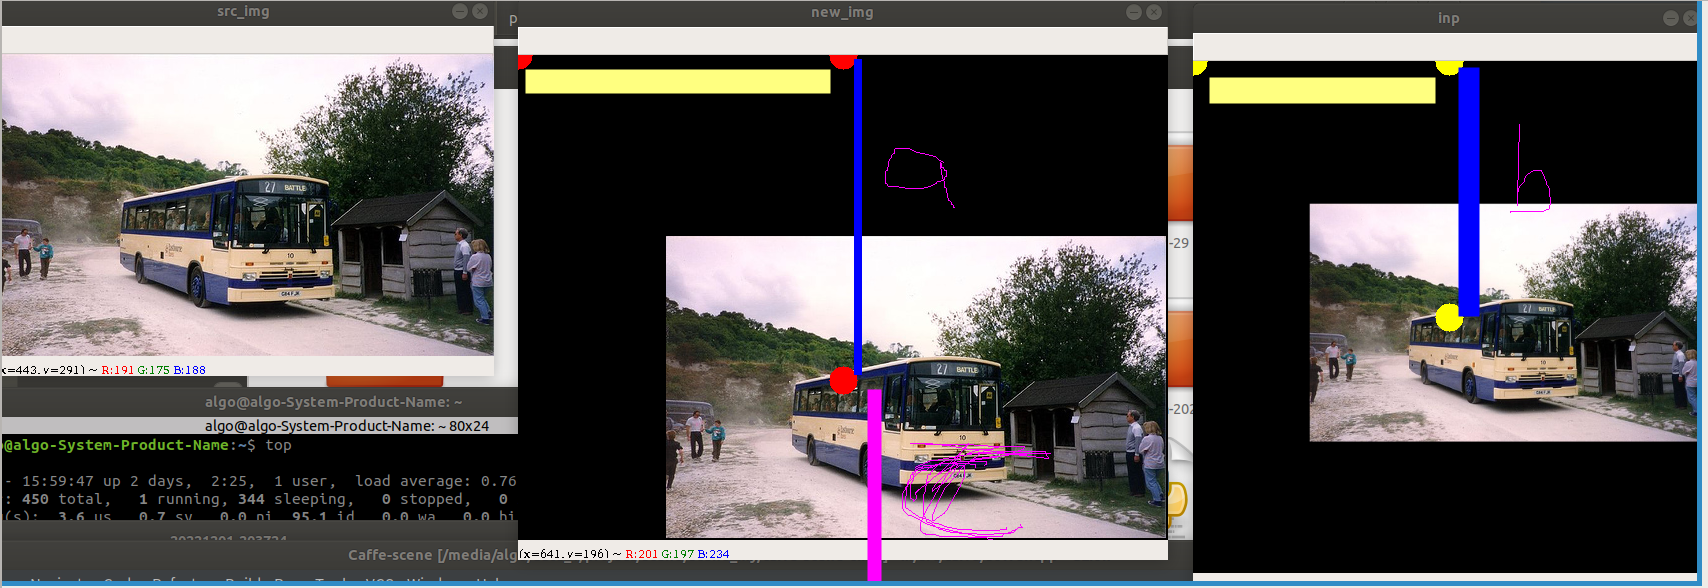
如图,a段等效于b段,其实c段是和a段等长的,只不过因为越界所以没有显示,但是由于仿射变换是线性变换,在变换之后的图c段其实以黑色填充映射到映射之后的图中!表现出来缩放的效果。
产生黑边就是因为向上的偏移量,src_w * -0.5大于c的y,!左边的黑边就是因为src_w * -0.5 大于c的x。
s = max(img.shape[0], img.shape[1]) * 1.0
s = s * np.random.choice(np.arange(0.6, 1.4, 0.1))
src_dir = get_dir([0, src_w * -0.5], rot_rad) #这里src_w就是s

