类似vant中的tab实现
在使用 vant weapp 开发微信小程序过程中tab组件无法满足现需求,不能在tab项中添加图片;于是自己动手写了一个tab组件,并实现点击后将选中的tab移动到视线中央;
html
<div class="nav_left" ref="nav_left">
  <div class="nav_group" ref="nav_group">
    <div
            class="nav_btn"
            ref="nav_btn"
            v-for="(item, index) in navList"
            :key="item.id"
            :class="item.id === activeSpotType ? 'map_top_active' : ''"
            @click="navClick(index)"
            >
      <img
           class="icon"
           v-if="item.id === activeSpotType"
           :src="item.iconSrc"
           />
      <img class="icon" v-else :src="item.iconSrc" />
      {{ item.name }}
    </div>
  </div>
</div>
css (css使用的是scss预编译),
.nav_left {
  display: inline-block;
  vertical-align: top;
  width: calc(100% - 35px);
  height: 100%;
  .nav_group {
    width: 100%;
    height: 100%;
    white-space: nowrap;
    display: flex;
    overflow-x: scroll;
    scroll-behavior: smooth; // 滚动行为 平稳
    &::-webkit-scrollbar {
      display: none;
    }
  }
  .nav_btn {
    margin-top: 7px;
    padding: 6px 20px;
    display: inline-block;
    font-size: 14px;
    border: none;
    height: 32px;
    line-height: 17px;
    background: #FFF;
    box-sizing: border-box;
    outline: none;
    border-radius: 18px;
    .icon{
      width: 16px;
      height: 17px;
      margin-right: 2px;
      vertical-align: bottom;
    }
  }
  .map_top_active {
    color: #FFF;
    background: rgba(81, 166, 255, 1);
    transition: all ease 0.3s;
  }
}
js
export default {
  data(){
      activeSpotType: '12301',
      navList: [
       {
          id: '12301',
          name: '女装',
          selectedIcon: '选中时的图标链接',
          unselectedIcon: '未选中时的图标链接',
        },
       {
          id: '12302',
          name: '男装',
          selectedIcon: '选中时的图标链接',
          unselectedIcon: '未选中时的图标链接',
        },
       {
          id: '12303',
          name: '数码',
          selectedIcon: '选中时的图标链接',
          unselectedIcon: '未选中时的图标链接',
        },
       {
          id: '12304',
          name: '家电',
          selectedIcon: '选中时的图标链接',
          unselectedIcon: '未选中时的图标链接',
        },
       {
          id: '12305',
          name: '生鲜',
          selectedIcon: '选中时的图标链接',
          unselectedIcon: '未选中时的图标链接',
        }
      ]
  },
  methods {
    // tab点击事件
    navClick(index) {
      this.activeSpotType = this.navList[index].id;
      this.handleScroll(index)
    },

    // 选中tab时滚动居中
    handleScroll(index) {
      let boxHalf = this.$refs.nemu.offsetWidth / 2;
      // 单个item的宽度
      let itemLeft = this.$refs.nav_btn[index].offsetLeft;
      // 选中状态的item宽度
      let itemWidth = this.$refs.nav_btn[index].offsetWidth;

      // 使用js添加滚动过渡动画
      let scrollLeft = 0;
      if (boxHalf <= itemLeft) {
        // 设置滚动距离实现当前选中item居中显示
        // 添加 css: overflow-x: scroll; scroll-behavior: smooth; // 设置之后滚动更丝滑
        // this.$refs.nav_group.scrollLeft = (itemLeft - boxHalf) + itemWidth / 2
        scrollLeft =  (itemLeft - boxHalf) + itemWidth / 2
      }else {
        // this.$refs.nav_group.scrollLeft = 0
        scrollLeft = 0;
      }
      this.scrollSmoothTo(this,scrollLeft)

      // 使用css添加滚动过渡动画
      if (boxHalf <= itemLeft) {
        // 设置滚动距离实现当前选中item居中显示
        // 在 overflow-x: scroll;的元素中添加css: scroll-behavior: smooth;
        this.$refs.nav_group.scrollLeft = (itemLeft - boxHalf) + itemWidth / 2
      }else {
        this.$refs.nav_group.scrollLeft = 0
      }
    },

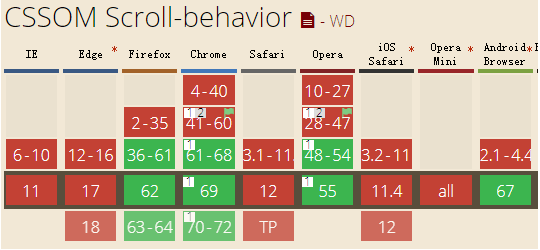
    // 居中时添加过渡动画; scroll-behavior 的兼容性很差,移动端基本不能用使用,所以还得使用js来实现过渡效果
    scrollSmoothTo (_this,position) {
      if (!window.requestAnimationFrame) {
        window.requestAnimationFrame = function(callback, element) {
          return setTimeout(callback, 17);
        };
      }
      // 当前滚动高度
      let currentLeft = _this.$refs.nav_group.scrollLeft;
      // 滚动step方法
      var step = function () {
        // 距离目标滚动距离
        var distance = position - currentLeft;
        // 目标滚动位置
        currentLeft = currentLeft + distance / 5;
        if (Math.abs(distance) < 1) {
          _this.$refs.nav_group.scrollLeft = position
        } else {
          _this.$refs.nav_group.scrollLeft = currentLeft
          requestAnimationFrame(step);
        }
      };
      step();
    },
  }
}
实例图:

拓展:平滑滚动 - scroll-behavior
这个属性的兼容性不太友好;
移动端基本不能用;
在PC端使用不考虑兼容性的情况话还是很不错的(scroll-behavior: smooth; 一行代码解决所有问题)

蜉蝣过山亦有风


