SpringBoot第十四篇:统一异常处理
作者:追梦1819
原文:https://www.cnblogs.com/yanfei1819/p/10984081.html
版权声明:本文为博主原创文章,转载请附上博文链接!
引言
本文将谈论 SpringBoot 的默认错误处理机制,以及如何自定义错误响应。
版本信息
- JDK:1.8
- SpringBoot :2.1.4.RELEASE
- maven:3.3.9
- Thymelaf:2.1.4.RELEASE
- IDEA:2019.1.1
默认错误响应
我们新建一个项目,先来看看 SpringBoot 的默认响应式什么:
首先,引入 maven 依赖:
<dependency>
    <groupId>org.springframework.boot</groupId>
    <artifactId>spring-boot-starter-web</artifactId>
</dependency>
<dependency>
    <groupId>org.springframework.boot</groupId>
    <artifactId>spring-boot-starter-thymeleaf</artifactId>
</dependency>
然后,写一个请求接口:
package com.yanfei1819.customizeerrordemo.web.controller;
import org.springframework.stereotype.Controller;
import org.springframework.web.bind.annotation.GetMapping;
import org.springframework.web.bind.annotation.ResponseBody;

/**
 * Created by 追梦1819 on 2019-05-09.
 */
@Controller
public class DefaultErrorController {
    @GetMapping("/defaultViewError")
    public void defaultViewError(){
        System.out.println("默认页面异常");
    }
    @ResponseBody
    @GetMapping("/defaultDataError")
    public void defaultDataError(){
        System.out.println("默认的客户端异常");
    }
}
随意访问一个8080端口的地址,例如 http://localhost:8080/a ,如下效果:
-
浏览器访问,返回一个默认页面

-
其它的客户端访问,返回确定的json字符串

以上是SpringBoot 默认的错误响应页面和返回值。不过,在实际项目中,这种响应对用户来说并不友好。通常都是开发者自定义异常页面和返回值,使其看起来更加友好、更加舒适。
默认的错误处理机制
在定制错误页面和错误响应数据之前,我们先来看看 SpringBoot 的错误处理机制。
ErrorMvcAutoConfiguration :

容器中有以下组件:
1、DefaultErrorAttributes
2、BasicErrorController
3、ErrorPageCustomizer
4、DefaultErrorViewResolver
系统出现 4xx 或者 5xx 错误时,ErrorPageCustomizer 就会生效:
	@Bean
	public ErrorPageCustomizer errorPageCustomizer() {
		return new ErrorPageCustomizer(this.serverProperties, this.dispatcherServletPath);
	}
   private static class ErrorPageCustomizer implements ErrorPageRegistrar, Ordered {
		private final ServerProperties properties;
		private final DispatcherServletPath dispatcherServletPath;
		protected ErrorPageCustomizer(ServerProperties properties,
				DispatcherServletPath dispatcherServletPath) {
			this.properties = properties;
			this.dispatcherServletPath = dispatcherServletPath;
		}
         // 注册错误页面响应规则
		@Override
		public void registerErrorPages(ErrorPageRegistry errorPageRegistry) {
			ErrorPage errorPage = new ErrorPage(this.dispatcherServletPath
					.getRelativePath(this.properties.getError().getPath()));
			errorPageRegistry.addErrorPages(errorPage);
		}
		@Override
		public int getOrder() {
			return 0;
		}
	}
上面的注册错误页面响应规则能够的到错误页面的路径(getPath):
    @Value("${error.path:/error}")
	private String path = "/error"; //(web.xml注册的错误页面规则)
	public String getPath() {
		return this.path;
	}
此时会被 BasicErrorController 处理:
@Controller
@RequestMapping("${server.error.path:${error.path:/error}}")
public class BasicErrorController extends AbstractErrorController {
}
BasicErrorController 中有两个请求:
	// //产生html类型的数据;浏览器发送的请求来到这个方法处理
	//  MediaType.TEXT_HTML_VALUE ==> "text/html"
	@RequestMapping(produces = MediaType.TEXT_HTML_VALUE)
	public ModelAndView errorHtml(HttpServletRequest request,
			HttpServletResponse response) {
		HttpStatus status = getStatus(request);
		Map<String, Object> model = Collections.unmodifiableMap(getErrorAttributes(
				request, isIncludeStackTrace(request, MediaType.TEXT_HTML)));
		response.setStatus(status.value());
        //去哪个页面作为错误页面;包含页面地址和页面内容
		ModelAndView modelAndView = resolveErrorView(request, response, status, model);
		return (modelAndView != null) ? modelAndView : new ModelAndView("error", model);
	}
	//产生json数据,其他客户端来到这个方法处理;
	@RequestMapping
	public ResponseEntity<Map<String, Object>> error(HttpServletRequest request) {
		Map<String, Object> body = getErrorAttributes(request,
				isIncludeStackTrace(request, MediaType.ALL));
		HttpStatus status = getStatus(request);
		return new ResponseEntity<>(body, status);
	}
上面源码中有两个请求,分别是处理浏览器发送的请求和其它浏览器发送的请求的。是通过请求头来区分的:
1、浏览器请求头

2、其他客户端请求头

resolveErrorView,获取所有的异常视图解析器 ;
	protected ModelAndView resolveErrorView(HttpServletRequest request,
			HttpServletResponse response, HttpStatus status, Map<String, Object> model) {
         //获取所有的 ErrorViewResolver 得到 ModelAndView
		for (ErrorViewResolver resolver : this.errorViewResolvers) {
			ModelAndView modelAndView = resolver.resolveErrorView(request, status, model);
			if (modelAndView != null) {
				return modelAndView;
			}
		}
		return null;
	}
DefaultErrorViewResolver,默认错误视图解析器,去哪个页面是由其解析得到的;
	@Override
	public ModelAndView resolveErrorView(HttpServletRequest request, HttpStatus status,
			Map<String, Object> model) {
		ModelAndView modelAndView = resolve(String.valueOf(status.value()), model);
		if (modelAndView == null && SERIES_VIEWS.containsKey(status.series())) {
			modelAndView = resolve(SERIES_VIEWS.get(status.series()), model);
		}
		return modelAndView;
	}
	private ModelAndView resolve(String viewName, Map<String, Object> model) {
        // 视图名,拼接在 error/ 后面
		String errorViewName = "error/" + viewName;
		TemplateAvailabilityProvider provider = this.templateAvailabilityProviders
				.getProvider(errorViewName, this.applicationContext);
		if (provider != null) {
             // 使用模板引擎的情况
			return new ModelAndView(errorViewName, model);
		}
         // 未使用模板引擎的情况
		return resolveResource(errorViewName, model);
	}
其中 SERIES_VIEWS 是:
	private static final Map<Series, String> SERIES_VIEWS;
	static {
		Map<Series, String> views = new EnumMap<>(Series.class);
		views.put(Series.CLIENT_ERROR, "4xx");
		views.put(Series.SERVER_ERROR, "5xx");
		SERIES_VIEWS = Collections.unmodifiableMap(views);
	}
下面看看没有使用模板引擎的情况:
	private ModelAndView resolveResource(String viewName, Map<String, Object> model) {
		for (String location : this.resourceProperties.getStaticLocations()) {
			try {
				Resource resource = this.applicationContext.getResource(location);
				resource = resource.createRelative(viewName + ".html");
				if (resource.exists()) {
					return new ModelAndView(new HtmlResourceView(resource), model);
				}
			}
			catch (Exception ex) {
			}
		}
		return null;
	}
以上代码可以总结为:
模板引擎不可用
就在静态资源文件夹下
找errorViewName对应的页面 error/4xx.html
如果,静态资源文件夹下存在,返回这个页面
如果,静态资源文件夹下不存在,返回null
定制错误响应
按照 SpringBoot 的默认异常响应,分为默认响应页面和默认响应信息。我们也分为定制错误页面和错误信息。
定制错误的页面
-
有模板引擎的情况
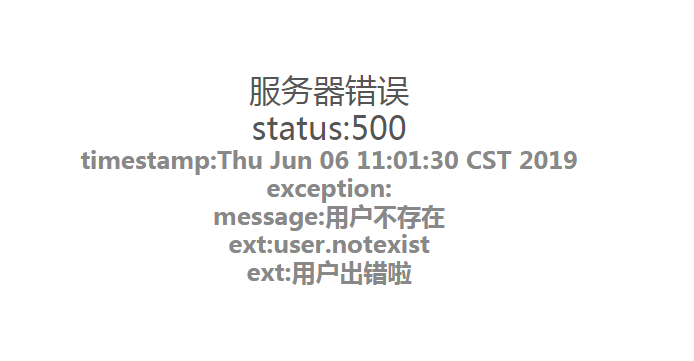
SpringBoot 默认定位到模板引擎文件夹下面的 error/ 文件夹下。根据发生的状态码的错误寻找到响应的页面。注意一点的是,页面可以"精确匹配"和"模糊匹配"。
精确匹配的意思是返回的状态码是什么,就找到对应的页面。例如,返回的状态码是 404,就匹配到 404.html. 模糊匹配,意思是可以使用 4xx 和 5xx 作为错误页面的文件名来匹配这种类型的所有错误。不过,"精确匹配"优先。
-
没有模板引擎
项目如果没有使用模板引擎,则在静态资源文件夹下面查找。
下面自定义异常页面,并模拟异常发生。
在以上的示例基础上,首先,自定义一个异常:
public class UserNotExistException extends RuntimeException {
    public UserNotExistException() {
        super("用户不存在");
    }
}
然后,进行异常处理:
@ControllerAdvice
public class MyExceptionHandler {
    @ExceptionHandler(UserNotExistException.class)
    public String handleException(Exception e, HttpServletRequest request){
        Map<String,Object> map = new HashMap<>();
        // 传入我们自己的错误状态码  4xx 5xx,否则就不会进入定制错误页面的解析流程
        // Integer statusCode = (Integer) request.getAttribute("javax.servlet.error.status_code");
        request.setAttribute("javax.servlet.error.status_code",500);
        map.put("code","user.notexist");
        map.put("message","用户出错啦");
        request.setAttribute("ext",map);
        //转发到/error
        return "forward:/error";
    }
}
注意几点,一定要定制自定义的状态码,否则没有作用。
第三步,定制一个页面:
<!doctype html>
<html lang="en" xmlns:th="http://www.thymeleaf.org">
<head>
    <meta charset="utf-8">
    <title>Internal Server Error | 服务器错误</title>
    <meta name="viewport" content="width=device-width, initial-scale=1">
    <style>
		<!--省略css代码-->
    </style>
</head>
<body>
<h1>服务器错误</h1>
<main role="main" class="col-md-9 ml-sm-auto col-lg-10 pt-3 px-4">
    <h1>status:[[${status}]]</h1>
    <h2>timestamp:[[${timestamp}]]</h2>
    <h2>exception:[[${exception}]]</h2>
    <h2>message:[[${message}]]</h2>
    <h2>ext:[[${ext.code}]]</h2>
    <h2>ext:[[${ext.message}]]</h2>
</main>
</body>
</html>
最后,模拟一个异常:
@Controller
public class CustomizeErrorController {
    @GetMapping("/customizeViewError")
    public void customizeViewError(){
        System.out.println("自定义页面异常");
        throw new UserNotExistException();
    }
}
启动项目,可以观察到以下结果:

定制响应的json
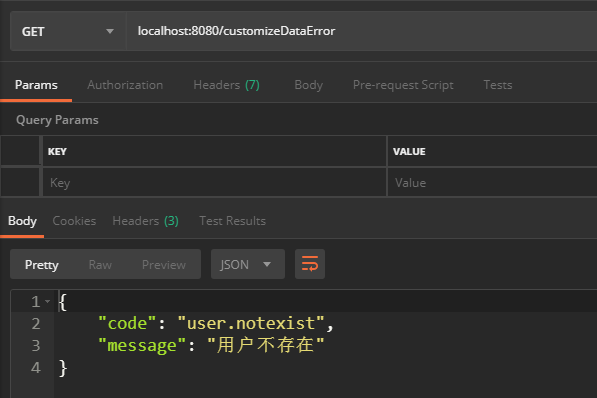
针对浏览器意外的其他客户端错误响应,相似的道理,我们先进行自定义异常处理:
    @ResponseBody
    @ExceptionHandler(UserNotExistException.class)
    public Map<String,Object> handleException(Exception e){
        Map<String,Object> map = new HashMap<>();
        map.put("code","user.notexist");
        map.put("message",e.getMessage());
        return map;
    }
然后模拟异常的出现:
    @ResponseBody
    @GetMapping("/customizeDataError")
    public void customizeDataError(){
        System.out.println("自定义客户端异常");
        throw new UserNotExistException();
    }
启动项目,看到结果是:

总结
异常处理同日志一样,也属于项目的“基础设施”,它的存在,可以扩大系统的容错处理,加强系统的健壮性。在自定义的基础上,优化了错误提示,对用户更加友好。
由于篇幅所限,以上的 SpringBoot 的内部错误处理机制也只属于“蜻蜓点水”。后期将重点分析 SpringBoot 的工作机制。
最后,如果需要完整代码,请移步至我的GitHub。
源码:我的GitHub

本文来自博客园,作者:追梦1819,转载请注明原文链接:https://www.cnblogs.com/yanfei1819/p/10984081.html


