SpringBoot第七篇:整合Mybatis-Plus
作者:追梦1819
原文:https://www.cnblogs.com/yanfei1819/p/10881666.html
版权声明:本文为博主原创文章,转载请附上博文链接!
引言
一看这个名字,就能看出与 MyBatis 有关。没错,它就是一款 MyBatis 的增强工具。
下面我们先介绍这款工具,然后再介绍在 SpringBoot 中的使用。这样符合博主的习惯:在学习一个新的技术或者新的框架之前,一定会思考这个技术或者框架为什么会出现?解决了什么问题?有没有别的取代方案?
Mybatis Plus简介
1、概念
MyBatis-Plus(简称 MP)是一个 MyBatis 的增强工具,在 MyBatis 的基础上只做增强不做改变,为简化开发、提高效率而生。
2、特性
官网列举了很多特性。不过总的来说,无非就是封装好了常规的 CRUD 操作,无需配置,同时内嵌了很多插件(热加载、代码生成、分页、性能分析等),减少了代码量。
3、关于版本说明
MyBatis Plus2.0 是基于 JDK1.7 及以下版本的。MyBatis Plus3.0 是基于 JDK1.8 及以上版本的(因为插件内部使用了JDK8 的新特性 lambda 表达式)。本系列文章的JDK版本是1.8的,故选择的插件版本是3.0版本的。
使用
MyBatis Plus 的核心功能有三个:
- CRUD 操作;
- 代码生成器;
- 条件生成器。
下面逐一介绍。
CRUD操作
我们来看看 MyBatis 在 SpringBoot 项目中的应用。
准备工作,初始化数据库:
SET NAMES utf8mb4; SET FOREIGN_KEY_CHECKS = 0; -- ---------------------------- -- Table structure for user -- ---------------------------- DROP TABLE IF EXISTS `user`; CREATE TABLE `user` ( `id` int(11) NOT NULL AUTO_INCREMENT, `age` int(3) NOT NULL, `name` varchar(30) CHARACTER SET utf8 COLLATE utf8_general_ci NOT NULL, PRIMARY KEY (`id`) USING BTREE ) ENGINE = MyISAM AUTO_INCREMENT = 3 CHARACTER SET = utf8 COLLATE = utf8_general_ci ROW_FORMAT = Dynamic; -- ---------------------------- -- Records of user -- ---------------------------- INSERT INTO `user` VALUES (1, 21, 'admin'); INSERT INTO `user` VALUES (2, 22, 'test'); SET FOREIGN_KEY_CHECKS = 1;
首先,创建 SpringBoot 项目,引入 maven 依赖:
<dependency> <groupId>org.springframework.boot</groupId> <artifactId>spring-boot-starter-web</artifactId> </dependency> <dependency> <groupId>org.mybatis.spring.boot</groupId> <artifactId>mybatis-spring-boot-starter</artifactId> <version>2.0.1</version> </dependency> <!-- https://mvnrepository.com/artifact/com.baomidou/mybatis-plus-boot-starter --> <dependency> <groupId>com.baomidou</groupId> <artifactId>mybatis-plus-boot-starter</artifactId> <version>3.1.0</version> </dependency> <dependency> <groupId>mysql</groupId> <artifactId>mysql-connector-java</artifactId> <scope>runtime</scope> </dependency>
然后,配置数据库信息和数据库方言:
server.port=8087 spring.datasource.driver-class-name=com.mysql.jdbc.Driver spring.datasource.url=jdbc:mysql://xx.xx.xx.xx:3306/test spring.datasource.username=root spring.datasource.password=root
package com.yanfei1819.mybatisplusdemo.config; import com.baomidou.mybatisplus.extension.plugins.PaginationInterceptor; import org.springframework.context.annotation.Bean; import org.springframework.context.annotation.Configuration; /** * MyBatis Plus 的方言配置 * Created by 追梦1819 on 2019-05-17. */ @Configuration public class MybatisPlusConfig { @Bean public PaginationInterceptor paginationInterceptor(){ PaginationInterceptor page = new PaginationInterceptor(); //设置方言类型 page.setDialectType("mysql"); return page; } }
下面再创建一个实体类,以映射数据库字段:
package com.yanfei1819.mybatisplusdemo.entity; /** * Created by 追梦1819 on 2019-05-17. */ public class User { private Long id; private String name; private int age; // get/set 省略 }
然后,创建代理接口:
package com.yanfei1819.mybatisplusdemo.mapper; import com.baomidou.mybatisplus.core.mapper.BaseMapper; import com.yanfei1819.mybatisplusdemo.entity.User; /** * Created by 追梦1819 on 2019-05-17. */ //@Mapper public interface UserMapper extends BaseMapper<User> { }
这里需要注意,需要通过启动类的 @MapperScan 注解或者代理接口上的 @Mapper 注解(本示例中用的是前者)。
看到这一步,是不是很眼熟?很像前一篇的通用Mapper?
这里说一句题外话,其实只要了解 MyBatis 的原理,自己都可以写出想要的插件。后续在 MyBatis 的专栏中,我将分析 Mybatis 的使用和原理。敬请关注。
最后创建一个测试接口方法:
package com.yanfei1819.mybatisplusdemo.web.controller; import com.yanfei1819.mybatisplusdemo.entity.User; import com.yanfei1819.mybatisplusdemo.mapper.UserMapper; import org.springframework.beans.factory.annotation.Autowired; import org.springframework.web.bind.annotation.GetMapping; import org.springframework.web.bind.annotation.RestController; import java.util.List; /** * Created by 追梦1819 on 2019-05-17. */ @RestController public class UserController { @Autowired private UserMapper userMapper; @GetMapping("/queryUsers") public List<User> queryUsers(){ return userMapper.selectList(null); } }
启动程序:
package com.yanfei1819.mybatisplusdemo; import org.mybatis.spring.annotation.MapperScan; import org.springframework.boot.SpringApplication; import org.springframework.boot.autoconfigure.SpringBootApplication; @SpringBootApplication @MapperScan("com.yanfei1819.mybatisplusdemo.mapper") public class MybatisPlusDemoApplication { public static void main(String[] args) { SpringApplication.run(MybatisPlusDemoApplication.class, args); } }
通过 postman 测试的结果:
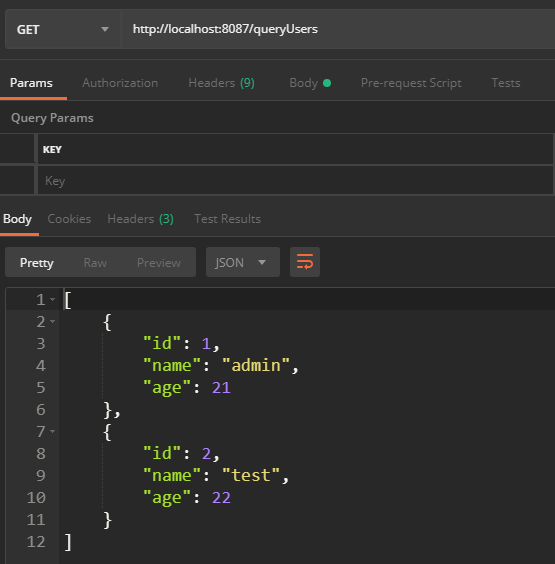
常用API
该插件封装好的方法有很多,以上只是演示了其中的查询列表的方法。下面是列举几个常用的方法。
当然,如果感兴趣,想要了解更多,可以研究一下插件中的源码:com.baomidou.mybatisplus.core.mapper.BaseMapper 。
/** * 插入一条记录 * @param entity 实体对象 */ int insert(T entity); /** * 根据 ID 删除 * @param id 主键ID */ int deleteById(Serializable id); /** * 根据 columnMap 条件,删除记录 * * @param columnMap 表字段 map 对象 */ int deleteByMap(@Param(Constants.COLUMN_MAP) Map<String, Object> columnMap); /** * 根据 ID 修改 * @param entity 实体对象 */ int updateById(@Param(Constants.ENTITY) T entity); /** * 根据 ID 查询 * @param id 主键ID */ T selectById(Serializable id); /** * 根据 entity 条件,查询全部记录 * @param queryWrapper 实体对象封装操作类(可以为 null) */ List<T> selectList(@Param(Constants.WRAPPER) Wrapper<T> queryWrapper);
代码生成器
这是这个插件比较好用的一个功能。
为了更好的演示该功能,在本小节中重新新建一个工程:
首选,引入 maven 依赖:
<dependency> <groupId>com.baomidou</groupId> <artifactId>mybatis-plus-boot-starter</artifactId> <version>3.1.0</version> </dependency> <dependency> <groupId>mysql</groupId> <artifactId>mysql-connector-java</artifactId> <scope>runtime</scope> </dependency> <dependency> <groupId>com.baomidou</groupId> <artifactId>mybatis-plus-boot-starter</artifactId> <version>2.2.0</version> </dependency> <!-- freemarker --> <dependency> <groupId>org.freemarker</groupId> <artifactId>freemarker</artifactId> </dependency>
此处要注意版本问题,mybatis-plus-boot-starter 用的是 3.0 以上的版本,mybatis-plus-boot-starter 用了 3.0 以下的版本。因为MyBatis-Plus 从 3.0.3 之后移除了代码生成器与模板引擎的默认依赖,需要手动添加相关依赖。此处为了简化演示,故用了 3.0 以下的版本。
另外,MyBatis-Plus 支持 Velocity(默认)、Freemarker、Beetl,用户可以选择自己熟悉的模板引擎,也可以自定义自定义模板引擎。本篇用的是 Freemarker 。
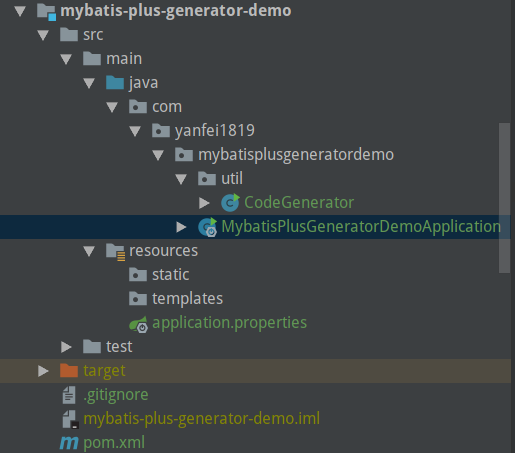
下面,就是最代码生成工具了:
package com.yanfei1819.mybatisplusgeneratordemo.util; import com.baomidou.mybatisplus.generator.AutoGenerator; import com.baomidou.mybatisplus.generator.config.DataSourceConfig; import com.baomidou.mybatisplus.generator.config.GlobalConfig; import com.baomidou.mybatisplus.generator.config.PackageConfig; import com.baomidou.mybatisplus.generator.config.StrategyConfig; import com.baomidou.mybatisplus.generator.config.converts.MySqlTypeConvert; import com.baomidou.mybatisplus.generator.config.rules.DbColumnType; import com.baomidou.mybatisplus.generator.config.rules.DbType; import com.baomidou.mybatisplus.generator.config.rules.NamingStrategy; import com.baomidou.mybatisplus.generator.engine.FreemarkerTemplateEngine; /** * <p> * 代码生成器演示 * </p> */ public class CodeGenerator { public static void main(String[] args) { // assert (false) : "代码生成属于危险操作,请确定配置后取消断言执行代码生成!"; AutoGenerator mpg = new AutoGenerator(); // 选择 freemarker 引擎,默认 Velocity mpg.setTemplateEngine(new FreemarkerTemplateEngine()); // 全局配置 GlobalConfig gc = new GlobalConfig(); gc.setAuthor("追梦1819"); gc.setOutputDir("F://私人文档/springboot/springboot-example/mybatis-plus-generator-demo/src/main/java"); gc.setFileOverride(false);// 是否覆盖同名文件,默认是false gc.setActiveRecord(true);// 不需要ActiveRecord特性的请改为false gc.setEnableCache(false);// XML 二级缓存 gc.setBaseResultMap(true);// XML ResultMap gc.setBaseColumnList(false);// XML columList /* 自定义文件命名,注意 %s 会自动填充表实体属性! */ // gc.setMapperName("%sDao"); // gc.setXmlName("%sDao"); // gc.setServiceName("MP%sService"); // gc.setServiceImplName("%sServiceDiy"); // gc.setControllerName("%sAction"); mpg.setGlobalConfig(gc); // 数据源配置 DataSourceConfig dsc = new DataSourceConfig(); dsc.setDbType(DbType.MYSQL); dsc.setTypeConvert(new MySqlTypeConvert() { // 自定义数据库表字段类型转换【可选】 @Override public DbColumnType processTypeConvert(String fieldType) { System.out.println("转换类型:" + fieldType); // 注意!!processTypeConvert 存在默认类型转换,如果不是你要的效果请自定义返回、非如下直接返回。 return super.processTypeConvert(fieldType); } }); dsc.setDriverName("com.mysql.jdbc.Driver"); dsc.setUsername("root"); dsc.setPassword("pass123"); dsc.setUrl("jdbc:mysql://192.168.1.88:3306/test?serverTimezone=GMT%2B8"); mpg.setDataSource(dsc); // 策略配置 StrategyConfig strategy = new StrategyConfig(); // strategy.setCapitalMode(true);// 全局大写命名 ORACLE 注意 strategy.setTablePrefix(new String[] { "user_" });// 此处可以修改为您的表前缀 strategy.setNaming(NamingStrategy.nochange);// 表名生成策略 strategy.setInclude(new String[] { "user" }); // 需要生成的表 // strategy.setExclude(new String[]{"test"}); // 排除生成的表 // 自定义实体父类 // strategy.setSuperEntityClass("com.baomidou.demo.TestEntity"); // 自定义实体,公共字段 // strategy.setSuperEntityColumns(new String[] { "test_id", "age" }); // 自定义 mapper 父类 // strategy.setSuperMapperClass("com.baomidou.demo.TestMapper"); // 自定义 service 父类 // strategy.setSuperServiceClass("com.baomidou.demo.TestService"); // 自定义 service 实现类父类 // strategy.setSuperServiceImplClass("com.baomidou.demo.TestServiceImpl"); // 自定义 controller 父类 // strategy.setSuperControllerClass("com.baomidou.demo.TestController"); // 【实体】是否生成字段常量(默认 false) // public static final String ID = "test_id"; // strategy.setEntityColumnConstant(true); // 【实体】是否为构建者模型(默认 false) // public User setName(String name) {this.name = name; return this;} // strategy.setEntityBuilderModel(true); mpg.setStrategy(strategy); // 包配置 PackageConfig pc = new PackageConfig(); pc.setParent("com.yanfei1819.mybatisplusgeneratordemo"); // pc.setModuleName("test"); mpg.setPackageInfo(pc); // 注入自定义配置,可以在 VM 中使用 cfg.abc 【可无】 // InjectionConfig cfg = new InjectionConfig() { // @Override // public void initMap() { // Map<String, Object> map = new HashMap<String, Object>(); // map.put("abc", this.getConfig().getGlobalConfig().getAuthor() + // "-mp"); // this.setMap(map); // } // }; // // // 自定义 xxList.jsp 生成 // List<FileOutConfig> focList = new ArrayList<>(); // focList.add(new FileOutConfig("/template/list.jsp.vm") { // @Override // public String outputFile(TableInfo tableInfo) { // // 自定义输入文件名称 // return "D://my_" + tableInfo.getEntityName() + ".jsp"; // } // }); // cfg.setFileOutConfigList(focList); // mpg.setCfg(cfg); // // // 调整 xml 生成目录演示 // focList.add(new FileOutConfig("/templates/mapper.xml.vm") { // @Override // public String outputFile(TableInfo tableInfo) { // return "/develop/code/xml/" + tableInfo.getEntityName() + ".xml"; // } // }); // cfg.setFileOutConfigList(focList); // mpg.setCfg(cfg); // // // 关闭默认 xml 生成,调整生成 至 根目录 // TemplateConfig tc = new TemplateConfig(); // tc.setXml(null); // mpg.setTemplate(tc); // 自定义模板配置,可以 copy 源码 mybatis-plus/src/main/resources/templates 下面内容修改, // 放置自己项目的 src/main/resources/templates 目录下, 默认名称一下可以不配置,也可以自定义模板名称 // TemplateConfig tc = new TemplateConfig(); // tc.setController("..."); // tc.setEntity("..."); // tc.setMapper("..."); // tc.setXml("..."); // tc.setService("..."); // tc.setServiceImpl("..."); // 如上任何一个模块如果设置 空 OR Null 将不生成该模块。 // mpg.setTemplate(tc); // 执行生成 mpg.execute(); // 打印注入设置【可无】 // System.err.println(mpg.getCfg().getMap().get("abc")); } }
可以看到,所有的配置都在这个类中(当然不是每一项配置都是必须的,“按需所取”)。
执行该类,能够得到结果:

条件构造器
简单说,就是通过方法把条件封装好,直接写入参数即可。个人并不推荐这种方式,因为可读性并不强,有点封装过度。如果感兴趣的小伙伴,可以看看 官方文档 ,写得很详细。
参考
- MyBatis Plus 官网:https://mp.baomidou.com/
- 源码:com.baomidou.mybatisplus.core.mapper.BaseMapper
总结
其实就个人来说,我并不喜欢这个工具。因为它给我的感觉是封装过度了,从某种程度上来说,把简单问题复杂化了。
常规的 CRUD 操作,对应问题的解决方案有很多,比就如上一篇文章【SpringBoot第六篇:整合通用Mapper】中说到的通用Mapper,就是我比较喜欢的解决方案。
针对代码生成器和条件生成器,那就是“萝卜白菜,各有所爱”了。
当然,这只是个人的观点。技术与框架的选择,是多个因素的综合考虑的结果。
源码:我的GitHub
<全文完>

本文来自博客园,作者:追梦1819,转载请注明原文链接:https://www.cnblogs.com/yanfei1819/p/10881666.html


【推荐】国内首个AI IDE,深度理解中文开发场景,立即下载体验Trae
【推荐】编程新体验,更懂你的AI,立即体验豆包MarsCode编程助手
【推荐】抖音旗下AI助手豆包,你的智能百科全书,全免费不限次数
【推荐】轻量又高性能的 SSH 工具 IShell:AI 加持,快人一步