webgl变换:深入图形旋转
1. 前言
图形的动画是由平移、旋转、和缩放三种基础的变换方式组成。
之前的文章里,分享了下如何进行图形的平移。《webgl变换:深入图形平移》 ,文章中使用了两种方法来实现一个图形的平移操作,
- 直接在着色器源代码里实现
- 通过矩阵的方式实现。
而且通过推导得出了平移矩阵(列主序)
| 1 0 0 0 |
| 0 1 0 0 |
| 0 0 1 0 |
| Tx Ty Tz 1 |
1.1 两种方式对比
| 优点 | 缺点 | |
|---|---|---|
| 源代码 | 1.容易理解,可直观观察到坐标的变化 2.可通过着色器内置方法修改坐标值 |
扩展性、操作性、可维护性差 |
| 矩阵 | 1.扩展性、操作性、可维护性好 | 不好理解,不能观察到坐标是如何变化的 |
通过对比我们也可以看出,通过矩阵实现的变换操作,扩展性和可操作性都比源代码的方式好了很多。而矩阵也是 webgl 中常用的处理动画的方法。
今天,我们来分享动画的第二个操作 -- 图形的旋转
2. 图形旋转
2.1 旋转操作
由于之后所有的变换操作都是基于矩阵进行的,所以这里我们直接过渡到矩阵推导。来看下如何推导出旋转矩阵
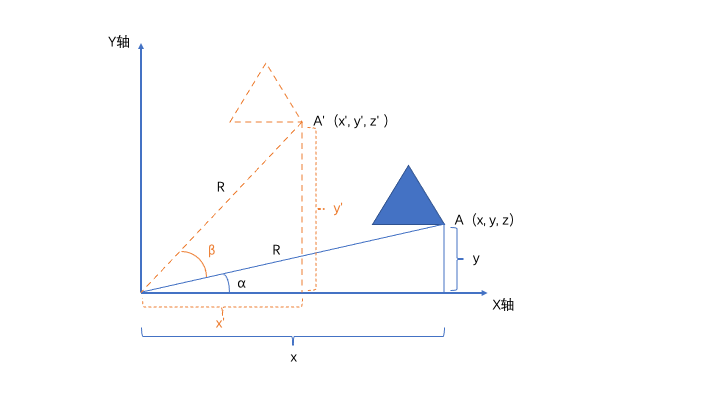
首先来看一个效果,将蓝色的三角形沿某个原点旋转到虚线三角形处。

2.2 矩阵推导
接下来,我们通过这个效果来进行旋转矩阵的推导,看下如何获取到旋转矩阵。
1. 首先获取到操作图示

2. 得到坐标公式
通过上方的图示显示,我们可以得到如下信息
-
顶点A
x = R * cos(α)
y = R * sin(α)
z = 0
-
顶点A’
x’ = R * cos(α + β)
= R * ( cos(α) * cos(β) - sin(α) * sin (β) )
= R * cos(α) * cos(β) - R * sin(α) * sin (β)
y’ = R * sin(α + β)
= R * ( sin(α) * cos(β) + cos(α) * sin(β) )
= R * sin(α) * cos(β) + R* cos(α) * sin(β)
z’ = z
-
将 顶点A 的公式代入到 顶点A’
x’ = x * cos(β) - y * sin(β)
y’ = y * cos(β) + x * sin(β)
z’ = z
3. 通过 (伪矩阵)表示坐标变化

通过矩阵,也可以得到一组公式,用来表示 顶点A 和 顶点A’ 的关联关系。
w齐次坐标 目前固定为1
ax + by + cz + d = x'ex + fy + gz + h = y'ix + jy + kz + l = z'mx + ny + oz + p = w'
4. 得到矩阵公式
将 第二步 和 第三步 得到的工作求解可得
ax + by + cz + w = x * cos(β) - y * sin(β):只有当a = cos(β),b = -sin(β), c = w = 0的时候,等式左右两边成立ex + fy + gz + h = y * cos(β) + x * sin(β):只有当e = sin(β) f = cos(β), g = h = 0的时候,等式左右两边成立ix + jy + kz + l = z':只有当k = 1, i = j = k = 0的时候,等式左右两边成立mx + ny + oz + p = 1':只有当m = n = o = 0, p = 1的时候,等式左右两边成立
经过处理,可得旋转矩阵为:
| cos(β) sin(β) 0 0 |
| -sin(β) cos(β) 0 0 |
| 0 0 1 0 |
| 0 0 0 1 |
同样的,这里得到的矩阵为列主序。
3. 实现图形旋转
1. 绘制一个三角形 (多次绘制的图形,代码就不赘述了)
const vertexShaderSource = "" +
      "attribute vec4 apos;" +
      "void main(){" +
      " gl_Position = apos;" +
      "}";
const fragmentShaderSource = "" +
      "void main(){" +
      " gl_FragColor = vec4(0.0,0.0,1.0,1.0);" +
      "}";

const program = initShader(gl,vertexShaderSource,fragmentShaderSource);
const aposLocation = gl.getAttribLocation(program,'apos');

const data =  new Float32Array([
  0.0,0.3,
  -.3,-.3,
  .3,-.3
]);
const buffer = gl.createBuffer();
gl.bindBuffer(gl.ARRAY_BUFFER,buffer);
gl.bufferData(gl.ARRAY_BUFFER,data,gl.STATIC_DRAW);

gl.vertexAttribPointer(aposLocation,2,gl.FLOAT,false,0,0);
gl.enableVertexAttribArray(aposLocation);

gl.drawArrays(gl.TRIANGLES,0,3); // 第二步需要将此方法注释
2. 添加矩阵变量
因为矩阵会影响到所有顶点,所以我们使用 uniform 类型的数据。
const vertexShaderSource = "" +
      "attribute vec4 apos;" +
      "uniform mat4 mat;" +  // 添加的矩阵变量
      "void main(){" +
      " gl_Position = mat * apos;" +
      "}";

const matLocation = gl.getUniformLocation(program,'mat');

let deg = 0;    // 定义初始旋转角度
function run () {
  deg -= 0.03; // 顺时针旋转,每次变化量为0.03

  // 初始化一个旋转矩阵。
  const mat = new Float32Array([
    Math.cos(deg), Math.sin(deg), 0.0, 0.0,
    -Math.sin(deg),Math.cos(deg), 0.0, 0.0,
    0.0,           0.0,           1.0, 0.0,
    0.0,           0.0,           0.0, 1.0,
  ]);

  // 将旋转矩阵赋值给着色器
  gl.uniformMatrix4fv(matLocation,false,mat);
  // 绘制新的三角形
  gl.drawArrays(gl.TRIANGLES,0,3);

  // 使用此方法实现一个动画
  requestAnimationFrame(run)
}
run()
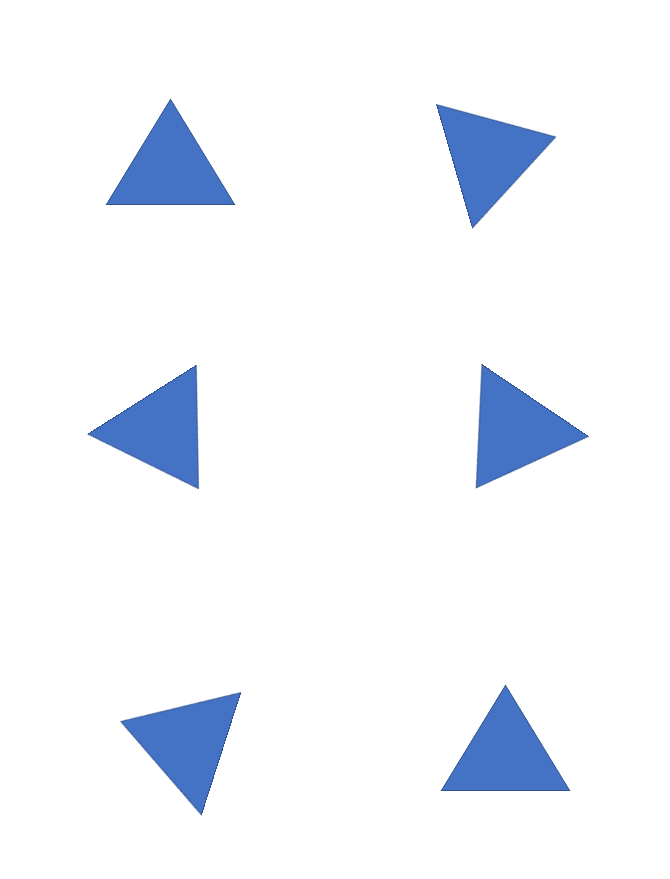
3. 效果演示

4. 完整代码
<!DOCTYPE html>
<html lang="en">
<head>
  <meta charset="UTF-8">
  <title>Title</title>
</head>
<body>
<canvas id="webgl" width="500" height="500"></canvas>
<script>
  const gl = document.getElementById('webgl').getContext('webgl');
  const vertexShaderSource = "" +
    "attribute vec4 apos;" +
    "uniform mat4 mat;" +
    "void main(){" +
    " gl_Position = mat * apos;" +
    "}";
  const fragmentShaderSource = "" +
    "void main(){" +
    " gl_FragColor = vec4(0.0,0.0,1.0,1.0);" +
    "}";

  const program = initShader(gl,vertexShaderSource,fragmentShaderSource);
  const aposLocation = gl.getAttribLocation(program,'apos');
  const matLocation = gl.getUniformLocation(program,'mat');

  const data =  new Float32Array([
    0.0,0.3,
    -.3,-.3,
    .3,-.3
  ]);
  const buffer = gl.createBuffer();
  gl.bindBuffer(gl.ARRAY_BUFFER,buffer);
  gl.bufferData(gl.ARRAY_BUFFER,data,gl.STATIC_DRAW);

  gl.vertexAttribPointer(aposLocation,2,gl.FLOAT,false,0,0);
  gl.enableVertexAttribArray(aposLocation);

  let deg = 0;    // 定义初始旋转角度
  function run () {
    deg += 0.03; // 每次变动将旋转角度增加 0.03

    // 初始化一个旋转矩阵。
    const mat = new Float32Array([
      Math.cos(deg), Math.sin(deg), 0.0, 0.0,
      -Math.sin(deg),Math.cos(deg), 0.0, 0.0,
      0.0,           0.0,           1.0, 0.0,
      0.0,           0.0,           0.0, 1.0,
    ]);

    // 将旋转矩阵赋值给着色器
    gl.uniformMatrix4fv(matLocation,false,mat);
    // 绘制新的三角形
    gl.drawArrays(gl.TRIANGLES,0,3);

    // 使用此方法实现一个动画
    requestAnimationFrame(run)
  }
  run()

  function initShader(gl,vertexShaderSource,fragmentShaderSource){
    const vertexShader = gl.createShader(gl.VERTEX_SHADER);
    const fragmentShader = gl.createShader(gl.FRAGMENT_SHADER);

    gl.shaderSource(vertexShader,vertexShaderSource);
    gl.shaderSource(fragmentShader,fragmentShaderSource);

    gl.compileShader(vertexShader);
    gl.compileShader(fragmentShader);

    const program = gl.createProgram();

    gl.attachShader(program,vertexShader);
    gl.attachShader(program,fragmentShader)

    gl.linkProgram(program);
    gl.useProgram(program);
    return program;
  }
</script>
</body>
</html>


