Spring MVC基本原理
Spring MVC基本原理
Spring MVC是Spring开源项目在Web开发上的一个扩展,方便我们在开发Web项目的时候使用IOC来管理我们的bean对象,我们都知道Tomcat是作为web项目的一个容器(准确点说是servlet容器),既然要在web项目中使用Spring框架,我们就必须知道,Tomcat与Spring是如何地结合,来方便我们进行web项目开发。
在开始之前,先提出以下两个问题
- Tomcat在启动SpringMVC web项目的时候,是如何创建Spring容器?
- Spring作为bean对象的容器,与Tomcat作为web容器是什么区别?
通过对以上问题的探索,我们基本上可以理清Spring MVC的基本设计思路
一、Tomcat启动原理
1.Tomcat基本框架

2.Tomcat启动流程
tomcat启动从执行 org.apache.catalina.startup.Bootstrap.main()方法开始。main方法主要实现的逻辑如下源码:
    public static void main(String args[]) {

        synchronized (daemonLock) {
            if (daemon == null) {
                // Don't set daemon until init() has completed
                Bootstrap bootstrap = new Bootstrap();
                try {
                    bootstrap.init();
                } catch (Throwable t) {
                    handleThrowable(t);
                    t.printStackTrace();
                    return;
                }
                daemon = bootstrap;
            } else {
                // When running as a service the call to stop will be on a new
                // thread so make sure the correct class loader is used to
                // prevent a range of class not found exceptions.
                Thread.currentThread().setContextClassLoader(daemon.catalinaLoader);
            }
        }

        try {
            String command = "start";
            if (args.length > 0) {
                command = args[args.length - 1];
            }

            if (command.equals("startd")) {
                args[args.length - 1] = "start";
                daemon.load(args);
                daemon.start();
            } else if (command.equals("stopd")) {
                args[args.length - 1] = "stop";
                daemon.stop();
            } else if (command.equals("start")) {
                daemon.setAwait(true);
                daemon.load(args);
                daemon.start();
                if (null == daemon.getServer()) {
                    System.exit(1);
                }
            } else if (command.equals("stop")) {
                daemon.stopServer(args);
            } else if (command.equals("configtest")) {
                daemon.load(args);
                if (null == daemon.getServer()) {
                    System.exit(1);
                }
                System.exit(0);
            } else {
                log.warn("Bootstrap: command \"" + command + "\" does not exist.");
            }
        } catch (Throwable t) {
            // Unwrap the Exception for clearer error reporting
            if (t instanceof InvocationTargetException &&
                    t.getCause() != null) {
                t = t.getCause();
            }
            handleThrowable(t);
            t.printStackTrace();
            System.exit(1);
        }
    }
我们看到在main方法中,Bootstrap首先会新建一个本类对象,然后再调用对象的init方法,init方法执行完成后,因为我们没有传参数,所以默认是start,执行start
    public void start() throws Exception {
        if (catalinaDaemon == null) {
            init();
        }
        Method method = catalinaDaemon.getClass().getMethod("start", (Class [])null);
        method.invoke(catalinaDaemon, (Object [])null);
    }
我们看到在执行start方法的时候,通过反射的方法调用了Catalina的Start方法、
Catalina.java中start方法源码
    public void start() {

        if (getServer() == null) {
            load();
        }

        if (getServer() == null) {
            log.fatal(sm.getString("catalina.noServer"));
            return;
        }

        long t1 = System.nanoTime();

        // Start the new server
        try {
            getServer().start();
        } catch (LifecycleException e) {
            log.fatal(sm.getString("catalina.serverStartFail"), e);
            try {
                getServer().destroy();
            } catch (LifecycleException e1) {
                log.debug("destroy() failed for failed Server ", e1);
            }
            return;
        }

        if (log.isInfoEnabled()) {
            log.info(sm.getString("catalina.startup", Long.toString(TimeUnit.NANOSECONDS.toMillis(System.nanoTime() - t1))));
        }

        // Register shutdown hook
        if (useShutdownHook) {
            if (shutdownHook == null) {
                shutdownHook = new CatalinaShutdownHook();
            }
            Runtime.getRuntime().addShutdownHook(shutdownHook);

            // If JULI is being used, disable JULI's shutdown hook since
            // shutdown hooks run in parallel and log messages may be lost
            // if JULI's hook completes before the CatalinaShutdownHook()
            LogManager logManager = LogManager.getLogManager();
            if (logManager instanceof ClassLoaderLogManager) {
                ((ClassLoaderLogManager) logManager).setUseShutdownHook(
                        false);
            }
        }

        if (await) {
            await();
            stop();
        }
    }
getServer().start() 获取Server,执行server的start方法,启动服务器
然后依次启动服务器的各个组件
Engine 引擎
表示可运行的Catalina的servlet引擎实例,并且包含了servlet容器的核心功能。在一个服务中只能有一个引擎。同时,作为一个真正的容器,Engine元素之下可以包含一个或多个虚拟主机。它主要功能是将传入请求委托给适当的虚拟主机处理。如果根据名称没有找到可处理的虚拟主机,那么将根据默认的Host来判断该由哪个虚拟主机处理。
Host 虚拟主机
它负责安装和展开这些应用,并且标识这个应用以便能够区分它们。它的子容器通常是 Context。一个虚拟主机下都可以部署一个或者多个Web App,每个Web App对应于一个Context,当Host获得一个请求时,将把该请求匹配到某个Context上,然后把该请求交给该Context来处理。主机组件类似于Apache中的虚拟主机,但在Tomcat中只支持基于FQDN(完全合格的主机名)的“虚拟主机”。Host主要用来解析web.xml。
Context上下文
代表 Servlet 的 Context,它具备了 Servlet 运行的基本环境,它表示Web应用程序本身。Context 最重要的功能就是管理它里面的 Servlet 实例,一个Context对应于一个Web Application,一个Web Application由一个或者多个Servlet实例组成。
Wrapper包装器
代表一个 Servlet,它负责管理一个 Servlet,包括的 Servlet 的装载、初始化、执行以及资源回收。Wrapper 是最底层的容器,它没有子容器了,所以调用它的 addChild 将会报错。

二、Spring MVC启动流程
Spring MVC中我们通常会在web.xml文件中这样配置
<?xml version="1.0" encoding="UTF-8"?>
<web-app xmlns="http://xmlns.jcp.org/xml/ns/javaee"
         xmlns:xsi="http://www.w3.org/2001/XMLSchema-instance"
         xsi:schemaLocation="http://xmlns.jcp.org/xml/ns/javaee http://xmlns.jcp.org/xml/ns/javaee/web-app_4_0.xsd"
         version="4.0">
    <context-param>
        <param-name>contextConfigLocation</param-name>
        <param-value>classpath:spring-config.xml</param-value>
    </context-param>
    <!--  定义Spring容器加载器  -->
    <listener>
        <listener-class>org.springframework.web.context.ContextLoaderListener</listener-class>
    </listener>
<!--  定义Spring MVC前端控制器  -->
    <servlet>
        <servlet-name>mvc-test</servlet-name>
        <servlet-class>org.springframework.web.servlet.DispatcherServlet</servlet-class>
        <!--SpringMVC配置文件-->
        <init-param>
            <param-name>contextConfigLocation</param-name>
            <param-value>classpath:applicationContext.xml</param-value>
        </init-param>
        <load-on-startup>1</load-on-startup>
    </servlet>
    <servlet-mapping>
        <servlet-name>mvc-test</servlet-name>
        <url-pattern>/</url-pattern>
    </servlet-mapping>
</web-app>
在 Servlet API中有一个ServletContextListener接口,它能够监听ServletContext对象的生命周期,实际上就是监听Web应用的生命周期。当Servlet容器启动或终止Web应用时,会触发ServletContextEvent事件,该事件由ServletContextListener来处理。在ServletContextListener接口中定义了处理ServletContextEvent 事件的两个方法contextInitialized()和contextDestroyed()。
ContextLoaderListener监听器的作用就是启动Web容器时,自动装配ApplicationContext的配置信息。因为它实现了ServletContextListener这个接口,在web.xml配置了这个监听器,启动容器时,就会默认执行它实现的方法。由于在ContextLoaderListener中关联了ContextLoader这个类,所以整个加载配置过程由ContextLoader来完成。
DispatchServlet初始化
DispatchServlet名如其义,它的本质上是一个Servlet,所以web容器会默认执行其中的init 方法,DispatchServlet实现了FrameworkServlet接口,类结构如下
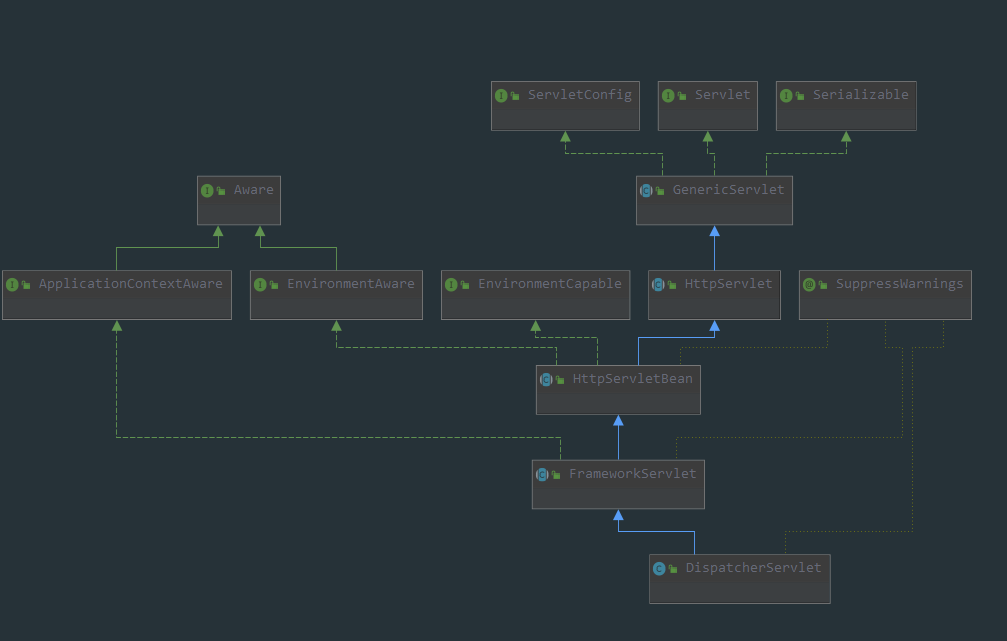
通过以上类图,我们可以看出DispatchServlet是交由Spring容器进行管理的
阅读源码后,我们发现
DispatchServlet在进行初始化的时候,可以将它的init-param指定的Spring配置文件 作为BeanDefinition。
DispatchServlet 它提供了整合web javabean和spring application context的整合方案
所以在Spring容器中,我们可以得出以下总结
Tomcat在启动的时候,读取web.xml文件
通过ContextLoaderListener初始Root上下文,并将其作为一个Spring父容器
通过DispatcherServlet初始化WebMVC上下文,并指定Root上下文作为web mvc上下文的父容器
DispatcherServlet 的 init方法
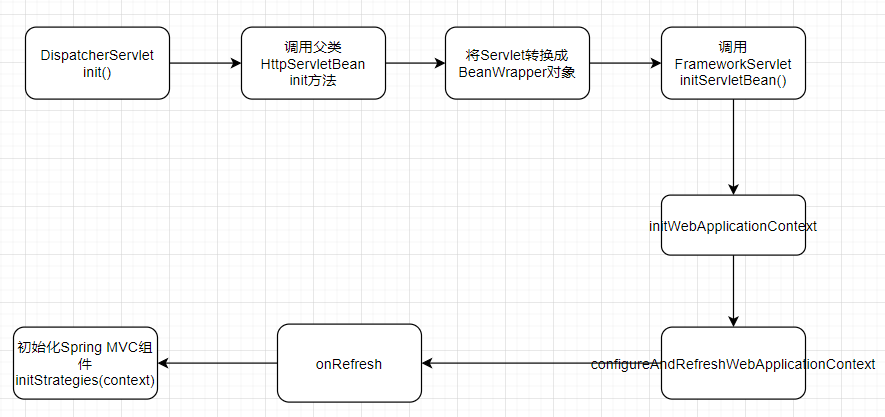
在init方法中,会初始化Spring容器的九大组件
protected void initStrategies(ApplicationContext context) {
		// 初始化 MultipartResolver:主要用来处理文件上传.如果定义过当前类型的bean对象,那么直接获取,如果没有的话,可以为null
		initMultipartResolver(context);
		// 初始化 LocaleResolver:主要用来处理国际化配置,基于URL参数的配置(AcceptHeaderLocaleResolver),基于session的配置(SessionLocaleResolver),基于cookie的配置(CookieLocaleResolver)
		initLocaleResolver(context);
		// 初始化 ThemeResolver:主要用来设置主题Theme
		initThemeResolver(context);
		// 初始化 HandlerMapping:映射器,用来将对应的request跟controller进行对应
		initHandlerMappings(context);
		// 初始化 HandlerAdapter:处理适配器,主要包含Http请求处理器适配器,简单控制器处理器适配器,注解方法处理器适配器
		initHandlerAdapters(context);
		// 初始化 HandlerExceptionResolver:基于HandlerExceptionResolver接口的异常处理
		initHandlerExceptionResolvers(context);
		// 初始化 RequestToViewNameTranslator:当controller处理器方法没有返回一个View对象或逻辑视图名称,并且在该方法中没有直接往response的输出流里面写数据的时候,spring将会采用约定好的方式提供一个逻辑视图名称
		initRequestToViewNameTranslator(context);
		// 初始化 ViewResolver: 将ModelAndView选择合适的视图进行渲染的处理器
		initViewResolvers(context);
		// 初始化 FlashMapManager: 提供请求存储属性,可供其他请求使用
		initFlashMapManager(context);
	}
到此Spring MVC启动工作完成
我们再来看一下Spring MVC的请示处理过程
三、Spring MVC运行原理
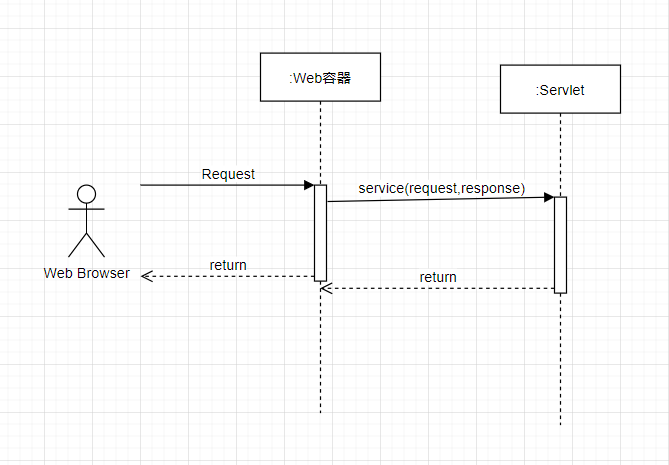
了解Servlet的同鞋都知道,当request到达后,会调用servlet的service方法,父类HttpServlet给了一个默认的实现,通过Http Method,调用对应的doXXX方法(doGet、doPost、doPut等等)
在DispatcherServlet中它的父类有FrameworkServlet实现了service方法
@Override
	protected void service(HttpServletRequest request, HttpServletResponse response)
			throws ServletException, IOException {

		// 获得请求方法
		HttpMethod httpMethod = HttpMethod.resolve(request.getMethod());
		// 处理patch请求
		if (httpMethod == HttpMethod.PATCH || httpMethod == null) {
			processRequest(request, response);
		}
		else {
			// 处理其他类型的请求,实际是调用HttpServlet中的service方法(根据请求方法,doXXX(req,reps))
			super.service(request, response);
		}
	}
处理流程如下图

最终调用DispatcherServlet的doService方法,再调用doDispatcher方法
doDispatch方法源码如下
protected void doDispatch(HttpServletRequest request, HttpServletResponse response) throws Exception {
		// 实际处理时所用的request,如果不是上传请求,则直接使用接收到的request,否则封装成上传类型的request
		HttpServletRequest processedRequest = request;
		// 处理请求的处理器链(包含处理器和对应的interceptor)
		HandlerExecutionChain mappedHandler = null;
		// 是不是上传请求的标志
		boolean multipartRequestParsed = false;

		// 获取异步管理器
		WebAsyncManager asyncManager = WebAsyncUtils.getAsyncManager(request);

		try {
			// 封装model和view的容器
			ModelAndView mv = null;
			// 处理请求过程中抛出的异常,但是不包含渲染过程中抛出的异常
			Exception dispatchException = null;

			try {
				// 检测请求是否为上传请求,如果是则通过multipartResolver将其封装成MultipartHttpServletRequest对象
				processedRequest = checkMultipart(request);
				// 设置上传请求的标志
				multipartRequestParsed = (processedRequest != request);

				// Determine handler for the current request.
				// 获得请求对应的HandlerExecutionChain对象(HandlerMethod和HandlerInterceptor拦截器们)
				mappedHandler = getHandler(processedRequest);
				//  如果获取不到,则根据配置抛出异常或返回404错误
				if (mappedHandler == null) {
					noHandlerFound(processedRequest, response);
					return;
				}

				// Determine handler adapter for the current request.
				// 获得当前handler对应的HandlerAdapter对象
				HandlerAdapter ha = getHandlerAdapter(mappedHandler.getHandler());

				// Process last-modified header, if supported by the handler.
				// 处理GET、HEAD请求的Last-Modified,当浏览器第一次跟服务器请求资源时,服务器会在返回的请求头里包含一个last_modified的属性,
				// 代表资源最后时什么时候修改的,在浏览器以后发送请求的时候,会同时发送之前接收到的Last_modified.服务器接收到带last_modified的请求后,
				// 会跟实际资源的最后修改时间做对比,如果过期了返回新的资源,否则直接返回304表示未过期,直接使用之前缓存的结果即可
				String method = request.getMethod();
				boolean isGet = "GET".equals(method);
				if (isGet || "HEAD".equals(method)) {
					// 获取请求中服务器端最后被修改时间
					long lastModified = ha.getLastModified(request, mappedHandler.getHandler());
					if (new ServletWebRequest(request, response).checkNotModified(lastModified) && isGet) {
						return;
					}
				}

				// 执行响应的Interceptor的preHandler
				// 注意:该方法如果有一个拦截器的前置处理返回false,则开始倒序触发所有的拦截器的 已完成处理
				if (!mappedHandler.applyPreHandle(processedRequest, response)) {
					return;
				}

				// Actually invoke the handler.
				// 真正的调用handler方法,也就是执行对应的方法,并返回视图
				mv = ha.handle(processedRequest, response, mappedHandler.getHandler());

				// 如果需要异步处理,直接返回
				if (asyncManager.isConcurrentHandlingStarted()) {
					return;
				}

				// 当view为空时,根据request设置默认的view
				applyDefaultViewName(processedRequest, mv);
				// 执行响应的interceptor的postHandler方法
				mappedHandler.applyPostHandle(processedRequest, response, mv);
			}
			catch (Exception ex) {
				// 记录异常
				dispatchException = ex;
			}
			catch (Throwable err) {
				// As of 4.3, we're processing Errors thrown from handler methods as well,
				// making them available for @ExceptionHandler methods and other scenarios.
				dispatchException = new NestedServletException("Handler dispatch failed", err);
			}
			// 处理返回结果,包括处理异常、渲染页面、触发Interceptor的afterCompletion
			processDispatchResult(processedRequest, response, mappedHandler, mv, dispatchException);
		}
		catch (Exception ex) {
			// 已完成处理 拦截器
			triggerAfterCompletion(processedRequest, response, mappedHandler, ex);
		}
		catch (Throwable err) {
			// 完成处理激活触发器
			triggerAfterCompletion(processedRequest, response, mappedHandler,
					new NestedServletException("Handler processing failed", err));
		}
		finally {
			// 判断是否执行异步请求
			if (asyncManager.isConcurrentHandlingStarted()) {
				// Instead of postHandle and afterCompletion
				if (mappedHandler != null) {
					mappedHandler.applyAfterConcurrentHandlingStarted(processedRequest, response);
				}
			}
			else {
				// Clean up any resources used by a multipart request.
				// 删除上传请求的资源
				if (multipartRequestParsed) {
					cleanupMultipart(processedRequest);
				}
			}
		}
	}
