


Overview
Many people wonder if it is possible to work with both ASP.NET MVC and ASP.NET Web Forms in the same Web Application. The answer, thankfully, is rather short: yes, you can work with both platforms in one application. The reason you can do this is because they are both distinct layers on top of core ASP.NET that do not interfere with each other. Once this question is asked (and, thankfully, answered), many observers have a follow-up: "Why in the world would you do this?"
There are various reasons why you might want to run one Project type from within another, for example:
-
Web Forms is very good at encapsulating view logic into components. You may have a need to show a complex reporting page, or perhaps a portal page, and you'd like to flex components you already know how to use.
-
ASP.NET MVC is very good at allowing you to test the logic in your Web Application. Your company may have a code-coverage policy that dictates that 90 percent of all code written must be covered by a Unit Test. MVC can help you with this.
-
You may be migrating an existing application to ASP.NET MVC and not want to do it all in one development cycle. Having the ability to add ASP.NET MVC to your application and slowly roll it over is a tremendous benefit.
You may have your own reasons that differ from the ones we made up here; the good news is that the ASP.NET team went out of their way to make this possible for you.
How is It Possible?
The ASP.NET MVC team is placing an emphasis on pluggability and extensibility. This applies not only to ASP.NET MVC core components, but to the framework as a whole. With the introduction of ASP.NET MVC Preview 2, the ASP.NET MVC team separated the core MVC functionality stack into three different assemblies, each of which extends System.Web:
-
System.Web.Routing
-
System.Web.Abstractions
-
System.Web.Mvc
In addition to this separation, the ASP.NET MVC team made these assemblies "work in Medium-trust server environments, and bin-deployable," which means that the assemblies do not need to be installed into the Global Assembly Cache (GAC) on your development box and/or web server. You can simply add a reference to the assemblies, and you can work with ASP.NET MVC.
Most importantly, what this means to you is that you don't need an explicit project/application type to run ASP.NET MVC — you just need to reference some assemblies, add some directories, and tweak your Web.config a little bit — and then you're all set.
Including MVC in Existing Web Forms Applications
Adding ASP.NET MVC functionality to an existing Web Forms application is comprised of three different steps:
-
Add a reference to the three core libraries that ASP.NET MVC needs: System.Web.Mvc, System. Web.Routing, and System.Web.Abstractions.
-
Add two directories to your application: Controllers and Views.
-
Update the Web.config to load the three assemblies at run time as well as registering the UrlRoutingModule HttpModule.
This section walks you through adding ASP.NET MVC functionality to an ASP.NET Web Project (or web site) step-by-step and adding the basic "Welcome to MVC" (which comes from the ASP.NET MVC template).
Step 1: Referencing the Required Libraries
The first step is to find the libraries that are required for ASP.NET MVC to work. By default, the System. Web.Mvc.dll assemby is stored in [Installation Directory]\Microsoft.NET\ASP.NET MVC\Assemblies. The System.Web.Abstractions.dll and System.Web.Routing.dll assemblies are stored in [Installation Directory]\Reference Assemblies\Microsoft\Framework\v3.5.
Once located, the three core libraries can be copied to your project's \bin directory. These three files (System.Web.Abstractions.dll, System.Web.Mvc.dll, and System.Web.Routing.dll) should be put in a directory that's specific to the project, and, ideally, is usable by your source control system.
For this example, the application will have a Reference_Assemblies directory, following along with the convention introduced by the ASP.NET MVC team with Preview 2, and the three assemblies the project needs will go into it. Figure 12-1 shows the three core MVC libraries in this directory.
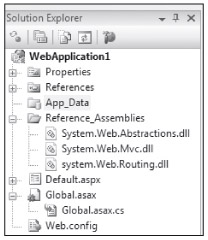
Once added to this directory, you need to reference the three code MVC libraries in your application by right-clicking the Project and selecting Add Reference. You then select the Browse tab and locate the Reference_Assemblies directory, and then select the three libraries.
Step 2: Creating the Necessary Directories
As mentioned in Chapter 2, ASP.NET MVC relies on a certain amount of convention (doing things in a prescribed way) to reduce the amount of guesswork and configuration. One of the core conventions of ASP.NET MVC is the naming of the directories where the project's Controllers and Views are kept — each should have its own directory, and each should be named in a particular way. This topic is covered extensively in Chapters 2, 5 (on Controllers), and 6 (on Views).
For this preliminary example, the required directories will be used ("Controllers" and "Views"). The ASP.NET MVC engine expects these directories to exist, and that all of the Controllers are in the Controllers directory, and all the Views (and their subdirectories) are kept in the Views directory.
In addition, the example will keep with the ASP.NET MVC convention of having the images and CSS files stored in the Content directory. This isn't required, but the notion of "convention over configuration" extends beyond what is required to make the technology work — it also applies to what other developers expect. If you have the ability to follow the convention, it's usually a good idea to do so for clarity.
To get started, the following files (taken from a starter ASP.NET MVC project) should be added to the example application:
-
HomeController.cs
-
The HomeController view files: Index.aspx and About.aspx
-
The shared Site.master file
-
The ~/Views/Web.config file
-
Optionally, add the scripts directory if you plan on using Ajax helpers.
After adding these files, the site structure begins to look a bit more like an ASP.NET MVC site, as shown in Figure 12-2.
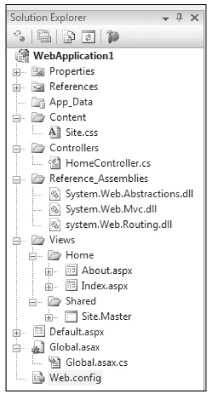
The example site is almost ready; the final step is to configure some minor settings in the Web.config so that the site will relay requests appropriately to the ASP.NET MVC engine.
Step 3: Updating the Web.Config
The final step to enabling ASP.NET MVC in our ASP.NET Web Forms application is to update the Web. config. The initial step is to make sure that each required assembly is referenced for compilation. In this code sample, the ASP.NET MVC assemblies are the first three:
<compilation debug="true"> <assemblies> <add assembly="System.Web.Mvc, Version=1.0.0.0, Culture=neutral, PublicKeyToken=31BF3856AD364E35"/> <add assembly="System.Web.Abstractions, Version=3.5.0.0, Culture=neutral, PublicKeyToken=31BF3856AD364E35"/> <add assembly="System.Web.Routing, Version=3.5.0.0, Culture=neutral, PublicKeyToken=31BF3856AD364E35"/> <add assembly="System.Core, Version=3.5.0.0, Culture=neutral, PublicKeyToken=B77A5C561934E089"/> <add assembly="System.Data.DataSetExtensions, Version=3.5.0.0, Culture=neutral, PublicKeyToken=B77A5C561934E089"/> <add assembly="System.Web.Extensions, Version=3.5.0.0, Culture=neutral, PublicKeyToken=31BF3856AD364E35"/> <add assembly="System.Xml.Linq, Version=3.5.0.0, Culture=neutral, PublicKeyToken=B77A5C561934E089"/> </assemblies></compilation>
The next step is to add a namespace reference to the system.web/pages section; doing this allows access to the System.Web.Mvc helpers, System.Linq, and System.Collections.Generic from the ViewPage:
<pages> <controls> <add tagPrefix="asp" namespace="System.Web.UI" assembly="System.Web.Extensions, Version=3.5.0.0, Culture=neutral, PublicKeyToken=31BF3856AD364E35"/> <add tagPrefix="asp" namespace="System.Web.UI.WebControls" assembly="System.Web.Extensions, Version=3.5.0.0, Culture=neutral, PublicKeyToken=31BF3856AD364E35"/></controls><namespaces> <add namespace="System.Web.Mvc"/> <add namespace="System.Web.Mvc.Html"/> <add namespace="System.Web.Mvc.Ajax"/> <add namespace="System.Linq"/> <add namespace="System.Collections.Generic"/></namespaces>
The only namespaces that are required here are System.Web.Mvc, System.Web.Mvc.Html, and System.Web.Mvc.Ajax but it's usually helpful to have additional ones like System.Collections.Generic and System.Linq, so that you can work with their IEnumerable and ICollection extension methods.
Finally, you need to register the UrlRoutingModule HttpModule. This is the module responsible for matching the URL being requested to the proper Route (and thus Controller/Action):
<httpModules> <add name="ScriptModule" type="System.Web.Handlers.ScriptModule, System.Web.Extensions, Version=3.5.0.0, Culture=neutral, PublicKeyToken=31BF3856AD364E35"/> <add name="UrlRoutingModule" type="System.Web.Routing.UrlRoutingModule, System.Web.Routing, Version=3.5.0.0, Culture=neutral, PublicKeyToken=31BF3856AD364E35"/></httpModules>
This UrlRoutingModule is the gateway to ASP.NET MVC from your Web Application, and it's full of magic and goodness. This module will evaluate every request that comes in and will, literally, act as the gatekeeper for every request your application receives.
Issues can arise from this; for example, ASP.NET MVC might respond to a given request when you were expecting that request to be passed on to a Web Form, which may leave you mystified. This module, and the routing that it performs, are discussed at length in Chapter 4.
Once these three settings are added to the application, you're ready to roll! Well almost — the initial application route settings have to be created first.
Routes, as described in Chapter 4, can be declared anywhere in your application; however, the mapping of them needs to be invoked when the application starts and there's no better place — in fact, there's really no other place at all — where this can be set than the Application_Start method of the Global.asax (you may need to add this to your application if one doesn't exist already):
using System;using System.Collections.Generic;using System.Webusing System.Web.Mvc;using System.Web.Routing;//...protected void Application_Start(object sender, EventArgs e){ RouteTable.Routes.MapRoute( "Default", "home/{action}/{id}", new { controller = "Home", action = "Index", id = "" } );}
The three MVC assemblies have been added, the Web.config configured, and the routes set up in the example application. It's now time for a test run. Figure 12-3 shows an example ASP.NET WebApplication running ASP.NET MVC.

Adding Web Forms to an Existing ASP.NET MVC Application
Adding Web Forms functionality is not really a question of how, but more of why. Chapters 2 and 3 go over the appeal of ASP.NET MVC as well as why you may want to make the switch. Indeed, there are many reasons to adopt ASP.NET MVC, and you may be wondering why it's included in this section.
The major thing to remember is that both platforms have their strengths. In particular, ASP.NET Web Forms has a very strong componentization model — one that many third-party developers have extended over the last few years — and many projects might want to take advantage of this.
There are a few scenarios in which you may want to use a Web Form in addition to ASP.NET MVC:
-
The use of third-party (or just old reliable) Server Controls. These types of components might include reporting (such as a pivot table), calendaring (such as a suite of Outlook-style calendar views), or charting.
-
A dashboard/portal page that uses WebParts or integrates with SharePoint.
-
One or more reports, which use the rich reporting tools found in ASP.NET Web Forms.
-
An administration site for editing data, which might use a technology such as ASP.NET DynamicData.
There are other scenarios, to be sure; however, these are probably the most common. The following example focuses on Reporting as it is the most likely scenario an ASP.NET MVC developer will face.
The Easy Part: Do Nothing
The good news comes first with this chapter: If you're using the Web Forms ViewEngine (which you're using by default when you use ASP.NET MVC; see Chapter 6 for more details), you can render any Web Form as you would with a Web Application — by calling it directly. In fact, as you'll see in a following section, you're already using a Web Form if you use Master Pages in your application!
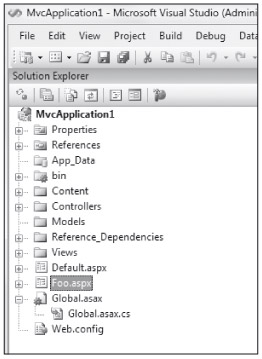
For example, if you add "Foo.aspx" to your application root, as shown in Figure 12-4, and add some code:
<%@ Page Language="C#" AutoEventWireup="true" CodeBehind="Foo.aspx.cs" Inherits="MvcApplication1.Foo" %><!DOCTYPE html PUBLIC "-//W3C//DTD XHTML 1.0 Transitional//EN""http://www.w3.org/TR/xhtml1/DTD/xhtml1-transitional.dtd"><html xmlns="http://www.w3.org/1999/xhtml"><head runat="server"> <title>Untitled Page</title></head><body> <form id="form1" runat="server"> <div> Hello from your cousin the WebForm! </div> </form></body></html>
Now select Run from the Debug menu in Visual Studio and navigate directly to the page (see Figure 12-5) — when you get into the details, you realize that the feat here is not all that amazing. Simply put: If a URL doesn't match the routing you've set up, ASP.NET MVC is not part of the Request cycle, and the web server will go looking for a page to fulfill the request.

With a new web site, like the example one, the only route that exists in the application is the default sample route:
routes.MapRoute( "Default","{controller}/{action}/{id}", parameters new { controller = "Home", action = "Index", id = "" }, new { controller = @"[^\.]*" } constraints);
It may not seem important now, but if you are going to be integrating Web Forms into your site, you will have to think about your site URLs and how requests will be routed. URLs are discussed further in Chapter 4.
To conclude this example, you can work with a Web Form in an MVC application in the same way you would normally, and you can even use a "pretty URL" to access it using Routing!
When/Home/Isn't/Home/
One issue you might face when combining Web Forms and MVC is when a default page is requested for a given directory. To illustrate this, the following example adds a Reports directory to the MVC application to display some Northwind sales reports the authors had for a long time (and that the client really likes). Figure 12-6 shows a Web Forms application with a Reports directory added.
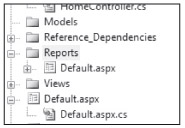
There is, however, a potential routing collision, because two conditions are now true:
-
The URL http://localhost/Reports/ should display /Reports/default.aspx.
-
The URL matches our default route above, and routing might try to find a ReportsController and invoke the default method, which is Index.
The good news here is that Phil's team already thought of this, and Routing checks first to make sure that the supplied URL doesn't match up to a physical page or directory — if it does, the request is handed off to that resource.
As you're probably keenly aware by now, routing in ASP.NET MVC is critically important to understand. It's almost becoming obnoxious how much we tell you to go have a look at Chapter 4. But if you haven't, you should do that now.
Care should be taken that directory names don't collide with the Routes and Controllers that are set up for an application; naming a directory the same as a Controller will, indeed, do this. For instance, if you have a directory called Admin on your site and you have a Controller called AdminController, Routing will ignore this Controller completely, and it's likely that this is not intended.
Using System.Web.Routing to Route to Web Forms
Many developers prize what are termed pretty URLs, in other words, URLs that are readable and (most of the time) extensionless. For instance, an ecommerce site with pretty URLs might have its catalog browsable by navigating to http://somecompany.com/catalog/shoes.
These URLs are discoverable and readable by humans, and the modern user is beginning to understand that they can actually navigate certain web sites simply by changing the URL in the address bar. In the above example, for instance, it seems fairly obvious that if you're looking for shirts you would most likely find them at the URL http://somecompany.com/catalog/shirts.
This is one of the really cool features of ASP.NET MVC: The URLs are mutable, and you can change them as you need to, because requests coming in are not requests for files on disk — they are requests for methods on a Controller (this is discussed further in Chapter 4).
It may seem that all is lost if you revert to using a physical file, but this is not the case. Routing is very configurable, and, indeed, you can set it up to route certain requests to an ASPX page on disk. This is covered in extensive detail in Chapter 4 (as you've probably guessed by now).
Sharing Data Between Web Forms and MVC
As mentioned in Chapters 2 and 3, the concept of the PostBack has been removed from ASP.NET MVC and with it the ability to "persist" the values of controls on a ViewPage using the Page's ViewState. This may seem like a critical loss of functionality, but, in fact, there are many ways to accomplish this same thing using core ASP.NET functionality.
Sharing data between a Controller in ASP.NET MVC and a Web Form is actually very straightforward and follows many of the "conventional" ways that you've probably followed for years — such as appending parameters to a URL and passing data through an HTML Form post.
As mentioned in the introduction to this chapter, ASP.NET MVC and ASP.NET Web Forms both work on top of System.Web, and therefore share much of the same core functionality, including
-
HttpContext
-
Session
-
Server
-
Request
-
Response
Using these core objects, it is possible to easily and efficiently pass data between a Web Form and an ASP.NET MVC Controller action.
Using HTTP POST
It's become commonplace to rely on a Web Form's ViewState to manage the data moving between the client and server. Reliance on using POST and GET and methods of moving data between requests has waned over the years, in favor of using the ViewState.
Because there is no ViewState with ASP.NET MVC, you will most likely find yourself using HTTP POST and HTTP GET for passing data between page requests. It's assumed, for this chapter, that you know the difference between POST and GET, and that you understand how to use each of them within the scope of an ASP.NET Web Form.
Passing data using HTTP POST involves using HTML Form data and the Request.Form object. In ASP. NET MVC, the Controller is extended with some extension methods that make this a bit easier for you to work with. For example, if a form value is passed (let's call it testinput) to the Index action on the HomeController, it can be accessed using the Request.Form NameValueCollection:
string myInput = Request.Form["testinput"];
If there is a key in Request.Form that matches testinput, then a string value will be returned; otherwise, a null value will be returned.
For many Web Forms developers, the concept of more than one HTML Form tag on a page may seem strange. The ASP.NET Web Forms model has dictated that "there can be only one" Form with the attribute"runat=server" per System.Web.UI.Page, which is enforced to enable the Page's ViewState model. You could, indeed, have multiple HTML form tags, but most developers dropped that idea because it stepped outside the Web Forms model.
Because you are not limited to plain old HTML Forms (without the "runat=server"), you can put these all over your Web Forms page without harm. Given this, you can now pass simple data back to your Controller class:
<form action="/home/" method=" post"> <input type=" text" name=" FirstName" value=" Rob"/> <input type=" text" name=" LastName" value=" Conery"/> <input type=" submit" value=" Take Me To Your Controller"/></form>
This will post the form data to the HomeController, where it can be read using the Controller's ReadFromRequest extension method (or with Request.Form — this is up to you):
public ActionResult Index(){ string firstName = Request.Form["FirstName"].ToString(); string lastName = .Form["LastName"].ToString(); //... return View();}
The thing to remember is that more than one form tag will not poison a Web Form and, indeed, can be very helpful if you need to have your page communicate with other platforms.
Using the ASP.NET Session
Request and Response are interchangeable between ASP.NET MVC and Web Forms, and so is the Session. This may or may not be good news to you, depending on your Session Gag Reflex. Some developers have come to believe that all things Session are evil and lead to scaling nightmares; others see it as a convenient way to store Session-specific information, as long as the lifetime is managed properly.
For this section, we'll sidestep the Session debate and simply tell you that it's possible; whether you use it is up to you.
This example will add a Button control to a Web Forms page (Reports/Default.aspx) and create a click event for it:
<form id=" form1" runat=" server"><div><h1>Reports Home</h1> <asp:Button ID=" Button1" runat=" server" onclick=" Button1_Click" Text=" Button" /> <br /></div></form>
Clicking the button adds some data to the Session, and then redirects it to the HomeController:
protected void Button1_Click(object sender, EventArgs e){ Session["session_message"] = "This is a test"; Response.Redirect("/Home/", true);}
Code in the HomeController's Index action can then access the Session object and work with the data:
public ActionResult Index(){ string message = HttpContext.Session["session_message"].ToString(); //... return View();}
As you can see, it's very straightforward, once again, to pass data between MVC and Web Forms. These first two samples are by far the easiest, but may not work in every scenario. There are a few more ways to do this, however.
Using Cross-Page Posting
A feature of ASP.NET 2.0 and above is a concept called Cross-Page Posting. Put simply, this feature allows you to set the PostBack URL (of a control that is capable of PostBack) to a URL of your choice.
This example extends the form sample above to use a TextBox server control and changes the Button to have a PostBackUrl attribute:
<form id=" form1" runat=" server"><div><h1>Reports Home</h1> <asp:TextBox ID=" FirstName" runat=" server"></asp:TextBox> <asp:Button ID=" Button1" runat=" server" onclick=" Button1_Click" Text=" Button" PostBackUrl="/Home/" /> <br /></div></form>
When Button1 is clicked, the form and its contents (including the ViewState) are posted to the HomeController. The posted data can be retrieved from Request.Form using the TextBox control's ClientID property:
public ActionResult Index(){ string firstName = this.ReadFromRequest("FirstName"); //... return View();}
There is a problem here, however, and it is one of the many reasons developers prefer ASP.NET MVC: You don't have control over the HTML naming of your Web Forms Controls, and because of this, it may be difficult to reference them by name using Request.Form.
As mentioned in Chapter 2, ASP.NET Web Forms abstracts the development process into a "form-creation" model, and as such, it relies on unique IDs for every control used on a given System.Web.UI.Page.
Often one Control can be added as a child to another Control and placed inside the parent Control's ControlCollection. This is often referred to as the Control Tree when discussing the Page Lifecycle of an ASP.NET Web Form.
Examples of this may include adding a Control to a UserControl, or adding a Control to a Panel, DataList, or Repeater. ASP.NET Web Forms is built on the concept of nesting one control inside another — this reduces UI coding and allows for a high amount of functionality.
ASP.NET MVC, however, does not have the ability to work with the Control Tree because it is maintained in the Page's ViewState, something that a Controller does not have access to. As such, the naming of the controls becomes more important because the values of these controls must be accessed using Request.Form and not the ViewState persistence abstraction. For example, when developing a Web Forms page, you might drop a TextBox on the page and set the ID to something like MyTextBox. In the CodeBehind, you can then access this control by referencing the ID you have set. The actual name given to this control on the HTML page, however, may be something completely different, especially if you've placed this control on a UserControl called MyUserControl. In this case, the HTML generated will be something like this:
<input name=" MyUserControl1$MyTextBox" type=" text" id=" MyUserControl1_MyTextBox" />
This presents a bit of a problem when you use Request.Form to get at the value of this TextBox because you'll need to know this control's name. This is referred to as a brittle condition — something that's easily breakable — and, unfortunately, there are not a lot of alternatives that can be offered here other than "becareful."
On a positive note, most of the time the controls on a Web Form will have their HTML names set to the same value as their IDs. You may not have to worry about this problem as long as your control is not placed inside of another control's ControlCollection.
It would be neat if you could parse the passed-in ViewState and get at the TextBox control itself, and introspect its settings and get at its properties. This is most likely possible, but ventures dangerously close to hackery, so we'll sidestep that discussion here.
Using TempData
ASP.NET MVC has a special data storage mechanism called TempData, which is a quick and simple way to store data between requests. TempData acts a lot like Session; indeed by default, it uses Session (when it's available) to store the data you send to it. It's a little different, however, in that it will only store the data you pass in for a single web request.
Using TempData in ASP.NET MVC works in exactly the same way as Session:
TempData["message"] = "I like TempData!";
You can pass in just about any data type (including objects and lists) to TempData — just be aware that there is a maximum of one request in its lifetime.
Accessing TempData from a Web Form is a little different, however. You need to create what's known as a TempDataDictionary and pass it an HttpContextBase in the constructor.
It was mentioned in the beginning of this section that HttpContext is shared between Web Forms and ASP.NET MVC. While this is mostly true, there is a small detail that is important to understand. ASP.NET MVC abstracts the notion of the static property HttpContext (the object that holds things like the Session, Server, Request, Response, etc.) into HttpContextBase.
This is covered more in Chapter 3; however, the summary form is that ASP.NET MVC will actually use its own version of HttpContext which is a thin wrapper that delegates to HttpContext.Current as opposed to using HttpContext.Current directly. What this means to us is that most things will work as you expect, though there are occasions when you need to work around this difference, such as in this case with the TempDataDictionary.
The problem here is that the Web Form's HttpContext and HttpContextBase are not the same type, and you'll get an error if you try to pass in HttpContext.Current to the TempDataDictionary constructor.
Thankfully, there is a work-around:
protected void Button1_Click(object sender, EventArgs e){ TempDataDictionary td = new TempDataDictionary(); SessionStateTempDataProvider tdProvider = new SessionStateTempDataProvider(new HttpContextWrapper(HttpContext.Current)); td["foo"] = "bar"; tdProvider.SaveTempData(td); Response.Redirect("~/home");}
You can now access this data in your Controller like so:
Migrating from Web Forms to MVC
If you've decided to start working with ASP.NET MVC, chances are that you'll be thinking about migrating an existing ASP.NET Web Forms site (web site or Web Application). This prospect can be quite intimidating, but with a little planning and effort, you can make this transition quite smoothly.
For this chapter, you'll migrate the ASP.NET 2.0 ClubSite Starter Kit to ASP.NET MVC.
Step 1: Create an Empty ASP.NET MVC Project with a Test Project
The goal of this process is to have a smooth transition that will allow for "baby steps" with the least amount of friction as possible. With this in mind, a new Solution will be created, where you can work with the Web Application and ASP.NET MVC Application open together; essentially dragging and copying the files from one project to another.
To get started, a single Solution is created, and the current Club Site Starter Kit (an ASP.NET web site) is added to it. The next thing to do is to use File/New and create the template ASP.NET MVC application, along with the requisite Test Application.
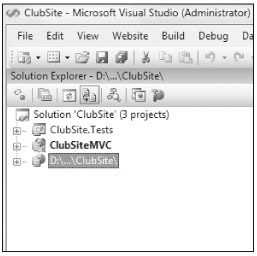
Once these things are created and added to the solution, it should look something like the initial migration solution shown in Figure 12-7.
The projects are in place, and the solution is set up; it's now time to code.
Step 2: Implement the Structure
Rob is a very visual person, and when doing projects like this one, he tends to evaluate it from the end-user perspective. If the site doesn't look, feel, and act like it did on the previous platform, there will be more immediate problems than if there are data errors. The look and feel of the site, after all, is most of what the end-user notices, and the last thing that's needed here is to make the user upset because you've changed platforms.
In addition, because the site is not being built from the ground up, the database design and core functionality are mostly proven to this point, so starting from the "outside in" can be a big benefit. With the "outside in" thought process in action, the first thing to tackle is the site's Master Page. Master Pages usually handle the site's layout and other features, and this is precisely where you want to start.
An initial review of the Club Site Starter Kit's Default.Master page may be a little startling, given that there are a lot of Server controls and ASP.NET Web Forms artifacts in place:
<%@ Master Language=" C#" %><!DOCTYPE html PUBLIC "-//W3C//DTD XHTML 1.0 Strict//EN""http://www.w3.org/TR/xhtml1/DTD/xhtml1-strict.dtd"><html xmlns=" http://www.w3.org/1999/xhtml" xml:lang=" en" lang=" en"><head> <title>My Club Site</title> <link type=" text/css" rel=" Stylesheet" href=" clubsite.css" /></head><body> <div id=" poster"> <h1><a href=" default.aspx">My Club Site</a></h1> <h2>My Club Site tag line or slogan</h2> </div> <div class="none "> <a href="#content_start">Skip Repetitive Navigational Links</a></div> <div id=" navtop"> <asp:SiteMapDataSource ID=" SiteMapDataSource1" runat=" server" ShowStartingNode=" false" /> <asp:Repeater ID=" TopNavRepeat" runat=" server" DataSourceID=" SiteMapDataSource1"> <HeaderTemplate> <ul> </HeaderTemplate> <ItemTemplate> <li> <asp:HyperLink ID=" HyperLink1" runat=" server" Text='<%# Eval("Title") %>' NavigateUrl='<%# Eval("Url") %>' ToolTip='<%# Eval("Description") %>' /> </li> </ItemTemplate> <FooterTemplate> </ul> </FooterTemplate> </asp:Repeater> </div> <form id=" form1" runat=" server"> <asp:ContentPlaceHolder ID=" ContentPlaceHolder1" runat=" server"> </asp:ContentPlaceHolder> </form> <div id=" navbottom"> <asp:Repeater ID=" BottomNavRepeat" runat=" server" DataSourceID=" SiteMapDataSource1"> <HeaderTemplate> <ul> </HeaderTemplate> <ItemTemplate> <li> <asp:HyperLink ID=" HyperLink1" runat=" server" Text='<%# Eval("Title") %>' NavigateUrl='<%# Eval("Url") %>' ToolTip='<%# Eval("Description") %>' /> </li> </ItemTemplate> <FooterTemplate> </ul> </FooterTemplate> </asp:Repeater> </div> <div id=" footer"> <p> Club Address here <br /> © 2009 My Club Site </p> </div></body></html>
The good news is that if you're using the WebFormsViewEngine — which you likely will be — you don't have to do a thing. All of this code will work straightaway.
This might seem like a trick, but this is a very significant decision. Because the ViewEngine that comes with ASP.NET MVC uses the Web Forms engine underneath it, the Web Forms Server Controls can still be used as long as the controls being used do not require PostBack.
In this example, the Master Page from the original Club Site Starter Kit does not require a PostBack — the only functionality present is the reading and display of the SiteMapDataSource. This is good news for the migration process as the code can literally be copied and pasted over.
If the copy-and-paste approach doesn't sit right with you, the Server Controls on the Club Site Starter Kit Master Page are relatively simple, and you can, indeed, re-create this functionality by hand if it makes you feel better. It should be understood, however, that a Master Page is, indeed, a Web Forms artifact, and you're OK doing "Web Formsy" things with it.
To finish up creating the Master Page:
-
Copy and paste the code from Default.Master from the Club Site Starter Kit into the Views\Shared\Site.Master file in the MVC project.
-
Remove the <form runat=" server" tag surrounding the ContentPlaceHolder and rename ContentPlaceHolder1 to MainContent.
-
Delete the text and code from between the <asp:Content tags in Views\Home\Index.aspx.
-
Copy the Web.sitemap file into the \ folder so that the Site.Master page has a data source from which to read.
Once complete, the initial layout is ready. Figure 12-8 shows the Club Site MVC's new look.

You'll notice straightaway that this site has no formatting — and that's because the images and CSS files have not been copied in yet. Given that you are migrating this site from the "outside in," the next step is to make sure that the styling and imagery are handled properly.
Step 3: Add Images and Styling
The ASP.NET MVC template site gives you a great structure to start from. One of the more useful conventions introduced with ASP.NET MVC is a directory where the developer can place the site's "assets" — such as images and CSS files. This directory is named Content and is located in the root of the main application. This convention is optional, of course, but if you can keep to it, other developers will know exactly where to go when looking for images, CSS, and other site "assets."
In keeping with this convention, an "Images" folder is created in the "Content" directory, and all of the images from the Club Site are copied in. Next, the clubsite.css stylesheet is added to a "CSS" directory, and the link to this CSS file is updated in the Site.master page:
<html xmlns=" http://www.w3.org/1999/xhtml" xml:lang=" en" lang=" en"><head> <title>My Club Site</title> <link type=" text/css" rel=" Stylesheet" href=" content/clubsite.css" /></head>
Note here that you're using a relative reference. This isn't always a good idea, and you may want to work up some logic so that you're free to implement your routing as you see fit. In the example case, you're not going to set up your routes in a very complicated fashion as this site is pretty simple — if you're going to do this, however, you'll want to make sure that links such as your CSS and image tags aren't compromised by relative URLs.
The final step is to update the clubsite.css file to point to the correct images for the background and other features:
#poster{ background: url(/content/images/poster.jpg) no-repeat; margin-right: auto; margin-left: auto; width: 726px; height: 139px; margin-top: 17px;}
| Note |
Once again you'll notice, here, that a root-relative link is being used, and it will break if your site is located in a subroot of a larger application. You will need to set these links as appropriate for your application. |
The images are in place, as well as the CSS. Time to review the look and feel of the site, as you can see in Figure 12-9.

Off to a good start!. Now for the fun part — adding in the functionality. Because this section is not about converting the ClubSite Starter Kit to ASP.NET MVC, the next section highlights some of the issues you might face as you migrate your site to ASP.NET MVC.
Step 4: Setting Up Routing and Controllers
Routing is a critical component of any ASP.NET MVC application, and it's covered extensively in Chapter 4. The issue that needs to be addressed now is just how does a site migrate from a page-driven application to more of an MVC-style site? There is a lot to consider here, and some of the questions that need to be answered are:
-
What will your URLs look like (assuming you are free to change them)?
-
What Controllers and Views will you need?
-
Will the site become more complex at a later point?
Setting Up the Routing
We can't stress enough the importance of thinking through Routing as completely as possible. It's tempting to think that the initial route of "/controller/action/parameter" will solve most routing issues; invariably, however, exceptions will arise.
One such issue is the introduction of personalization, or perhaps a Social Networking aspect to your site. You may want to give each member of your club his or her own page with a URL such as /clubsite/members/membername, and as you will see below, this can clash with an existing route.
In addition to clashing routes, you'll want your routes to be discoverable. In general, what a developer considers discoverable is usually far from what the casual user might think is discoverable. Discuss the options with others, and make sure that the Routing you set up is an informed team decision.
The first step in deciding the routes for the application is to look at the structure and flow of the current site that's being migrated. For this example, it's assumed that there will be no new functionality and the routes that are set up will stand for a long time.
Each Controller in your MVC application should have a single area of responsibility, and each Action on that Controller should handle specific user interactions (such as data retrieval or manipulation). Those are a lot of words, and it might be better to explain with examples.
Most developers work with databases and at some level need to understand how to create and develop a basic database. A key part of this skill is the ability to understand the requirements of the data being stored, and to segment that data into Tables that comply with relational theory (which we assume you know). The same thought process is involved with deciding which Controllers your application will need — except that instead of divining relational entities, you're segregating application responsibility.
A handy way to do this segregation with an existing system is to look at how the navigation is set up. In simpler systems (such as the ClubSite), it's fairly straightforward to see that the application is divided into five main areas:
-
Home (the home page, links, contacts)
-
Events
-
News
-
Photos
-
Membership
Of course, this doesn't always work, and you'll have to put a lot more time into deciding what your Controller structure should look like. For this example, you'll move forward with these five Controllers. Based on this, you can go with a nice RESTful URL structure that looks something like this:
-
http://clubsite/events
-
http://clubsite/news
-
http://clubsite/photos
-
http://clubsite/members
Given this URL structure, you can now design what Controllers you're going to need to implement.
The ClubSiteMVC Controllers
The site will need five basic Controllers:
-
HomeController: This Controller typically handles summary information about the site, such as the home page, an "about" page, and the like. With this site, you can probably use the HomeController for the Links and Contacts section above — this seems to fit nicely.
-
EventsController: The Events section of the site has some logic to it, specifically the adding/editing/deleting of events. In addition there is a calendar display of club events. This feature should have its own Controller. Figure 12-10 shows the Events page of the Club Site Starter Kit.
-
NewsController: The News section of the site is devoted to news articles relating to the club, with display options and the ability to add and edit specific news items. Figure 12-11 shows the News section of the ClubSite Starter Kit.
-
PhotosController: The site has an area where administrators can create and edit photo albums, as well as upload photos, as shown in Figure 12-12.
-
MembershipController: A good thing is that Membership, as of Preview 4 of the ASP.NET MVC Framework, is built in to the project template, and you can extend the current Controller to implement the Profiling features of the Membership section.


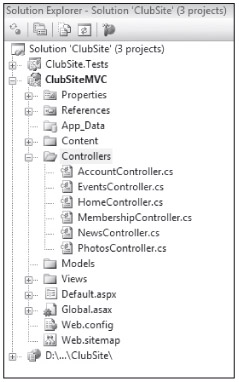
When you've finished adding in the Controllers, your site should look like Figure 12-13.
Now you're ready to start rolling over the functionality. Rather than focusing on every detail of migrating the ClubSite Starter Kit, some key issues you may run into are highlighted in the next section.
Step 5: Replacing Complex Server Controls
One key issue you will run into is what to do when you lose the functionality of a given server control that your project has been relying on to display some complex UI elements. A control that embodies this is the popular Calendar Control, which dates back to the original release of ASP.NET.
Options for Control Replacement
The Club Site Starter Kit uses the Calendar Control in the Events section of this site, and losing this control means extra work for you as the developer. On one hand, this can be seen as a setback, having to recreate functionality that was, literally, drag-and-drop and took minutes to implement. On the other hand, you can seize this opportunity to enrich the UI experience with some different ways of expressing the data, and also using some advanced JavaScript. The answer, however, doesn't need to be a choice between doing it yourself or going back to Web Forms — there are alternatives here that you can explore:
-
Roll Your Own: This is perhaps the last resort, but many people actually enjoy the challenge of doing something like this, and if they do it well, what they create is often contributed back to the community.
-
Hope Someone Else Has Done It: With the ever-expanding Open Source ecosystem that is building around .NET, it's a safe bet that someone else has already created what you're looking for. A quick Web search just now revealed at least three projects that involved ASP.NET MVC and a Calendar. And (as this paragraph is being written) we're not even in beta yet!
-
Use a JavaScript Control: A quick Web search for a JavaScript calendar has just returned no less than 34 usable alternatives. Some are quite slick and others will work, but with less pizzazz. The nice thing about having a script-based calendar is that it can cut down on round-trips to the server, which is nice.
-
Use a Rich Internet Application Control (RIA): These include Flash and Silverlight controls, and there are, once again, a great many to choose from. The nice benefit to using an RIA calendar is that it looks great and can offer behaviors that are just outside the reach of JavaScript controls.
-
Use a Service: Companies like Yahoo, Microsoft, and Google are beginning to offer more and more service-based developer resources, and the Calendar is one of them. One of the favorites that Rob has used repeatedly in the past is Google's Calendar; this is discussed below in this chapter.
The initial reaction to some of the suggestions here may be a little negative. Developers have long had the perception that the server controls that come with ASP.NET Web Forms are "part of the platform" and therefore the easiest and safest bet. You can extend this to the "Not Invented Here" syndrome, wherein a development team or company simply will not use a tool or component they create; this deserves a little more discussion.
Not Invented Here?
As developers, we sometimes begin the problem-solving process by evaluating how long it would take us to "just write it ourselves." A Web-based calendar is just such an example of this. It may be tempting at first to open up Visual Studio and start whipping up the nested for loops necessary to output a calendar to the page. Usually after 40 minutes or so, when the if statements start to make your head spin, you may start wondering if someone else has tackled this issue before.
And, indeed, they have. As Chapter 3 discusses, there is a shift in thinking that goes along with the change to ASP.NET MVC. You are no longer confined to looking for server controls or supporting your UI elements with server-side code. You're free to use some very interesting technologies — including DHTML, Rich Internet Application (Silverlight and Flash), and some popular JavaScript solutions.
| Important |
Product Team Aside ScottHa worked in banking for years, for a company whose core competency was banking. One day a young programmer wanted to know if he could write a calendar control for a new banking site. ScottHa said (trying to stay nice), "Do you think that's our core competency? I can buy a calendar for $400 online. Here, I'll make you a deal. You are billed out at $100 an hour. You have four hours to write the best calendar control you can, and if it's good, we'll use it. Otherwise, we'll spend $400 on one from a third-party vender who does this as their core competency." The moral of the story is, "Do what you are good at." |
In changing the club's Calendar, one of us authors hit upon several solutions that would work right away, just by running some Web searches. To keep things as simple as possible, however, we authors decided to work with Google's Calendar API to replace the current Calendar that's part of the Club Starter Kit. It's a very simple matter to add calendar information in, and the real hook is the ability for the club to share the Calendar among members.
Once you've moved the data into Google's Calendar (which is quite simple, but beyond the scope of this book), all you have to do is go to your Calendar's setting, and right there is the HTML you need to embed in your application (see Figure 12-14).

This code is very easy to embed into your project, and quite easy to customize. The next step is to create an Index view for the EventsController and add the calendar code to it:
<iframe src=" http://www.google.com/calendar/embed?...." style=" border-width:0 " width="600" height="400" frameborder="0" scrolling=" no"></iframe>
You can customize the style of the iFrame nicely to accommodate for placement on the page, and you can also tweak the src URL to have Google style the Calendar the way you like. In fact, Google gives you a nice interface for customizing the look and feel of your embedded Calendar. Once this code is in place, you can view the new Calendar for your Club site, as shown in Figure 12-15.

Step 6: Uploading Files and Working with Images
The photos section of the Club Starter Kit allows administrators to create photo albums and upload images. ASP.NET Web Forms made this very, very simple by creating the FileUpload control, which presents you with a File Dialog. Grabbing the file on the server side is also ridiculously simple because all you had to do was check if there was an UploadedFile present, and then save its contents to the server's hard drive. There isn't an analogous control in ASP.NET MVC (yet), and this is where you need to get back to basics a bit.
Taking a Step Back
Before getting into the code, it's a good idea to revisit just what's happening when a file gets sent to the web server when posting a form with <input type=" file">. When this tag is used, a browser will typically render a textbox with a button next to it that indicates a user should browse for a file. Figure 12-16 shows the Internet Explorer's File Input dialog.

A file input control will supply three things when posting the form to the server:
-
Indicate the file's name.
-
Contain the file's contents.
-
Indicate the file's MIME type (text, image, etc.).
In order to send files to the server, the developer needs to specify that the form contains some special data, and not just text. Normally, if you have a form that has some text inputs and perhaps a checkbox or two, the data would be sent back with a simple URL encoding (or "ENCTYPE," as the browser calls it) ENCTYPE=application/x-www-form-urlencoded.
This worked well for a while, but soon people began to clamor for the ability to send files over HTTP to their web servers (as opposed to FTP, which is designed specifically for files). Some hacks came about to do just this; however, a standard was eventually created that allows you to send binary file data using HTTP: ENCTYPE="multipart/form-data".
What this encoding type is telling the web server is that the posted form information contains multiple parts, and one of those parts has a MIME type (basically a file type) that contains some binary data, and that this data should be handled differently from the text data.
There's a lot more to this, but for the sake of brevity, move on ahead to the next section, where you learn how you read the files from the Request using ASP.NET MVC.
Using HttpRequest
The good news here is that the same core plumbing is at work in ASP.NET MVC as ASP.NET Web Forms (as discussed in Chapters 2 and 4), and this applies to uploading files as well. You may not have the FileUpload control, but from the server's perspective, you can still access the file quite nicely.
A simple example to illustrate this is to create a form for passing a file from the user to the server. This will be needed for the Photos section of the Club Starter Kit, so the first thing to do is get a form set up to pass the photo along:
<form action="/home/index" method=" post" enctype=" multipart/form-data"> Select a photo:<input type=file name=" myinput" size="40"/> <input type=" submit" value=" upload"/></form>
This example is posting the form back to the Index action of the HomeController, and in there is where the code goes to pull the file from the Request:
foreach (string file in Request.Files){ HttpPostedFileBase posted = (HttpPostedFileBase)Request.Files[file]; posted.SaveAs(Server.MapPath("~/Uploaded/" + System.IO.Path.GetFileName(posted.FileName)));}
There are a few things to note here. Primarily, you should notice that you're not really using HttpRequest,you're using an abstract base class called HttpRequestBase. This is something that MVC uses so that it's easily testable and mockable. Secondarily, the file is not an HttpPostedFile as you might expect — it's an HttpPostedFileBase. This is a base class that is used, once again, to facilitate testing.
The rest of the logic is much the same as you might use with ASP.NET Web Forms in that you ask System.IO.Path to figure out the filename, and then HttpPostedFileBase will save the file to the hard drive depending on the filename you give it.
Summary
There are many, many differences that the ASP.NET Web Forms developer will need to get used to when working with ASP.NET MVC. In many ways, this will feel like "taking a step back 10 years" to classic ASP — especially when working with the UI and Views. Chapter 3 discusses this issue (and others), and we provide some of our thoughts as to why you may want to use ASP.NET MVC.
For some, this is a welcome change and a breath of fresh air; for others, it just doesn't work. It does take some getting used to, but in the end, the core ASP.NET functionality and the .NET framework in general are there to support you.
