

Spring(一)
Spring学习
1. spring一些关键概念
IoC 容器
Spring 容器是 Spring 框架的核心。容器将创建对象,把它们连接在一起,配置它们,并管理他们的整个生命周期从创建到销毁。 IOC 容器 具有依赖注入功能的容器,它可以创建对象,IOC 容器负责实例化、定位、配置应用程序中的对象及建立这些对象间的依赖。通常new一个实例,控制权由程序员控制,而"控制反转"是指new实例工作不由程序员来做而是交给Spring容器来做。
注: 无需过于陷入概念中,到时回头看就明白什么意思了,当前可以认为Ioc容器是一个按照你的配置并帮助你创建对象(new一个实例)的工厂,并且你可以通过这个Ioc容器拿到它帮助你创建的对象。
ID(依赖注入)
依赖关系的管理交给spring维护,在当前类需要用到其他类的对象,由spring为我们提供,只需在配置文件中说明关系的维护。每个基于应用程序的 java 都有几个对象,由这些对象一起工作来呈现出终端用户所看到的工作的应用程序。当编写一个复杂的 Java 应用程序时,应用程序类应该尽可能独立于其他 Java 类来增加这些类重用的可能性,并且在做单元测试时,测试独立于其他类的独立性。
注: 当前可认为是ID是对对象中的成员进行赋值的过程,而对象之间的关系由spring帮我们管理。我们只需告知spring这个对象的成员要设置什么值就行。(通过配置的方式指定属性的值)
AOP(面向切面编程)
AOP像OOP一样,只是一种编程范式,并且AOP并非是spring独有的,只不过spring提供了AOP的实现,即:spring AOP。 AOP则是针对业务处理过程中的切面进行提取,它所面对的是处理过程中的某个步骤或阶段,以获得逻辑过程中各部分之间低耦合性的隔离效果。
注: 当前可理解为一种通过动态代理的方式通过横向切入实现某些增强功能。(可以简单理解为不改变源代码的方式下向源代码插入一段新的代码。)
2. spring注入(DI)
2.1 xml配置方式
2.1.1 构造器注入
<bean id="bean_name" class="bean_classPath">
    <!--当没指定构造器时,默认使用无参构造-->
    <!--
		三种方式定位构造器:通过index,通过参数的类型,通过参数的名字

        <constructor-arg index="0" value="var_value"/>
        <constructor-arg type="int" value="var_value"/>
		<constructor-arg name="var_name" value="var_value"/>
	-->
    <constructor-arg index="0" value="var_value"/>
</bean>


<!--c命名空间注入-->
<bean id="beanOne" class="x.y.ThingOne">
        <constructor-arg name="thingTwo" ref="beanTwo"/>
        <constructor-arg name="thingThree" ref="beanThree"/>
        <constructor-arg name="email" value="something@somewhere.com"/>
</bean>
<!--官方案例,上面的注入等价于下面的c命名空间注入-->
<bean id="beanOne" class="x.y.ThingOne" c:thingTwo-ref="beanTwo"
        c:thingThree-ref="beanThree" c:email="something@somewhere.com"/>
2.1.2 set注入
<bean id="bean_name" class="bean_classPath">
<!--
		ref:引用spring容器中创建好的其他对象
		value:值,基本数据类型
		array:数组注入
		list:list注入
		map:map注入
		set
		null

	-->
    <property name="var_name" value="var_value"/>
    <property name="var_name" ref="Other_bean_name"/>
    <property name="arr_name">
        <array>
            <value>1</value>
            <value>2</value>
            <value>3</value>
        </array>
    </property>
    <property name="list_name">
        <list>
            <value>1</value>
            <value>2</value>
            <value>3</value>
        </list>
    </property>

    <property name="map_name">
        <map>
            <entry key="k1" value="v1"></entry>
            <entry key="k2" value="v2"></entry>
        </map>
    </property>

    <property name="set_name">
        <set>
            <value>1</value>
            <value>2</value>
        </set>
    </property>

    <property name="var_name">
       	<null/>
    </property>


     <property name="var_name">
       	<prop key="password">123456</prop>
       	<prop key="password">123456</prop>
     </property>
</bean>

<!--通过p命名空间直接锁定属性并注入-->
<bean id="bean_name" class="bean_classPath" p:name="zhangsan" p:age="25" p:student-ref="other_beanName">
2.1.3 自动装配
<bean id="cat" class="com.ex.cat">
<bean id="dog" class="com.ex.dog">
<!--自动装配-->
<!--
	autowire可以选:byType,byName.
	byType:通过上下文找同类型的bean进行装配,同类型的自动装配
	byName:通过上下文找同名字的bean进行装配,必须你写的bean和对应类中的变量名一致

-->
<bean id="people" class="com.ex.people" autowire="byName">
    <property name="name" value="zhangsan">
</bean>
2.2 通过注解进行注入
2.2.1 开启注解扫描
<!-- 开启包扫描 -->
<context:component-scan base-package=" ">
<!-- 开启注入注解扫描 -->
<context:annotation-config>
2.2.2 使用
@Component
//注册类到spring中
//效果跟在xml配置中写<bean id="bean_name" class="bean_classPath"/>差不多
@Component
Public class Student{
	@Value("zhangsan")  //注入值
	private String name;
}

//三个泛生 spring MVC中的知识
@Repository    //【dao层】
@service       //【service层】
@Controller    //【Controller层】
@value
@Component
Public class Student{
	@Value("zhangsan")  //注入值
	private String name;
}

/*
	等价于:
	<bean id="beanOne" class="Student">
       <property name="name" value="zhangsan"/>
	</bean>
*/
@Autowired
//@Autowired源码
@Target({ElementType.CONSTRUCTOR, ElementType.METHOD, ElementType.PARAMETER, ElementType.FIELD, ElementType.ANNOTATION_TYPE})
@Retention(RetentionPolicy.RUNTIME)
@Documented
public @interface Autowired {
    boolean required() default true;      //能否未空
}


//@Autowired使用  通过Autowired注解进行自动装配,@Autowired通过byType实现
@Autowired
private Cat cat;

//允许为null
@Autowired(required=false)
private Cat cat;

//配合@Qualifier,去显式指定注入对象
@Autowired
@Qualifier(value="Tom")    //指定装配某个bean
private Cat cat;
@Resource (属于java的)
//@Resource源码
@Target({TYPE, FIELD, METHOD})
@Retention(RUNTIME)
public @interface Resource {
    String name() default "";      //指定要装配的对象
    String lookup() default "";
    Class<?> type() default java.lang.Object.class;
    enum AuthenticationType {
            CONTAINER,
            APPLICATION
    }
    AuthenticationType authenticationType() default AuthenticationType.CONTAINER;
    boolean shareable() default true;
    String mappedName() default "";
    String description() default "";  //自定义的装配描述信息
}


@Resource  //先通过名字进行自动装配,找不到再通过类型进行装配(byType+byName)
private Cat cat;

@Resource(name="Tom")
private Cat cat;
2.3 用java代码配置bean
不使用xml写bean,改成使用java代码,使用@Configuration声明一个类是配置类,通过该类生成我们需要的bean。
@Configuration   //定义是spring的bean配置类
@ComponentScan("com.ex.test")  //扫描包
@Import(other.class)  //导入config
public class beanconfig{
	@Bean
	public User user(){return new User();}
}
2.4 bean的作用域
官方图片:
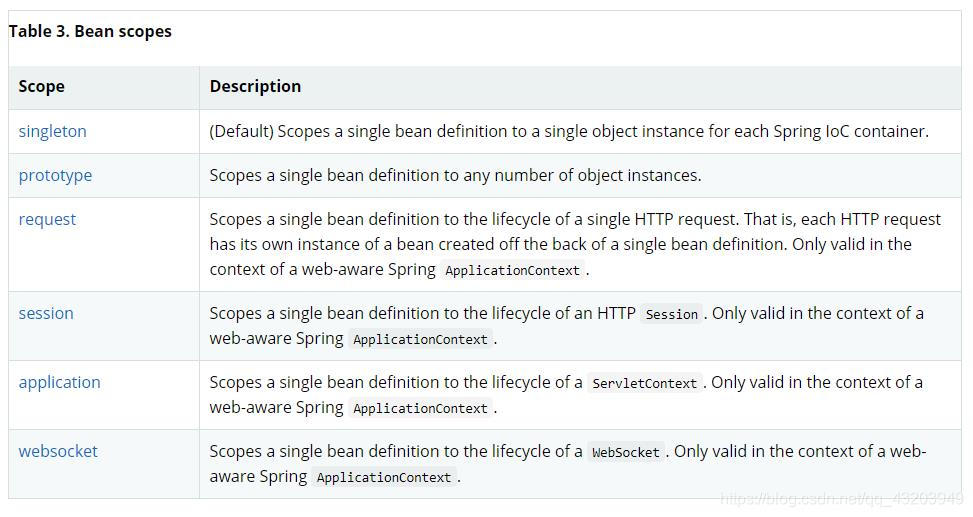
spring Bean默认使用的是单例模式,也就是singleton,单例模式每个bean对应一个对象,每次getBean时候都会获取同一个bean对象。而prototype模式(原型)是每次getBean时,spring都会以配置的Bean为原型放回新的对象。
xml bean Scope
<bean id="cat" class="com.ex.cat" scope="singleton">
@Scope
//定义作用域
@Scope("prototype")

//singleton 单例,通过spring容器获得该bean时总是返回唯一的实例
//prototype表示每次获得bean都会生成一个新的对象
//request表示在一次http请求内有效
//session表示在一个用户会话内有效
//globalSession表示在全局会话内有效
3. 其他操作
获取bean对象
ApplicationContext context = new ClassPathXmlApplication(beans.xml);
context.getBean("bean_name").getVar_name();
bean别名
<alias name="bean_name" alias="new_bean_name"/>
<bean id="bean_name" class="bean_classPath" name="new_bean_name"/>
导入xml
<import resource="other_xmlconfigFile"/>
4. AOP
AOP核心概念
1、横切关注点:对哪些方法进行拦截,拦截后怎么处理,这些关注点称之为横切关注点
2、切面(aspect): 类是对物体特征的抽象,切面就是对横切关注点的抽象
3、连接点(joinpoint):被拦截到的点,因为Spring只支持方法类型的连接点,所以在Spring中连接点指的就是被拦截到的方法,实际上连接点还可以是字段或者构造器
4、切入点(pointcut): 对连接点进行拦截的定义
5、通知(advice): 所谓通知指的就是指拦截到连接点之后要执行的代码,通知分为前置、后置、异常、最终、环绕通知五类
6、目标对象 :代理的目标对象
7、织入(weave):将切面应用到目标对象并导致代理对象创建的过程
8、引入(introduction): 在不修改代码的前提下,引入可以在运行期为类动态地添加一些方法或字段
其他相关博文:https://www.cnblogs.com/hongwz/p/5764917.html
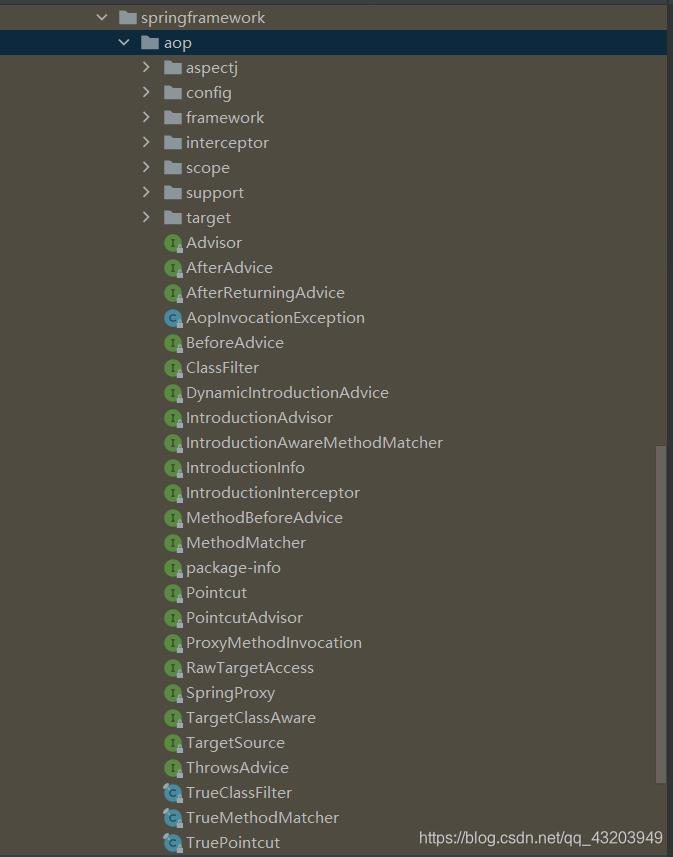
spring aop相关接口
xml配置方式
官方文档: Core Technologies (spring.io)
<!--下面为一些官方示例-->
<!-- aop配置 -->
<aop:config>
    <!-- aspect的定义,切面通常是一个类,里面定义了要切入的函数 -->
    <aop:aspect id="myAspect" ref="aBean">

        <!-- pointcut切入点,expression中定义了对那些类进行切入 -->
        <aop:pointcut id="businessService"
            expression="execution(* com.xyz.myapp.service.*.*(..))"/>

        <!-- 下面的是Advice(通知) -->
        <!-- before通知,这里执行切入点为businessService,执行方法为aBean.monitor -->
        <aop:before pointcut-ref="businessService" method="monitor"/>

        <!-- after通知,即方法执行完成后 -->
        <aop:after pointcut-ref="businessService" method="doReleaseLock"/>

         <!-- around通知(环绕),即before+after -->
        <aop:around pointcut-ref="businessService" method="doBasicProfiling"/>

        <!-- after-returning通知,即return语句执行后-->
        <aop:after-returning pointcut-ref="businessService" method="doAccessCheck"/>

        <!-- after-throwing通知,即抛出异常后 -->
        <aop:after-throwing pointcut-ref="businessService" method="doRecoveryActions"/>

    </aop:aspect>
</aop:config>


<aop:config>
    <!-- pointcut切入点,expression中定义了对那些类进行切入 -->
    <aop:pointcut id="businessService"
                  expression="execution(* com.xyz.myapp.service.*.*(..))"/>

    <!-- 也可以直接用于一个实现了AOP API的bean,处理切入点 -->
    <aop:advisor advice-ref="abean" pointcut-ref="businessService"/>
</aop:config>
待续。。。。。


【推荐】国内首个AI IDE,深度理解中文开发场景,立即下载体验Trae
【推荐】编程新体验,更懂你的AI,立即体验豆包MarsCode编程助手
【推荐】抖音旗下AI助手豆包,你的智能百科全书,全免费不限次数
【推荐】轻量又高性能的 SSH 工具 IShell:AI 加持,快人一步
· 分享4款.NET开源、免费、实用的商城系统
· 全程不用写代码,我用AI程序员写了一个飞机大战
· MongoDB 8.0这个新功能碉堡了,比商业数据库还牛
· 白话解读 Dapr 1.15:你的「微服务管家」又秀新绝活了
· 上周热点回顾(2.24-3.2)