nutch开发(六)
nutch开发(六)
文章目录
1.nutch1.18整合solr-8.11.0
1.1 配置index-writers.xml文件
在nutch1.18的conf目录下面有一个index-writers.xml文件,该文件的配置会传递给indexer-solr
<writer id="indexer_solr_1" class="org.apache.nutch.indexwriter.solr.SolrIndexWriter">
    <parameters>
      <param name="type" value="http"/>
      <param name="url" value="http://localhost:8983/solr/nutch"/>
      <param name="collection" value=""/>
      <param name="weight.field" value=""/>
      <param name="commitSize" value="1000"/>
      <param name="auth" value="false"/>
      <param name="username" value="username"/>
      <param name="password" value="password"/>
    </parameters>
    <mapping>
      <copy>
        <!-- <field source="content" dest="search"/> -->
        <!-- <field source="title" dest="title,search"/> -->
      </copy>

      <rename>
     	<!--这里是字段名的重命名-->
        <field source="metatag.description" dest="description"/>
        <field source="metatag.keywords" dest="keywords"/>
        <field source="metatag.icon" dest="icon"/>
        <field source="metatag.good" dest="good"/>
        <field source="metatag.collections" dest="collections"/>
      </rename>

      <remove>
        <field source="segment"/>
      </remove>
    </mapping>
  </writer>
1.2 solr core字段的配置
我配置了以下字段,具体看我下面的field字段配置
- good:点赞数
- keywords:文章关键词
- pulishedTime:文章发布时间
- title:标题
- description:文章描述
  <field name="_version_" type="long" indexed="true" stored="true"/>
  <field name="anchor" type="text_general" multiValued="true" indexed="true" stored="true"/>
  <field name="binaryContent" type="binary" indexed="false" stored="true"/>
  <field name="boost" type="float" indexed="false" stored="true"/>
  <field name="cache" type="string" indexed="false" stored="true"/>
  <field name="collections" type="int" uninvertible="false" indexed="false" stored="true"/>
  <field name="content" type="text_ik" indexed="true" stored="true"/>
  <field name="contentLength" type="string" indexed="false" stored="true"/>
  <field name="date" type="tdate" indexed="true" stored="true"/>
  <field name="description" type="text_ik" indexed="true" stored="true"/>
  <field name="digest" type="string" indexed="false" stored="true"/>
  <field name="good" type="int" uninvertible="false" indexed="false" stored="true"/>
  <field name="host" type="url" indexed="true" stored="false"/>
  <field name="icon" type="string" uninvertible="false" indexed="false" stored="true"/>
  <field name="id" type="string" indexed="true" required="true" stored="true"/>
  <field name="keywords" type="text_ik" indexed="true" stored="true"/>
  <field name="lang" type="string" indexed="true" stored="true"/>
  <field name="lastModified" type="date" indexed="false" stored="true"/>
  <field name="pulishedTime" type="date" uninvertible="false" indexed="false" stored="true"/>
  <field name="segment" type="string" indexed="false" stored="true"/>
  <field name="text" type="text_ik" multiValued="true" indexed="true" stored="false"/>
  <field name="title" type="text_ik" indexed="true" stored="true"/>
  <field name="tstamp" type="date" indexed="false" stored="true"/>
  <field name="type" type="string" multiValued="true" indexed="true" stored="true"/>
  <field name="url" type="url" indexed="true" stored="true"/>
  <field name="webName" type="string" uninvertible="false" indexed="false" stored="true"/>
  <copyField source="content" dest="text"/>
  <copyField source="description" dest="text"/>
  <copyField source="title" dest="text"/>
  <copyField source="url" dest="text"/>
1.3 solr配置Ik分词器
1.4 nutch metatags plugs插件修改配置
解析出的Matedata是比较多时,我们可以修改index-metatags插件的配置信息,对解析出的数据进行index生成。
注意:还有别忘了在plugin.includes中添加parse-blog的引用
 <property>
  <name>index.parse.md</name> <value>metatag.description,metatag.keywords,metatag.good,metatag.collections,metatag.icon,pulishedTime,webName</value>
  <description>
  Comma-separated list of keys to be taken from the parse metadata to generate fields.
  Can be used e.g. for 'description' or 'keywords' provided that these values are generated
  by a parser (see parse-metatags plugin)
  </description>
</property>
2.测试自定义的插件是否运行成功
运行parserchecker
在运行整个爬取过程前,先观察配置正确,自定义的插件是否有生效。
2.1 IDEA创建启动
点击主菜单依次选择: Run -> Edit Configurations ,点击 + 号,选择创建 Application :
- Name : ParserChecker
- Main Class :org.apache.nutch.parse.ParserChecker
- Program arguments : https://blog.csdn.net/qq_43203949/article/details/122626378
注意:Program arguments的填充是跟你nutch提供的脚本传递的参数一样的
2.2 运行效果对等
运行效果等价于使用nutch(Bin版本)的bin/目录下的nutch命令一样。
./nutch parsercheck https://blog.csdn.net/qq_43203949/article/details/122626378
2.3 解析结果分析
解析的Metadata比较多,因为我用了其他插件
Parse Metadata:
  OriginalCharEncoding = utf-8
  renderer = webkit
  keywords = Nutch开发(一)
  metatag.good = 0
  force-rendering = webkit
  metatag.description = Nutch开发和使用教程
  metatag.icon = https://g.csdnimg.cn/static/logo/favicon32.ico
  applicable-device = pc
  shenma-site-verification = 5a59773ab8077d4a62bf469ab966a63b_1497598848
  description = Nutch开发和使用教程
  csdn-baidu-search = {"autorun":true,"install":true,"keyword":"Nutch开发(一)"}
  metatag.collections = 0
  CharEncodingForConversion = utf-8
  referrer = always
  viewport = width=device-width, initial-scale=1.0, minimum-scale=1.0, maximum-scale=1.0, user-scalable=no
  webName = csdn
  report = {"pid": "blog", "spm":"1001.2101"}
  metatag.keywords = Nutch开发(一)
  pulishedTime = 2022-01-21
运行IndexChecker
2.4 IDEA创建启动
点击主菜单依次选择: Run -> Edit Configurations ,点击 + 号,选择创建 Application :
- Name : IndexChecker
- Main Class :org.apache.nutch.indexer.IndexingFiltersChecker
- Program arguments : https://blog.csdn.net/qq_43203949/article/details/122626378
注意:Program arguments的填充是跟你nutch提供的脚本传递的参数一样的
2.5 运行效果对等
运行效果等价于使用nutch(Bin版本)的bin/目录下的nutch命令一样。
./nutch indexcheck https://blog.csdn.net/qq_43203949/article/details/122626378
2.6 index过滤结果分析
parsing: https://blog.csdn.net/qq_43203949/article/details/122626378
contentType: text/html
metatag.good :	0
metatag.description :	Nutch开发和使用教程
metatag.icon :	https://g.csdnimg.cn/static/logo/favicon32.ico
title :	Nutch开发(一)_鸭梨的药丸哥的博客-CSDN博客
metatag.collections :	0
url :	https://blog.csdn.net/qq_43203949/article/details/122626378
content :	Nutch开发(一)_鸭梨的药丸哥的博客-CSDN博客
Nutch开发(一)
鸭梨的药丸哥
于 2022-01-21 17:47:03 发布
533
收藏
分类专栏:
搜索技术
文章标签:
intel
tstamp :	Thu Feb 17 17:13:53 CST 2022
webName :	csdn
digest :	bc16673003db2f6216d16bdaf092ee61
host :	blog.csdn.net
id :	https://blog.csdn.net/qq_43203949/article/details/122626378
metatag.keywords :	Nutch开发(一)
pulishedTime :	2022-01-21
3.修改抓取delay
如果直接进行抓取,你会发现虽然使用了很多fetcher线程,但是抓取速度还是非常慢,原因是nutch对同一个域下面的网页爬取是有延时操作的,默认同一域下爬取一个网页后延时5s在爬下一个资源。
<property>
  <name>fetcher.server.delay</name>
  <value>5.0</value>
    <!--服务器爬取延时值,当fetcher.threads.per.queue=1时才生效,并且会被robots.txt协议中的延时值覆盖-->
    <!--注意点:是同一服务器下的爬取延时-->
  <description>The number of seconds the fetcher will delay between
   successive requests to the same server. Note that this might get
   overridden by a Crawl-Delay from a robots.txt and is used ONLY if
   fetcher.threads.per.queue is set to 1.
   </description>
</property>

<property>
  <name>fetcher.server.min.delay</name>
  <value>0.0</value>
  <!--服务器爬取延时值,当fetcher.threads.per.queue>1时生效,用于代替fetcher.server.delay-->
  <description>The minimum number of seconds the fetcher will delay between
  successive requests to the same server. This value is applicable ONLY
  if fetcher.threads.per.queue is greater than 1 (i.e. the host blocking
  is turned off).</description>
</property>

<property>
 <name>fetcher.max.crawl.delay</name>
 <value>30</value>
 <!--最大爬取延时,robots.txt协议规定延时值大于该值时,会跳过该网页的爬取-->
 <description>
 If the Crawl-Delay in robots.txt is set to greater than this value (in
 seconds) then the fetcher will skip this page, generating an error report.
 If set to -1 the fetcher will never skip such pages and will wait the
 amount of time retrieved from robots.txt Crawl-Delay, however long that
 might be.
 </description>
</property>

<property>
 <name>fetcher.min.crawl.delay</name>
 <value>${fetcher.server.delay}</value>
 <!--最小爬取延时,robots.txt协议规定延时值小于该值时,使用该值进行网页爬取-->
 <description>
 Minimum Crawl-Delay (in seconds) accepted in robots.txt, even if the
 robots.txt specifies a shorter delay. By default the minimum Crawl-Delay
 is set to the value of `fetcher.server.delay` which guarantees that
 a value set in the robots.txt cannot make the crawler more aggressive
 than the default configuration.
 </description>
</property>

<property>
  <name>fetcher.threads.fetch</name>
  <value>10</value>
  <!--爬取线程数-->
  <description>The number of FetcherThreads the fetcher should use.
  This is also determines the maximum number of requests that are
  made at once (each FetcherThread handles one connection). The total
  number of threads running in distributed mode will be the number of
  fetcher threads * number of nodes as fetcher has one map task per node.
  </description>
</property>

<property>
  <name>fetcher.threads.per.queue</name>
  <value>1</value>
  <!--一次应该允许访问队列的最大线程数,当值大于1时,不再忽略robots.txt中的值,并使用fetcher.server.min.delay作为爬取延时值-->
  <description>This number is the maximum number of threads that
    should be allowed to access a queue at one time. Setting it to
    a value > 1 will cause the Crawl-Delay value from robots.txt to
    be ignored and the value of fetcher.server.min.delay to be used
    as a delay between successive requests to the same server instead
    of fetcher.server.delay.
   </description>
</property>
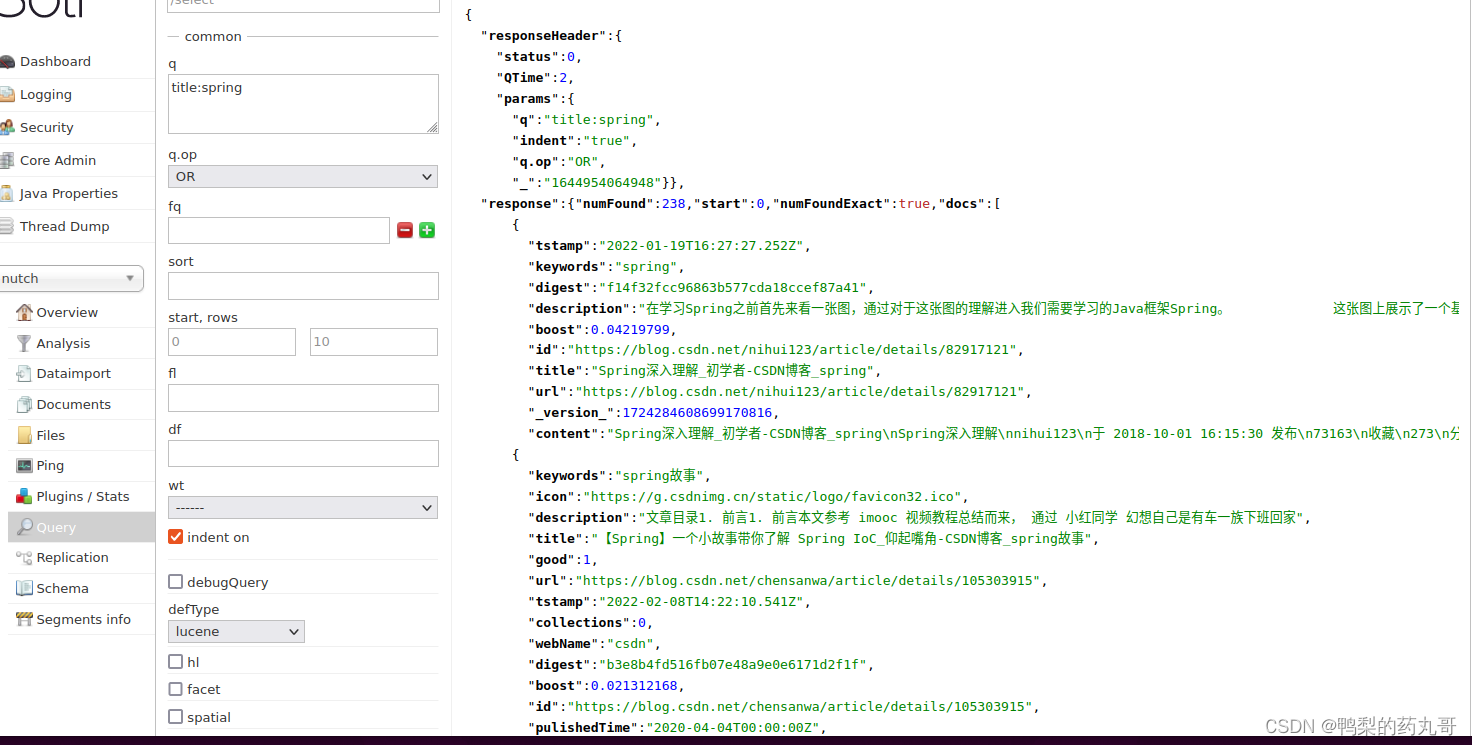
4.在solr上看抓取结果
执行完整的爬取和索引过程了,我们可以从solr的nutch core中查看到被indexer-solr插件在solr中建立的document文档。

 浙公网安备 33010602011771号