
Autofac支持配置文件
Autofac支持配置文件
前面一节介绍了Autofac注入方式,这节介绍Autofac支持配置文件。
环境
Win10+VS2020+.NET 5.0 +Autofac 6.3.0
介绍
autofac是比较简单易用的IOC容器。下面我们展示如何通过json配置文件,来进行控制反转。
步骤:
- Nuget引入程序集:
l Autofac.Extensions.DependencyInjection
l Autofac.Configuration
l Autofac
2.准备配置文件
3.读取配置文件,根据配置文件信息,生成抽象和映射信息
实践
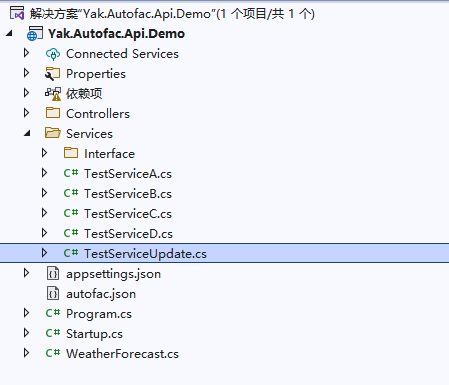
项目结构
在上节Autofac的注入方式的项目上改造。
引入程序集
|
<ItemGroup> <PackageReference Include="Autofac" Version="6.3.0" /> <PackageReference Include="Autofac.Configuration" Version="6.0.0" /> <PackageReference Include="Autofac.Extensions.DependencyInjection" Version="7.1.0" /> </ItemGroup> |
准备配置文件
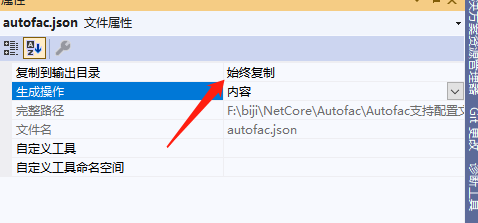
在根目录下添加名称为“autofac”的Json文件,设置为“始终复制”。
代码如下:
|
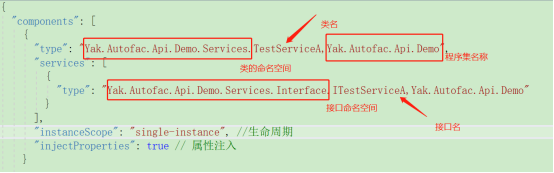
{ "components": [ { "type": "Yak.Autofac.Api.Demo.Services.TestServiceA,Yak.Autofac.Api.Demo", "services": [ { "type": "Yak.Autofac.Api.Demo.Services.Interface.ITestServiceA,Yak.Autofac.Api.Demo" } ], "instanceScope": "single-instance", //生命周期 "injectProperties": true // 属性注入 } , { "type": "Yak.Autofac.Api.Demo.Services.TestServiceB,Yak.Autofac.Api.Demo", "services": [ { "type": "Yak.Autofac.Api.Demo.Services.Interface.ITestServiceB,Yak.Autofac.Api.Demo" } ], "instanceScope": "single-instance", //生命周期 "injectProperties": true // 属性注入 }, { "type": "Yak.Autofac.Api.Demo.Services.TestServiceC,Yak.Autofac.Api.Demo", "services": [ { "type": "Yak.Autofac.Api.Demo.Services.Interface.ITestServiceC,Yak.Autofac.Api.Demo" } ], "instanceScope": "single-instance", //生命周期 "injectProperties": true // 属性注入 }, { "type": "Yak.Autofac.Api.Demo.Services.TestServiceD,Yak.Autofac.Api.Demo", "services": [ { "type": "Yak.Autofac.Api.Demo.Services.Interface.ITestServiceD,Yak.Autofac.Api.Demo" } ], "instanceScope": "single-instance", //生命周期 "injectProperties": true // 属性注入 } ] } |
生成抽象和映射信息
修改Startup中ConfigureServices方法,读取配置文件,根据配置文件信息,生成抽象和映射信息,代码如下
|
ContainerBuilder containerBuilder = new ContainerBuilder(); { //读取配置文件,把配置关系装载到ContainerBuilder IConfigurationBuilder config = new ConfigurationBuilder(); IConfigurationSource autofacJsonConfigSource = new JsonConfigurationSource() { Path = "autofac.json", Optional = false,//boolean,默认就是false,可不写 ReloadOnChange = true,//同上 }; config.Add(autofacJsonConfigSource); ConfigurationModule module = new ConfigurationModule(config.Build()); containerBuilder.RegisterModule(module); } IContainer container = containerBuilder.Build(); ITestServiceD testServiceD = container.Resolve<ITestServiceD>(); testServiceD.Show(); |
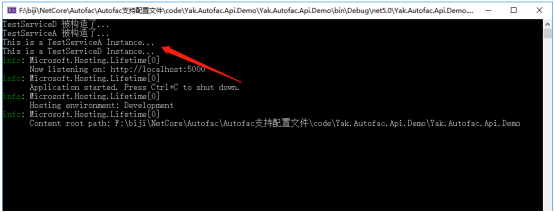
运行
运行程序:
支持配置文件优势
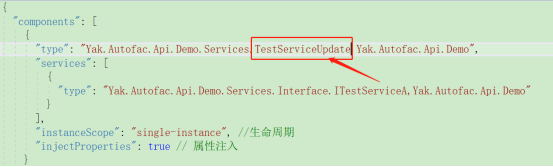
支持配置文件有什么好处呢?再添加一个类TestServiceUpdate ,代码如下:
|
public class TestServiceUpdate : ITestServiceA { public TestServiceUpdate() { Console.WriteLine($"{this.GetType().Name} 被构造了..."); }
public void Show() { Console.WriteLine($"This is a {this.GetType().Name} Instance..."); } } |
把配置文件中TestServiceUpdate修改为TestServiceUpdate 。
运行结果:
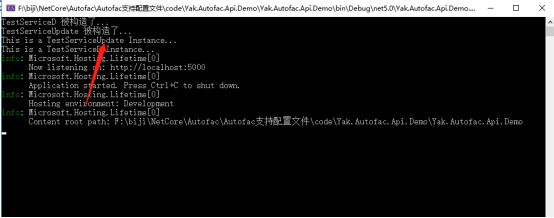
发现不用修改代码只要配置就可以实现类的调换了,是不是很方便。
总结
Autofac支持配置文件太强大了,不用修改代码只要配置就可以实现类的调换了。
本文来自博客园,作者:{春光牛牛,yak},转载请注明原文链接:https://www.cnblogs.com/yakniu/p/16282880.html
欢迎各位大佬们评论指正
QQ讨论群:610129902


【推荐】国内首个AI IDE,深度理解中文开发场景,立即下载体验Trae
【推荐】编程新体验,更懂你的AI,立即体验豆包MarsCode编程助手
【推荐】抖音旗下AI助手豆包,你的智能百科全书,全免费不限次数
【推荐】轻量又高性能的 SSH 工具 IShell:AI 加持,快人一步
· AI与.NET技术实操系列:基于图像分类模型对图像进行分类
· go语言实现终端里的倒计时
· 如何编写易于单元测试的代码
· 10年+ .NET Coder 心语,封装的思维:从隐藏、稳定开始理解其本质意义
· .NET Core 中如何实现缓存的预热?
· 分享一个免费、快速、无限量使用的满血 DeepSeek R1 模型,支持深度思考和联网搜索!
· 25岁的心里话
· 基于 Docker 搭建 FRP 内网穿透开源项目(很简单哒)
· ollama系列01:轻松3步本地部署deepseek,普通电脑可用
· 按钮权限的设计及实现