MVC客户端访问微服务
MVC客户端访问微服务
前言
前面章节介绍了“基于consul+polly+oclet+identityserver4+cap实现微服务
”,使用的是Postman工具模拟客户端访问访问,为了更贴近应用,这节介绍使用MVC客户端访问微服务。
环境
l Win10
l VS2022
l .NET5.0
l DotNetCore.CAP 5.0.1
l DotNetCore.CAP.RabbitMQ 5.0.1
l DotNetCore.CAP.SqlServer 5.0.1
l CAP.Dashboard 5.0.0
l Microsoft.EntityFrameworkCore.Design 5.0.0
l SQLserver2012
l Ocelot 17.0.0
项目实践
在前面的章节“基于consul+polly+oclet+identityserver4+cap实现微服务
”增加MVC客户端,项目结构如下:

项目介绍
一共包含有8个项目
l DB项目:“Yak.Cap.RabbitMQ.DB”
l 模型项目:“Yak.Cap.RabbitMQ.Models”
l 发布接口项目:“Yak.Cap.RabbitMQ.PublisherApi”
l 订阅接口项目“Yak.Cap.RabbitMQ.SubscribeApi”
l 认证服务项目:“IdentityServer_ResourceOwnerPasswordCredentials”
l 网关测试项目“Yak.Ocelot.Api”
l 网关项目“Yak.Ocelot.Gateway”
l MVC客户端项目“Yak.MicroService.MVCClient”
其中网关测试项目是以前测试的项目,可以忽略。项目的创建可以参考前面章节,这里不复述了。
新建MVC客户端项目
Step1:新建MVC客户端,选择MVC模板,如下图所示,命名为“Yak.MicroService.MVCClient”,取消HTTPS选项,选择“.net5.0。

生成的项目如下:

Step2:在Home控制器中添加获取Token方法。
代码如下:
|
public static async Task<string> GetAccessToken() { //1、建立连接 HttpClient client = new HttpClient(); DiscoveryDocumentResponse disco = await client.GetDiscoveryDocumentAsync("http://localhost:8000"); if (disco.IsError) { Console.WriteLine($"[DiscoveryDocumentResponse Error]: {disco.Error}"); } // 通过客户端用户密码获取AccessToken TokenResponse tokenResponse = await client.RequestPasswordTokenAsync(new PasswordTokenRequest { Address = disco.TokenEndpoint, ClientId = "yakclient", ClientSecret = "yaksecret", Scope = "Yak.Cap.RabbitMQ.PublisherApi", UserName = "yak", Password = "yakpassword" }); if (tokenResponse.IsError) { //ClientId 与 ClientSecret 错误,报错:invalid_client //Scope 错误,报错:invalid_scope //UserName 与 Password 错误,报错:invalid_grant string errorDesc = tokenResponse.ErrorDescription; if (string.IsNullOrEmpty(errorDesc)) errorDesc = ""; if (errorDesc.Equals("invalid_username_or_password")) { Console.WriteLine("用户名或密码错误,请重新输入!"); } else { Console.WriteLine($"[TokenResponse Error]: {tokenResponse.Error}, [TokenResponse Error Description]: {errorDesc}"); } } else { Console.WriteLine($"Access Token: {tokenResponse.Json}"); Console.WriteLine($"Access Token: {tokenResponse.RefreshToken}"); Console.WriteLine($"Access Token: {tokenResponse.ExpiresIn}"); } return tokenResponse.AccessToken; } |
Step3:在Home控制器中添加使用Token下订单方法。
代码如下:
|
public static async Task<string> UseAccessToken(string AccessToken) { HttpClient apiClient = new HttpClient(); apiClient.SetBearerToken(AccessToken); // 1、设置token到请求头 HttpResponseMessage response = await apiClient.PostAsync("http://localhost:5000/Publish/Create",null); if (!response.IsSuccessStatusCode) { Console.WriteLine($"API Request Error, StatusCode is : {response.StatusCode}"); } else { string content = await response.Content.ReadAsStringAsync(); Console.WriteLine(""); Console.WriteLine($"下单成功,订单号: {content}"); // 输出结果到页面 return $"下单成功,订单号:"+content; } return ""; } |
Step4:在Home控制器中修改Index。
代码如下:
|
public async Task<IActionResult> Index() { #region token模式 { string access_token = await GetAccessToken(); // 2、使用AccessToken 进行资源访问 string result = await UseAccessToken(access_token); // 3、响应结果到页面 ViewData.Add("Json", result); } #endregion return View(); } |
Step5:在Home控制器中修改Index。
代码如下:
|
public async Task<IActionResult> Index() { #region token模式 { string access_token = await GetAccessToken(); // 2、使用AccessToken 进行资源访问 string result = await UseAccessToken(access_token); // 3、响应结果到页面 ViewData.Add("Json", result); } #endregion return View(); } |
Step6:修改Home的视图文件,增加显示订单号内容。
代码如下:
|
@{ ViewData["Title"] = "Home Page"; } <div class="text-center"> <h1 class="display-4">Welcome</h1> <p>Learn about <a href="https://docs.microsoft.com/aspnet/core">building Web apps with ASP.NET Core</a>.</p> </div> <div> <p>@ViewData["Json"]</p> </div> |
调试
Step1:启动认证服务项目。

Step2:启动发布消息接口和订阅消息接口。


Step3:启动网关项目,查看接口服务已经注册到Consul中。

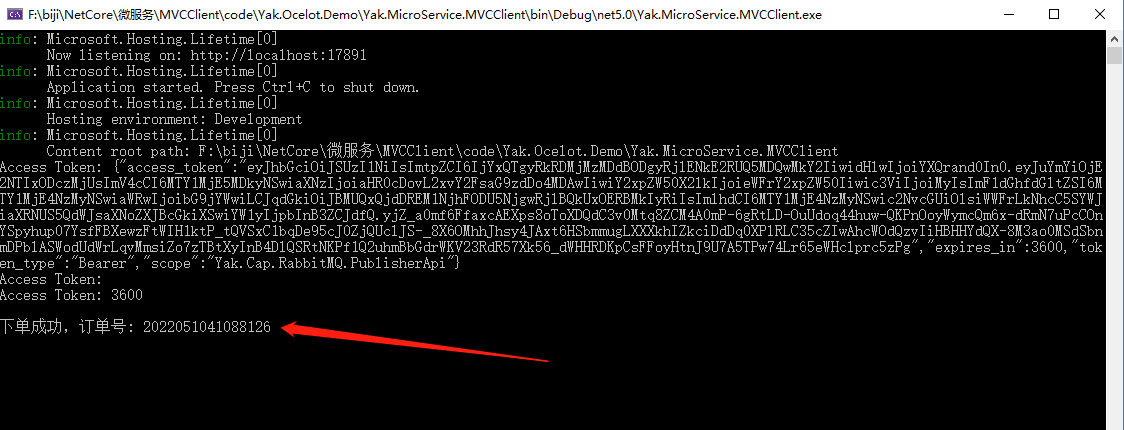
Step4:运行MVC客户端,下订单。

Step6:查看数据库,库存减少了。

Step7:访问http://localhost:5000/cap,打开CAP面板。

访问http://localhost:15672/#/,打开RabbitMQ面板。

总结
在运行MVC客户端后,就访问Home控制器的Index方法,获取token后,再使用此token访问创建订单接口,商品服务接受到消息,减去库存。客户端可以有很多类型,如Vue,手机端,Winfrom等。
鸣谢
https://www.cnblogs.com/yakniu/category/2141955.html
源码
https://github.com/yandaniugithub/MicroService
本文来自博客园,作者:{春光牛牛,yak},转载请注明原文链接:https://www.cnblogs.com/yakniu/p/16255655.html
欢迎各位大佬们评论指正
QQ讨论群:610129902


 浙公网安备 33010602011771号