
Ocelot之结合IdentityServer4认证二
Ocelot之结合IdentityServer4认证二
前言
上章节介绍了Ocelot之结合IdentityServer4认证一,Ocelot网关仅仅是提供路由服务,这节介绍在网关中进行认证。
环境
Win10+VS2022 +.NET5.0 + Ocelot17.0.0.0 + Consul 1.6.1.1+IDS4
1 项目实现
在上节“Ocelot之结合IdentityServer4认证一”的项目实现上继续改造。
1.1 创建IDS4项目
IDS4项目上节已经创建,这里为了阅读方便再显示下创建过程。
1. 创建项目
dotnet CLI快速安装模板Identityserver模板
|
dotnet new -i IdentityServer4.Templates |
创建IdentityServery 项目
|
dotnet new is4empty -n IdentityServer_ResourceOwnerPasswordCredentials |
2.引用IdentityServer4依赖
3.修改端口
在Properties\launchSettings.json文件中更改它。
这里修改为:
|
"applicationUrl": "https://localhost:5001;http://localhost:5000" |
4.定义API接口的活动范围API Scope
API 是系统中要保护的资源。资源定义可以通过多种方式加载。模板已经创建了 Config.cs。打开它,将代码更新为如下所示:
|
public static IEnumerable<ApiScope> ApiScopes => new ApiScope[] { new ApiScope("Yak.Ocelot.Api", "My API")}; |
5.添加用户
就像基于内存存储的资源(即范围 Scopes)和客户端一样,对于用户也可以这样做。
TestUser类型表示一个测试用户及其身份信息。 Config.cs文件中添加以下代码以创建用户:
|
public static List<TestUser> GetUsers() { return new List<TestUser> { new TestUser { SubjectId = "1", Username = "alice", Password = "password" }, new TestUser { SubjectId = "2", Username = "bob", Password = "password" }, new TestUser { SubjectId = "3", Username = "yak", Password = "yakpassword" } }; } |
5. 添加IdentityResources
|
public static IEnumerable<IdentityResource> GetIdentityResources() { return new IdentityResource[] { new IdentityResources.OpenId(),//未添加导致scope错误 new IdentityResources.Profile() }; } |
7.配置身份服务器
在Startup文件中配置身份服务器,加载资源和客户端,然后将测试用户注册到 IdentityServer中。代码如下:
|
public void ConfigureServices(IServiceCollection services) { var builder = services.AddIdentityServer() .AddInMemoryIdentityResources(Config.GetIdentityResources()) .AddInMemoryApiScopes(Config.ApiScopes) .AddInMemoryClients(Config.GetClients()) .AddTestUsers(Config.GetUsers()); builder.AddDeveloperSigningCredential(); } |
AddTestUsers扩展方法在背后做了以下几件事:
(1)为资源所有者密码授权添加支持
(2)添加对用户相关服务的支持,这服务通常为登录 UI 所使用
(3)为基于测试用户的身份信息服务添加支持
7.添加客户端定义
可以通过修改AllowedGrantTypes属性简单地添加对已有客户端授权类型的支持。
通常要为资源所有者用例创建独立的客户端,添加以下代码到你配置中的客户端定义中
|
public static IEnumerable<Client> GetClients() { return new List<Client> { // resource owner password grant client new Client { ClientId = "yakclient", AllowedGrantTypes = GrantTypes.ResourceOwnerPassword,
ClientSecrets = { new Secret("yaksecret".Sha256()) }, AllowedScopes = { "Yak.Ocelot.Api", IdentityServerConstants.StandardScopes.OpenId, IdentityServerConstants.StandardScopes.Profile }//需要额外添加 } }; } |
1.2 修改接口服务
1. 在接口控制器上去掉认证特性。
|
//[Authorize] [ApiController] [Route("[controller]")] public class WeatherForecastController : ControllerBase ............ |
2. 删除Microsoft.AspNetCore.Authentication.JwtBearer依赖
3. 修改Startup文件,删除认证代码。
|
public void ConfigureServices(IServiceCollection services) { services.AddSingleton(Configuration.GetSection("Consul").Get<ConsulOption>()); services.AddControllers(); }
// This method gets called by the runtime. Use this method to configure the HTTP request pipeline. public void Configure(IApplicationBuilder app, IWebHostEnvironment env, IHostApplicationLifetime lifetime, ConsulOption consulOption) { if (env.IsDevelopment()) { app.UseDeveloperExceptionPage(); } // 注册 app.RegisterConsul(lifetime, consulOption); app.UseRouting();
app.UseAuthorization();
app.UseEndpoints(endpoints => { endpoints.MapControllers(); }); } |
1.3 修改网关
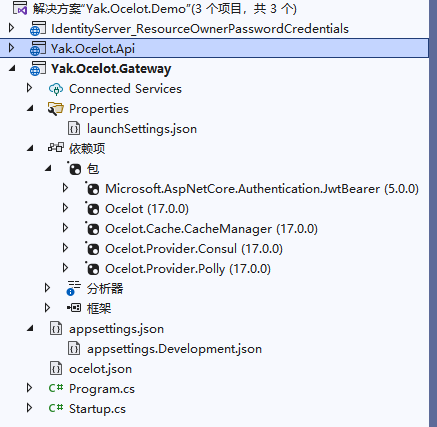
1.添加Microsoft.AspNetCore.Authentication.JwtBearer依赖
添加后所有的依赖有:
|
<ItemGroup> <PackageReference Include="Microsoft.AspNetCore.Authentication.JwtBearer" Version="5.0.0" /> <PackageReference Include="Ocelot" Version="17.0.0" /> <PackageReference Include="Ocelot.Cache.CacheManager" Version="17.0.0" /> <PackageReference Include="Ocelot.Provider.Consul" Version="17.0.0" /> <PackageReference Include="Ocelot.Provider.Polly" Version="17.0.0" /> </ItemGroup> |
4. 修改ocelot配置
|
{ "Routes": [ { "DownstreamPathTemplate": "/WeatherForecast", "DownstreamScheme": "http", "ServiceName": "service-a", "UseServiceDiscovery": true, "UpstreamPathTemplate": "/Weather", "UpstreamHttpMethod": [ "Get" ], "LoadBalancerOptions": { "Type": "RoundRobin" }, //熔断器Polly "QoSOptions": { "ExceptionsAllowedBeforeBreaking": 3, //打开断路器之前允许的多少个异常请求 "DurationOfBreak": 60000, // 熔断时间 "TimeoutValue": 1000 //请求超时时间(毫秒) }, //鉴权 "AuthenticationOptions": { "AuthenticationProviderKey": "Gatewaykey", "AllowedScopes": [ "Yak.Ocelot.Api" ] } } ], "GlobalConfiguration": { "BaseUrl": "http://localhost:5000" } } |
添加鉴权配置:
5. 修改Startup文件,添加认证代码。
|
public void ConfigureServices(IServiceCollection services) { var identityBuilder = services.AddAuthentication(); IdentityServerConfig identityServerConfig = new IdentityServerConfig() IdentityModelEventSource.ShowPII = true; var authenticationProviderKey = "Gatewaykey"; services.AddAuthentication().AddJwtBearer(authenticationProviderKey, x => { x.Authority = "http://localhost:8000"; x.RequireHttpsMetadata = false; x.TokenValidationParameters = new TokenValidationParameters { ValidateAudience = false }; });
services.AddControllers(); services.AddOcelot(Configuration).AddConsul().AddPolly(); } public void Configure(IApplicationBuilder app, IWebHostEnvironment env) { if (env.IsDevelopment()) { app.UseDeveloperExceptionPage(); }
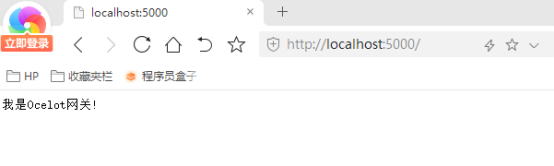
app.UseRouting(); app.UseAuthentication();//先鉴权,没有鉴权,授权是没有意义的 app.UseAuthorization();//后授权 app.UseEndpoints(endpoints => { endpoints.MapGet("/", async context => { await context.Response.WriteAsync("我是Ocelot网关!"); }); });
app.UseOcelot(); } |
1.4 启动Consul
这里是Win10系统,下载相应的Consul后,在文件夹下创建启动BAT文件用于启动Consul,双击启动。
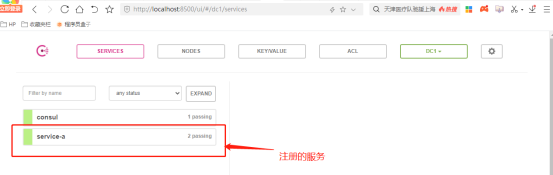
1.5 服务发现
启动“Yak.Ocelot.Api”项目,查看到服务已经注册到Consul中。
1.6 调试
1. 启动网关服务
运行网关项目“Yak.Ocelot.Gateway”。
2. 启动接口服务
运行接口项目“Yak.Ocelot.Api”。
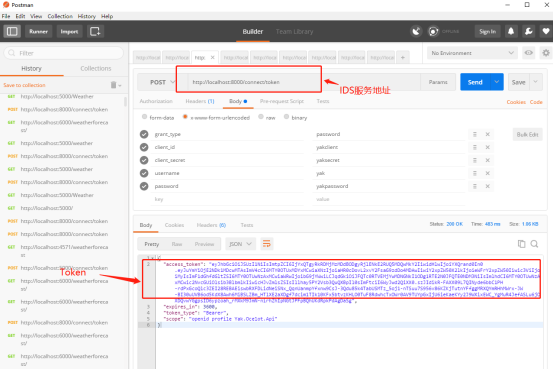
3. 取Token
启动IDS4服务获取Token,地址:http://localhost:8000/connect/token
参数:
grant_type:password
client_id:yakclient
client_secret:yaksecret
username:yak
password:yakpassword
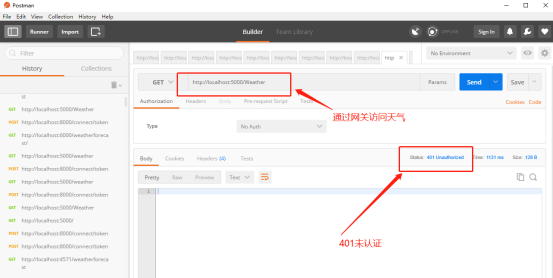
4. 通过网关访问接口服务
通过网关地址http://localhost:5000/Weather
访问WebAPI天气接口服务,返回401未认证。
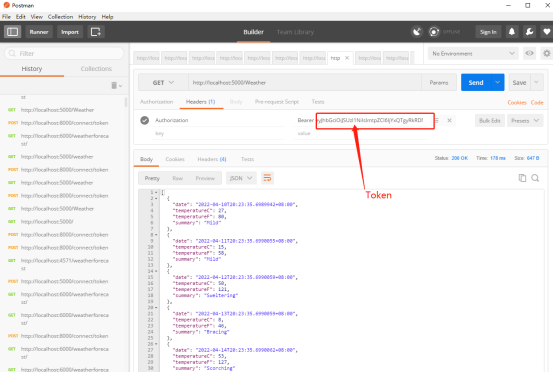
添加Token认证后访问
参数:
Authorization : Bearer token
2 总结
这节例子是在上节的例子进行改造,上节的网关仅仅提供了路由,这节介绍网关结合IDS4提供认证。
首先在鉴权服务中心请求获取Token,拿到Token后去请求实例服务上的接口。鉴权中心和服务实例并没有进行交互。在第一次请求到达服务实例的时候,服务实例会去鉴权中心请求拿到公钥。之后就不在需要和鉴权中心进行交互,除非服务实例重新启动。
既然是微服务架构,所以鉴权也统一走网关,不然每一个服务实例都要写一套鉴权的代码。因为走网关鉴权,所以所有的api都要授权才能访问。
3 鸣谢
https://cloud.tencent.com/developer/article/1174014
https://blog.csdn.net/qin_yu_2010/article/details/83120215
https://www.cnblogs.com/zhengwei-cq/p/12856267.html
https://www.cnblogs.com/zhangnever/p/13198176.html
4 源码
https://github.com/yandaniugithub/NETCore
本文来自博客园,作者:{春光牛牛,yak},转载请注明原文链接:https://www.cnblogs.com/yakniu/p/16127848.html
欢迎各位大佬们评论指正
QQ讨论群:610129902


【推荐】国内首个AI IDE,深度理解中文开发场景,立即下载体验Trae
【推荐】编程新体验,更懂你的AI,立即体验豆包MarsCode编程助手
【推荐】抖音旗下AI助手豆包,你的智能百科全书,全免费不限次数
【推荐】轻量又高性能的 SSH 工具 IShell:AI 加持,快人一步
· TypeScript + Deepseek 打造卜卦网站:技术与玄学的结合
· 阿里巴巴 QwQ-32B真的超越了 DeepSeek R-1吗?
· 【译】Visual Studio 中新的强大生产力特性
· 10年+ .NET Coder 心语 ── 封装的思维:从隐藏、稳定开始理解其本质意义
· 【设计模式】告别冗长if-else语句:使用策略模式优化代码结构