React组件的生命周期钩子
六、组件的生命周期
1. 理解
-
组件从创建到死亡它会经历一些特定的阶段。
-
React组件中包含一系列勾子函数(生命周期回调函数), 会在特定的时刻调用。
-
我们在定义组件时,会在特定的生命周期回调函数中,做特定的工作。
2. 生命周期流程(旧)
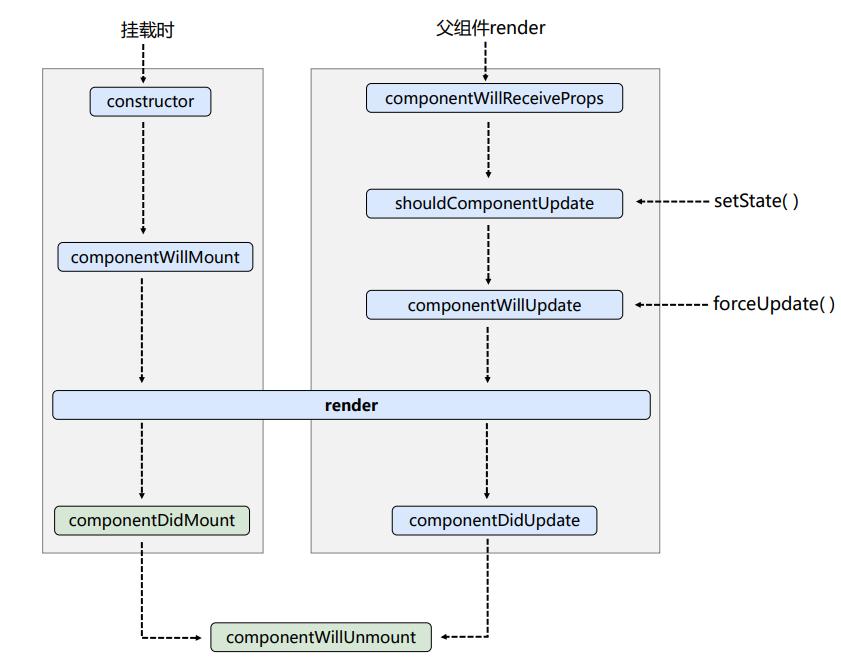
-
初始化阶段: 由ReactDOM.render()触发—初次渲染
- constructor()
componentWillMount()- render()
- componentDidMount() ====> 常用:一般在这个钩子做一些初始化的事情,例如:开启定时器、发送网络请求、订阅消息
-
更新阶段: 由组件内部this.setSate()或父组件render触发
- shouldComponentUpdate()
componentWillUpdate()- render() ====> 必须使用的钩子
- componentDidUpdate()
-
卸载组件: 由ReactDOM.unmountComponentAtNode()触发
- componentWillUnmount() ====> 常用:一般在这个钩子做一些收尾的事,例如:关闭定时器、取消订阅消息
-
代码:
// 创建组件
class Count extends React.Component {
  // 构造器
  constructor(props) {
    console.log("Count --- constructor");
    super(props);
    // 初始化状态
    this.state = {
      count: 0,
    };
  }

  // 加一按钮
  add = () => {
    this.setState({
      count: ++this.state.count,
    });
  };

  // 卸载组件按钮的回调
  death = () => {
    ReactDOM.unmountComponentAtNode(document.getElementById("test"));
  };

  // 强制更新按钮的回调
  force = () => {
    this.forceUpdate();
  };

  // 组件将要挂载的钩子
  componentWillMount() {
    console.log("Count --- componentWillMount");
  }

  // 组件挂载完毕的钩子
  componentDidMount() {
    console.log("Count --- componentDidMount");
  }

  // 组件将要卸载的钩子
  componentWillUnmount() {
    console.log("Count --- componentWillUnmount");
  }

  // 控制组件更新的阀门
  shouldComponentUpdate() {
    // 不写,底层默认会补一个shouldComponentUpdate生命周期钩子,且默认返回true
    // 写了该生命周期钩子,以写的为准,返回true阀门开启,返回false阀门关闭
    console.log("Count --- shouldComponentUpdate");
    return true;
  }

  // 组件将要更新的的钩子
  componentWillUpdate() {
    console.log("Count --- componentWillUpdate");
  }

  // 组件更新完毕的钩子
  componentDidUpdate() {
    console.log("Count --- componentDidUpdate");
  }

  // 初始化渲染、状态更新之后调用
  render() {
    console.log("Count --- render");
    const { count } = this.state;
    return (
      <div>
        <h2>当前求和为:{count}</h2>
        <button onClick={this.add}>点我+1</button>
        <button onClick={this.death}>卸载组件</button>
        <button onClick={this.force}>
          不更改组件中任何状态中的数据,强制更新一下
        </button>
      </div>
    );
  }
}

// 父组件A
class A extends React.Component {
  state = {
    carName: "奔驰",
  };

  changeCar = () => {
    this.setState({
      carName: "bwm",
    });
  };

  render() {
    console.log("A --- render");
    return (
      <div>
        <div>A组件</div>
        <button onClick={this.changeCar}>换车</button>
        <B carName={this.state.carName} />
      </div>
    );
  }
}

// 子组件B
class B extends React.Component {
  // 组件将要接收新的props钩子
  componentWillReceiveProps(props) {
    // 第一次不算
    console.log("B --- componentWillReceiveProps", props);
  }

  // 控制组件更新的阀门
  shouldComponentUpdate() {
    // 不写,底层默认会补一个shouldComponentUpdate生命周期钩子,且默认返回true
    // 写了该生命周期钩子,以写的为准,返回true阀门开启,返回false阀门关闭
    console.log("B --- shouldComponentUpdate");
    return true;
  }

  // 组件将要更新的的钩子
  componentWillUpdate() {
    console.log("B --- componentWillUpdate");
  }

  // 组件更新完毕的钩子
  componentDidUpdate() {
    console.log("B --- componentDidUpdate");
  }

  render() {
    console.log("B --- render");
    return <div>B组件,接收到的车是:{this.props.carName}</div>;
  }
}

// 2.渲染组件到页面
ReactDOM.render(<A />, document.getElementById("test"));
3. 生命周期流程(新)
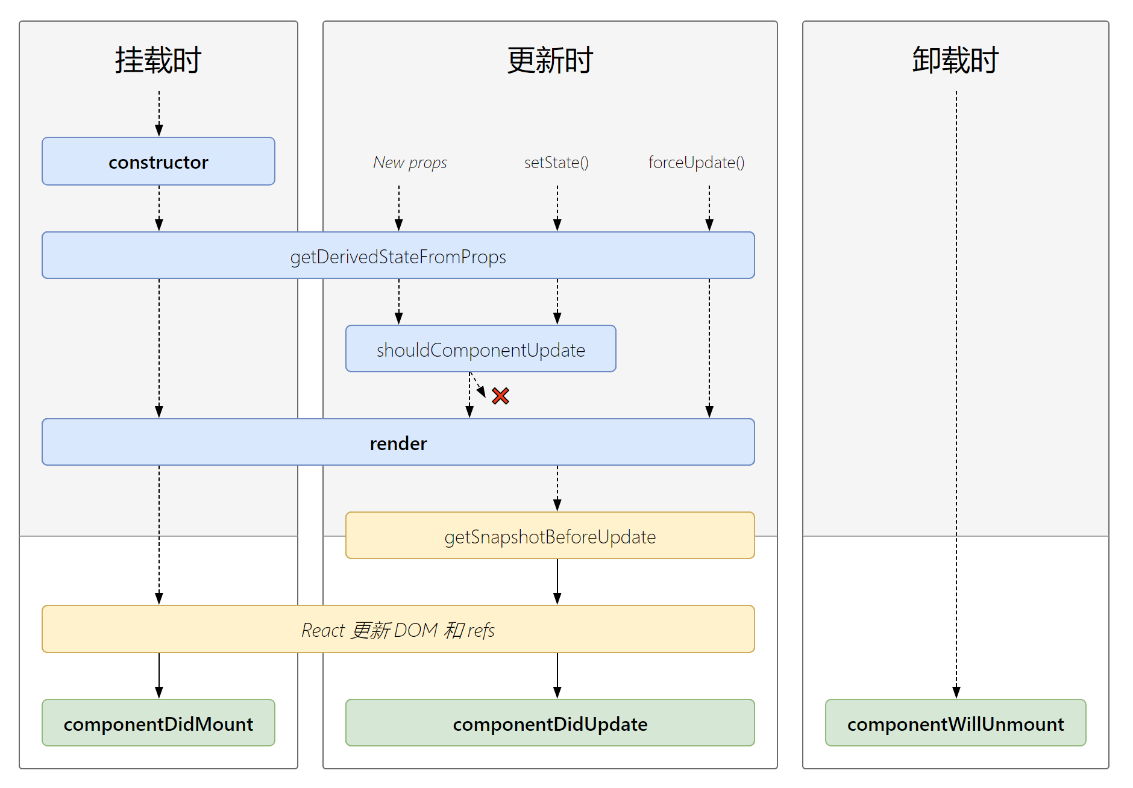
-
初始化阶段: 由ReactDOM.render()触发—初次渲染
- constructor()
- getDerivedStateFromProps ===>static
- render() ====> 常用
- componentDidMount() ====> 常用:一般在这个钩子做一些初始化的事情,例如:开启定时器、发送网络请求、订阅消息
-
更新阶段: 由组件内部this.setSate()或父组件重新render触发
- getDerivedStateFromProps()
- shouldComponentUpdate()
- render()
- getSnapshotBeforeUpdate
- componentDidUpdate()
-
卸载组件: 由ReactDOM.unmountComponentAtNode()触发
- componentWillUnmount() ====> 常用:一般在这个钩子做一些收尾的事,例如:关闭定时器、取消订阅消息
-
代码如下:
// 创建组件 class Count extends React.Component { // 构造器 constructor(props) { console.log("Count --- constructor"); super(props); // 初始化状态 this.state = { count: 0, }; } // 加一按钮 add = () => { this.setState({ count: this.state.count + 1, }); }; // 卸载组件按钮的回调 death = () => { ReactDOM.unmountComponentAtNode(document.getElementById("test")); }; // 强制更新按钮的回调 force = () => { this.forceUpdate(); }; // 若state的同名属性值在任何时候都取决于props,那么可以使用getDerivedStateFromProps static getDerivedStateFromProps(props, state) { console.log("Count --- getDerivedStateFromProps", props, state); return null; } // 在更新之前获取快照 getSnapshotBeforeUpdate(preProps, preState) { console.log("Count --- getSnapshotBeforeUpdate"); return "xzq"; } // 组件挂载完毕的钩子 componentDidMount() { console.log("Count --- componentDidMount"); } // 组件将要卸载的钩子 componentWillUnmount() { console.log("Count --- componentWillUnmount"); } // 控制组件更新的阀门 shouldComponentUpdate() { // 不写,底层默认会补一个shouldComponentUpdate生命周期钩子,且默认返回true // 写了该生命周期钩子,以写的为准,返回true阀门开启,返回false阀门关闭 console.log("Count --- shouldComponentUpdate"); return true; } // 组件更新完毕的钩子 componentDidUpdate(preProps, preState, snapValue) { // 此处若是add里面的修改count是'count: ++this.state.count' 那么会导致preState等于当前state console.log("Count --- componentDidUpdate", preProps, preState, snapValue); } // 初始化渲染、状态更新之后调用 render() { console.log("Count --- render"); const { count } = this.state; return ( <div> <h2>当前求和为:{count}</h2> <button onClick={this.add}>点我+1</button> <button onClick={this.death}>卸载组件</button> <button onClick={this.force}> 不更改组件中任何状态中的数据,强制更新一下 </button> </div> ); } } // 2.渲染组件到页面 ReactDOM.render(<Count count={199} />, document.getElementById("test")); -
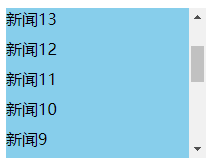
getSnapshotBeforeUpdate的使用场景
-
需求描述
-
展示一个新闻加载的案例
-
每隔一秒增加一条新闻在顶部
-
保持当前看到的新闻不会窜动
-
-
代码如下:
class NewsList extends React.Component {
  state = {
    newsArr: [],
  };

  componentDidMount() {
    setInterval(() => {
      // 获取原状态
      const { newsArr } = this.state;
      // 模拟一条数据
      const news = "新闻" + (newsArr.length + 1);
      // 更新状态
      this.setState({
        // 新生成的新闻在前
        newsArr: [news, ...newsArr],
      });
    }, 1000);
  }

  getSnapshotBeforeUpdate(preProps, preState) {
    return this.refs.list.scrollHeight;
  }
  componentDidUpdate(preProps, preState, snapValue) {
    // 每次添加一条新闻就让滚动条往下走一条新闻的高度,实现内容不会窜动
    this.refs.list.scrollTop += this.refs.list.scrollHeight - snapValue;
  }

  render() {
    return (
      <div className="list" ref="list">
        {this.state.newsArr.map((x, index) => {
          return (
            <div className="news" key={index}>
              {x}
            </div>
          );
        })}
      </div>
    );
  }
}

// 2.渲染组件到页面
ReactDOM.render(<NewsList />, document.getElementById("test"));
-
4. 重要的勾子
- render:初始化渲染或更新渲染调用
- componentDidMount:开启监听, 发送ajax请求
- componentWillUnmount:做一些收尾工作, 如: 清理定时器
5. 即将废弃的勾子
- componentWillMount
- componentWillReceiveProps
- componentWillUpdate
注意:现在使用会出现警告,下一个大版本需要加上UNSAFE_前缀才能使用,以后可能会被彻底废弃,不建议使用。
本文来自博客园,作者:你就是星光,转载请注明原文链接:https://www.cnblogs.com/xzqyl/p/17045394.html
分类:
React学习笔记


【推荐】国内首个AI IDE,深度理解中文开发场景,立即下载体验Trae
【推荐】编程新体验,更懂你的AI,立即体验豆包MarsCode编程助手
【推荐】抖音旗下AI助手豆包,你的智能百科全书,全免费不限次数
【推荐】轻量又高性能的 SSH 工具 IShell:AI 加持,快人一步
· 阿里最新开源QwQ-32B,效果媲美deepseek-r1满血版,部署成本又又又降低了!
· Manus重磅发布:全球首款通用AI代理技术深度解析与实战指南
· 开源Multi-agent AI智能体框架aevatar.ai,欢迎大家贡献代码
· 被坑几百块钱后,我竟然真的恢复了删除的微信聊天记录!
· AI技术革命,工作效率10个最佳AI工具