OVS 使用总结
1. 简介
Open vSwitch 是一个用C语言开发的多层虚拟交换机。
1.1 工作原理
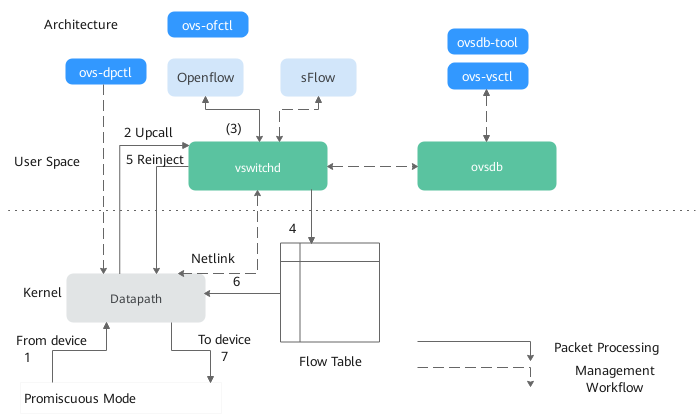
内核模块实现了多个“数据路径”(类似网桥),每个都可以有多个“vports”(类似网桥的端口)。每个数据路径也通过关联流表(flow table)来设置操作,而这些流表中的流都是用户空间在报文头和元数据的基础上映射的关键信息,一般的操作都是将数据包转发到另一个 vport。当一个数据包到达一个vport,内核模块所作的处理是提取其流的关键信息并在流表中查找这些关键信息。当有一个匹配的流时,它执行对应的操作。如果没有匹配,它会将数据包发送到用户空间的处理队列中(作为处理的一部分,用户空间可能会设置一个流用于以后碰到相同类型的数据包可以在内核中执行操作)

OVS 架构由内核态的 Datapath 和用户态的 vswitchd、ovsdb 组成:
- Datapath: 负责数据交换的内核模块,从网口读取数据,快速匹配FlowTable中的流表项,成功直接转发,失败的上交vswitchd进程处理。在 OVS 初始化和port binding 时注册钩子函数,把端口的报文处理接管到内核模块
- vswitchd: 负责OVS管理和控制的守护进程,通过 Unix Socket 将配置信息保存到ovsdb中,并通过Netlink和内核模块进行交互
- ovsdb: OVS数据库,保存OVS的配置信息
管理工具:
- ovs-vsctl
- ovs-dpctl
- ovs-ofctl
- ovs-appctl
1.2 实现过程

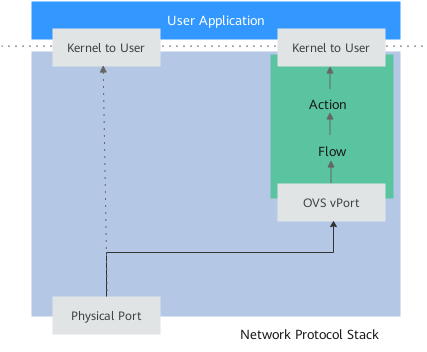
OVS 创建网桥,绑定物理网卡后,数据流从物理网卡端口接收包后,在内核态由OVS的vPort进入OVS中,根据数据包Key值进行FlowTable流表匹配,成功则执行流表Action后续流程,失败则Upcall由vswitchd进程处理
1.3 OVS 集群
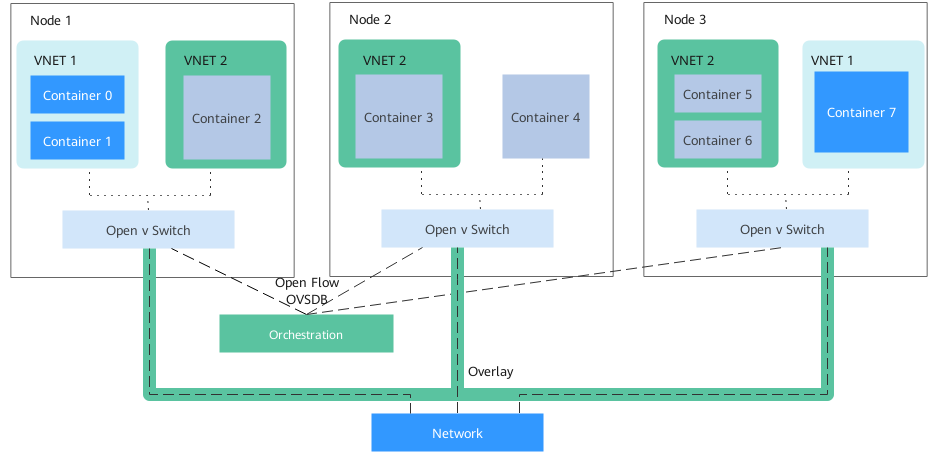
OVS集群组网拓扑图:

- 集群物理节点之间网络互通,OVS组件使用VxLAN/GRE的方式Overlay模式完成节点间网络平面的互通
- 集群物理节点内部,OVS组件通过虚拟网桥方式管理容器端口网络及其VLAN信息
- 集群物理节点间,OVS组件之间通过集群编排工具如OVN等进行集群网络的编排、路由配置与互通
1.4 术语解释
Bridge: 网桥,即交换机(Switch),一台主机中可创建一个或多个Bridge。Bridge可根据一定的规则,把某个端口接收到的数据报文转发到另一个或多个端口上,也可以修改或者丢弃数据报文
Port: 端口,即交换机上的插口。有以下几种类型:
- Normal:将物理网卡添加到Bridge上,此时它们成为了Port,类型为Normal。此时物理网卡将不能配置IP,只负责数据报文的进出。此类型的Port常用于VLAN模式下多台物理主机相连的那个口,交换机的一端属于Trunk模式
- Internal:此类型的Port,OVS会自动创建一个虚拟网卡(Interface),此端口收到的数据都转发给这块网卡,从网卡发出的数据也会通过Port交给OVS处理。当OVS创建一个新Bridge时,会自动创建一个与网桥同名的Internal Port,同时也会创建一个与网桥同名的Interface。另外,Internal Port可配置IP地址,然后将其up,即可实现OVS三层网络
- Patch:与 veth pair 功能相同,可看作是一根网线,常用于连接两个Bridge
- Tunnel:实现overlay网络。支持 GRE、VXLAN、STT、Geneve和IPSec等隧道协议
Interface: 网卡,可以是虚拟的(TUN/TAP)或物理的都可以。
Controller:控制器,OVS可接收一个或多个OpenFlow控制器的管理,主要功能为下发流表来控制转发规则
Flow:流表,OVS进行数据转发的核心功能,定义了端口之间的转发数据报文的规则。每条流表规则可分为匹配和动作两部分,“匹配”决定哪些数据将被处理;动作决定了匹配到的数据报文该如何处理
2. 常用操作
2.1 Bridge
ovs-vsctl add-br br0
ovs-vsctl list-br
ovs-vsctl del-br br0
ovs-vsctl br-exists br0
2.2 Port
2.2.1 Normal
ovs-vsctl add-port br0 ens38  # 物理网卡
ovs-vsctl del-port br0 ens38
2.2.2 Internal
ovs-vsctl add-port br0 p0 -- set interface p0 type=internal

# 设置IP地址
ip link set p0 up
ip addr add 192.168.80.10/24 dev p0

# 设置VLAN tag
ovs-vsctl set port p0 tag=100
ovs-vsctl remove port p0 tag 100

# 设置允许通过的VLAN tag
ovs-vsctl set port p0 trunks=100,200
ovs-vsctl remove port p0 trunks 100,200
2.2.3 Patch
ovs-vsctl add-br br0
ovs-vsctl add-br br1

ovs-vsctl add-port br0 patch0 -- set interface patch0 type=patch options:peer=patch1
ovs-vsctl add-port br1 patch1 -- set interface patch1 type=patch options:peer=patch0
2.2.4 Tunnel
# 192.168.3.103
ovs-vsctl add-br br0
ovs-vsctl add-port br0 vxlan01 -- set interface vxlan01 type=vxlan options:remote_ip=192.168.3.104

# 192.168.3.104
ovs-vsctl add-br br0
ovs-vsctl add-port br0 vxlan01 -- set interface vxlan01 type=vxlan options:remote_ip=192.168.3.103
2.2.5 其他
# 设置VLAN mode: trunk|access|native-tagged|native-untagged
ovs-vsctl set port p0 vlan_mode=trunk
ovs-vsctl get port p0 vlan_mode
ovs-vsctl remove port p0 vlan_mode trunk

# 查看Port的属性
ovs-vsctl list interface p0

# 网桥下的所有端口
ovs-vsctl list-ports br0

# 端口所属的网桥
ovs-vsctl port-to-br p0
2.3 命令补充
# ovs网络状态
ovs-vsctl show

# 设置控制器
ovs-vsctl set-controller br0 tcp:ip:6633
ovs-vsctl del-controller br0

# 设置支持OpenFlow Version 1.3
ovs-vsctl set bridge br0 protocols=OpenFlow13

# 删除OpenFlow支持设置
ovs-vsctl clear bridge br0 protocols

# 查看网桥上所有交换机端口的状态
ovs-ofctl dump-ports br0

# 查看网桥上所有的流规则
ovs-ofctl dump-flows br0

# 查看ovs的版本:
ovs-ofctl -V
3. VLAN 隔离
3.1 单节点
ovs-vsctl add-br br0

# 添加内部端口
ovs-vsctl add-port br0 vnet0 -- set interface vnet0 type=internal
ovs-vsctl add-port br0 vnet1 -- set interface vnet1 type=internal
ovs-vsctl add-port br0 vnet2 -- set interface vnet2 type=internal

# 添加网络命名空间
ip netns add ns0
ip netns add ns1
ip netns add ns2

# 移到端口到网络命令空间
ip link set vnet0 netns ns0
ip link set vnet1 netns ns1
ip link set vnet2 netns ns2

# 启用端口并配置IP
ip netns exec ns0 ip link set lo up
ip netns exec ns0 ip link set vnet0 up
ip netns exec ns0 ip addr add 10.0.0.1/24 dev vnet0
ip netns exec ns0 ip addr show

ip netns exec ns1 ip link set lo up
ip netns exec ns1 ip link set vnet1 up
ip netns exec ns1 ip addr add 10.0.0.2/24 dev vnet1
ip netns exec ns1 ip addr show

ip netns exec ns2 ip link set lo up
ip netns exec ns2 ip link set vnet2 up
ip netns exec ns2 ip addr add 10.0.0.3/24 dev vnet2
ip netns exec ns2 ip addr show

# 连通性验证
ip netns exec ns0 ping 10.0.0.2  # ok
ip netns exec ns0 ping 10.0.0.3  # ok

# 设置VLAN
ovs-vsctl set port vnet0 tag=100
ovs-vsctl set port vnet1 tag=100
ovs-vsctl set port vnet2 tag=200

# 连通性验证
ip netns exec ns0 ping 10.0.0.2  # ok
ip netns exec ns0 ping 10.0.0.3  # unavailable
3.2 多节点

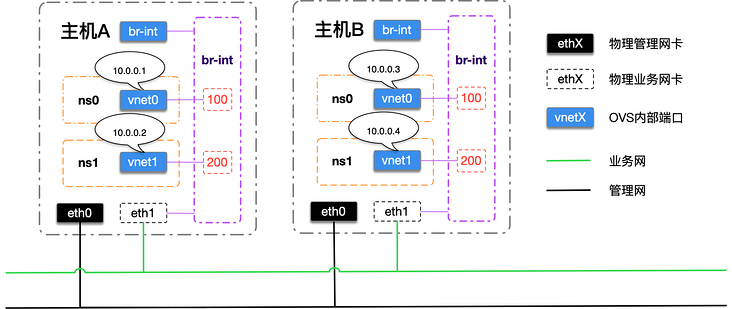
未配置VLAN:
#### 主机A ####################################################
ovs-vsctl add-br br-int

# 添加物理网卡
ovs-vsctl add-port br-int ens38
ip link set ens38 up  # 非常必要,否则无法跨节点通信

# 添加内部端口
ovs-vsctl add-port br-int vnet0 -- set interface vnet0 type=internal
ovs-vsctl add-port br-int vnet1 -- set interface vnet1 type=internal

# 添加网络命名空间
ip netns add ns0
ip netns add ns1

# 移到端口到网络命令空间
ip link set vnet0 netns ns0
ip link set vnet1 netns ns1

# 启用端口并配置IP
ip netns exec ns0 ip link set lo up
ip netns exec ns0 ip link set vnet0 up
ip netns exec ns0 ip addr add 10.0.0.1/24 dev vnet0
ip netns exec ns0 ip addr show

ip netns exec ns1 ip link set lo up
ip netns exec ns1 ip link set vnet1 up
ip netns exec ns1 ip addr add 10.0.0.2/24 dev vnet1
ip netns exec ns1 ip addr show

# 网桥详情
ovs-vsctl show
f96a27d4-c91d-43ff-858b-fd559fe6b771
    Bridge br-int
        Port ens38
            Interface ens38
        Port vnet1
            Interface vnet1
                type: internal
        Port vnet0
            Interface vnet0
                type: internal
        Port br-int
            Interface br-int
                type: internal
    ovs_version: "2.13.3"


#### 主机B ####################################################
ovs-vsctl add-br br-int

# 添加物理网卡
ovs-vsctl add-port br-int ens38
ip link set ens38 up  # 非常必要,否则无法跨节点通信

# 添加内部端口
ovs-vsctl add-port br-int vnet0 -- set interface vnet0 type=internal
ovs-vsctl add-port br-int vnet1 -- set interface vnet1 type=internal

# 添加网络命名空间
ip netns add ns0
ip netns add ns1

# 移到端口到网络命令空间
ip link set vnet0 netns ns0
ip link set vnet1 netns ns1

# 启用端口并配置IP
ip netns exec ns0 ip link set lo up
ip netns exec ns0 ip link set vnet0 up
ip netns exec ns0 ip addr add 10.0.0.3/24 dev vnet0
ip netns exec ns0 ip addr show

ip netns exec ns1 ip link set lo up
ip netns exec ns1 ip link set vnet1 up
ip netns exec ns1 ip addr add 10.0.0.4/24 dev vnet1
ip netns exec ns1 ip addr show

# 网桥详情
ovs-vsctl show
验证:
#### 主机A ####################################################
ip netns exec ns0 ping 10.0.0.1   # ok
ip netns exec ns0 ping 10.0.0.2   # ok
ip netns exec ns0 ping 10.0.0.3   # ok
ip netns exec ns0 ping 10.0.0.4   # ok

#### 主机B ####################################################
ip netns exec ns1 ping 10.0.0.1   # ok
ip netns exec ns1 ping 10.0.0.2   # ok
ip netns exec ns1 ping 10.0.0.3   # ok
ip netns exec ns1 ping 10.0.0.4   # ok
配置VLAN:
#### 主机A ####################################################
ovs-vsctl set port vnet0 tag=100
ovs-vsctl set port vnet1 tag=200

#### 主机B ####################################################
ovs-vsctl set port vnet0 tag=100
ovs-vsctl set port vnet1 tag=200
验证:
#### 主机A ####################################################
ip netns exec ns0 ping 10.0.0.1   # ok
ip netns exec ns0 ping 10.0.0.2   # unavailable
ip netns exec ns0 ping 10.0.0.3   # ok
ip netns exec ns0 ping 10.0.0.4   # unavailable

#### 主机B ####################################################
ip netns exec ns1 ping 10.0.0.1   # unavailable
ip netns exec ns1 ping 10.0.0.2   # ok
ip netns exec ns1 ping 10.0.0.3   # unavailable
ip netns exec ns1 ping 10.0.0.4   # ok
4. 端口镜像
4.1 简介
镜像源:
- select_all: bool, true表示网桥上所有流量
- select_dst_port: string,端口接收到的所有流量
- select_src_port: string, 端口发送的所有流量
- select_vlan: int, 带VLAN标签的流量
镜像目的:
- output_port: string, 接收流量报文的观察端口
- output_vlan: int,只修改VLAN标签,原VLAN标签将被剥离
# 新增端口镜像
ovs-vsctl -- set Bridge <bridge_name> mirrors=@m \
 -- --id=@<port0> get Port <port0> \
 -- --id=@<port1> get Port <port1> \
 -- --id=@m create Mirror name=<mirror_name> select-dst-port=@<port0> select-src-port=@<port0> output-port=@<port1>

# 删除端口镜像
ovs-vsctl remove Bridge <bridge-name> mirrors <mirror-id>

# 获取端口的ID
ovs-vsctl get port <port_name> _uuid

# 在原端口镜像的基础上增加镜像源
ovs-vsctl add Mirror <mirror-name> select_src_port <port-id>
ovs-vsctl add Mirror <mirror-name> select_dst_port <port-id>

# 在原端口镜像的基础上删除镜像源
ovs-vsctl remove Mirror <mirror-name> select_src_port <port-id>
ovs-vsctl remove Mirror <mirror-name> select_dst_port <port-id>

# 清空端口镜像
ovs-vsctl clear Mirror

# 查看端口镜像
ovs-vsctl list Mirror

# 关闭端口的MAC地址学习
ovs-ofctl mod-port <bridge-name> <port-name> NO-FLOOD
4.2 实践
ovs-vsctl add-br br-int

# 添加内部端口
ovs-vsctl add-port br-int vnet0 -- set interface vnet0 type=internal
ovs-vsctl add-port br-int vnet1 -- set interface vnet1 type=internal
ovs-vsctl add-port br-int vnet2 -- set interface vnet2 type=internal

# 添加网络空间
ip netns add ns0
ip netns add ns1
ip netns add ns2

# 内部端口移到网络空间
ip link set vnet0 netns ns0
ip link set vnet1 netns ns1
ip link set vnet2 netns ns2

# 启用端口、配置IP
ip netns exec ns0 ip link set lo up
ip netns exec ns0 ip link set vnet0 up
ip netns exec ns0 ip addr add 10.0.0.1/24 dev vnet0
ip netns exec ns0 ip addr show

ip netns exec ns1 ip link set lo up
ip netns exec ns1 ip link set vnet1 up
ip netns exec ns1 ip addr add 10.0.0.2/24 dev vnet1
ip netns exec ns1 ip addr show

ip netns exec ns2 ip link set lo up
ip netns exec ns2 ip link set vnet2 up
ip netns exec ns2 ip addr add 10.0.0.3/24 dev vnet2
ip netns exec ns2 ip addr show

# 增加端口镜像
ovs-vsctl set bridge br-int mirrors=@m \
-- --id=@vnet1 get port vnet1 \
-- --id=@vnet2 get port vnet2 \
-- --id=@m create mirror name=mirror_test select-dst-port=@vnet1 select-src-port=@vnet1 output-port=@vnet2
将流量发送到vnet1:
ip netns exec ns0 ping 10.0.0.2
监控 vnet2 的流量:
ip netns exec ns2 tcpdump -i vnet2

15:10:35.785945 IP 10.0.0.1 > 10.0.0.2: ICMP echo request, id 17311, seq 25, length 64
15:10:35.785978 IP 10.0.0.2 > 10.0.0.1: ICMP echo reply, id 17311, seq 25, length 64
15:10:36.809925 IP 10.0.0.1 > 10.0.0.2: ICMP echo request, id 17311, seq 26, length 64
15:10:36.809938 IP 10.0.0.2 > 10.0.0.1: ICMP echo reply, id 17311, seq 26, length 64
15:10:37.834173 IP 10.0.0.1 > 10.0.0.2: ICMP echo request, id 17311, seq 27, length 64
15:10:37.834196 IP 10.0.0.2 > 10.0.0.1: ICMP echo reply, id 17311, seq 27, length 64
15:10:38.858455 IP 10.0.0.1 > 10.0.0.2: ICMP echo request, id 17311, seq 28, length 64
15:10:38.858477 IP 10.0.0.2 > 10.0.0.1: ICMP echo reply, id 17311, seq 28, length 64
5. 流表
OVS流表就像是“大腿”一样接受来自“大脑”的指令,决定要向哪个方向前进
5.1 操作命令
ovs-ofctl dump-flows br0

ovs-ofctl add-flow "CONDITION, action=ACT1,ACT2..."
ovs-ofctl add-flows "CONDITION, action=ACT1,ACT2..."
ovs-ofctl mod-flows "CONDITION, action=ACT1,ACT2..."

# 清空流表
ovs-ofctl del-flows br0

# 删除特定流表规则
ovs-ofctl del-flows br0 xx
5.2 流表匹配条件
主要分四部分:
- OVS 匹配条件
- OSI模型二层 【数据链路层】
- OSI模型三层 【网络层】
- OSI模型四层 【传输层】
5.2.1 OVS 匹配条件
| key | value | comment |
|---|---|---|
| in_port | port | 流量进入的端口编号或名称,示例 in_port=br0 |
| table | number | 规则保存的流表编号,0~254, 默认0 |
5.2.2 数据链路层
dl, data link
| key | value | comment |
|---|---|---|
| dl_type | ethertype | 以太网类型,10~65535, 也可以使用别名 ip/arp/ipv6/arp |
| dl_vlan | tag | Vlan Tag, 0~4095 |
| dl_vlan_pcp | priority | 优先级, 0~7 |
| dl_src | mac | 源mac地址 |
| dl_dst | mac | 目的mac地址 |
5.2.3 网络层
| key | value | comment |
|---|---|---|
| nw_src | ip/mask | |
| nw_dst | ip/mask | |
| nw_proto | proto | |
| ipproto | proto | |
| nw_tos | tos | 匹配IP ToS / DSCP或IPv6流量类别字段tos, 0~255 |
| ip_dscp | dscp | 匹配IP ToS / DSCP或IPv6流量类字段dscp, 0~63 |
| nw_ecn | ecn | 匹配IP ToS / DSCP或IPv6流量类字段dscp, 0~63 |
| ip_ecn | ecn | 匹配IP ToS或IPv6流量类别字段中的ecn位, 0~3 |
| nw_ttl | ttl | 匹配IP TTL或IPv6跃点限制值ttl, 0~255 |
5.2.4 应用层
| key | value | comment |
|---|---|---|
| tcp_src | port, port/mask | |
| tcp_dst | port port/mask | |
| tcp_flags | flags/mask | 0:fin 查找不再有来自发送方的数据。 |
| 1:syn 同步同步序列号。 | ||
| 2:rst 重置连接。 | ||
| 3:psh 推送功能。 | ||
| 4:ack 确认字段有效。 | ||
| 5:urg 紧急指针字段有效。 | ||
| 6:ece ECN回显。 | ||
| 7:cer 减少拥塞窗口。 | ||
| 8:ns 现时总和 | ||
| 9-11:保留。 | ||
| 12-15:不处理,必须为零。 | ||
| icmp_type | type | |
| ip | dl_type=0x0800 | |
| icmp | 等同于dl_type=0x0800,nw_proto=1 |
|
| tcp | 等同于dl_type=0x0800,nw_proto=6 |
|
| udp | 等同于dl_type=0x0800,nw_proto=17 |
|
| arp | 等同于dl_type=0x0806 |
5.3 流表动作
| action | comment |
|---|---|
| output:port | 将数据包输出到OpenFlow端口号port。如果port是数据包的输入端口,则不输出数据包。 |
| local | 在与本地网桥名称相同的网络设备对应的``本地端口’'上输出数据包。 |
| in_port | 在接收数据包的端口上输出数据包 |
| drop | 丢弃数据包,因此不会进行进一步的处理或转发。如果使用丢弃动作,则不能指定其他动作 |
| mod_dl_src:mac | 将源以太网地址设置为mac |
| mod_nw_src:ip | 将IPv4源地址设置为ip |
参考资料:https://www.openvswitch.org/support/dist-docs-2.5/ovs-ofctl.8.txt

