

微信点餐系统(七)-微信授权获取openid:
章节小结:
1.学会了微信授权的步骤,学会了微信授权的文档
2.学会了使用natapp内网穿透工具
3.加深了虚拟机的网络配置以及基本使用
4.学会了抓包购票工具fiddler的使用
5.微信授权步骤
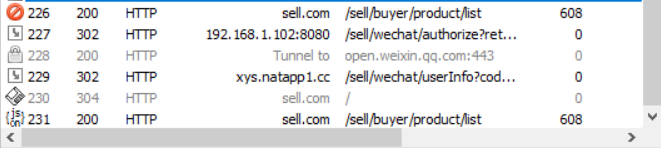
分析微信登录跳转的几个路径
1)sell.com 这是我本地在电脑端口微信界面点击的时候的的入口,这里是可以调到我的本地的虚拟机中的项目192.168.1.105中去
2)sell.com /sell/buyer/product/list获取商品list。这是在nginx中配置的。Nginx中/sell/这个路径设置之后寻找192.168.1.102:8080,这就是我的本地项目的路径,sell.com /sell/buyer/product/list
3)http://192.168.1.102:8080/sell/wechat/authorize?returnUrl=http%3A%2F%2Fsell.com%2F%23%2F 这个是我在虚拟机项目中设置的寻找openid的路径http://192.168.1.102:8080/sell/wechat/authorize参数是虚拟机项目自己上,这是本地项目中查找openid的第一步找到code
4)http://xys.natapp1.cc/sell/wechat/userInfo?code=011XT9ko0SA33l1TbWjo00O6ko0XT9kq&state=http%3A%2F%2Fsell.com%2F%23%2F 这是我本地项目中查找openid的第二步,找出openid
5)http://sell.com/sell/buyer/product/list,再查一次商品
微信授权获取openid:
根据微信给的接口说明,这是文档:https://pay.weixin.qq.com/wiki/doc/api/jsapi.php?chapter=7_3我们可以分为以下几步:
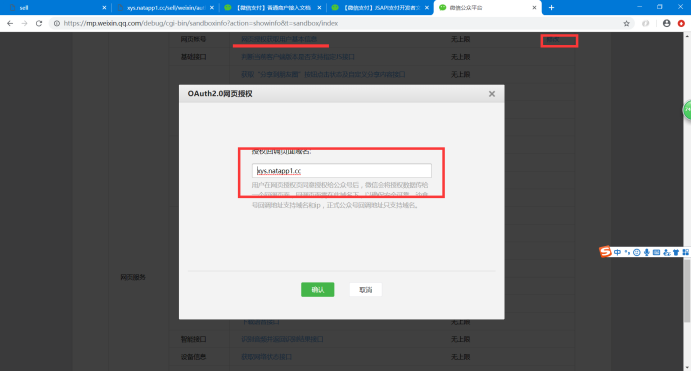
设置域名:
1.在natapp上面买一个域名,我的是http://xys.natapp1.cc
2.本地设置服务器穿透,开启natapp.exe,开启命令:natapp -authtoken=e922eb840cb4b7df
3.微信公众号我这边弄得是接口测试号
4.外网访问验证

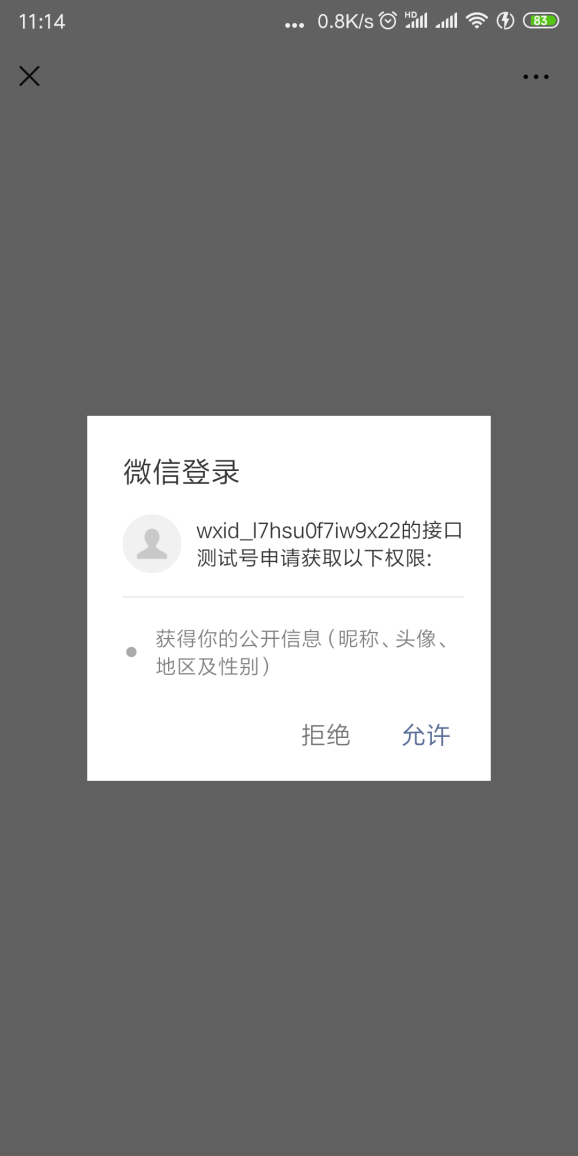
手动获取获取用户OpenID:
OpenId是一个用户的唯一标示,通过微信提供的接口我们可以获取这个唯一标示

上面图中第一步:设置域名已经完成,接下来就是第二步获取OpenID,细分为几步
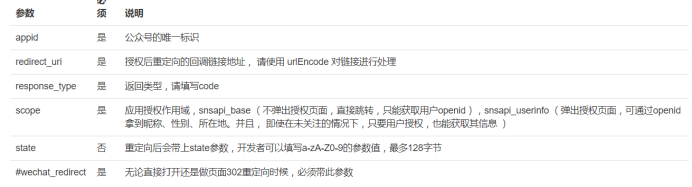
1.用户同意授权,获得code
这是微信提供的模仿路径
https://open.weixin.qq.com/connect/oauth2/authorize?appid=APPID&redirect_uri=REDIRECT_URI&response_type=code&scope=SCOPE&state=STATE#wechat_redirect
 然后进行修改
设置权限
appid=wxdf2b09f280e6e6e2
redirect_uri=http://xys.natapp1.cc/sell/weixin/auth
scope=snsapi_base
https://open.weixin.qq.com/connect/oauth2/authorize?appid=wxdf2b09f280e6e6e2&redirect_uri=http://xys.natapp1.cc/sell/weixin/auth&response_type=code&scope=snsapi_base&state=STATE#wechat_redirect
当该路径成功之后,微信方面就会跳转成这样
http://xys.natapp1.cc/sell/weixin/auth?code=adfsdfsdfs&state=STATE
补充上方法路径:sell/weixin/auth所以我们可以获取code,而这个state想写就写不写算哒,这是给我们自定义的参数

@RestController
@RequestMapping("/weixin")
@Slf4j
public class WinxinController {
    @GetMapping("/auth")
    public void auth(@RequestParam("code") String code) {
        log.info("进入auth方法。。。");
        log.info("code={}", code);
    }
}
已获得code
2.通过code换取网页授权access_token

微信提供的模仿接口
appid=wxdf2b09f280e6e6e2
secret=f924b2e9f140ac98f9cb5317a8951c71
https://api.weixin.qq.com/sns/oauth2/access_token?appid=wxdf2b09f280e6e6e2&secret=f924b2e9f140ac98f9cb5317a8951c71&code=CODE&grant_type=authorization_code
然后我们在auth方法中请求这个链接获取回调参数
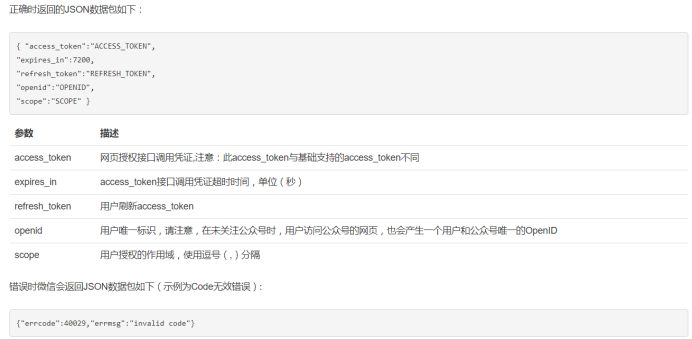
下图是我们auto定义的返回的参数

3.拉取用户信息(需scope为 snsapi_userinfo)
与scope=snsapi_base不同的是,用户需要授权而不是直接进入
appid=wxdf2b09f280e6e6e2
redirect_uri=http://xys.natapp1.cc/sell/weixin/auth
scope=snsapi_base
https://open.weixin.qq.com/connect/oauth2/authorize?appid=wxdf2b09f280e6e6e2&redirect_uri=http://xys.natapp1.cc/sell/weixin/auth&response_type=code&scope=snsapi_userinfo&state=STATE#wechat_redirect
获取的参数更多一些
https://api.weixin.qq.com/sns/userinfo?access_token=ACCESS_TOKEN&openid=OPENID&lang=zh_CN
SDK获取OpenID(这才是项目中使用的):
Github:https://github.com/Wechat-Group/WxJava,里面也有写好的怎么使用的文档
这里我们使用了别人写好的SDK工具,我们直接拿来就可以用,导入maven
<dependency>
  <groupId>com.github.binarywang</groupId>
  <artifactId>weixin-java-mp</artifactId>
  <version>3.3.0</version>
</dependency>
Github:Wechat-Group/WxJava文档
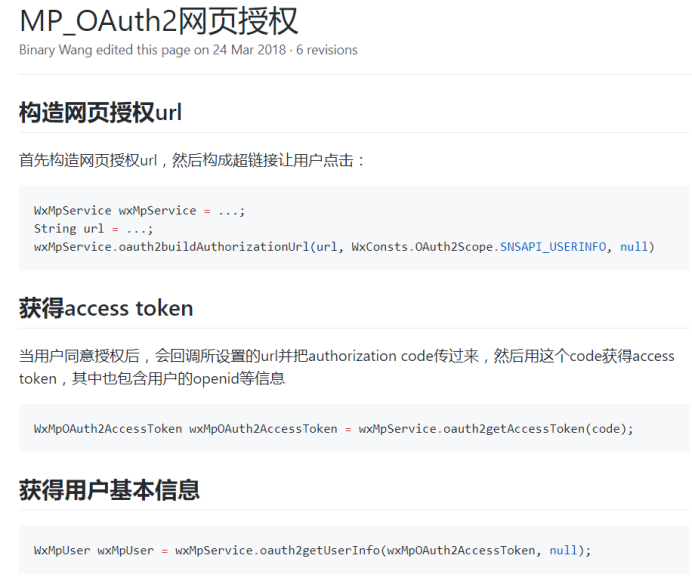

API文档
获取openid

重定向到 /sell/wechat/authorize

参数

returnUrl: http://xxx.com/abc  //【必填】

返回

http://xxx.com/abc?openid=oZxSYw5ldcxv6H0EU67GgSXOUrVg
此时我们创建一个WechatAccountConfig放在config下,这是全文配置,获取配置文件信息@Component@ConfigurationProperties(prefix = "wechat")
package com.xiong.sell.config;

import lombok.Data;
import org.springframework.boot.context.properties.ConfigurationProperties;
import org.springframework.stereotype.Component;

@Data
@Component
@ConfigurationProperties(prefix = "wechat")
public class WechatAccountConfig {
    private String mpAppId;
    private String mpAppSecret;
}
配置文件中
wechat:
  mpAppId: wxdf2b09f280e6e6e2
  mpAppSecret: f924b2e9f140ac98f9cb5317a8951c71
然后配置WechatMpConfig配置文件中
package com.xiong.sell.config;

import me.chanjar.weixin.mp.api.WxMpConfigStorage;
import me.chanjar.weixin.mp.api.WxMpInMemoryConfigStorage;
import me.chanjar.weixin.mp.api.WxMpService;
import me.chanjar.weixin.mp.api.impl.WxMpServiceImpl;
import org.springframework.beans.factory.annotation.Autowired;
import org.springframework.context.annotation.Bean;
import org.springframework.stereotype.Component;

@Component
public class WechatMpConfig {
    @Autowired
    private WechatAccountConfig accountConfig;
    @Bean
    public WxMpService wxMpService() {
        WxMpService wxMpService = new WxMpServiceImpl();
        wxMpService.setWxMpConfigStorage(wxMpConfigStorage());
        return wxMpService;
    }
    @Bean
    public WxMpConfigStorage wxMpConfigStorage() {
        WxMpInMemoryConfigStorage wxMpConfigStorage = new WxMpInMemoryConfigStorage();
        wxMpConfigStorage.setAppId(accountConfig.getMpAppId());
        wxMpConfigStorage.setSecret(accountConfig.getMpAppSecret());
        return wxMpConfigStorage;
    }
}
@Bean告诉项目,我这里是一个bean
@Component告诉项目我这里是一个组件,可以扫描我
@Autowired
private WechatAccountConfig accountConfig;
这个时候就会调用相同返回参数的配置bean
创建WechatController类,生成aothorize方法
package com.xiong.sell.controller;

import com.xiong.sell.enums.ResultEnum;
import com.xiong.sell.exception.SellException;
import lombok.extern.slf4j.Slf4j;
import me.chanjar.weixin.common.api.WxConsts;
import me.chanjar.weixin.common.error.WxErrorException;
import me.chanjar.weixin.mp.api.WxMpService;
import me.chanjar.weixin.mp.bean.result.WxMpOAuth2AccessToken;
import org.springframework.beans.factory.annotation.Autowired;
import org.springframework.stereotype.Controller;
import org.springframework.web.bind.annotation.GetMapping;
import org.springframework.web.bind.annotation.RequestMapping;
import org.springframework.web.bind.annotation.RequestParam;
import org.springframework.web.bind.annotation.RestController;

import java.net.URLEncoder;

/**
 * @author Xiong YuSong
 * 2019/1/24 11:41
 */
@Controller
@RequestMapping("wechat")
@Slf4j
public class WechatController {

    @Autowired
    private WxMpService wxMpService;

    /**
     * 获取code
     * @param returnUrl
     * @return
     */
    @GetMapping("/authorize")
    public String authorize(@RequestParam("returnUrl") String returnUrl) {
        //1. 配置
        //2. 调用方法
        String url = "http://xys.natapp1.cc/sell/wechat/userInfo";
        String redirectUrl = wxMpService.oauth2buildAuthorizationUrl(url, WxConsts.OAuth2Scope.SNSAPI_USERINFO, URLEncoder.encode(returnUrl));
        return "redirect:" + redirectUrl;
    }

    /**
     * 通过code获得user信息,然后再回调
     * @param code
     * @param returnUrl
     * @return
     */
    @GetMapping("/userInfo")
    public String userInfo(@RequestParam("code") String code,
                           @RequestParam("state") String returnUrl) {
        WxMpOAuth2AccessToken wxMpOAuth2AccessToken = new WxMpOAuth2AccessToken();
        try {
            wxMpOAuth2AccessToken = wxMpService.oauth2getAccessToken(code);
        } catch (WxErrorException e) {
            log.error("【微信网页授权】{}", e);
            throw new SellException(ResultEnum.WECHAT_MP_ERROR.getCode(), e.getError().getErrorMsg());
        }
        String openId = wxMpOAuth2AccessToken.getOpenId();
        return "redirect:" + returnUrl + "?openid=" + openId;
    }
}
成功返回一个url:"redirect:" + returnUrl + "?openid=" + openId;
前端验证:
补充一个买家信息,和图片路径显示

如果无法加载则:Ctrl+F9进行静态文件加载,页面刷新Ctrl+Shift+R
前端项目配置获取后端项目路径以及openid获取路径
路径以及修改地方
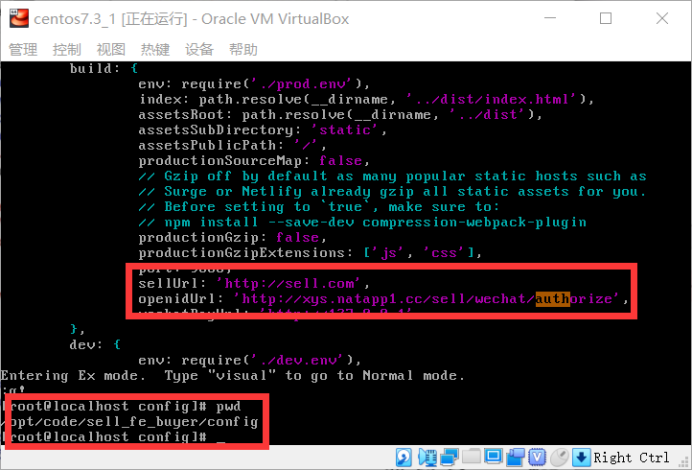
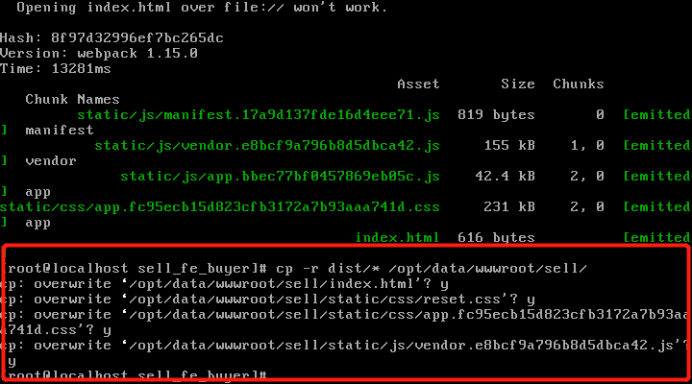
重新部署
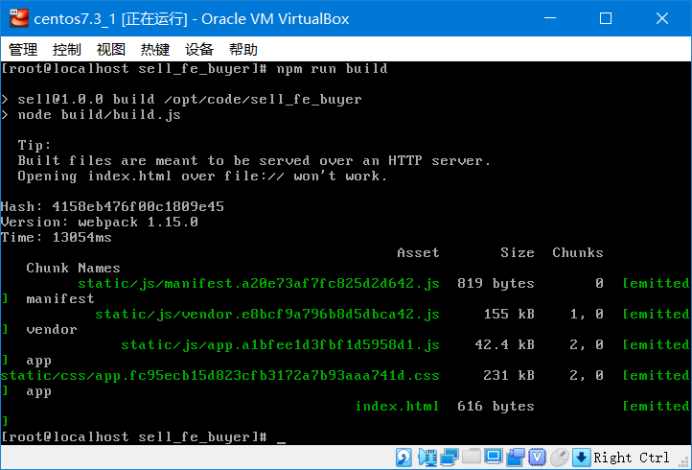
将重新打包好的项目放到网站的根目录下去
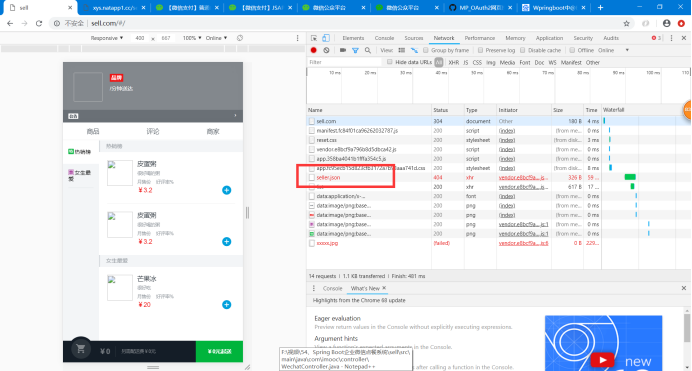
抓包工具fiddler
通过抓包工具我们可以看出,虚拟机项目中寻找微信身份验证的路径是错误的
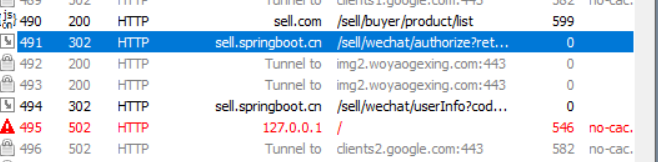
找了半天是路径打错了
最后我把虚拟机中项目中查找openid的路径直接写为我的本机Ip+端口地址,然后成功了,这说明内网穿透并没有什么用


【推荐】国内首个AI IDE,深度理解中文开发场景,立即下载体验Trae
【推荐】编程新体验,更懂你的AI,立即体验豆包MarsCode编程助手
【推荐】抖音旗下AI助手豆包,你的智能百科全书,全免费不限次数
【推荐】轻量又高性能的 SSH 工具 IShell:AI 加持,快人一步
· AI与.NET技术实操系列:基于图像分类模型对图像进行分类
· go语言实现终端里的倒计时
· 如何编写易于单元测试的代码
· 10年+ .NET Coder 心语,封装的思维:从隐藏、稳定开始理解其本质意义
· .NET Core 中如何实现缓存的预热?
· 25岁的心里话
· 闲置电脑爆改个人服务器(超详细) #公网映射 #Vmware虚拟网络编辑器
· 零经验选手,Compose 一天开发一款小游戏!
· 因为Apifox不支持离线,我果断选择了Apipost!
· 通过 API 将Deepseek响应流式内容输出到前端