CountDownLatch源码分析
1:countDownLatch的源码依赖与AQS,不了解AQS的可以先阅读这位大神的博客,讲的非常完美:http://www.cnblogs.com/waterystone/p/4920797.html
2:countDownLatch()主要分析三个方法,1.构造方法 2:countDown()方法 3:await()方法
2.1:构造函数解析
 1:countDowhLatch的构造方法,调用sync(),传入count也就是线程个数
public CountDownLatch(int count) {
        if (count < 0) throw new IllegalArgumentException("count < 0");
        this.sync = new Sync(count);
    }

2:调用setState()
Sync(int count) {
    setState(count);
}
3:最终将count赋值给state,也就是AQS类中的state,熟读AQS源码都应该知道,state的作用,不懂AQS的可以参考上面的源码
protected final void setState(int newState) {
    state = newState;
}
2.2:await()方法解析
1:await()方法,调用acquireSharedInterruptibly(1),传入默认参数1,为啥传入参数为1,后续介绍
 public void await() throws InterruptedException {
        sync.acquireSharedInterruptibly(1);
    }

2:调用doAcquireSharedInterruptibly(1),类似AQS的doAcquireShared()方法,功能基本类似
public final void acquireSharedInterruptibly(int arg)
        throws InterruptedException {
    if (Thread.interrupted())
        throw new InterruptedException();
    if (tryAcquireShared(arg) < 0)
        doAcquireSharedInterruptibly(arg);
}
3:doAcquireSharedInterruptibly()方法源码
private void doAcquireSharedInterruptibly(int arg)
    throws InterruptedException {
    final Node node = addWaiter(Node.SHARED);
    boolean failed = true;
    try {
        for (;;) {
            final Node p = node.predecessor();
            if (p == head) {
                int r = tryAcquireShared(arg);
                if (r >= 0) {
                    setHeadAndPropagate(node, r);
                    p.next = null; // help GC
                    failed = false;
                    return;
                }
            }
            if (shouldParkAfterFailedAcquire(p, node) &&
                parkAndCheckInterrupt())
                throw new InterruptedException();
        }
    } finally {
        if (failed)
            cancelAcquire(node);
    }
}
4:addWaiter()方法,是存放节点到等待队列
private Node addWaiter(Node mode) {
    Node node = new Node(Thread.currentThread(), mode);
    // Try the fast path of enq; backup to full enq on failure
    Node pred = tail;
    if (pred != null) {
        node.prev = pred;
        if (compareAndSetTail(pred, node)) {
            pred.next = node;
            return node;
        }
    }
    enq(node);
    return node;
}
5:因为pred==null 所以进入enq()源码
private Node enq(final Node node) {
    for (;;) {
        Node t = tail;
        if (t == null) { // Must initialize
            if (compareAndSetHead(new Node()))
                tail = head;
        } else {
            node.prev = t;
            if (compareAndSetTail(t, node)) {
                t.next = node;
                return t;
            }
        }
    }
}
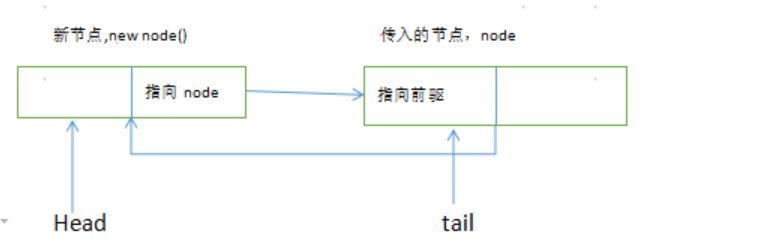
分析:很明显,第一次调用addWaiter()方法,会进行enq回旋,将会把head->new node() ,tail->node(),new node()->node(),node().prev - > new node()
图形:大概就是这样,画图确实一般,哈哈
然后进行这段代码:
 try {
        for (;;) {
            final Node p = node.predecessor();
            if (p == head) {
                int r = tryAcquireShared(arg);
                if (r >= 0) {
                    setHeadAndPropagate(node, r);
                    p.next = null; // help GC
                    failed = false;
                    return;
                }
            }
            if (shouldParkAfterFailedAcquire(p, node) &&
                parkAndCheckInterrupt())
                throw new InterruptedException();
        }
    } finally {
        if (failed)
            cancelAcquire(node);
    }
很明显,上图可知,node的前驱节点就是head,所以进行tryAcquireShared方法如下,判断是否state为0,0表示可以获取锁,资源空置,很明显,前面构造函数已经传入3了,
所以返回-1
protected int tryAcquireShared(int acquires) {
    return (getState() == 0) ? 1 : -1;
}
然后进入这段代码,这段熟读AQS源码都知道,就是将自己的前置节点设置为signal,返回false,然后调用parkAndCheckInterrupt()方法进行阻塞,等待唤醒
  if (shouldParkAfterFailedAcquire(p, node) &&
                parkAndCheckInterrupt())
                throw new InterruptedException();
        }
shouldParkAfterFailedAcquire()源码如下,初始化ws==0,所以直接调用compareAndSetWaitStatus(pred, ws, Node.SIGNAL);然后返回false
private static boolean shouldParkAfterFailedAcquire(Node pred, Node node) {
    int ws = pred.waitStatus;
    if (ws == Node.SIGNAL)
        return true;

    if (ws > 0) {
        do {
            node.prev = pred = pred.prev;
        } while (pred.waitStatus > 0);
        pred.next = node;
    } else {
        compareAndSetWaitStatus(pred, ws, Node.SIGNAL);
    }
    return false;
}
parkAndCheckInterrupt()该方法用来阻塞该线程,等待唤醒
private final boolean parkAndCheckInterrupt() {
    LockSupport.park(this);
    return Thread.interrupted();
}
3:countDown()方法分析
3.1:进行释放state
public void countDown() {
        sync.releaseShared(1);
    }

3.2:调用tryReleaseShared()尝试释放state(),判断state的值
public final boolean releaseShared(int arg) {
    if (tryReleaseShared(arg)) {
        doReleaseShared();
        return true;
    }
    return false;
}

每调用一次countDown(),state的值就会减去1,当最后state的值为0,也即是nextc==0,就会返回true
protected boolean tryReleaseShared(int releases) {
        // Decrement count; signal when transition to zero
        for (;;) {
            int c = getState();
            if (c == 0)
                return false;
            int nextc = c-1;
            if (compareAndSetState(c, nextc))
                return nextc == 0;
        }
    }
}

当state的值为0,也就是tryReleaseShared(arg)返回true的时候,就进行如下方法计算
private void doReleaseShared() {

    for (;;) {
        Node h = head;
        if (h != null && h != tail) {
            int ws = h.waitStatus;
            if (ws == Node.SIGNAL) {
                if (!compareAndSetWaitStatus(h, Node.SIGNAL, 0))
                    continue;            // loop to recheck cases
                unparkSuccessor(h);
            }
            else if (ws == 0 &&
                     !compareAndSetWaitStatus(h, 0, Node.PROPAGATE))
                continue;                // loop on failed CAS
        }
        if (h == head)                   // loop if head changed
            break;
    }
}
很明显,前继节点已经为signal所以直接调用 unparkSuccessor()方法,进行后续节点的唤醒,await()方法阻塞释放
private void unparkSuccessor(Node node) {
    int ws = node.waitStatus;
    if (ws < 0)
        compareAndSetWaitStatus(node, ws, 0);

    Node s = node.next;
    if (s == null || s.waitStatus > 0) {
        s = null;
        for (Node t = tail; t != null && t != node; t = t.prev)
            if (t.waitStatus <= 0)
                s = t;
    }
    if (s != null)
        LockSupport.unpark(s.thread);
}
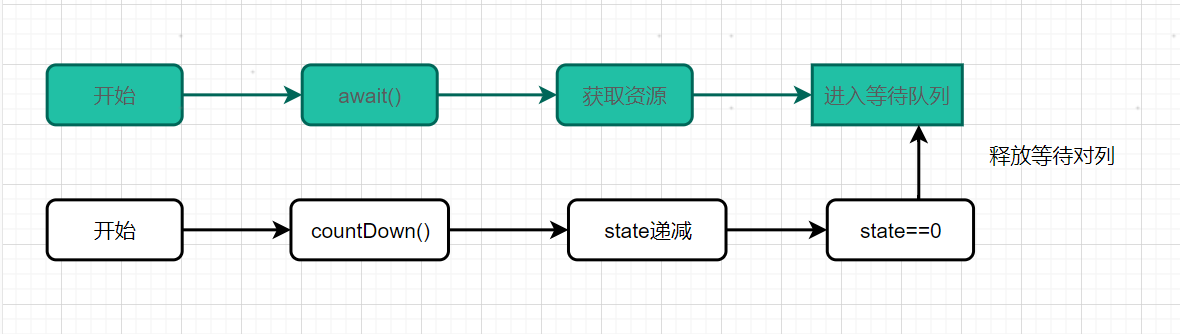
4:最后给大家来张流程图,帮助大家更好的理解

 浙公网安备 33010602011771号