nat网关高可用
背景:
最近因业务需要,需要允许内网服务器上网,因为本身没有硬件防火墙做网关,暂时只能用iptables做nat转发上网了.
直接上拓扑图,说明如下:
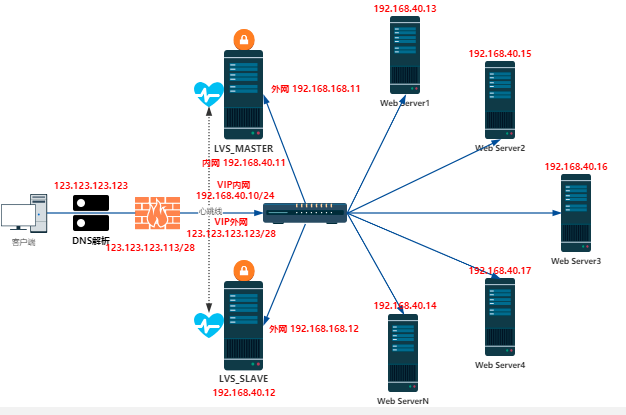
- lvs_master和lvs_slave都有两块网卡,外网卡连接上联交换机、内网卡连接内网交换机。
- lvs_master 外网卡地址:192.168.168.11/24 内网卡地址:192.168.40.11/24
- lvs_slave 外网卡地址:192.168.168.12/24 内网卡地址:192.168.40.12/24
- lvs_master和lvs_slave 需要开启iptables转发功能并做相应设置
- lvs_master和lvs_slave 需要安装并配置keepalived应用
- 所有需要上网的内网服务器都要和lvs_master和lvs_slave的内网在同一个网络内并且默认路由都配置为 内网的vip地址:192.168.40.10
开始搞:
1、以上1、2、3 不做说明。
2、4步骤
echo 1 > /proc/sys/net/ipv4/ip_forward
iptables -t nat -A POSTROUTING -o eth0 ! -d 192.168.168.0/24 -p tcp --syn -j LOG --log-level 5 --log-prefix "IPTABLES SNAT: "
iptables -A FORWARD -s 192.168.40.0/24 -j ACCEPT
iptables  -A FORWARD -d 192.168.40.0/24 -j ACCEPT
iptables  -t nat -A POSTROUTING -o eth0 -s 192.168.40.0/24 ! -d 192.168.168.0/24 -j MASQUERADE
iptables  -t nat -A POSTROUTING -o eth0 -s 192.168.168.0/24 ! -d 192.168.40.0/24 -j MASQUERADE
3、5步骤 安装并配置keepalived
tar -zxvf keepalived-1.3.5.tar.gz
cd keepalived-1.3.5
./configure --prefix=/usr/local/keepalived-1.3.5 --with-kernel-dir=/usr/src/linux --enable-profile --enable-snmp --enable-snmp-vrrp --
enable-snmp-rfcv2 --enable-snmp-rfcv3
make && make install
ln -s /usr/local/keepalived-1.3.5 /usr/local/keepalived
master配置keepalived
[root@gw-master keepalived]# more keepalived.conf
! Configuration File for Keepalived

! ---------------------------------------------------------------------------
! GLOBAL
! ---------------------------------------------------------------------------

global_defs {
	! this is who emails will go to on alerts
	notification_email {
		email@126.com
		! add a few more email addresses here if you would like
	}
	notification_email_from wx@126.com

	! mail relay server
	smtp_server 127.0.0.1
	smtp_connect_timeout 30

	! each load balancer should have a different ID
	! this will be used in SMTP alerts, so you should make
	! each router easily identifiable
	router_id LVS_151
	vrrp_mcast_group4 224.0.0.18
	lvs_sync_daemon eth1 VI1_LVS_GW
	script_user root
}

vrrp_instance VI1_LVS_NAT_GW {

	state MASTER
	interface eth1

	track_interface {
		eth0
		eth1
	}

	! interface to run LVS sync daemon on

	! lvs_sync_daemon_interface eth1

	!mcast_src_ip 192.168.40.11

	! each virtual router id must be unique per instance name!

	virtual_router_id 10

	! MASTER and BACKUP state are determined by the priority
	! even if you specify MASTER as the state, the state will
	! be voted on by priority (so if your state is MASTER but your
	! priority is lower than the router with BACKUP, you will lose
	! the MASTER state)
	! I make it a habit to set priorities at least 50 points apart
	! note that a lower number is lesser priority - lower gets less vote

	priority 100

	! how often should we vote, in seconds?

	advert_int 1

	! send an alert when this instance changes state from MASTER to BACKUP

	smtp_alert

	! this authentication is for syncing between failover servers
	! keepalived supports PASS, which is simple password
	! authentication or AH, which is the IPSec authentication header.
	! Don't use AH yet as many people have reported problems with it

	authentication {
		auth_type PASS
		auth_pass xzliveVw
	}

	! these are the IP addresses that keepalived will setup on this
	! machine. Later in the config we will specify which real
	! servers  are behind these IPs without this block, keepalived
	! will not setup and takedown any IP addresses

	virtual_ipaddress {
		123.123.123.123/28 dev eth0
		192.168.40.10/24 dev eth1
	}
	notify_master "/etc/keepalived/keepalived_gw_route master"
	notify_backup "/etc/keepalived/keepalived_gw_route backup"
}
slave配置keepalived
[root@gw-slave keepalived]# more keepalived.conf
! Configuration File for Keepalived

! ---------------------------------------------------------------------------
! GLOBAL
! ---------------------------------------------------------------------------

global_defs {
	! this is who emails will go to on alerts
	notification_email {
		email@126.com
		! add a few more email addresses here if you would like
	}
	notification_email_from wx@126.com

	! mail relay server
	smtp_server 127.0.0.1
	smtp_connect_timeout 30

	! each load balancer should have a different ID
	! this will be used in SMTP alerts, so you should make
	! each router easily identifiable
	router_id LVS_151
	vrrp_mcast_group4 224.0.0.18
	lvs_sync_daemon eth1 VI1_LVS_GW
	script_user root
}

vrrp_instance VI1_LVS_NAT_GW {

	state MASTER
	interface eth1

	track_interface {
		eth0
		eth1
	}

	! interface to run LVS sync daemon on

	! lvs_sync_daemon_interface eth1

	!mcast_src_ip 192.168.40.12

	! each virtual router id must be unique per instance name!

	virtual_router_id 10

	! MASTER and BACKUP state are determined by the priority
	! even if you specify MASTER as the state, the state will
	! be voted on by priority (so if your state is MASTER but your
	! priority is lower than the router with BACKUP, you will lose
	! the MASTER state)
	! I make it a habit to set priorities at least 50 points apart
	! note that a lower number is lesser priority - lower gets less vote

	priority 90

	! how often should we vote, in seconds?

	advert_int 1

	! send an alert when this instance changes state from MASTER to BACKUP

	smtp_alert

	! this authentication is for syncing between failover servers
	! keepalived supports PASS, which is simple password
	! authentication or AH, which is the IPSec authentication header.
	! Don't use AH yet as many people have reported problems with it

	authentication {
		auth_type PASS
		auth_pass xzliveVw
	}

	! these are the IP addresses that keepalived will setup on this
	! machine. Later in the config we will specify which real
	! servers  are behind these IPs without this block, keepalived
	! will not setup and takedown any IP addresses

	virtual_ipaddress {
		123.123.123.123/28 dev eth0
		192.168.40.10/24 dev eth1
	}
	notify_master "/etc/keepalived/keepalived_gw_route master"
	notify_backup "/etc/keepalived/keepalived_gw_route backup"
}
主从切换执行脚本
[root@gw-master keepalived]# more keepalived_gw_route
#! /bin/bash
#
# keepalived_gw_route       Bring add/del gw/route for keepalived
#
# chkconfig: 2345 15 85
# description: Add/Delete iptables rule for keepalived to start at boot time.
#
### BEGIN INIT INFO
# Provides: $keepalived_gw_route
### END INIT INFO

# Source function library.
. /etc/init.d/functions

INTER_GW=123.123.123.113
INTRA_GW=192.168.40.10
INTER_DEV=eth0
INTRA_DEV=eth1


# ---------
# functions
# ---------

message() { echo -e "$@"; }        # message - output message on stdout
error() { echo -e "$@" >&2; }      # error - output message on stderr
die() { error "$@"; exit 1; }   # die - output message on stderr and exit

TO_INTER_GW()
{
	ip route del default
	ip route add default via ${INTER_GW} dev ${INTER_DEV}
}

TO_INTRA_GW()
{
	ip route del default
	ip route add default via ${INTRA_GW} dev ${INTRA_DEV}
}

status() {
	ip route show
}

case "$1" in
        to_inter_gw)
                TO_INTER_GW
        ;;
	to_intra_gw)
		TO_INTRA_GW
	;;
        status)
                status
        ;;
        *)
                echo $"Usage: $0 {to_inter_gw|to_intra_gw|status}"
                exit 1
esac

exit 0
4、其他服务器上配置默认路由
ip route add default via 192.168.40.10
验证并测试:
1、master、slave上启动keepalived后,查看主从状态以及vip状态是否正常。
2、切换主从后是否正常
3、其他服务器上访问外网是否正常 或者 curl “ipinfo.io/ip” 显示的IP地址是否 123.123.123.123
配置完成。内网服务器可以愉快的上网了。
wx@126.com

 浙公网安备 33010602011771号