2、[MLIR] 转换流程详解(以Toy接入为例)
参考资料:
[MLIR] 转换流程详解(以Toy接入为例) - 知乎 (zhihu.com)
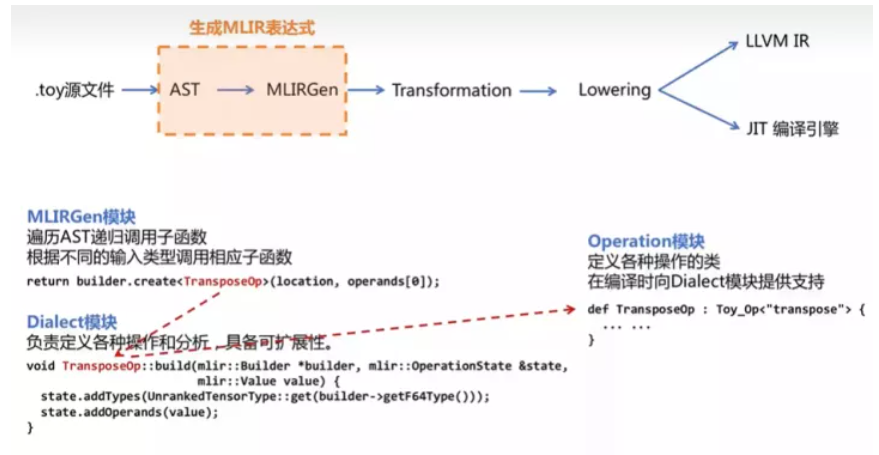
在本文中我们使用 toy 语言接入 MLIR,最终转化为 LLVM IR (或目标代码)为例,来讲解 MLIR 的转换流程。具体的流程如下:
.toy 源文件 → AST → MLIRGen(遍历AST生成MLIR表达式) → Transformation(变形消除冗余) → Lowering → LLVM IR / JIT 编译引擎
1. Toy接入MLIR
本节对应 Chapter 2: Emitting Basic MLIR - MLIR (llvm.org)
1.1 Toy源码和AST
def multiply_transpose(a, b){
    return transpose(a) * transpose(b);
}
def main() {
  var a<2, 3> = [[1, 2, 3], [4, 5, 6]];
  var b<2, 3> = [1, 2, 3, 4, 5, 6];
  var c = multiply_transpose(a, b);
  print(c);
}
原toy教程的第一节生成ast的指令如下:
cd llvm-project/build/bin
./toyc-ch1 ../../mlir/test/Examples/Toy/Ch1/ast.toy --emit=ast
编译得到的AST如下
Module:
  Function
    Proto 'multiply_transpose' @test/Examples/Toy/Ch1/ast.toy:4:1'
    Params: [a, b]
    Block {
      Return
        BinOp: * @test/Examples/Toy/Ch1/ast.toy:5:25
          Call 'transpose' [ @test/Examples/Toy/Ch1/ast.toy:5:10
            var: a @test/Examples/Toy/Ch1/ast.toy:5:20
          ]
          Call 'transpose' [ @test/Examples/Toy/Ch1/ast.toy:5:25
            var: b @test/Examples/Toy/Ch1/ast.toy:5:35
          ]
    } // Block
    ... // main函数的ast未写出
1.2 生成(未优化)MLIR表达式

MLIRGen 模块会遍历 AST ,递归调用子函数,构建 operation。operation 是 dialect 中重要的组成元素,用来表示 dialect 中的某个操作,一个 dialect 中可以有很多的 operation。
mlir::Value mlirGen(CallExperAST &call)
{
    llvm::StringRef callee = call.getCallee();
    auto location = loc(call.loc());

    SmallVector<mlir::Value, 4> operands;
    for(auto &expr:call.getArgs()){
        auto arg = mlirGen(*expr); // 递归调用
        if(!arg)
            return nullptr;
        operands.push_back(arg);
    }

    if(callee == "transpose"){
        if(call.getArgs().size() != 1){
            emitError(location, "MLIR codegen encountered an error: toy.transpose does not accept multiple arguments");
            return nullptr;
        }
        return bulider.creater<TransposeOp>(location, operands[0]);
    }
    ...
}
创建好的节点 operation 还没有输入参数等定义,Toy Dialect 模块负责定义各种操作和分析。(Toy Dialect 继承自 mlir::Dialect,并注册了属性、操作和数据类型等)
Toy Dialect 模块的创建 见 MLIR初识 —— Dialect及Operation详解的 "3. 创建新的dialect"
// TransposeOp
void TransposeOp::build(mlir::OpBuilder &builder, mlir::OperationState &state, mlir::Value value){
    state.addTypes(UnrankedTensorType::get(bulider.getF64Type()));
    state.addOperands(value);
}
根据 ast 中的节点,生成的一系列 operations 最终组成 MLIR 表达式。(去除了loc的信息)
原toy教程的第一节生成MLIR 表达式的指令如下:
cd llvm-project/build/bin
./toyc-ch2 ../../mlir/test/Examples/Toy/Ch2/codegen.toy -emit=mlir -mlir-print-debuginfo
# 由toy ast 生成 MLIR 表达式
module{
  func @multiply_transpose(%arg0: tensor<*xf64>, %arg1: tensor<*xf64>) -> tensor<*xf64> {
    %0 = "toy.transpose"(%arg0): (tensor<*xf64>) -> tensor<*xf64>
    %1 = "toy.transpose"(%arg1): (tensor<*xf64>) -> tensor<*xf64>
    %2 = "toy.mul"(%0, %1): (tensor<*xf64>, tensor<*xf64>) -> tensor<*xf64>
    "toy.return"(%2): (tensor<*xf64>) -> ()
  }
  func @main(){
    %0 = "toy.constant"() {value = dense<[[1.000000e+00, 2.000000e+00, 3.000000e+00], [4.000000e+00, 5.000000e+00, 6.000000e+00]]> : tensor<2x3xf64>} : () -> tensor<2x3xf64>
    %1 = "toy.reshape"(%0) : (tensor<2x3xf64>) -> tensor<2x3xf64>
    %2 = "toy.constant"() {value = dense<[1.000000e+00, 2.000000e+00, 3.000000e+00, 4.000000e+00, 5.000000e+00, 6.000000e+00]> : tensor<6xf64>} : () -> tensor<6xf64>
    %3 = "toy.reshape"(%2) : (tensor<6xf64>) -> tensor<2x3xf64>
    %4 = "toy.generic_call"(%1, %