

kickstart自动化安装RHEL8系统
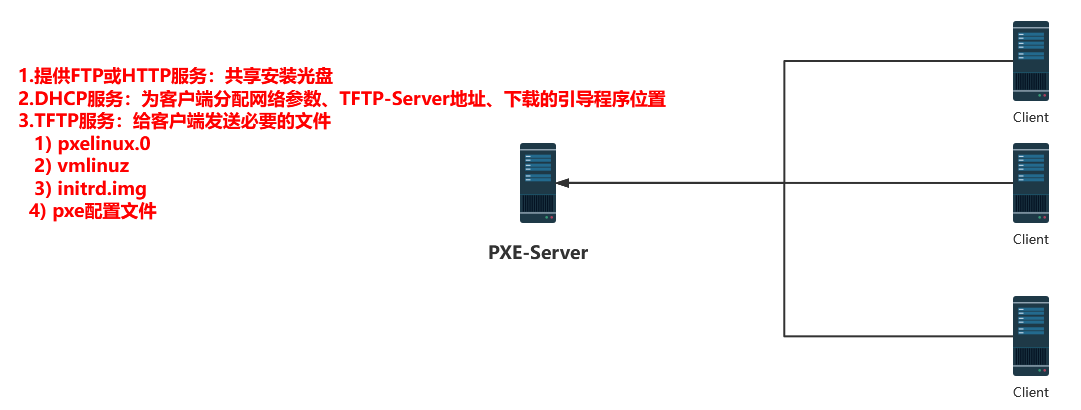
1.拓扑预览
2.实验过程
server端
-
ftp服务或http服务:server端通过ftp服务或http服务将光盘共享出去
-
dhcp服务:server端还需要安装DHCP服务,给客户端分配IP地址掩码网关、tftp-server的地址、以及我要下载的引导程序是哪个
-
tftp服务:通过tftp服务给客户端传输文件pxelinux.0、vmlinuz、initrd.img、pxe的配置文件
- pxe配置文件作用:设置引导程序的参数、指定要启动的内核vmlinuz、initrd.img(它是一个最小化的Linux系统)、给内核增加参数、指定ks配置文件
- pxe配置文件存放位置:/var/lib/tftpboot/pxelinux.cfg目录下,这个目录需要手动创建
- pxe配置文件从光盘中拷贝出来的
cp /mnt/isolinux/isolinux.cfg /var/lib/tftpboot/pxelinux.cfg/default
client端
- 客户端通过网络启动,发送DHCP请求,服务端给其分配IP地址等参数以及tftp地址、引导程序pxelinux.0的位置
- 客户端拿到IP地址之后,会去服务端下载引导程序pxelinux.0,然后运行引导程序
- 注意:这个地址是用于临时安装系统的地址,系统安装完成后此地址会被释放。
- 从服务端获取pxe配置文件,根据pxe配置文件引导安装、下载vmlinuz以及initrd.img
- 在内存中加载vmlinuz和initrd.img
- 根据pxe配置文件去下载kickstart应答文件
- 根据kickstart应答文件里面配置的url路径找到安装路径ISO并进行系统的安装
- 在安装系统的过程中,根据kickstart里面配置的脚本对系统自动进行配置
注意事项:如果使用vmwareworkstations做实验的话,需要关闭它提供的dhcp服务,否则可能会与本实验产生冲突。
- “虚拟网络编辑器” ==> 取消勾选 “使用本地DHCP服务将IP地址分配给虚拟机”
实验过程
- 第一阶段:网络引导
# 1.目前ftp服务已经配置好了
# 2.配置dhcp服务
[root@server1 ~]# yum install -y dhcp-server
# 将dhcp模板文件覆盖dhcp的配置文件
[root@server1 ~]# cat /usr/share/doc/dhcp-server/dhcpd.conf.example > /etc/dhcp/dhcpd.conf
[root@server1 ~]# vim /etc/dhcp/dhcpd.conf
# 注意:结束要加分号 ;
subnet 192.168.26.0 netmask 255.255.255.0 {
range 192.168.26.150 192.168.26.180;
option domain-name-servers 223.5.5.5;
option domain-name "example.com";
option routers 192.168.26.254;
option broadcast-address 192.168.26.255;
default-lease-time 600;
max-lease-time 7200;
# 配置tftp-server的IP地址以及pxelinux.0引导程序的位置
next-server 192.168.26.110;
# 注意:此处的 / 并不是系统的根,而是tftp-server的根:/var/lib/tftpboot 这个目录
filename "/pxelinux.0";
# 启动DHCP服务
[root@server1 ~]# systemctl enable dhcpd --now
# 如果防火墙是开启状态的话,需要放行dhcp服务
# 使其当前生效,重启也生效。
[root@server1 ~]# firewall-cmd --add-service=dhcp
[root@server1 ~]# firewall-cmd --add-service=dhcp --permanent
# 3.安装tftp-server
[root@server1 ~]# yum whatprovides "*/pxelinux.0"
# syslinux-tftpboot.noarch 这个包就包含了pxelinux.0文件
[root@server1 ~]# yum install -y tftp-server syslinux-tftpboot.noarch
[root@server1 ~]# systemctl enable tftp --now
[root@server1 ~]# cd /var/lib/tftpboot/
[root@server1 tftpboot]# cp /tftpboot/* ./
# pxelinux.0文件目前已经是在tftp的根目录了,客户端可以找到,但是还缺少vmlinuz和initrd,这两个文件在光盘中,我们可以去光盘中找
[root@server1 tftpboot]# mount /dev/cdrom /mnt/
[root@server1 tftpboot]# cd /mnt/images/pxeboot/
[root@server1 pxeboot]# cp initrd.img vmlinuz /var/lib/tftpboot/
# 4.创建pxe配置文件目录
[root@server1 pxeboot]# mkdir /var/lib/tftpboot/pxelinux.cfg
[root@server1 pxeboot]# cd /var/lib/tftpboot/pxelinux.cfg
# 从光盘中拷贝出该文件并进行相应的修改
[root@server1 pxelinux.cfg]# cp /mnt/isolinux/isolinux.cfg ./default
[root@server1 pxelinux.cfg]# chmod u+w default
# 可以先给这些文件改个名字,增加辨识度
[root@server1 pxelinux.cfg]# cd /var/lib/tftpboot/
[root@server1 tftpboot]# mv vmlinuz rhel8-vmlinuz
[root@server1 tftpboot]# mv initrd.img rhel8-initrd.img
# pxelinux.0 这个文件可以将 rhel8-vmlinuz、rhel8-initrd.img 这两个文件加载起来,但是它怎么是加载这两个文件呢? 需要我们 在pxe配置文件中指定
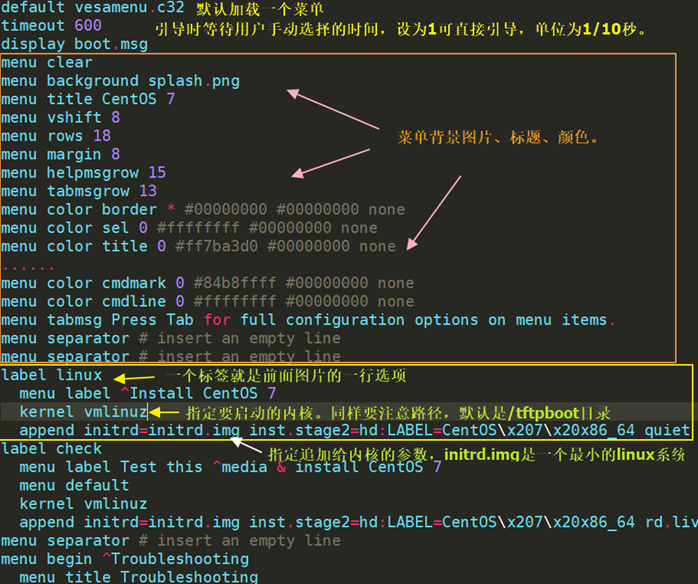
[root@server1 tftpboot]# vim pxelinux.cfg/default
# 指定默认安装的label
# 这里要对应我们在下面设置的 label
default rhel8
timeout 600
display boot.msg
# Clear the screen when exiting the menu, instead of leaving the menu displayed.
# For vesamenu, this means the graphical background is still displayed without
# the menu itself for as long as the screen remains in graphics mode.
menu clear
menu background splash.png
menu title Red Hat Enterprise Linux 8.4
menu vshift 8
menu rows 18
menu margin 8
#menu hidden
menu helpmsgrow 15
menu tabmsgrow 13
# Border Area
menu color border * #00000000 #00000000 none
# Selected item
menu color sel 0 #ffffffff #00000000 none
# Title bar
menu color title 0 #ff7ba3d0 #00000000 none
# Press [Tab] message
menu color tabmsg 0 #ff3a6496 #00000000 none
# Unselected menu item
menu color unsel 0 #84b8ffff #00000000 none
# Selected hotkey
menu color hotsel 0 #84b8ffff #00000000 none
# Unselected hotkey
menu color hotkey 0 #ffffffff #00000000 none
# Help text
menu color help 0 #ffffffff #00000000 none
# A scrollbar of some type? Not sure.
menu color scrollbar 0 #ffffffff #ff355594 none
# Timeout msg
menu color timeout 0 #ffffffff #00000000 none
menu color timeout_msg 0 #ffffffff #00000000 none
# Command prompt text
menu color cmdmark 0 #84b8ffff #00000000 none
menu color cmdline 0 #ffffffff #00000000 none
# Do not display the actual menu unless the user presses a key. All that is displayed is a timeout message.
menu tabmsg Press Tab for full configuration options on menu items.
menu separator # insert an empty line
menu separator # insert an empty line
# 在不同的label中可以安装不同的系统
# 要与第一行的default对应
label rhel8
menu label ^Install Red Hat Enterprise Linux 8.4
# 客户端会到/var/lib/tftpboot这个目录中查找对应的文件,如果改了名字,这里也要改
# 如果是安装RHEL7或者RHEL6系统的话,这两个文件换成对应系统版本的文件就好了
kernel rhel8-vmlinuz
# inst. 指定安装系统的文件
# (第一阶段)未使用无人值守时,光盘测试时用的repo文件【取消该阶段的注释就行了】
#append initrd=rhel8-initrd.img inst.repo=ftp://192.168.26.110/dvd quiet
# (第二阶段)使用无人值守时指定应答文件【取消该阶段的注释就行了】
#append initrd=rhel8-initrd.img inst.ks=ftp://192.168.26.110/ks.cfg quiet
label check
menu label Test this ^media & install Red Hat Enterprise Linux 8.4
menu default
kernel vmlinuz
append initrd=initrd.img inst.stage2=hd:LABEL=RHEL-8-4-0-BaseOS-x86_64 rd.live.check quiet
menu separator # insert an empty line
# utilities submenu
menu begin ^Troubleshooting
menu title Troubleshooting
label vesa
menu indent count 5
menu label Install Red Hat Enterprise Linux 8.4 in ^basic graphics mode
text help
Try this option out if you're having trouble installing
Red Hat Enterprise Linux 8.4.
endtext
kernel vmlinuz
append initrd=initrd.img inst.stage2=hd:LABEL=RHEL-8-4-0-BaseOS-x86_64 nomodeset quiet
label rescue
menu indent count 5
menu label ^Rescue a Red Hat Enterprise Linux system
text help
If the system will not boot, this lets you access files
and edit config files to try to get it booting again.
endtext
kernel vmlinuz
append initrd=initrd.img inst.stage2=hd:LABEL=RHEL-8-4-0-BaseOS-x86_64 rescue quiet
label memtest
menu label Run a ^memory test
text help
If your system is having issues, a problem with your
system's memory may be the cause. Use this utility to
see if the memory is working correctly.
endtext
kernel memtest
menu separator # insert an empty line
label local
menu label Boot from ^local drive
localboot 0xffff
menu separator # insert an empty line
menu separator # insert an empty line
label returntomain
menu label Return to ^main menu
menu exit
menu end
[root@server1 tftpboot]# systemctl restart tftp
# 如果防火墙是开启状态的话,需要放行tftp服务
[root@server1 ~]# firewall-cmd --add-service=tftp
[root@server1 ~]# firewall-cmd --add-service=tftp --permanent
接下来可以创建虚拟机测试是否可以进行网络引导。
- 第二阶段:无人值守自动化安装系统
- 需要创建kickstart应答文件
- 如果只提供网络引导,手动安装系统,可以不使用kickstart文件
# anaconda-ks.cfg这个应答文件是我们安装系统的时候生成的,我们可以在此基础上进行更改
[root@server1 ~]# ls
anaconda-ks.cfg  createuser.sh  initial-setup-ks.cfg  rhel-server-7.1-x86_64-dvd.iso  userdel.sh
[root@server1 ~]# cp anaconda-ks.cfg ks.cfg

# 1.修改应答文件
[root@server1 ~]# vim ks.cfg
#version=RHEL8
# Use graphical install

# 图形界面安装
graphical

# text :字符界面安装

# 这一行是从光盘里面读取的,注释掉
# repo --name="AppStream" --baseurl=file:///run/install/sources/mount-0000-cdrom/AppStream

# 需要安装哪些软件包
%packages
# @^graphical-server-environment
# @guest-agents
# kexec-tools
@core	# 最小化安装

%end

# 系统安装完后自动重启,如果想让系统安装完后关机,此处就写 poweroff
reboot
# poweroff

# Keyboard layouts
keyboard --xlayouts='us'
# System language
lang en_US.UTF-8 --addsupport=zh_CN.UTF-8

# Network information
# 网络配置
network  --bootproto=dhcp --activate
# 主机名配置
network  --hostname=ks-test

# Use CDROM installation media
#cdrom
url --url="ftp://192.168.26.110/dvd"

# Run the Setup Agent on first boot
#firstboot --enable

ignoredisk --only-use=sda
# Partition clearing information
clearpart --none --initlabel
# Disk partitioning information
part / --fstype="xfs" --ondisk=sda --size=6440
part swap --fstype="swap" --ondisk=sda --size=2096

# System timezone
timezone Asia/Shanghai --isUtc --nontp

# Root password
rootpw --iscrypted $6$2.XUPq0u45NqZNv8$cXXOuFSCigvwVQkw3uPe6ejD/FxTepJ4Uy5bqtsJmdTQEYZKbNsaoHVDqq11PkHFG0DuIQR2ZRkznaiwRn.gs1
user --name=waken --password=$6$BWZwqe344ErAJwsY$BTcT.dPIjLNVwD6EvA1VwLEqwCkIgzklPiohp2QnbqXMIZgSWDXEh6h0HwhU61ZgTxKrV66arp9QkNsZ8svFd1 --iscrypted --gecos="waken"

%addon com_redhat_kdump --enable --reserve-mb='auto'

%end


# 2.修改此文件的权限,让其他人也能访问到
[root@server1 ~]# chmod 644 ks.cfg

# 3.将此文件拷贝到ftp的根目录
# 后面需要在pxe的配置文件中指定此文件
[root@server1 ~]# cp ks.cfg /var/ftp/

# 4.编辑pxe的配置文件,指定应答文件的位置
[root@server1 ~]# vim /var/lib/tftpboot/pxelinux.cfg/default
# 参见“RH134-pxe配置文件”
append initrd=rhel8-initrd.img inst.ks=ftp://192.168.26.110/ks.cfg quiet

[root@server1 ~]# systemctl restart tftp

# 5.创建虚拟机测试开始无人值守测试
3.pxe配置文件和ks配置文件详解
3.1 这两个文件的作用以及存放位置
pxe的配置文件用于从网络引导系统启动
- 该文件用于指定vmlinuz位置、initrd.img位置、ks配置文件的位置、自定义内核参数
- vmlinuz和initrd.img这两个文件位于安装光盘中的 images/pxeboot 目录中
- 文件位置:位于安装光盘中的
isolinux目录,名为isolinux.cfg的文件
ks配置文件用于自动化安装系统,如果只提供网络引导,手动安装,可以不使用kickstart文件
- 该文件用于指定安装光盘位置、需要安装的软件包、在安装过程中需要配置的各种参数(如磁盘、网络、主机名、时区等等)
- 文件位置:每安装好一台Centos机器,Centos安装程序都会创建一个kickstart配置文件,名字叫anaconda-ks.cfg位于
/root/anaconda-ks.cfg,记录真实安装配置。
3.2 pxe配置文件
# 指定默认安装的label
# 这里要对应我们在下面设置的 label
default rhel8
timeout 600

display boot.msg

# Clear the screen when exiting the menu, instead of leaving the menu displayed.
# For vesamenu, this means the graphical background is still displayed without
# the menu itself for as long as the screen remains in graphics mode.
menu clear
menu background splash.png
menu title Red Hat Enterprise Linux 8.4
menu vshift 8
menu rows 18
menu margin 8
#menu hidden
menu helpmsgrow 15
menu tabmsgrow 13

# Border Area
menu color border * #00000000 #00000000 none

# Selected item
menu color sel 0 #ffffffff #00000000 none

# Title bar
menu color title 0 #ff7ba3d0 #00000000 none

# Press [Tab] message
menu color tabmsg 0 #ff3a6496 #00000000 none

# Unselected menu item
menu color unsel 0 #84b8ffff #00000000 none

# Selected hotkey
menu color hotsel 0 #84b8ffff #00000000 none

# Unselected hotkey
menu color hotkey 0 #ffffffff #00000000 none

# Help text
menu color help 0 #ffffffff #00000000 none

# A scrollbar of some type? Not sure.
menu color scrollbar 0 #ffffffff #ff355594 none

# Timeout msg
menu color timeout 0 #ffffffff #00000000 none
menu color timeout_msg 0 #ffffffff #00000000 none

# Command prompt text
menu color cmdmark 0 #84b8ffff #00000000 none
menu color cmdline 0 #ffffffff #00000000 none

# Do not display the actual menu unless the user presses a key. All that is displayed is a timeout message.

menu tabmsg Press Tab for full configuration options on menu items.

menu separator # insert an empty line
menu separator # insert an empty line

# 在不同的label中可以安装不同的系统
# 要与第一行的default对应
label rhel8
  menu label ^Install Red Hat Enterprise Linux 8.4
# 客户端会到/var/lib/tftpboot这个目录中查找对应的文件,如果改了名字,这里也要改
# 如果是安装RHEL7或者RHEL6系统的话,这两个文件换成对应系统版本的文件就好了
  kernel rhel8-vmlinuz
# inst. 指定安装系统的文件
  # (第一阶段)未使用无人值守时,光盘测试时用的repo文件【取消该阶段的注释就行了】
  #append initrd=rhel8-initrd.img inst.repo=ftp://192.168.26.110/dvd quiet
  # (第二阶段)使用无人值守时指定应答文件【取消该阶段的注释就行了】
  #append initrd=rhel8-initrd.img inst.ks=ftp://192.168.26.110/ks.cfg quiet

label check
  menu label Test this ^media & install Red Hat Enterprise Linux 8.4
  menu default
  kernel vmlinuz
  append initrd=initrd.img inst.stage2=hd:LABEL=RHEL-8-4-0-BaseOS-x86_64 rd.live.check quiet

menu separator # insert an empty line

# utilities submenu
menu begin ^Troubleshooting
  menu title Troubleshooting

label vesa
  menu indent count 5
  menu label Install Red Hat Enterprise Linux 8.4 in ^basic graphics mode
  text help
	Try this option out if you're having trouble installing
	Red Hat Enterprise Linux 8.4.
  endtext
  kernel vmlinuz
  append initrd=initrd.img inst.stage2=hd:LABEL=RHEL-8-4-0-BaseOS-x86_64 nomodeset quiet

label rescue
  menu indent count 5
  menu label ^Rescue a Red Hat Enterprise Linux system
  text help
	If the system will not boot, this lets you access files
	and edit config files to try to get it booting again.
  endtext
  kernel vmlinuz
  append initrd=initrd.img inst.stage2=hd:LABEL=RHEL-8-4-0-BaseOS-x86_64 rescue quiet

label memtest
  menu label Run a ^memory test
  text help
	If your system is having issues, a problem with your
	system's memory may be the cause. Use this utility to
	see if the memory is working correctly.
  endtext
  kernel memtest

menu separator # insert an empty line

label local
  menu label Boot from ^local drive
  localboot 0xffff

menu separator # insert an empty line
menu separator # insert an empty line

label returntomain
  menu label Return to ^main menu
  menu exit

menu end
3.3 kickstart应答文件(ks.cfg)
#version=RHEL8
# Use graphical install

# 图形界面安装
graphical

# text :字符界面安装

# 这一行是从光盘里面读取的,注释掉
# repo --name="AppStream" --baseurl=file:///run/install/sources/mount-0000-cdrom/AppStream

# 需要安装哪些软件包
%packages
# @^graphical-server-environment
# @guest-agents
# kexec-tools
@core	# 最小化安装

%end

# 系统安装完后自动重启,如果想让系统安装完后关机,此处就写 poweroff
reboot
# poweroff

# Keyboard layouts
keyboard --xlayouts='us'
# System language
lang en_US.UTF-8 --addsupport=zh_CN.UTF-8

# Network information
# 网络配置
network  --bootproto=dhcp --activate
# 主机名配置
network  --hostname=ks-test

# Use CDROM installation media
#cdrom
url --url="ftp://192.168.26.110/dvd"

# Run the Setup Agent on first boot
#firstboot --enable

ignoredisk --only-use=sda
# Partition clearing information
clearpart --none --initlabel
# Disk partitioning information
part / --fstype="xfs" --ondisk=sda --size=6440
part swap --fstype="swap" --ondisk=sda --size=2096

# System timezone
timezone Asia/Shanghai --isUtc --nontp

# Root password
rootpw --iscrypted $6$2.XUPq0u45NqZNv8$cXXOuFSCigvwVQkw3uPe6ejD/FxTepJ4Uy5bqtsJmdTQEYZKbNsaoHVDqq11PkHFG0DuIQR2ZRkznaiwRn.gs1
user --name=waken --password=$6$BWZwqe344ErAJwsY$BTcT.dPIjLNVwD6EvA1VwLEqwCkIgzklPiohp2QnbqXMIZgSWDXEh6h0HwhU61ZgTxKrV66arp9QkNsZ8svFd1 --iscrypted --gecos="waken"

%addon com_redhat_kdump --enable --reserve-mb='auto'

%end
3.4 pxe配置文件详解
egrep -v "^$|^#" /var/lib/tftpboot/pxelinux.cfg/default
最精简default配置文件(pxe配置文件)
[root@server1 ~]# vim /var/lib/tftpboot/pxelinux.cfg/default
default ks
prompt 0
label ks
  kernel vmlinuz
  append initrd=initrd.img inst.repo=http://172.16.1.201/ks_config/CentOS7-ks.cfg net.ifnames=0 biosdevname=0 ksdevice=eth1

#inst.repo告诉安装程序ks.cfg文件在哪里
#net.ifnames=0 biosdevname=0修改内核参数,达到更改网卡名的目的
#ksdevice=eth1当客户端有多块网卡的时候,指定从eth1安装,避免交互。
3.5 ks.cfg详解
3.5.1 ks文件组成
-
命令段
键盘类型,语言,安装方式等系统的配置,有必选项和可选项,如果缺少某项必选项,安装时会中断并提示用户选择此项的选项
-
软件包段
以%packages开头,以%end结束,在安装过程中默认安装的软件包,安装软件时会自动分析依赖关系。
@groupname:指定安装的包组
package_name:指定安装的包
-package_name:指定不安装的包
-
脚本段(可选)
以%post开头,以%end结束,在安装完系统之后执行的相关Linux命令、脚本
以%pre开头,以%end结束,在安装完系统之前执行的相关Linux命令、脚本
3.5.2 关键字含义说明
- 开始部分
# Kickstart Configurator for CentOS 7 by NOAH LUO
install
告知安装程序,这是一次全新安装,而不是升级upgrade。
- 安装源部分
url --url="http://10.0.0.7/CentOS-6.7/"
url --url ftp://<username>:<password>@<server>/<dir>
nfs --server=nfsserver.example.com --dir=/tmp/install-tree
通过FTP或HTTP或NFS从远程服务器上的安装树中安装。任选一即可
- 模式语言键盘等
text		使用文本模式安装。
lang en_US.UTF-8		设置在安装过程中使用的语言以及系统的缺省语言。
keyboard us	设置系统键盘类型。
zerombr	清除mbr引导信息。
- bootloader 系统引导配置
bootloader --location=mbr --driveorder=sda --append="crashkernel=auto rhgb quiet"
--location		指定引导记录被写入的位置.有效的值如下:mbr(缺省),partition,none。
--driveorder	指定在BIOS引导顺序中居首的驱动器。
--append=		指定内核参数.要指定多个参数,使用空格分隔它们。
- network网络配置[客户机]
network --bootproto=dhcp --device=eth0 --onboot=yes --noipv6 --hostname=CentOS7 --activate
或者
network --bootproto=static --device=eth0 --ip=10.0.0.201 --netmask=255.255.255.0 --gateway=10.0.0.201 --nameserver=10.0.0.202 --activate
network  --hostname=CentOS7
static方法要求在kickstart文件里输入所有的网络信息。

请注意所有配置信息都必须在一行上指定,或写两个newwork,不能使用反斜线来换行。
--ip=			被安装的机器的IP地址.
--gateway		IP地址格式的默认网关.
--netmask		安装的系统的子网掩码.
--hostname		安装的系统的主机名.
--onboot		是否在引导时启用该设备.
--noipv6		禁用此设备的IPv6.
--nameserver	配置dns解析.
- 时区和认证等
timezone --utc Asia/Shanghai
authconfig --enableshadow --passalgo=sha512
rootpw  --iscrypted $6$X20eRtuZhkHznTb4$dK0BJByOSA.....wJbAjVI5D6/
设置时区上海,设置认证方式,设置密码,密码非明文,用前文生成密码的方式生成
7)分区相关
clearpart --all --initlabel
--all 从系统中清除所有分区,--initlable 初始化磁盘标签
part /boot --fstype xfs --size 1024
part swap --size 1024
part / --fstype xfs --size 1 --grow
磁盘分区。
--fstype		为分区设置文件系统类型.有效的类型为ext2,ext3,swap, xfs和vfat。
--asprimary	强迫把分区分配为主分区,否则提示分区失败。
--size			以MB为单位的分区最小值.在此处指定一个整数值,如500.不加MB。
--grow			告诉分区使用所有可用空间(若有),或使用设置的最大值。
8)其他信息
firstboot --disable
selinux --disabled
firewall --disabled
logging --level=info
reboot
firstboot	负责协助配置redhat一些重要的信息。
selinux		关闭selinux。
firewall	关闭防火墙。
logging		设置日志级别。
reboot		设定安装完成后重启,也可以选择halt关机。
9)包选装
%packages
@^minimal
@compat-libraries
@debugging
@development
tree
nmap
sysstat
lrzsz
dos2unix
telnet
wget
vim
bash-completion
%end
10)安装完成后操作
%post
systemctl disable postfix.service
%end
可以调用优化脚本,对装完后的服务器进行初始优化


【推荐】国内首个AI IDE,深度理解中文开发场景,立即下载体验Trae
【推荐】编程新体验,更懂你的AI,立即体验豆包MarsCode编程助手
【推荐】抖音旗下AI助手豆包,你的智能百科全书,全免费不限次数
【推荐】轻量又高性能的 SSH 工具 IShell:AI 加持,快人一步
· 震惊!C++程序真的从main开始吗?99%的程序员都答错了
· 单元测试从入门到精通
· 【硬核科普】Trae如何「偷看」你的代码?零基础破解AI编程运行原理
· 上周热点回顾(3.3-3.9)
· winform 绘制太阳,地球,月球 运作规律