
Jax计算框架的NamedSharding的reshape —— namedsharding-gives-a-way-to-express-shardings-with-names
本篇post的主要讲解的是:
jax.device_put(x, mesh_sharding(P(('a', 'b'), None)))
与
jax.device_put(x, mesh_sharding(P(('b', 'a'), None)))
的不同:
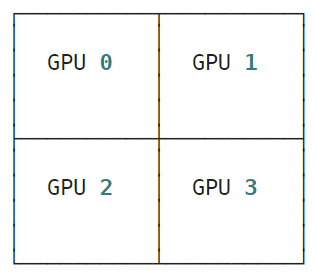
主机的四个CPU情况:
代码:
import os import functools from typing import Optional import numpy as np import jax import jax.numpy as jnp from jax.experimental import mesh_utils from jax.sharding import PositionalSharding # Create a Sharding object to distribute a value across devices: sharding = PositionalSharding(mesh_utils.create_device_mesh((4,))) # Create an array of random values: x = jax.random.normal(jax.random.PRNGKey(0), (8192, 8192)) # and use jax.device_put to distribute it across devices: y = jax.device_put(x, sharding.reshape(2, 2)) jax.debug.visualize_array_sharding(y)
运行结果:
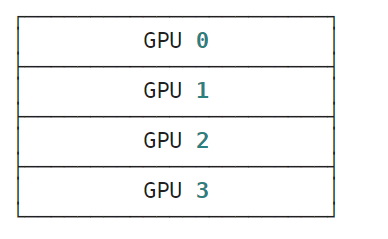
jax.device_put(x, mesh_sharding(P(('a', 'b'), None)))
代码:(行优先的方式展开GPU)
点击查看代码
from typing import Optional import jax from jax.sharding import Mesh from jax.sharding import PartitionSpec from jax.sharding import NamedSharding from jax.experimental import mesh_utils P = PartitionSpec devices = mesh_utils.create_device_mesh((2, 2)) mesh = Mesh(devices, axis_names=('a', 'b')) from jax.sharding import PositionalSharding sharding = PositionalSharding(devices) x = jax.random.normal(jax.random.PRNGKey(0), (8192, 8192)) x = jax.device_put(x, sharding.reshape(4, 1)) devices = mesh_utils.create_device_mesh((2, 2)) default_mesh = Mesh(devices, axis_names=('a', 'b')) def mesh_sharding( pspec: PartitionSpec, mesh: Optional[Mesh] = None, ) -> NamedSharding: if mesh is None: mesh = default_mesh return NamedSharding(mesh, pspec) y = jax.device_put(x, mesh_sharding(P(('a', 'b'), None))) jax.debug.visualize_array_sharding(y)
运行结果:
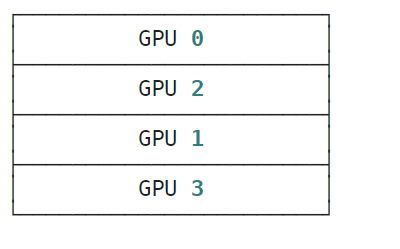
jax.device_put(x, mesh_sharding(P(('b', 'a'), None)))
代码:(列优先的方式展开GPU)
点击查看代码
from typing import Optional import jax from jax.sharding import Mesh from jax.sharding import PartitionSpec from jax.sharding import NamedSharding from jax.experimental import mesh_utils P = PartitionSpec devices = mesh_utils.create_device_mesh((2, 2)) mesh = Mesh(devices, axis_names=('a', 'b')) from jax.sharding import PositionalSharding sharding = PositionalSharding(devices) x = jax.random.normal(jax.random.PRNGKey(0), (8192, 8192)) x = jax.device_put(x, sharding.reshape(4, 1)) devices = mesh_utils.create_device_mesh((2, 2)) default_mesh = Mesh(devices, axis_names=('a', 'b')) def mesh_sharding( pspec: PartitionSpec, mesh: Optional[Mesh] = None, ) -> NamedSharding: if mesh is None: mesh = default_mesh return NamedSharding(mesh, pspec) y = jax.device_put(x, mesh_sharding(P(('b', 'a'), None))) jax.debug.visualize_array_sharding(y)
运行结果:
本博客是博主个人学习时的一些记录,不保证是为原创,个别文章加入了转载的源地址,还有个别文章是汇总网上多份资料所成,在这之中也必有疏漏未加标注处,如有侵权请与博主联系。
如果未特殊标注则为原创,遵循 CC 4.0 BY-SA 版权协议。


posted on 2024-01-07 19:22 Angry_Panda 阅读(64) 评论(0) 编辑 收藏 举报


【推荐】国内首个AI IDE,深度理解中文开发场景,立即下载体验Trae
【推荐】编程新体验,更懂你的AI,立即体验豆包MarsCode编程助手
【推荐】抖音旗下AI助手豆包,你的智能百科全书,全免费不限次数
【推荐】轻量又高性能的 SSH 工具 IShell:AI 加持,快人一步
· 分享一个免费、快速、无限量使用的满血 DeepSeek R1 模型,支持深度思考和联网搜索!
· 使用C#创建一个MCP客户端
· ollama系列1:轻松3步本地部署deepseek,普通电脑可用
· 基于 Docker 搭建 FRP 内网穿透开源项目(很简单哒)
· 按钮权限的设计及实现
2023-01-07 项目的工作核心内容
2023-01-07 项目所需技术及问题
2019-01-07 [python]自问自答:python -m参数? ( python3.7 版本 )
2019-01-07 常用增强学习实验环境 II (ViZDoom, Roboschool, TensorFlow Agents, ELF, Coach等) (转载)
2019-01-07 常用增强学习实验环境 I (MuJoCo, OpenAI Gym, rllab, DeepMind Lab, TORCS, PySC2) (转载)
2017-01-07 遗传算法,实数编码的交叉操作之SBX(模拟二进制交叉)