
盒子模型及边框使用
盒子模型及边框使用
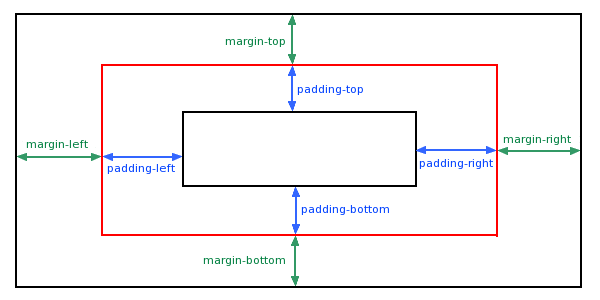
1、盒子模型
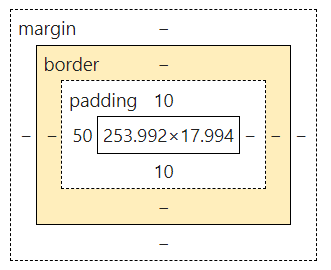
magin:外边距
padding:内边距
border:边框
2、边框
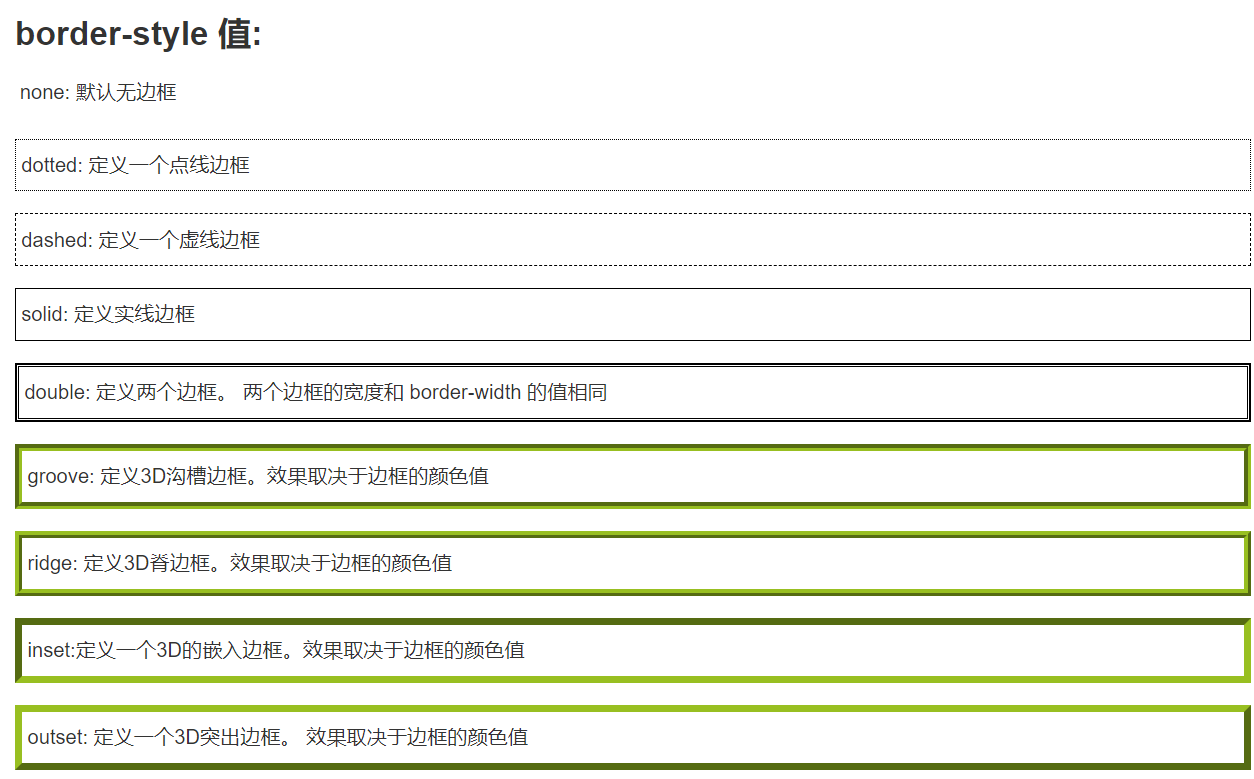
2.1 边框样式
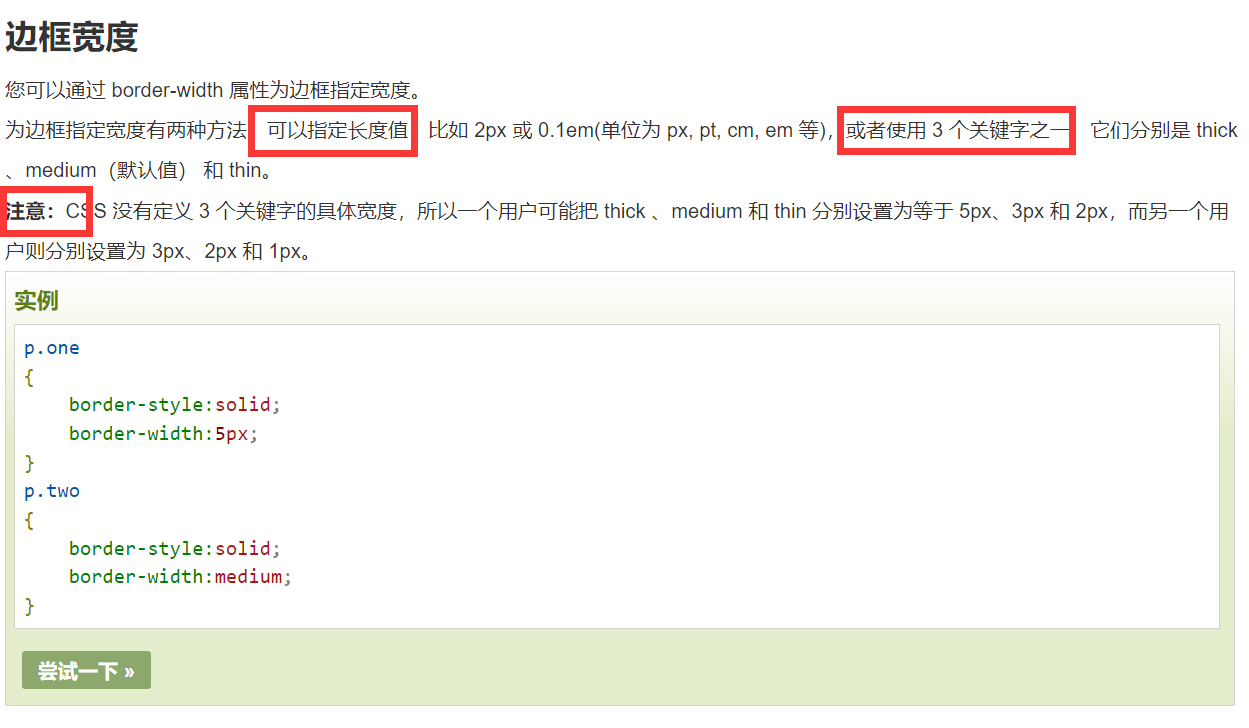
2.2 边框宽度
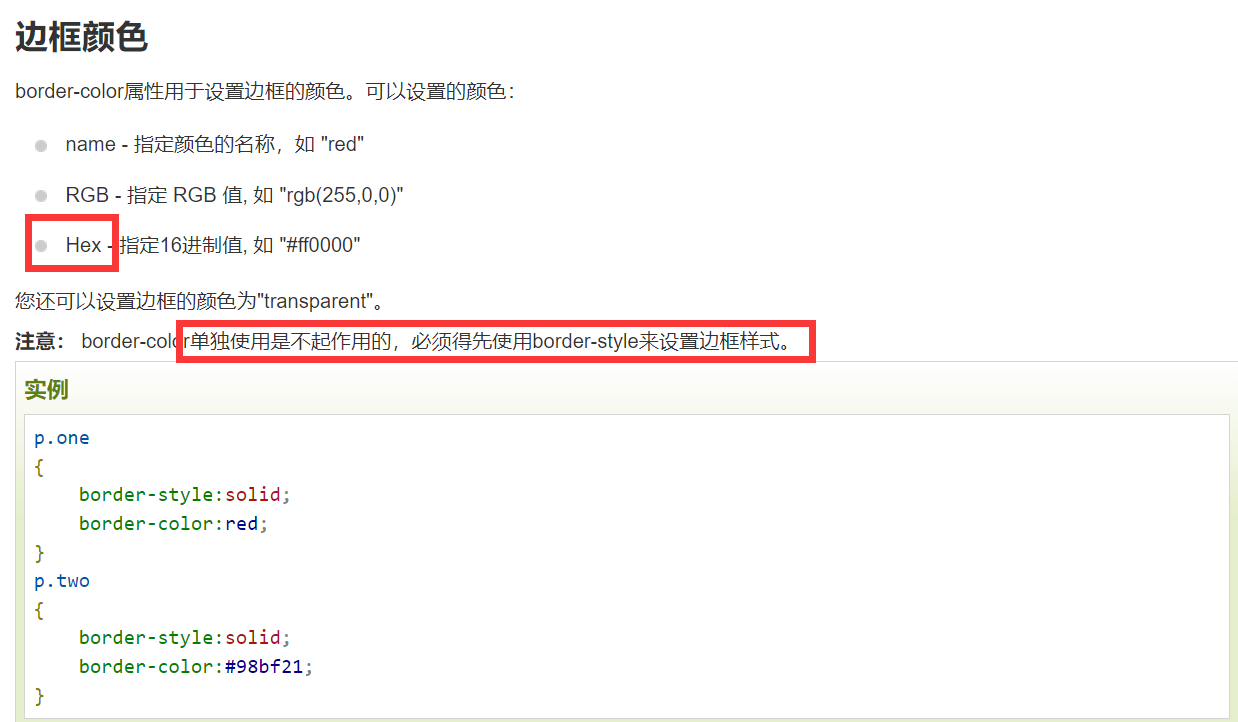
2.3 边框颜色
2.4 单独设置边框各边
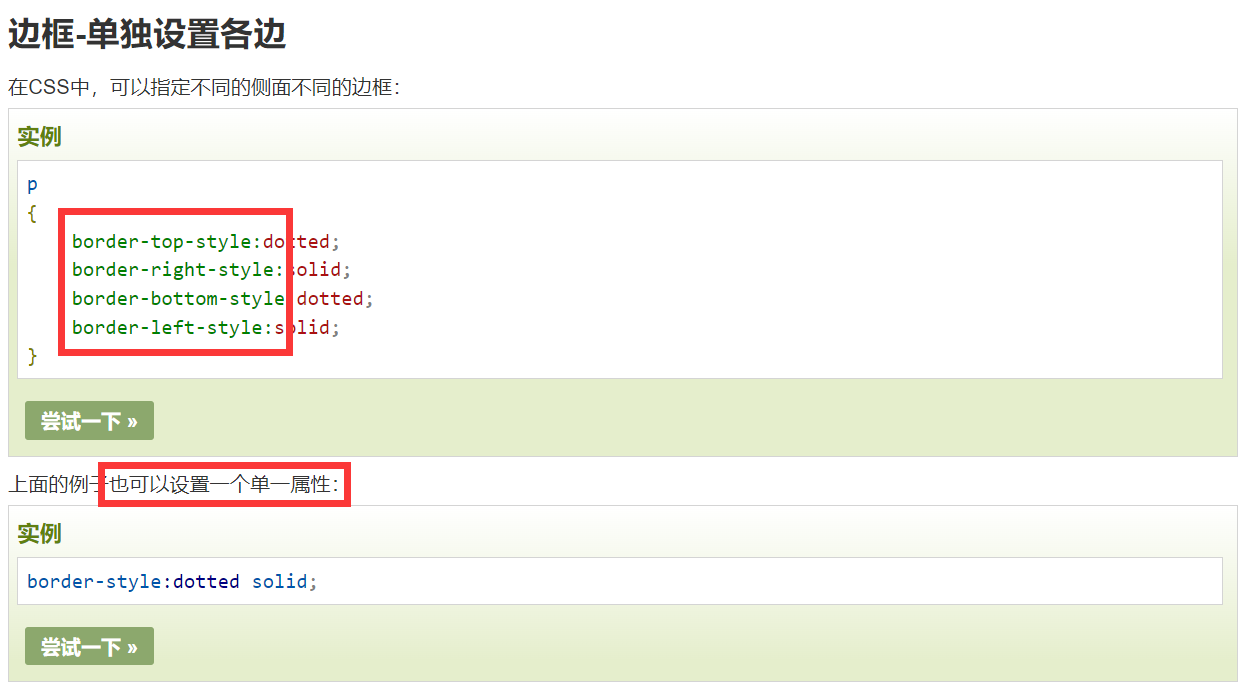
设置单一属性的顺序为上右底左
通过下边的例子深度理解单独设置边框各边
border-style属性可以有1-4个值:
- border-style:dotted solid double dashed;
- 上边框是 dotted
- 右边框是 solid
- 底边框是 double
- 左边框是 dashed
- border-style:dotted solid double;
- 上边框是 dotted
- 左、右边框是 solid
- 底边框是 double
- border-style:dotted solid;
- 上、底边框是 dotted
- 右、左边框是 solid
- border-style:dotted;
- 四面边框是 dotted
上面的例子用了border-style。然而,它也可以和border-width 、 border-color一起使用。
2.5 边框简写属性
可以在"border"属性中设置:
- border-width
- border-style (required)
- border-color
border:5px solid red;
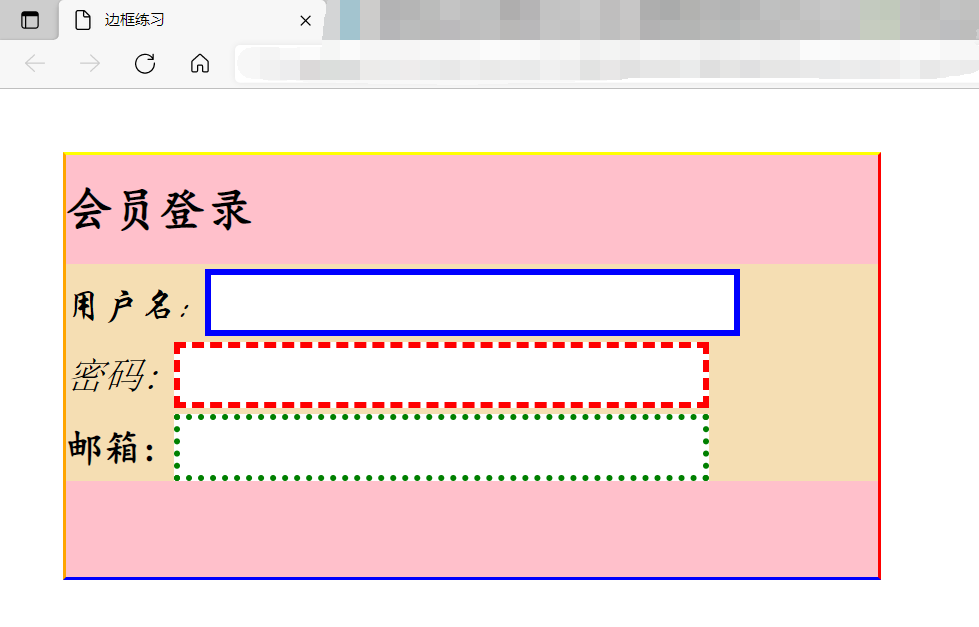
2.6 简单练习
.css代码
/*一些常用的初始化操作*/
body{
    margin : 20px;
    padding : 0px;
    text-decoration : none;
}

/*border : 宽度,高度,边框粗细、样式、颜色*/
#box {
    background : pink;
    width: 260px;
    height: 135px;
    border: 1px solid ;
    border-color : yellow red blue orange;

}

h2{
    font-size :15px;
    font-family:cursive;
    line-height:10px;
}

/*标签选择器*/
form{
    background : wheat;
}

/*分别设置form中的三个div的span标签*/
div:nth-of-type(1)>span {
    font-size: 8px;
    font-family: 华文行楷;
}
div:nth-of-type(2)>span {
    font-size: 8px;
    font-family: 宋体;
    font-style : oblique;
}
div:nth-of-type(3)>span {
    font-size: 8px;
    font-family: 楷体;
    font-weight : bold;
}

/*分别设置form中的三个div的input标签*/
div:nth-of-type(1)>input{
    border : 2px solid blue;
}
div:nth-of-type(2)>input{
    border : 2px dashed red;
}
div:nth-of-type(3)>input{
    border : 2px dotted green;
}
.html代码
<!DOCTYPE html>
<html lang="en">
<head>
    <meta charset="UTF-8">
    <title>边框练习</title>

    <link rel="stylesheet" href="css/style.css">

</head>
<body>

<div id="box">

    <h2>会员登录</h2>
    <form action="#">

        <div>
            <span>用户名:</span>
            <input type="text">
        </div>
        <div>
            <span>密码:</span>
            <input type="text">
        </div>
        <div>
            <span>邮箱:</span>
            <input type="text">
        </div>

    </form>

</div>

</body>
</html>
生成页面效果
3、内外边距及div居中
3.1 padding填充内边距
当元素的 padding(填充)内边距被清除时,所释放的区域将会受到元素背景颜色的填充。
单独使用 padding 属性可以改变上下左右的填充。
Padding属性,可以有一到四个值,默认为顺时针顺序
padding:25px 50px 75px 100px;
- 上填充为25px
- 右填充为50px
- 下填充为75px
- 左填充为100px
padding:25px 50px 75px;
- 上填充为25px
- 左右填充为50px
- 下填充为75px
padding:25px 50px;
- 上下填充为25px
- 左右填充为50px
padding:25px;
- 所有的填充都是25px
3.2 margin外边距
margin 清除周围的(外边框)元素区域。margin 没有背景颜色,是完全透明的。
margin 可以单独改变元素的上,下,左,右边距,也可以一次改变所有的属性。
margin属性可以有一到四个值,顺时针顺序
- margin:25px 50px 75px 100px;
- 上边距为25px
- 右边距为50px
- 下边距为75px
- 左边距为100px
- margin:25px 50px 75px;
- 上边距为25px
- 左右边距为50px
- 下边距为75px
- margin:25px 50px;
- 上下边距为25px
- 左右边距为50px
- margin:25px;
- 所有的4个边距都是25px
3.3 简单练习
.css代码
/*一些常用的初始化操作*/
body{
    margin : 20px;
    padding : 0px;
    text-decoration : none;
}

/*border : 宽度,高度,边框粗细、样式、颜色*/
#box {
    background : pink;
    width: 260px;
    height: 135px;
    border: 1px solid ;
    border-color : yellow red blue orange;
    margin : 0 auto;    /*上下为0,左右自动居中*/

}

h2{
    font-size :15px;
    font-family:cursive;
    line-height:10px;
    margin-top : 8px;
    margin-bottom : 8px ;
}

/*标签选择器*/
form{
    background : wheat;
}

/*分别设置form中的三个div的span标签*/
div:nth-of-type(1)>span {
    font-size: 8px;
    font-family: 华文行楷;
}
div:nth-of-type(2)>span {
    font-size: 8px;
    font-family: 宋体;
    font-style : oblique;
}
div:nth-of-type(3)>span {
    font-size: 8px;
    font-family: 楷体;
    font-weight : bold;
}

/*设置所有input标签*/
input{
    border : 1px solid black;
}
.html代码
<!DOCTYPE html>
<html lang="en">
<head>
    <meta charset="UTF-8">
    <title>边框练习</title>

    <link rel="stylesheet" href="css/style.css">

</head>
<body>

<div id="box">

    <h2>会员登录</h2>
    <form action="#">

        <div>
            <span>用户名:</span>
            <input type="text">
        </div>
        <div>
            <span>密码:</span>
            <input type="text">
        </div>
        <div>
            <span>邮箱:</span>
            <input type="text">
        </div>

    </form>

</div>

</body>
</html>
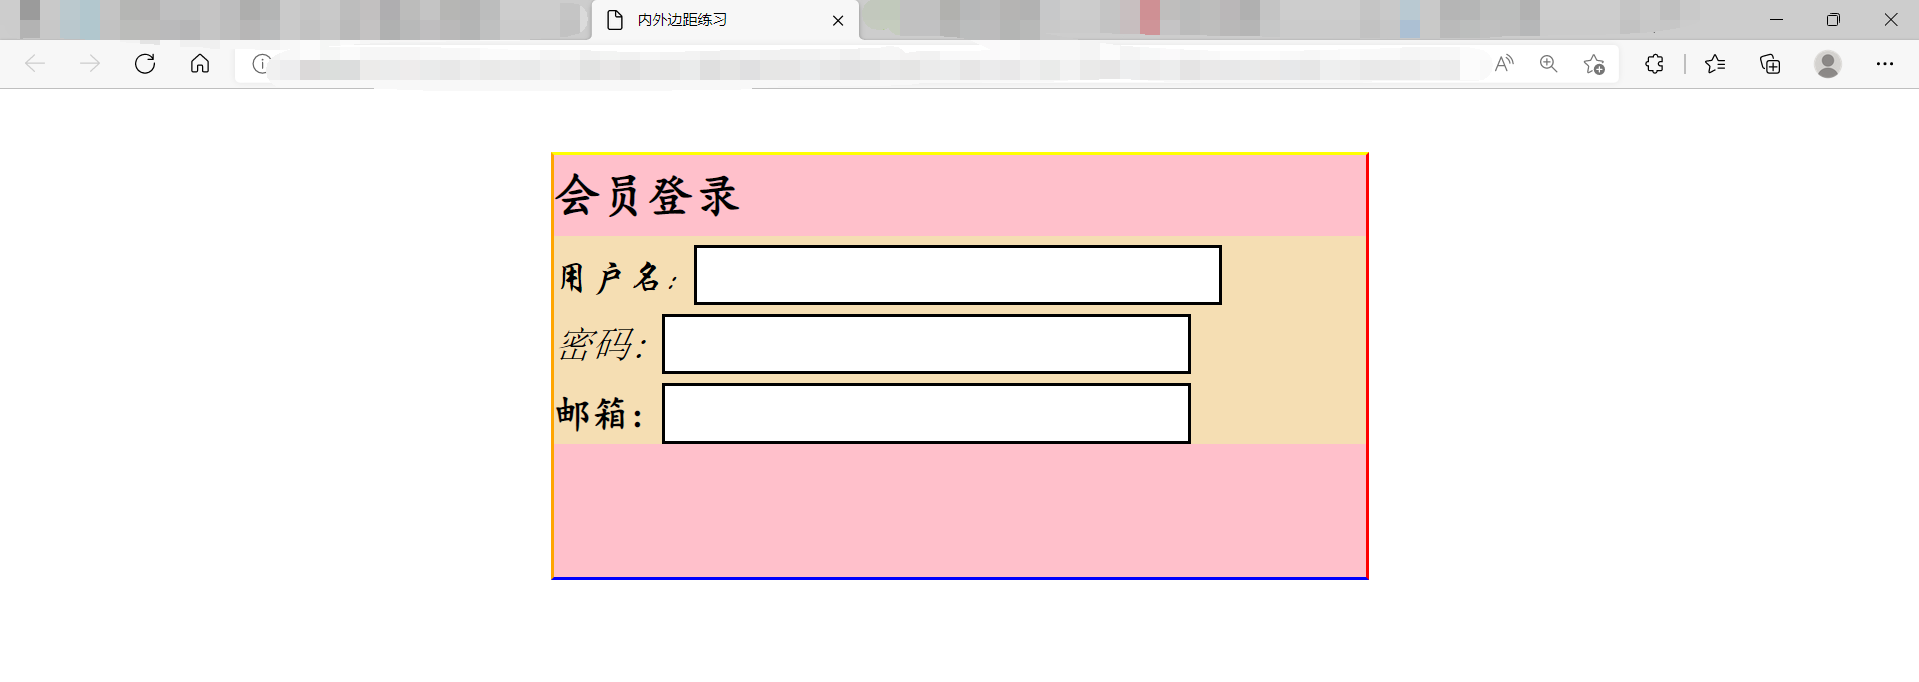
生成页面效果


【推荐】国内首个AI IDE,深度理解中文开发场景,立即下载体验Trae
【推荐】编程新体验,更懂你的AI,立即体验豆包MarsCode编程助手
【推荐】抖音旗下AI助手豆包,你的智能百科全书,全免费不限次数
【推荐】轻量又高性能的 SSH 工具 IShell:AI 加持,快人一步
· 震惊!C++程序真的从main开始吗?99%的程序员都答错了
· 【硬核科普】Trae如何「偷看」你的代码?零基础破解AI编程运行原理
· 单元测试从入门到精通
· 上周热点回顾(3.3-3.9)
· winform 绘制太阳,地球,月球 运作规律