QT常用控件(一)——菜单栏和对话框
引言
QMainWindow 是一个为用户提供主窗口程序的类,包含一个菜单栏(menu bar)、多个工具栏(tool bars)、多个锚接部件(dock widgets)、一个状态栏(status bar)及一个中心部件(central widget),是许多应用程序的基础,如文本编辑器,图片编辑器等。(本篇主要介绍菜单栏和工具栏)
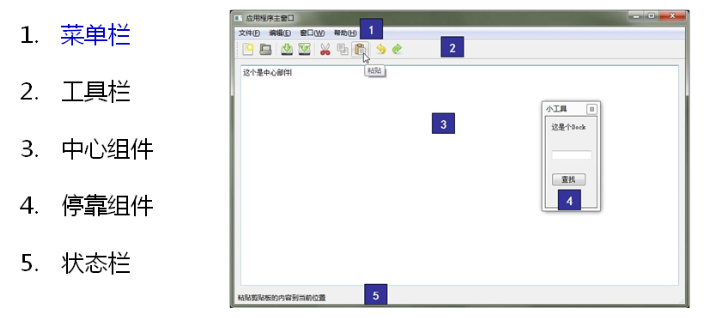
一,菜单栏
- 创建菜单栏。
QMenuBar* menuBar = new QMenuBar(this);
-
创建菜单,调用 QMenu 的成员函数 addMenu 来添加菜单
QAction* addMenu(QMenu * menu)
QMenu* addMenu(const QString & title)
QMenu* addMenu(const QIcon & icon, const QString & title)
- 创建菜单项,调用 QMenu 的成员函数 addAction 来添加菜单项
QAction* activeAction()
QAction* addAction(const QString & text)
QAction* addAction(const QIcon & icon, const QString & text)
QAction* addAction(const QString & text, const QObject * receiver, const char * member, const QKeySequence & shortcut = 0)
QAction* addAction(const QIcon & icon, const QString & text, const QObject * receiver, const char * member,const QKeySequence & shortcut = 0)
实例演示:(vs2019+qt5)
 //创建菜单栏
    QMenuBar* menuBar = new QMenuBar(this);
//创建菜单(用addMenu方法添加入菜单栏)
    QMenu* filename = menuBar->addMenu(QStringLiteral("文件(&F)"));
//创建菜单项
    QAction* openfile = new QAction(QStringLiteral("打开文件(&O)"));
    QAction* opendlg = new QAction(QStringLiteral("打开对话框(&D)"));
//给菜单项添入图标
    openfile->setIcon(QIcon(":/D:/image/Luffy.png"));
    opendlg->setIcon(QIcon(":/D:/image/LuffyQ.png"));
//用addAction加入菜单项
    filename->addAction(opendlg);
    filename->addAction(openfile);
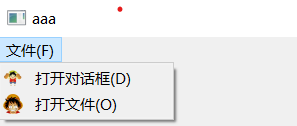
注意:使用 QStringLiteral 宏可以在编译期把代码里的常量字符串 str 直接构造为 QString 对象,于是运行时就不再需要额外的构造开销了。
资源文件的添加
openfile->setIcon(QIcon(":/D:/image/Luffy.png"));
对于该句代码":/D:/image/Luffy.png"是以相对路径添加的(即以:/开头的是资源文件),那么如何添加资源文件呢?
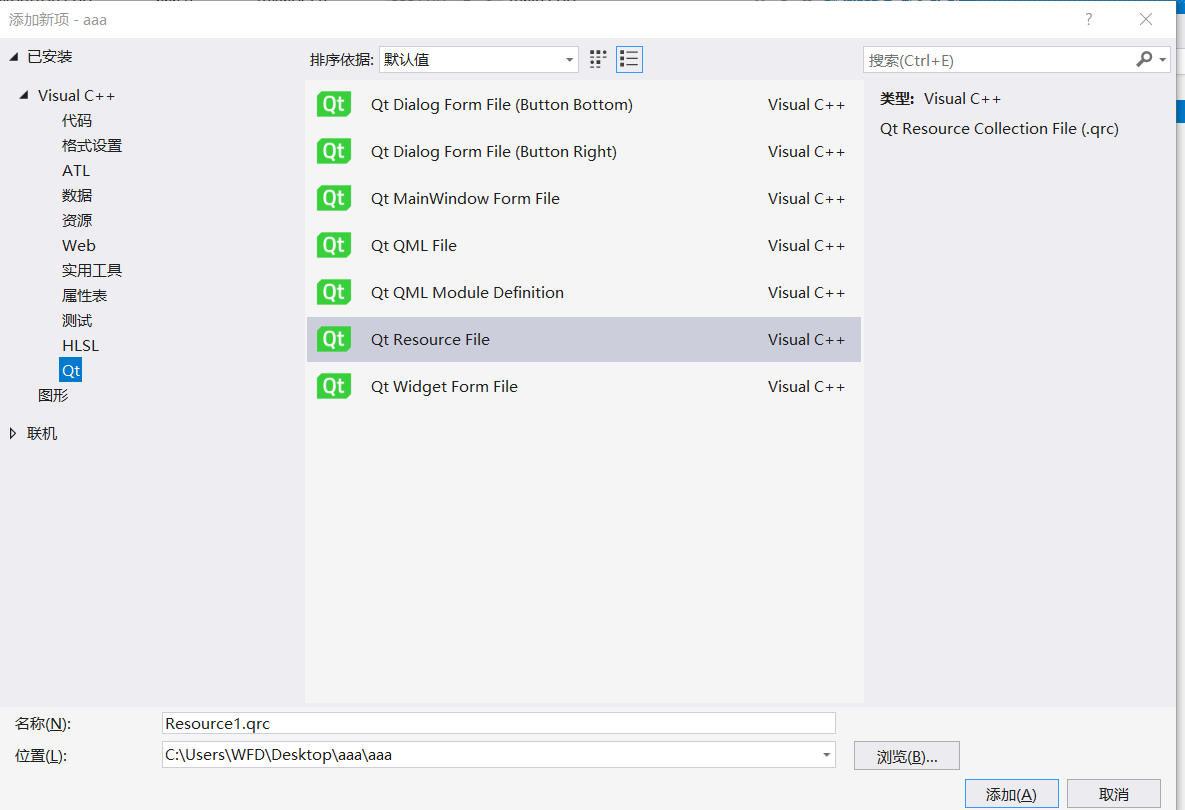
- 添加->新建项->Qt->Qt Resource File。
- 在Resource1.qrc中添加说需要的资源(比如图片)
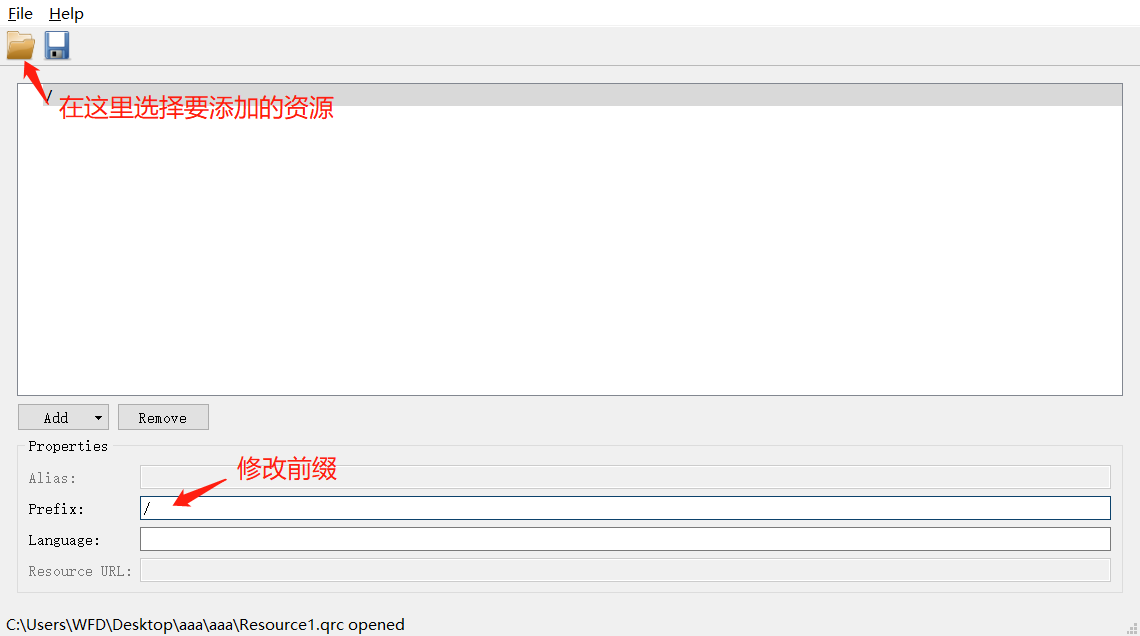
最后以冒号+前缀+名称(相对路径)写入资源。
二,工具栏
-
直接调用 QMainWindow 类的 addToolBar()函数获取主窗口的工具条对象,每增加一个工具条都需要调用一次该函数
-
插入属于工具条的动作,即在工具条上添加操作。通过 QToolBar 类的 addAction 函数添加
-
工具条是一个可移动的窗口,它的停靠区域由 QToolBar 的 allowAreas 决定,包括:
- Qt::LeftToolBarArea 停靠在左侧
- Qt::RightToolBarArea停靠在右侧
- Qt::TopToolBarArea 停靠在顶部
- Qt::BottomToolBarArea停靠在底部
- Qt::AllToolBarAreas以上四个位置都可停靠
使用 setAllowedAreas()函数指定停靠区域:
setAllowedAreas(Qt::LeftToolBarArea | Qt::RightToolBarArea)
setMoveable(false)//工具条不可移动, 只能停靠在初始化的位置上
三,对话框 QDialog
- QColorDialog: 选择颜色
-
QFileDialog: 选择文件或者目录
-
QFontDialog: 选择字体
-
QInputDialog: 允许用户输入一个值,并将其值返回
-
QMessageBox:模态对话框,用于显示信息、询问问题,消息,警告,错误。
-
QPageSetupDialog:为打印机提供纸张相关的选项
-
QPrintDialog:打印机配置
-
QPrintPreviewDialog:打印预览
-
QProgressDialog:显示操作过程
- 模态对话框,就是会阻塞同一应用程序中其它窗口的输入。模态对话框很常见,比如“打开文件”功能。你可以尝试一下记事本的打开文件,当打开文件对话框出现时,我们是不能对除此对话框之外的窗口部分进行操作的。
- 与此相反的是非模态对话框,例如查找对话框,我们可以在显示着查找对话框的同时,继续对记事本的内容进行编辑。
- 使用 QDialog::exec()实现应用程序级别的模态对话框
- 使用 QDialog::open()实现窗口级别的模态对话框
- 使用 QDialog::show()实现非模态对话框
模态对话框实例:
QDialog dlg1(this);
dlg1.resize(300,200);
dlg1.setWindowTitle(QStringLiteral("模态对话框"));
dlg1.exec();
非模态对话框实例:
QDialog dlg1(this);
dlg1.resize(300,200);
dlg1.setWindowTitle(QStringLiteral("模态对话框"));
dlg1.show();
QDialog *dlg2 = new QDialog();
dlg2->resize(200, 200);
dlg2->setAttribute(Qt::WA_DeleteOnClose);//关闭时清理内存
dlg2->show();
注意:在堆上就不能用点(.)了,要用->。而且由于使用 new 在堆上分配空间,却一直没有 delete。因此我们用setAttribute()函数设置对话框关闭时,自动销毁对话框。
2️⃣消息对话框 (QMessageBox)
QMessageBox :模态对话框,用于显示信息、询问问题等;我们一般会使用该类提供的几个 static成员函数:(静态成员函数有两种访问方式:1 创建对象 ;2 直接通过类名去调用)
-
显示关于对话框
void about(QWidget * parent, const QString & title, const QString & text)
这是一个最简单的对话框,其标题是 title,内容是 text,父窗口是parent。对话框只有一个 OK 按钮。
- 显示错误对话框
StandardButton critical(QWidget * parent, const QString & title, const QString & text, StandardButtons buttons = Ok, StandardButton defaultButton = NoButton)
这个对话框将显示一个红色的错误符号。我们可以通过 buttons 参数指明其显示的按钮 。 默认情况下只有一个Ok按钮 ,我们可以使用StandardButtons 类型指定多种按钮,指令如下:
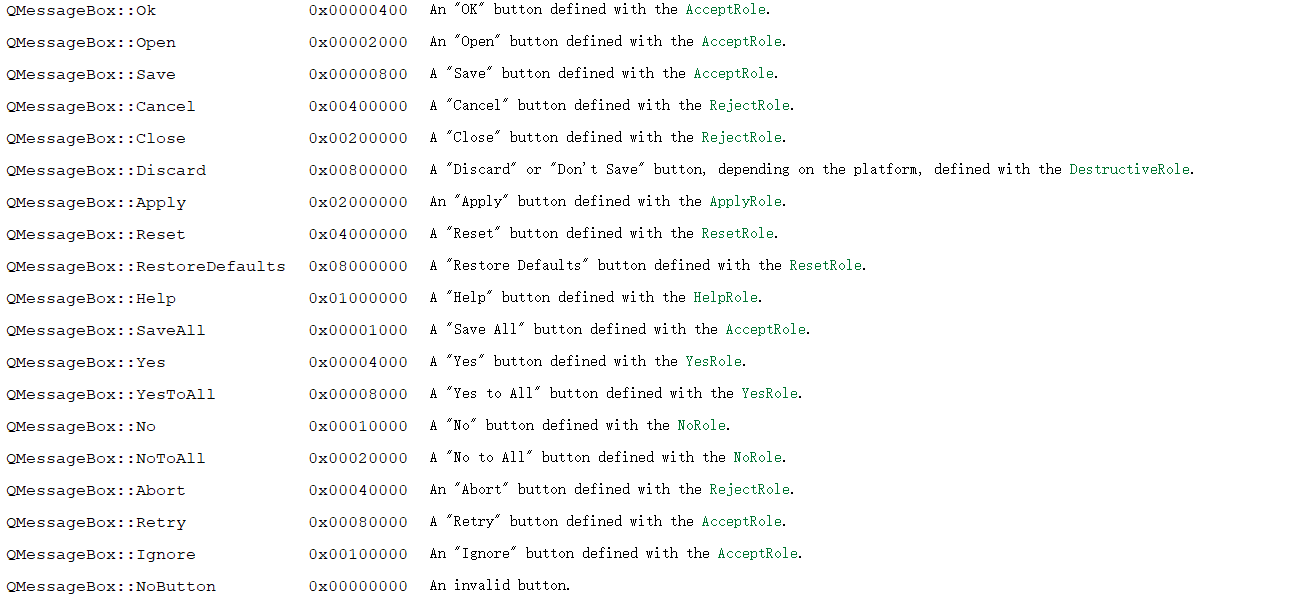
示例:
QMessageBox::critical(this, QStringLiteral("error"), QStringLiteral("错误"),QMessageBox::No);
第一个参数是 父类,第二个是标题,第三个是内容,第四个是按钮名称(类型为StandardButtons,可以有两个做选择),第五个参数是默认(按钮类型为StandardButtons)。

- 显示信息对话框
StandardButton information(QWidget * parent, const QString & title, const QString & text, StandardButtons buttons = Ok, StandardButton defaultButton = NoButton)
示例:
QMessageBox::information(this, QStringLiteral("信息"), "infor", QMessageBox::Ok);

- 显示问题对话框
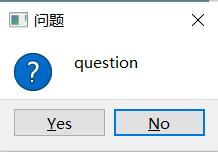
StandardButton question(QWidget * parent, const QString & title,const QString & text, StandardButtons buttons = StandardButtons( Yes | No ), StandardButton defaultButton = NoButton)
示例:
//获取点击信息
if (QMessageBox::Yes== QMessageBox::question(this, QStringLiteral("问题"), "question", QMessageBox::Yes | QMessageBox::No, QMessageBox::No))
        {
            qDebug() << "click yes";
        }
        else
        {
            qDebug() << "click no";

        }
3️⃣标准文件对话框
QString getOpenFileName(QWidget * parent = 0,                //父窗口
                        const QString & caption = QString(), //对话框标题
                        const QString & dir = QString(),     //对话框打开的默认路径
                        const QString & filter = QString(),  //过滤器(例如我们使用“imagefile(*.jpg*.png)”则只显示jpg和png文件。多个过滤器用“;;”分割。
                        QString * selectedFilter = 0,        //默认选择的过滤器
                        Options options = 0                  //对话框的参数设定
                       )
//打开文件
void MainWindow::openFile()
{
QString path = QFileDialog::getOpenFileName(this, tr("Open File"), ".", tr("Text Files(*.txt)"));
if(!path.isEmpty())
{
QFile file(path);
if (!file.open(QIODevice::ReadOnly | QIODevice::Text))
 {
QMessageBox::warning(this, tr("Read File"), tr("Cannot open file:\n%1").arg(path));
return;
}
QTextStream in(&file);
textEdit->setText(in.readAll());
file.close();
}
else
{
QMessageBox::warning(this, tr("Path"), tr("You did not select any file."));
 }
}
//保存文件
void MainWindow::saveFile()
{
QString path = QFileDialog::getSaveFileName(this, tr("Open File"), ".", tr("Text Files(*.txt)"));
if(!path.isEmpty())
{
QFile file(path);
if (!file.open(QIODevice::WriteOnly | QIODevice::Text))
{
QMessageBox::warning(this, tr("Write File"), tr("Cannot open file:\n%1").arg(path));
return;
}
QTextStream out(&file);
out << textEdit->toPlainText();
file.close();
}
else
 {
QMessageBox::warning(this, tr("Path"), tr("You did not select any file."));
 }
}
4️⃣其他对话框
- 颜色对话框
QColor color= QColorDialog::getColor(QColor(255, 0, 0));//设置默认颜色:红色,用color接收选取的颜色
- 字体对话框
 bool flag;
 QFont font = QFontDialog::getFont(&flag, QFont("华文彩云", 36));
演示示例
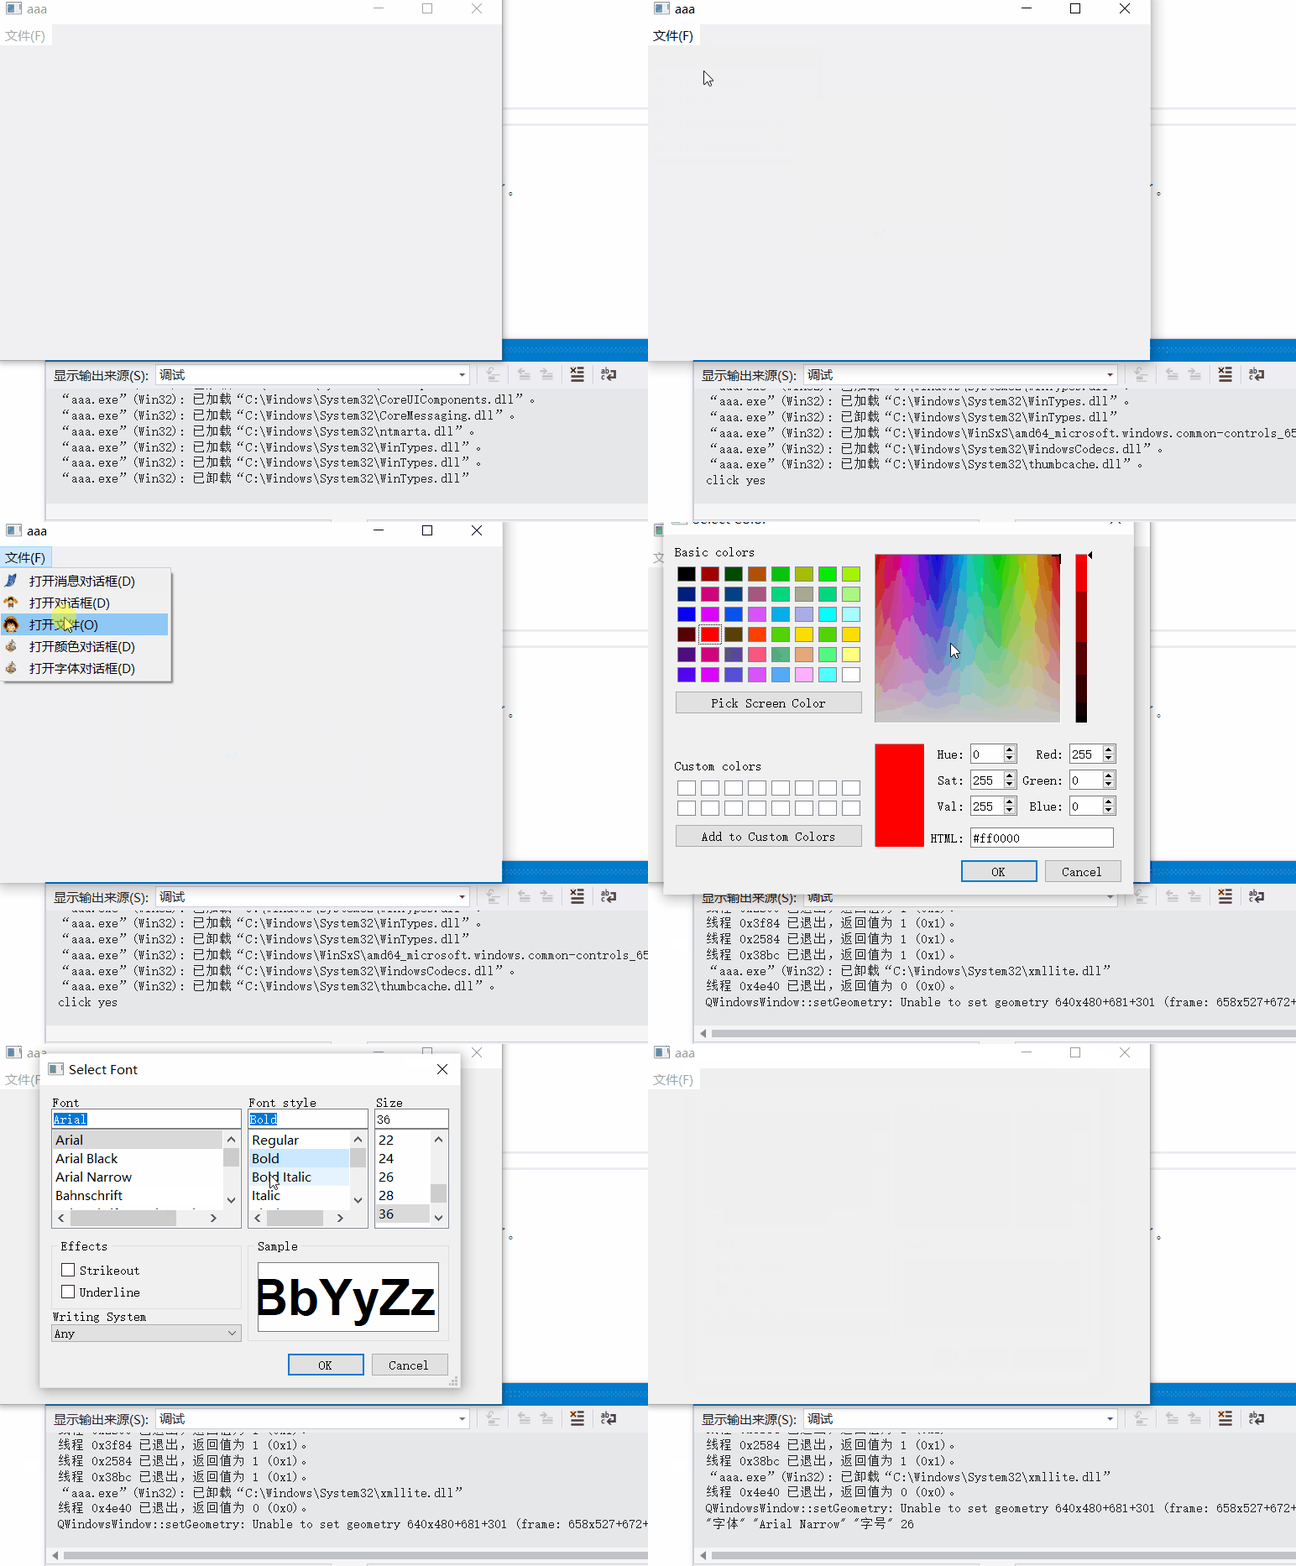
在菜单栏中打开上述对话框,并制定界面。
#include "aaa.h"
#include"qmenubar.h"
#include"qdialog.h"
#include"qfiledialog.h"
#include"qtoolbar.h"
#include"qmessagebox.h"
#include"qdebug.h"
#include"qcolordialog.h"
#include"qfontdialog.h"

aaa::aaa(QWidget *parent)
    : QWidget(parent)
{

    //菜单文件
    // 使用 QStringLiteral 宏可以在编译期把代码里的常量字符串 str 直接构造为 QString 对象,于是运行时就不再需要额外的构造开销了。
    QMenuBar* menuBar = new QMenuBar(this);
    QMenu* filename = menuBar->addMenu(QStringLiteral("文件(&F)"));
    QAction* openfile = new QAction(QStringLiteral("打开文件(&O)"));
    QAction* opendlg = new QAction(QStringLiteral("打开对话框(&D)"));
    QAction* openmessage = new QAction(QStringLiteral("打开消息对话框(&D)"));
    QAction* opencolor = new QAction(QStringLiteral("打开颜色对话框(&D)"));
    QAction* openfont = new QAction(QStringLiteral("打开字体对话框(&D)"));

    //设置图标
    opencolor->setIcon(QIcon(":/D:/image/sunny.png"));
    openfile->setIcon(QIcon(":/D:/image/Luffy.png"));
    opendlg->setIcon(QIcon(":/D:/image/LuffyQ.png"));
    openmessage->setIcon(QIcon(":/D:/image/up.png"));
    openfont->setIcon(QIcon(":/D:/image/sunny.png"));

    //加入主菜单
    filename->addAction(openmessage);
    filename->addAction(opendlg);
    filename->addAction(openfile);
    filename->addAction(opencolor);
    filename->addAction(openfont);

    //打开对话框
    connect(opendlg, &QAction::triggered, [=]() {
        //模态对话框(不可对其他对话框操作)
        QDialog dlg1(this);
        dlg1.resize(300,200);
        dlg1.setWindowTitle(QStringLiteral("模态对话框"));
        dlg1.exec();
        //非模态对话框(可以对其他对话框操作)
       // QDialog *dlg2 = new QDialog();
        //dlg2->resize(200, 200);
        //dlg2->setAttribute(Qt::WA_DeleteOnClose);//关闭时清理内存
        //dlg2->show();
        });

    //打开文件
    connect(openfile, &QAction::triggered, [=]() {
        QFileDialog fdlg(this);
        fdlg.getOpenFileName(this, QStringLiteral("选择文件"), "D:\\", tr("Image(*.jpg*.png)"));
        });

    //打开消息对话框
    connect(openmessage, &QAction::triggered, [=]() {
        if (QMessageBox::Yes== QMessageBox::question(this, QStringLiteral("问题"), "question", QMessageBox::Yes | QMessageBox::No, QMessageBox::No))
        {
            qDebug() << "click yes";
        }
        else
        {
            qDebug() << "click no";

        }
        });
    //打开颜色对话框
    connect(opencolor, &QAction::triggered, [=]() {
        QColor color=    QColorDialog::getColor(QColor(255, 0, 0));//设置默认颜色:红色,用color接收选取的颜色
        });

    //打开字体对话框
    connect(openfont, &QAction::triggered, [=]() {
        bool flag;
        QFont font = QFontDialog::getFont(&flag, QFont("华文彩云", 36));
        qDebug() << QStringLiteral("字体") << font.family() << QStringLiteral("字号") << font.pointSize();
        });
    ui.setupUi(this);
}


【推荐】编程新体验,更懂你的AI,立即体验豆包MarsCode编程助手
【推荐】凌霞软件回馈社区,博客园 & 1Panel & Halo 联合会员上线
【推荐】抖音旗下AI助手豆包,你的智能百科全书,全免费不限次数
【推荐】博客园社区专享云产品让利特惠,阿里云新客6.5折上折
【推荐】轻量又高性能的 SSH 工具 IShell:AI 加持,快人一步