


ElasticSearch
1、安装elasticsearch
2、利用 Java 接口创建索引以及操作文档
3、Head 插件安装以及使用
4、head插件的使用
5、elasticsearch-.yml(中文配置详解)
6、elasticsearch5.5多机集群配置
7、ElasticSearch 查询--简单查询
8、ElasticSearch 查询--组合多条件查询
9、elasticsearch安装中文分词器插件smartcn
10、elasticsearch基于smartcn中文分词查询
1、安装elasticsearch <--返回目录
1) 上传server-jre-8u131-linux-x64.tar.gz,解压 tar -xzvf server-jre-8u131-linux-x64.tar.gz
2) 新建elastic用户 并且把目录权限赋予给elastic
[root@bogon ~]# useradd elastic
[root@bogon ~]# chown -R elastic:elastic /usr/local/elasticsearch-5.5.2/

3) 启动 sh /usr/local/elasticsearch-5.5.2/bin/elasticsearch

解决上面的问题:http://blog.java1234.com/blog/articles/342.html
问题1: max file descriptors [4096] for elasticsearch process is too low, increase to at least [65536]
修改/etc/security/limits.conf文件,添加或修改如下行: (请切换到root用户进行修改,用户退出后重新登录生效)
*        hard    nofile           65536
*        soft    nofile           65536
root退出后重新登陆,使用下面命令查看修改后的结果:
ulimit -Hn
ulimit -Sn
问题2: max virtual memory areas vm.max_map_count [65530] is too low, increase to at least [262144]
$ sudo sysctl -w vm.max_map_count=262144

或者修改 /etc/sysctl.conf 文件,添加 “vm.max_map_count”设置 永久改变(sudo sysctl -p /etc/sysctl.conf生效)。

/sbin/sysctl -p 执行下 让/etc/sysctl.conf 立即生效
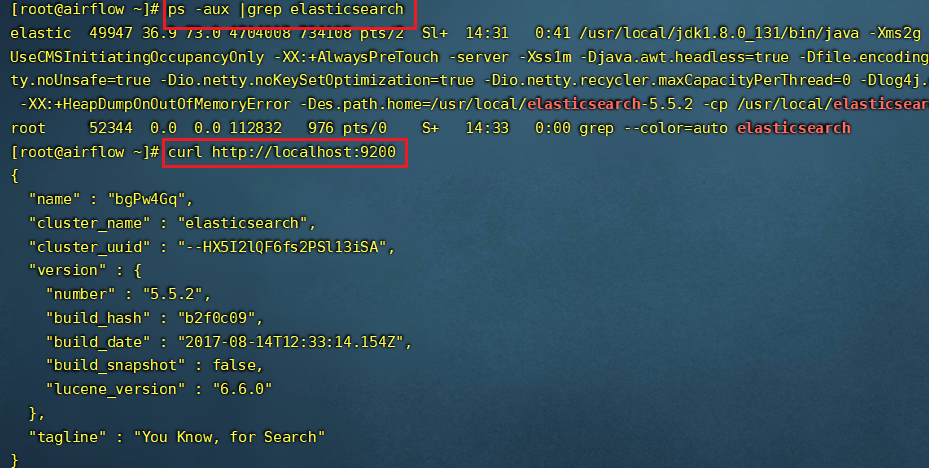
4) 验证是否启动成功
前端启动:sh /usr/local/elasticsearch-5.5.2/bin/elasticsearch
后台启动:sh /usr/local/elasticsearch-5.5.2/bin/elasticsearch -d
5) 配置外网访问
前面我们配置的仅仅是本机使用 但是我们比如集群以及其他机器连接 ,则需要配置下。可以修改 /home/es/elasticsearch/config/elasticsearch.yml 文件。把 network.host 和 http.port 前面的 备注去掉 然后Host改成你的局域网IP即可。
6)防火墙设置
查看防火墙状态:firewall-cmd --state
停止firewall:systemctl stop firewalld.service
禁止firewall开机启动:systemctl disable firewalld.service
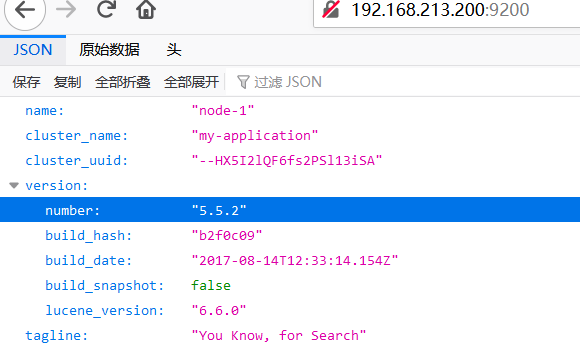
7) 浏览器访问
2、利用 Java 接口创建索引以及操作文档 <--返回目录
<dependencies>
    <dependency>
        <groupId>org.elasticsearch.client</groupId>
        <artifactId>transport</artifactId>
        <version>5.5.2</version>
    </dependency>

    <dependency>
        <groupId>com.google.code.gson</groupId>
        <artifactId>gson</artifactId>
        <version>2.8.2</version>
    </dependency>
</dependencies>
获取客户端连接
package com.oy.demo;

import java.net.InetAddress;

import org.elasticsearch.client.transport.TransportClient;
import org.elasticsearch.common.settings.Settings;
import org.elasticsearch.common.transport.InetSocketTransportAddress;
import org.elasticsearch.transport.client.PreBuiltTransportClient;

public class TestCon {

    private static String host="192.168.213.200"; // 服务器地址
    private static int port=9300; // 端口

    public static void main(String[] args) throws Exception{
        @SuppressWarnings("resource")
        TransportClient client = new PreBuiltTransportClient(Settings.EMPTY)
                .addTransportAddress(new InetSocketTransportAddress(InetAddress.getByName(host),port));
        System.out.println(client);
        client.close();
    }

}
利用 Java 接口创建索引以及操作文档
package com.oy.demo;

import java.net.InetAddress;

import org.elasticsearch.action.delete.DeleteResponse;
import org.elasticsearch.action.get.GetResponse;
import org.elasticsearch.action.index.IndexResponse;
import org.elasticsearch.action.update.UpdateResponse;
import org.elasticsearch.client.transport.TransportClient;
import org.elasticsearch.common.settings.Settings;
import org.elasticsearch.common.transport.InetSocketTransportAddress;
import org.elasticsearch.common.xcontent.XContentType;
import org.elasticsearch.transport.client.PreBuiltTransportClient;
import org.junit.After;
import org.junit.Before;
import org.junit.Test;

import com.google.gson.JsonObject;

public class TestIndex {

    private static String host="192.168.213.200"; // 服务器地址
    private static int port=9300; // 端口
    private TransportClient client = null;

    @SuppressWarnings("resource")
    @Before
    public void getCient() throws Exception {
        client = new PreBuiltTransportClient(Settings.EMPTY)
                .addTransportAddress(new InetSocketTransportAddress(InetAddress.getByName(host), port));
    }

    @After
    public void close() {
        if (client != null) {
            client.close();
        }
    }

    /**
     * 创建索引 添加文档
     *
     * @throws Exception
     */
    @Test
    public void testIndex() throws Exception {
        JsonObject jsonObject = new JsonObject();
        jsonObject.addProperty("name", "java编程思想");
        jsonObject.addProperty("publishDate", "2012-11-11");
        jsonObject.addProperty("price", 100);

        IndexResponse response = client.prepareIndex("book", "java", "1")
                .setSource(jsonObject.toString(), XContentType.JSON).get();
        System.out.println("索引名称:" + response.getIndex());
        System.out.println("类型:" + response.getType());
        System.out.println("文档ID:" + response.getId());
        System.out.println("当前实例状态:" + response.status());
    }

    /**
     * 根据id获取文档
     *
     * @throws Exception
     */
    @Test
    public void testGet() throws Exception {
        GetResponse response = client.prepareGet("book", "java", "1").get();
        System.out.println(response.getSourceAsString());
    }

    /**
     * 根据id修改文档
     *
     * @throws Exception
     */
    @Test
    public void testUpdate() throws Exception {
        JsonObject jsonObject = new JsonObject();
        jsonObject.addProperty("name", "java编程思想2");
        jsonObject.addProperty("publishDate", "2012-11-12");
        jsonObject.addProperty("price", 102);

        UpdateResponse response = client.prepareUpdate("book", "java", "1")
                .setDoc(jsonObject.toString(), XContentType.JSON).get();
        System.out.println("索引名称:" + response.getIndex());
        System.out.println("类型:" + response.getType());
        System.out.println("文档ID:" + response.getId());
        System.out.println("当前实例状态:" + response.status());
    }

    /**
     * 根据id删除文档
     *
     * @throws Exception
     */
    @Test
    public void testDelete() throws Exception {
        DeleteResponse response = client.prepareDelete("book", "java", "1").get();
        System.out.println("索引名称:" + response.getIndex());
        System.out.println("类型:" + response.getType());
        System.out.println("文档ID:" + response.getId());
        System.out.println("当前实例状态:" + response.status());
    }
}
3、Head 插件安装以及使用 <--返回目录
elasticsearch head插件是一个入门级的elasticsearch前端插件
参考:http://blog.java1234.com/blog/articles/355.html
第一步:安装nodejs
head插件是nodejs实现的,所以必须先安装Nodejs
参考:http://blog.java1234.com/blog/articles/354.html
第二步:安装git
我们要用git方式下载head插件
参考:http://blog.java1234.com/blog/articles/353.html
第三步:下载以及安装head插件
打开 https://github.com/mobz/elasticsearch-head
Running with built in server
-
git clone git://github.com/mobz/elasticsearch-head.git -
cd elasticsearch-head -
npm install -
npm run start
我们用这种最简单的方式安装
当然我们安装的地方是 /usr/local/
第四步:配置elasticsearch,允许head插件访问
进入elasticsearch config目录 打开 elasticsearch.yml
最后加上
http.cors.enabled: true
http.cors.allow-origin: "*"
第五步:测试
启动elasticsearch,再进入head目录,执行npm run start 启动插件

说明启动成功,然后浏览器 执行 http://192.168.1.110:9100/
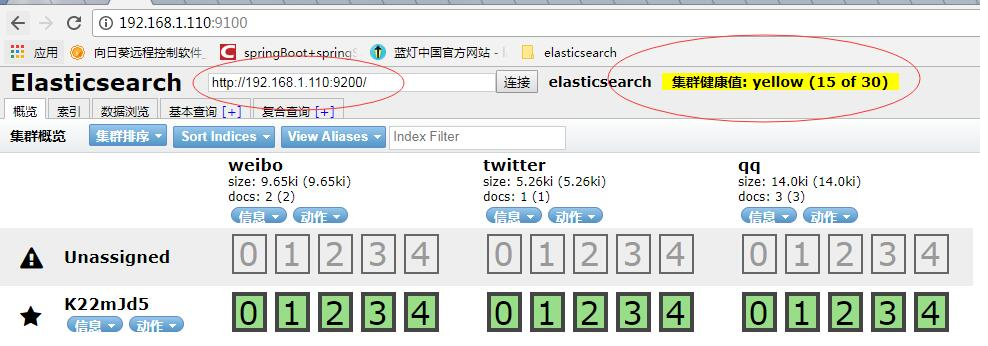
访问 http://192.168.1.110:9200/ 点击连接 如果右侧输出黄色背景字体 说明配置完整OK;
安装head插件出现的问题:
[root@airflow elasticsearch-head]# npm install
npm WARN deprecated phantomjs-prebuilt@2.1.16: this package is now deprecated
npm WARN deprecated request@2.88.2: request has been deprecated, see https://github.com/request/request/issues/3142
npm WARN deprecated har-validator@5.1.5: this library is no longer supported
npm WARN deprecated fsevents@1.2.13: fsevents 1 will break on node v14+ and could be using insecure binaries. Upgrade to fsevents 2.

> phantomjs-prebuilt@2.1.16 install /usr/local/elasticsearch-head/node_modules/phantomjs-prebuilt
> node install.js

PhantomJS not found on PATH
Download already available at /tmp/phantomjs/phantomjs-2.1.1-linux-x86_64.tar.bz2
Verified checksum of previously downloaded file
Extracting tar contents (via spawned process)
Error extracting archive
Phantom installation failed { Error: Command failed: tar jxf /tmp/phantomjs/phantomjs-2.1.1-linux-x86_64.tar.bz2
tar (child): bzip2:无法 exec: 没有那个文件或目录
tar (child): Error is not recoverable: exiting now
tar: Child returned status 2
tar: Error is not recoverable: exiting now

    at ChildProcess.exithandler (child_process.js:275:12)
    at emitTwo (events.js:126:13)
    at ChildProcess.emit (events.js:214:7)
    at maybeClose (internal/child_process.js:925:16)
    at Socket.stream.socket.on (internal/child_process.js:346:11)
    at emitOne (events.js:116:13)
    at Socket.emit (events.js:211:7)
    at Pipe._handle.close [as _onclose] (net.js:554:12)
  killed: false,
  code: 2,
  signal: null,
  cmd: 'tar jxf /tmp/phantomjs/phantomjs-2.1.1-linux-x86_64.tar.bz2' } Error: Command failed: tar jxf /tmp/phantomjs/phantomjs-2.1.1-linux-x86_64.tar.bz2
tar (child): bzip2:无法 exec: 没有那个文件或目录
tar (child): Error is not recoverable: exiting now
tar: Child returned status 2
tar: Error is not recoverable: exiting now

    at ChildProcess.exithandler (child_process.js:275:12)
    at emitTwo (events.js:126:13)
    at ChildProcess.emit (events.js:214:7)
    at maybeClose (internal/child_process.js:925:16)
    at Socket.stream.socket.on (internal/child_process.js:346:11)
    at emitOne (events.js:116:13)
    at Socket.emit (events.js:211:7)
    at Pipe._handle.close [as _onclose] (net.js:554:12)
解决
yum install bzip2 -y
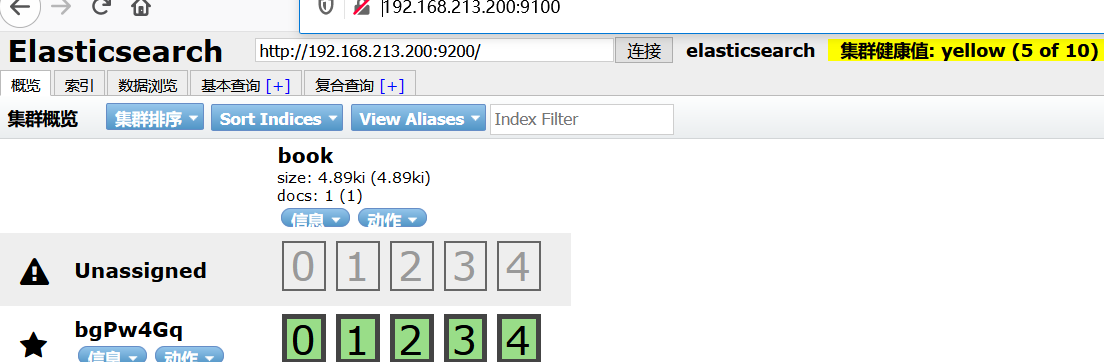
启动head插件,访问:http://192.168.213.200:9100/
4、head插件的使用 <--返回目录
elasticsearch-head插件添加索引
elasticsearch-head插件添加,修改,删除文档
elasticsearch head插件 增加索引映射
elasticsearch head插件 查询索引映射关系
5、elasticsearch-.yml(中文配置详解) <--返回目录
# ======================== Elasticsearch Configuration =========================
#
# NOTE: Elasticsearch comes with reasonable defaults for most settings.
# Before you set out to tweak and tune the configuration, make sure you
# understand what are you trying to accomplish and the consequences.
#
# The primary way of configuring a node is via this file. This template lists
# the most important settings you may want to configure for a production cluster.
#
# Please see the documentation for further information on configuration options:
# <http://www.elastic.co/guide/en/elasticsearch/reference/current/setup-configuration.html>
#
# ---------------------------------- Cluster -----------------------------------
#
# Use a descriptive name for your cluster:
# 集群名称,默认是elasticsearch
# cluster.name: my-application
#
# ------------------------------------ Node ------------------------------------
#
# Use a descriptive name for the node:
# 节点名称,默认从elasticsearch-2.4.3/lib/elasticsearch-2.4.3.jar!config/names.txt中随机选择一个名称
# node.name: node-1
#
# Add custom attributes to the node:
#
# node.rack: r1
#
# ----------------------------------- Paths ------------------------------------
#
# Path to directory where to store the data (separate multiple locations by comma):
# 可以指定es的数据存储目录,默认存储在es_home/data目录下
# path.data: /path/to/data
#
# Path to log files:
# 可以指定es的日志存储目录,默认存储在es_home/logs目录下
# path.logs: /path/to/logs
#
# ----------------------------------- Memory -----------------------------------
#
# Lock the memory on startup:
# 锁定物理内存地址,防止elasticsearch内存被交换出去,也就是避免es使用swap交换分区
# bootstrap.memory_lock: true
#
#
#
# 确保ES_HEAP_SIZE参数设置为系统可用内存的一半左右
# Make sure that the `ES_HEAP_SIZE` environment variable is set to about half the memory
# available on the system and that the owner of the process is allowed to use this limit.
#
# 当系统进行内存交换的时候,es的性能很差
# Elasticsearch performs poorly when the system is swapping the memory.
#
# ---------------------------------- Network -----------------------------------
#
#
# 为es设置ip绑定,默认是127.0.0.1,也就是默认只能通过127.0.0.1 或者localhost才能访问
# es1.x版本默认绑定的是0.0.0.0 所以不需要配置,但是es2.x版本默认绑定的是127.0.0.1,需要配置
# Set the bind address to a specific IP (IPv4 or IPv6):
#
# network.host: 192.168.0.1
#
#
# 为es设置自定义端口,默认是9200
# 注意:在同一个服务器中启动多个es节点的话,默认监听的端口号会自动加1:例如:9200,9201,9202...
# Set a custom port for HTTP:
#
# http.port: 9200
#
# For more information, see the documentation at:
# <http://www.elastic.co/guide/en/elasticsearch/reference/current/modules-network.html>
#
# --------------------------------- Discovery ----------------------------------
#
# 当启动新节点时,通过这个ip列表进行节点发现,组建集群
# 默认节点列表:
# 127.0.0.1,表示ipv4的回环地址。
# [::1],表示ipv6的回环地址
#
# 在es1.x中默认使用的是组播(multicast)协议,默认会自动发现同一网段的es节点组建集群,
# 在es2.x中默认使用的是单播(unicast)协议,想要组建集群的话就需要在这指定要发现的节点信息了。
# 注意:如果是发现其他服务器中的es服务,可以不指定端口[默认9300],如果是发现同一个服务器中的es服务,就需要指定端口了。
# Pass an initial list of hosts to perform discovery when new node is started:
#
# The default list of hosts is ["127.0.0.1", "[::1]"]
#
# discovery.zen.ping.unicast.hosts: ["host1", "host2"]
#
#
#
#
# 通过配置这个参数来防止集群脑裂现象 (集群总节点数量/2)+1
# Prevent the "split brain" by configuring the majority of nodes (total number of nodes / 2 + 1):
#
# discovery.zen.minimum_master_nodes: 3
#
# For more information, see the documentation at:
# <http://www.elastic.co/guide/en/elasticsearch/reference/current/modules-discovery.html>
#
# ---------------------------------- Gateway -----------------------------------
#
# Block initial recovery after a full cluster restart until N nodes are started:
# 一个集群中的N个节点启动后,才允许进行数据恢复处理,默认是1
# gateway.recover_after_nodes: 3
#
# For more information, see the documentation at:
# <http://www.elastic.co/guide/en/elasticsearch/reference/current/modules-gateway.html>
#
# ---------------------------------- Various -----------------------------------
# 在一台服务器上禁止启动多个es服务
# Disable starting multiple nodes on a single system:
#
# node.max_local_storage_nodes: 1
#
# 设置是否可以通过正则或者_all删除或者关闭索引库,默认true表示必须需要显式指定索引库名称
# 生产环境建议设置为true,删除索引库的时候必须显式指定,否则可能会误删索引库中的索引库。
# Require explicit names when deleting indices:
#
# action.destructive_requires_name: true
6、elasticsearch5.5多机集群配置 <--返回目录
java代码操作的文档
public class TestIndex {

    private static String host="192.168.1.111"; // 服务器地址
    private static int port=9300; // 端口

    public static final String CLUSTER_NAME="my-application"; // 集群名称

    private static Settings.Builder settings=Settings.builder().put("cluster.name",CLUSTER_NAME);

    private TransportClient client=null;

    @SuppressWarnings({ "resource", "unchecked" })
    @Before
    public void getCient()throws Exception{
        client = new PreBuiltTransportClient(settings.build())
                .addTransportAddress(new InetSocketTransportAddress(InetAddress.getByName(host),port));
    }

    @After
    public void close(){
        if(client!=null){
            client.close();
        }
    }

    /**
     * 创建索引 添加文档
     * @throws Exception
     */
    @Test
    public void testIndex()throws Exception{
        JsonObject jsonObject=new JsonObject();
        jsonObject.addProperty("name", "java编程思想");
        jsonObject.addProperty("publishDate", "2012-11-11");
        jsonObject.addProperty("price", 100);

        IndexResponse response=client.prepareIndex("book", "java", "1")
            .setSource(jsonObject.toString(), XContentType.JSON).get();
        System.out.println("索引名称:"+response.getIndex());
        System.out.println("类型:"+response.getType());
        System.out.println("文档ID:"+response.getId());
        System.out.println("当前实例状态:"+response.status());
    }

    /**
     * 根据id获取文档
     * @throws Exception
     */
    @Test
    public void testGet()throws Exception{
        GetResponse response=client.prepareGet("book", "java", "1").get();
        System.out.println(response.getSourceAsString());
    }

    /**
     * 根据id修改文档
     * @throws Exception
     */
    @Test
    public void testUpdate()throws Exception{
        JsonObject jsonObject=new JsonObject();
        jsonObject.addProperty("name", "java编程思想2");
        jsonObject.addProperty("publishDate", "2012-11-12");
        jsonObject.addProperty("price", 102);

        UpdateResponse response=client.prepareUpdate("book", "java", "1").setDoc(jsonObject.toString(), XContentType.JSON).get();
        System.out.println("索引名称:"+response.getIndex());
        System.out.println("类型:"+response.getType());
        System.out.println("文档ID:"+response.getId());
        System.out.println("当前实例状态:"+response.status());
    }

    /**
     * 根据id删除文档
     * @throws Exception
     */
    @Test
    public void testDelete()throws Exception{
        DeleteResponse response=client.prepareDelete("book", "java", "1").get();
        System.out.println("索引名称:"+response.getIndex());
        System.out.println("类型:"+response.getType());
        System.out.println("文档ID:"+response.getId());
        System.out.println("当前实例状态:"+response.status());
    }
}
7、ElasticSearch 查询--简单查询 <--返回目录
查询前先添加一些数据


public class TestIndex {

    private static String host="192.168.213.200"; // 服务器地址
    private static int port=9300; // 端口
    private TransportClient client = null;

    @SuppressWarnings("resource")
    @Before
    public void getCient() throws Exception {
        client = new PreBuiltTransportClient(Settings.EMPTY)
                .addTransportAddress(new InetSocketTransportAddress(InetAddress.getByName(host), port));
    }

    @After
    public void close() {
        if (client != null) {
            client.close();
        }
    }

    /**
     * 创建索引 添加文档
     *
     * @throws Exception
     */
    @Test
    public void testIndex() throws Exception {
        JsonArray jsonArray=new JsonArray();

        JsonObject jsonObject=new JsonObject();
        jsonObject.addProperty("title", "前任3:再见前任");
        jsonObject.addProperty("publishDate", "2017-12-29");
        jsonObject.addProperty("content", "一对好基友孟云(韩庚 饰)和余飞(郑恺 饰)跟女友都因为一点小事宣告分手,并且“拒绝挽回,死不认错”。两人在夜店、派对与交友软件上放飞人生第二春,大肆庆祝“黄金单身期”,从而引发了一系列好笑的故事。孟云与女友同甘共苦却难逃“五年之痒”,余飞与女友则棋逢敌手相爱相杀无绝期。然而现实的“打脸”却来得猝不及防:一对推拉纠结零往来,一对纠缠互怼全交代。两对恋人都将面对最终的选择:是再次相见?还是再也不见?");
        jsonObject.addProperty("director", "田羽生");
        jsonObject.addProperty("price", "35");
        jsonArray.add(jsonObject);


        JsonObject jsonObject2=new JsonObject();
        jsonObject2.addProperty("title", "机器之血");
        jsonObject2.addProperty("publishDate", "2017-12-29");
        jsonObject2.addProperty("content", "2007年,Dr.James在半岛军火商的支持下研究生化人。研究过程中,生化人安德烈发生基因突变大开杀戒,将半岛军火商杀害,并控制其组织,接管生化人的研究。Dr.James侥幸逃生,只好寻求警方的保护。特工林东(成龙 饰)不得以离开生命垂危的小女儿西西,接受证人保护任务...十三年后,一本科幻小说《机器之血》的出版引出了黑衣生化人组织,神秘骇客李森(罗志祥 饰)(被杀害的半岛军火商的儿子),以及隐姓埋名的林东,三股力量都开始接近一个“普通”女孩Nancy(欧阳娜娜 饰)的生活,想要得到她身上的秘密。而黑衣人幕后受伤隐藏多年的安德烈也再次出手,在多次缠斗之后终于抓走Nancy。林东和李森,不得不以身犯险一同前去解救,关键时刻却发现李森竟然是被杀害的半岛军火商的儿子,生化人的实验记录也落入了李森之手......");
        jsonObject2.addProperty("director", "张立嘉");
        jsonObject2.addProperty("price", "45");
        jsonArray.add(jsonObject2);

        JsonObject jsonObject3=new JsonObject();
        jsonObject3.addProperty("title", "星球大战8:最后的绝地武士");
        jsonObject3.addProperty("publishDate", "2018-01-05");
        jsonObject3.addProperty("content", "《星球大战:最后的绝地武士》承接前作《星球大战:原力觉醒》的剧情,讲述第一军团全面侵袭之下,蕾伊(黛西·雷德利 Daisy Ridley 饰)、芬恩(约翰·博耶加 John Boyega 饰)、波·达默龙(奥斯卡·伊萨克 Oscar Isaac 饰)三位年轻主角各自的抉 择和冒险故事。前作中觉醒强大原力的蕾伊独自寻访隐居的绝地大师卢克·天行者(马克·哈米尔 Mark Hamill 饰),在后者的指导下接受原力训练。芬恩接受了一项几乎不可能完成的任务,为此他不得不勇闯敌营,面对自己的过去。波·达默龙则要适应从战士向领袖的角色转换,这一过程中他也将接受一些血的教训。");
        jsonObject3.addProperty("director", "莱恩·约翰逊");
        jsonObject3.addProperty("price", "55");
        jsonArray.add(jsonObject3);

        JsonObject jsonObject4=new JsonObject();
        jsonObject4.addProperty("title", "羞羞的铁拳");
        jsonObject4.addProperty("publishDate", "2017-12-29");
        jsonObject4.addProperty("content", "靠打假拳混日子的艾迪生(艾伦 饰),本来和正义感十足的体育记者马小(马丽 饰)是一对冤家,没想到因为一场意外的电击,男女身体互换。性别错乱后,两人互坑互害,引发了拳坛的大地震,也揭开了假拳界的秘密,惹来一堆麻烦,最终两人在“卷莲门”副掌门张茱萸(沈腾 饰)的指点下,向恶势力挥起了羞羞的铁拳。");
        jsonObject4.addProperty("director", "宋阳 / 张吃鱼");
        jsonObject4.addProperty("price", "35");
        jsonArray.add(jsonObject4);

        JsonObject jsonObject5=new JsonObject();
        jsonObject5.addProperty("title", "战狼2");
        jsonObject5.addProperty("publishDate", "2017-07-27");
        jsonObject5.addProperty("content", "故事发生在非洲附近的大海上,主人公冷锋(吴京 饰)遭遇人生滑铁卢,被“开除军籍”,本想漂泊一生的他,正当他打算这么做的时候,一场突如其来的意外打破了他的计划,突然被卷入了一场非洲国家叛乱,本可以安全撤离,却因无法忘记曾经为军人的使命,孤身犯险冲回沦陷区,带领身陷屠杀中的同胞和难民,展开生死逃亡。随着斗争的持续,体内的狼性逐渐复苏,最终孤身闯入战乱区域,为同胞而战斗。");
        jsonObject5.addProperty("director", "吴京");
        jsonObject5.addProperty("price", "38");
        jsonArray.add(jsonObject5);

        for(int i=0;i<jsonArray.size();i++){
            JsonObject jo=jsonArray.get(i).getAsJsonObject();
            IndexResponse response=client.prepareIndex("film", "dongzuo")
                    .setSource(jo.toString(), XContentType.JSON).get();
            System.out.println("索引名称:"+response.getIndex());
            System.out.println("类型:"+response.getType());
            System.out.println("文档ID:"+response.getId());
            System.out.println("当前实例状态:"+response.status());
        }
    }

}
第一节:查询所有数据
get http://192.168.213.200:9200/film/dongzuo/_search/
第二节:分页查询
POST http://192.168.1.111:9200/film/dongzuo/_search/
{
"from": 0,
"size": 2
}
第三节:排序
post:http://192.168.1.111:9200/film/dongzuo/_search/
{
"sort":[
{"publishDate":{"order":"desc"}}
]
}
第四节:数据列过滤
POST http://192.168.1.111:9200/film/dongzuo/_search/
{
"from": 0,
"size": 2,
"_source":{
"include":["title","price"]
}
}
第五节:简单条件查询
post http://192.168.1.111:9200/film/dongzuo/_search/
{
"query":{
"match":{"title":"战"}
}
}
第六节:查询条件高亮显示
post http://192.168.1.111:9200/film/dongzuo/_search/
{
"query":{
"match":{"title":"战"}
},
"_source":{
"include":["title","price"]
},
"highlight":{
"fields":{"title":{}}
}
}
java代码实现
package com.oy.demo;

import java.net.InetAddress;

import org.elasticsearch.action.search.SearchRequestBuilder;
import org.elasticsearch.action.search.SearchResponse;
import org.elasticsearch.client.transport.TransportClient;
import org.elasticsearch.common.settings.Settings;
import org.elasticsearch.common.transport.InetSocketTransportAddress;
import org.elasticsearch.index.query.QueryBuilders;
import org.elasticsearch.search.SearchHit;
import org.elasticsearch.search.SearchHits;
import org.elasticsearch.search.fetch.subphase.highlight.HighlightBuilder;
import org.elasticsearch.search.sort.SortOrder;
import org.elasticsearch.transport.client.PreBuiltTransportClient;
import org.junit.After;
import org.junit.Before;
import org.junit.Test;

public class TestIndex {

    private static String host="192.168.213.200"; // 服务器地址
    private static int port=9300; // 端口
    private TransportClient client = null;

    @SuppressWarnings("resource")
    @Before
    public void getCient() throws Exception {
        client = new PreBuiltTransportClient(Settings.EMPTY)
                .addTransportAddress(new InetSocketTransportAddress(InetAddress.getByName(host), port));
    }

    @After
    public void close() {
        if (client != null) {
            client.close();
        }
    }

    /**
     * 查询所有
     * @throws Exception
     */
    @Test
    public void searchAll()throws Exception{
        SearchRequestBuilder srb=client.prepareSearch("film").setTypes("dongzuo");
        SearchResponse sr=srb.setQuery(QueryBuilders.matchAllQuery())
            .execute()
            .actionGet(); // 查询所有
        SearchHits hits=sr.getHits();
        for(SearchHit hit:hits){
            System.out.println(hit.getSourceAsString());
        }
    }

    /**
     * 分页查询
     * @throws Exception
     */
    @Test
    public void searchaging()throws Exception{
        SearchRequestBuilder srb=client.prepareSearch("film").setTypes("dongzuo");
        SearchResponse sr=srb.setQuery(QueryBuilders.matchAllQuery())
            .setFrom(1)
            .setSize(3)
            .execute()
            .actionGet();
        SearchHits hits=sr.getHits();
        for(SearchHit hit:hits){
            System.out.println(hit.getSourceAsString());
        }
    }

    /**
     * 排序查询
     * @throws Exception
     */
    @Test
    public void searchSort()throws Exception{
        SearchRequestBuilder srb=client.prepareSearch("film").setTypes("dongzuo");
        SearchResponse sr=srb.setQuery(QueryBuilders.matchAllQuery())
            .addSort("publishDate", SortOrder.DESC)
            .execute()
            .actionGet();
        SearchHits hits=sr.getHits();
        for(SearchHit hit:hits){
            System.out.println(hit.getSourceAsString());
        }
    }

    /**
     * 数据列过滤
     * @throws Exception
     */
    @Test
    public void searchInclude()throws Exception{
        SearchRequestBuilder srb=client.prepareSearch("film").setTypes("dongzuo");
        SearchResponse sr=srb.setQuery(QueryBuilders.matchAllQuery())
            .setFetchSource(new String[]{"title","price"}, null)
            .execute()
            .actionGet();
        SearchHits hits=sr.getHits();
        for(SearchHit hit:hits){
            System.out.println(hit.getSourceAsString());
        }
    }

    /**
     * 条件查询
     * @throws Exception
     */
    @Test
    public void searchByCondition()throws Exception{
        SearchRequestBuilder srb=client.prepareSearch("film").setTypes("dongzuo");
        SearchResponse sr=srb.setQuery(QueryBuilders.matchQuery("title", "战"))
            .setFetchSource(new String[]{"title","price"}, null)
            .execute()
            .actionGet();
        SearchHits hits=sr.getHits();
        for(SearchHit hit:hits){
            System.out.println(hit.getSourceAsString());
        }
    }

    /**
     * 条件查询高亮显示
     * @throws Exception
     */
    @Test
    public void searchHighlight()throws Exception{
        SearchRequestBuilder srb=client.prepareSearch("film").setTypes("dongzuo");
        HighlightBuilder highlightBuilder=new HighlightBuilder();
        highlightBuilder.preTags("<h2><font>");
        highlightBuilder.postTags("</font></h2>");
        highlightBuilder.field("title");
        SearchResponse sr=srb.setQuery(QueryBuilders.matchQuery("title", "战"))
            .highlighter(highlightBuilder)
            .setFetchSource(new String[]{"title","price"}, null)
            .execute()
            .actionGet();
        SearchHits hits=sr.getHits();
        for(SearchHit hit:hits){
            System.out.println(hit.getSourceAsString());
            System.out.println(hit.getHighlightFields());
        }
    }

}
8、ElasticSearch 查询--组合多条件查询 <--返回目录
第七节:组合多条件查询
实际开发中,基本都是组合多条件查询。elasticsearch提供bool来实现这种需求;
主要参数:
must:文档 必须 匹配这些条件才能被包含进来。

must_not:文档 必须不 匹配这些条件才能被包含进来。

should:如果满足这些语句中的任意语句,将增加 _score ,否则,无任何影响。它们主要用于修正每个文档的相关性得分。

filter:必须 匹配,但它以不评分、过滤模式来进行。这些语句对评分没有贡献,只是根据过滤标准来排除或包含文档。
例子1:模糊查询标题含有“战”:
post:http://192.168.1.111:9200/film/dongzuo/_search/
{
"query": {
"bool": {
"must":{"match":{"title":"战"}}
}
}
}
多条件的话
{
"query": {
"bool": {
"must":[
{"match":{"title":"战"}},
{"match":{"content":"星球"}}
]
}
}
}
java代码实现
/**
 * 多条件查询
 * @throws Exception
 */
@Test
public void searchMutil()throws Exception{
    SearchRequestBuilder srb=client.prepareSearch("film").setTypes("dongzuo");
    QueryBuilder queryBuilder=QueryBuilders.matchPhraseQuery("title", "战");
    QueryBuilder queryBuilder2=QueryBuilders.matchPhraseQuery("content", "星球");
    SearchResponse sr=srb.setQuery(QueryBuilders.boolQuery()
            .must(queryBuilder)
            .must(queryBuilder2))
        .execute()
        .actionGet();
    SearchHits hits=sr.getHits();
    for(SearchHit hit:hits){
        System.out.println(hit.getSourceAsString());
    }
}
例子2:
must_not使用
内容里不含有“武士”
{
"query": {
"bool": {
"must":{"match":{"title":"战"}},
"must_not":{"match":{"content":"武士"}}
}
}
}
public void searchMulti2()throws Exception{
    SearchRequestBuilder srb=client.prepareSearch("film").setTypes("dongzuo");
    QueryBuilder queryBuilder=QueryBuilders.matchPhraseQuery("title", "战");
    QueryBuilder queryBuilder2=QueryBuilders.matchPhraseQuery("content", "武士");
    SearchResponse sr=srb.setQuery(QueryBuilders.boolQuery()
            .must(queryBuilder)
            .mustNot(queryBuilder2))
        .execute()
        .actionGet();
    SearchHits hits=sr.getHits();
    for(SearchHit hit:hits){
        System.out.println(hit.getSourceAsString());
    }
}
例子3:
should使用 提高得分;
{
"query": {
"bool": {
"must":{"match":{"title":"战"}},
"should":[
{"match":{"content":"星球"}},
{"range":{"publishDate":{"gte":"2018-01-01"}}}
]
}
}
}
public void searchMulti3()throws Exception{
    SearchRequestBuilder srb=client.prepareSearch("film").setTypes("dongzuo");
    QueryBuilder queryBuilder=QueryBuilders.matchPhraseQuery("title", "战");
    QueryBuilder queryBuilder2=QueryBuilders.matchPhraseQuery("content", "星球");
    QueryBuilder queryBuilder3=QueryBuilders.rangeQuery("publishDate").gte("2018-01-01");
    SearchResponse sr=srb.setQuery(QueryBuilders.boolQuery()
            .must(queryBuilder)
            .should(queryBuilder2)
            .should(queryBuilder3))
        .execute()
        .actionGet();
    SearchHits hits=sr.getHits();
    for(SearchHit hit:hits){
        System.out.println(hit.getScore()+":"+hit.getSourceAsString());
    }
}
例子4:
filter过滤;
票价必须少于40
{
"query": {
"bool": {
"must": {
"match": {"title": "战"}
},
"filter": {
"range": {"price": {"lte":"40"}}
}
}
}
}
public void searchMulti4()throws Exception{
    SearchRequestBuilder srb=client.prepareSearch("film").setTypes("dongzuo");
    QueryBuilder queryBuilder=QueryBuilders.matchPhraseQuery("title", "战");
    QueryBuilder queryBuilder2=QueryBuilders.rangeQuery("price").lte(40);
    SearchResponse sr=srb.setQuery(QueryBuilders.boolQuery()
            .must(queryBuilder)
            .filter(queryBuilder2))
        .execute()
        .actionGet();
    SearchHits hits=sr.getHits();
    for(SearchHit hit:hits){
        System.out.println(hit.getSourceAsString());
    }
}
9、elasticsearch安装中文分词器插件smartcn <--返回目录
先进入elasticsearch的bin目录然后执行 sh elasticsearch-plugin install analysis-smartcn。
安装后 plugins目录会多一个smartcn文件包;安装后,我们需要重启es;
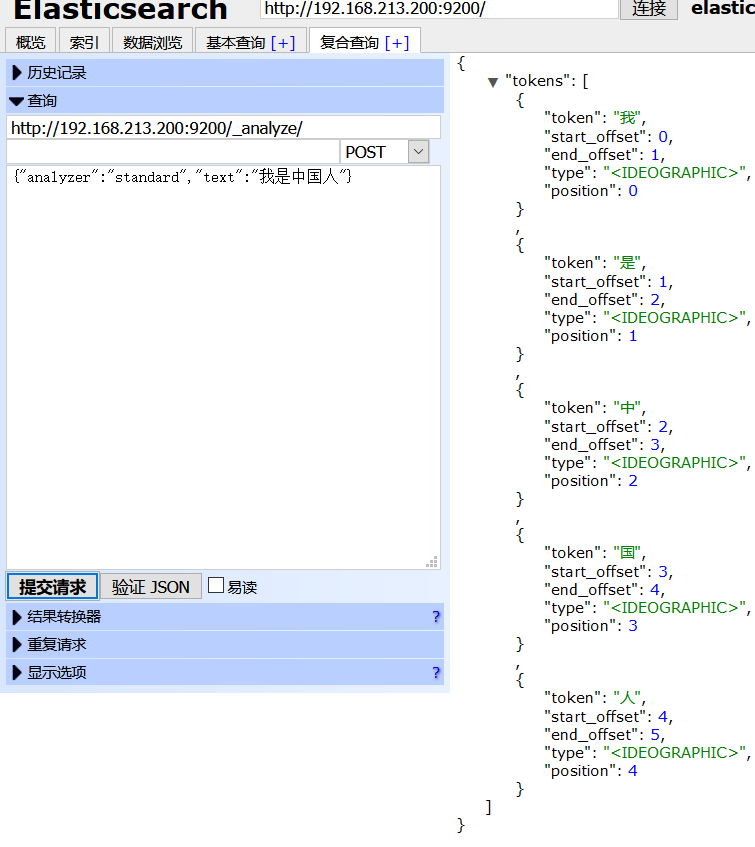
普通分词器效果:
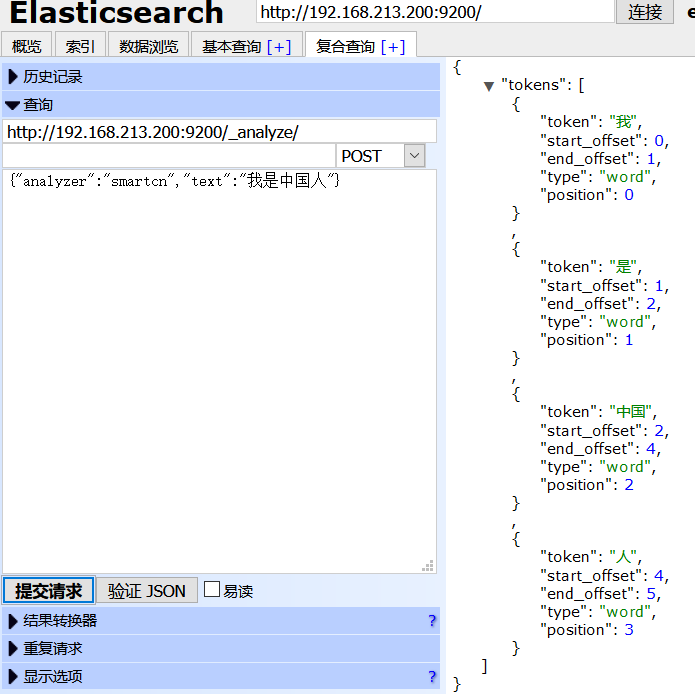
smartcn分词效果
10、elasticsearch基于smartcn中文分词查询 <--返回目录
我们新建索引film2; 然后映射的时候,指定smartcn分词;然后添加一点数据;
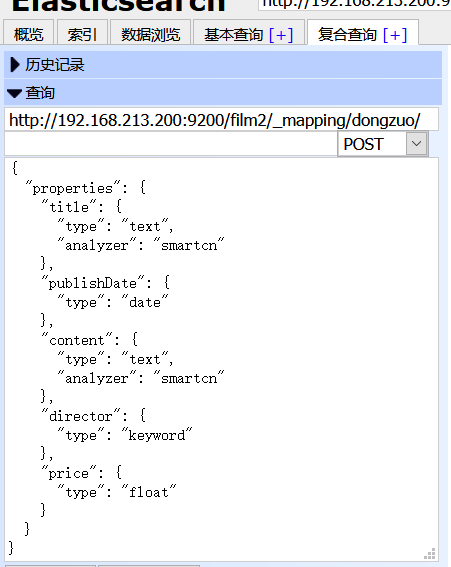
post http://192.168.1.111:9200/film2/_mapping/dongzuo/
{
"properties": {
"title": {
"type": "text",
"analyzer": "smartcn"
},
"publishDate": {
"type": "date"
},
"content": {
"type": "text",
"analyzer": "smartcn"
},
"director": {
"type": "keyword"
},
"price": {
"type": "float"
}
}
}
这样前面film索引,数据是标准分词,中文全部一个汉字一个汉字分词;film2用了smartcn,根据内置中文词汇分词;
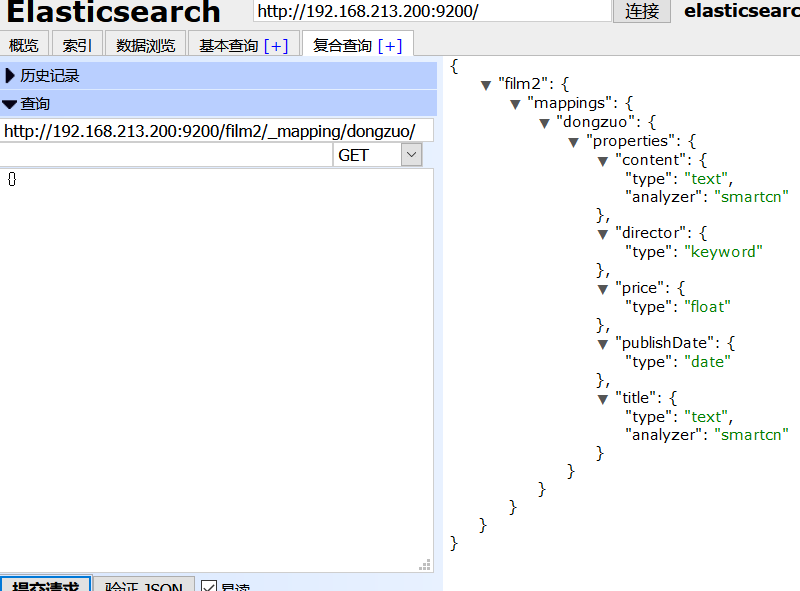
查看索引film2映射:
java代码分词搜索
/**
 * 分词查询
 * @throws Exception
 */
@Test
public void search()throws Exception{
    SearchRequestBuilder srb=client.prepareSearch("film2").setTypes("dongzuo");
    SearchResponse sr=srb.setQuery(QueryBuilders.matchQuery("title", "最狼").analyzer(ANALYZER))
        .setFetchSource(new String[]{"title","price"}, null)
        .execute()
        .actionGet();
    SearchHits hits=sr.getHits();
    for(SearchHit hit:hits){
        System.out.println(hit.getSourceAsString());
    }
}

/**
 * 多字段分词查询
 * @throws Exception
 */
@Test
public void search2()throws Exception{
    SearchRequestBuilder srb=client.prepareSearch("film2").setTypes("dongzuo");
    SearchResponse sr=srb.setQuery(QueryBuilders.multiMatchQuery("非洲星球铁拳", "title","content").analyzer(ANALYZER))
        .setFetchSource(new String[]{"title","price"}, null)
        .execute()
        .actionGet();
    SearchHits hits=sr.getHits();
    for(SearchHit hit:hits){
        System.out.println(hit.getSourceAsString());
    }
}
其他参考:
posted on 2021-02-15 16:22 wenbin_ouyang 阅读(140) 评论(0) 编辑 收藏 举报
