
vue学习笔记
VUE
vue的7个属性,8个方法,以及7个指令。787原则
属性:
- el属性:指示vue编译器什么时候开始解析vue的语法
- data属性:将视图的数据抽象的放在data中
- template属性:用来设置模板,会替换页面元素,包括占位符
- methods属性:放置页面中的业务逻辑
- render属性:创建真正的Virtual Dom
- computed属性:计算属性
- watch属性:watch:function(new,old){} 监听data中数据的变化 两个参数。一个返回新值,一个返回旧值
指令:
- v-bind:绑定dom的某一个属性(简写(:xx="info"))
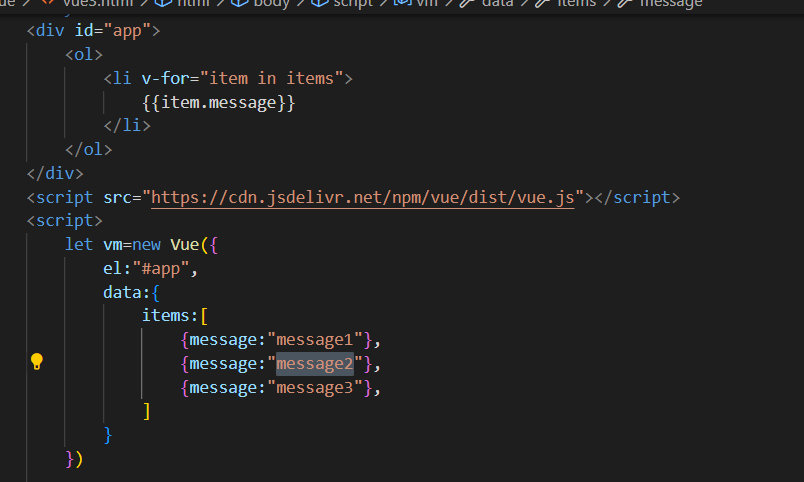
- v-for:循环获取
- v-on:click:绑定事件(简写(@click(sayHi))
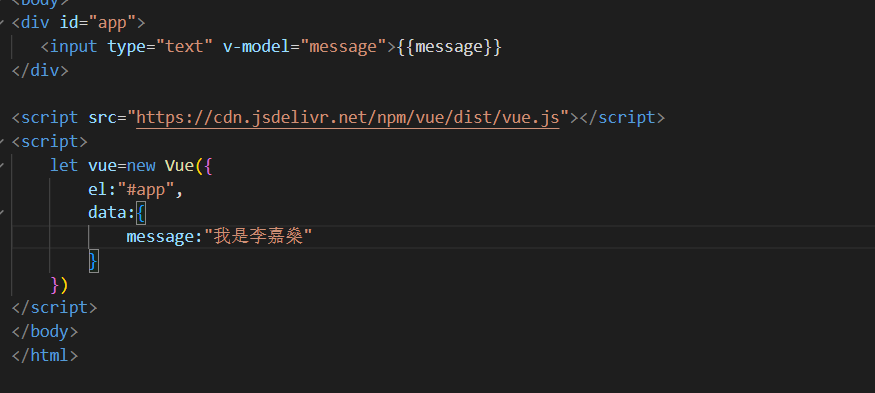
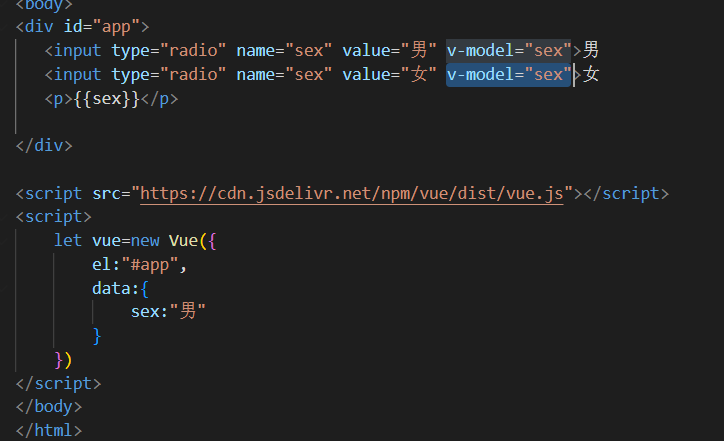
- v-model:(双向绑定):会忽略所有表单元素的select、checked、value属性,总是将vue的实例数据作为数据来源
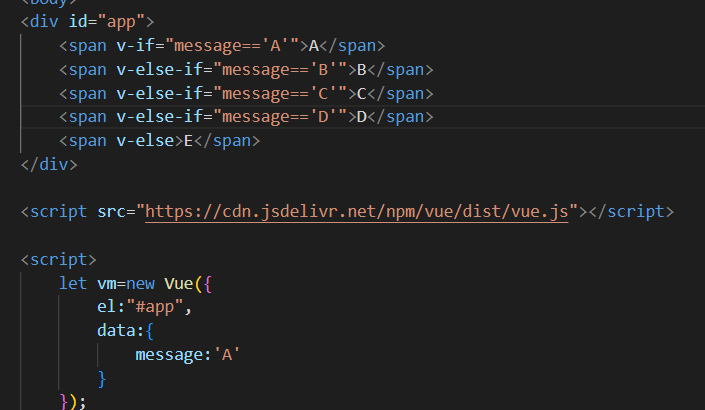
- v-if:判断
- v-text:
- v-html:
- v-show:
方法:
生命周期的八个钩子函数,可以在vue的各个阶段添加代码。
beforeCreate() 创建实例
created() 创建完成
beforeMount() 创建模板
mounted() 创建完成
beforeUpdate() 更新状态
updated() 更新完成
beforeDestory() 销毁 vue 实例
destoryed() 销毁完成
CDN
<script src="https://cdn.jsdelivr.net/npm/vue/dist/vue.js"></script>
Soc:关注点分离原则
axios:网络通信
vue-router:页面跳转
UI框架
iview(iviewui.com)
Element UI:(https://element.eleme.io)
https://gitcode.net/mirrors/PanJiaChen/vue-element-admin?utm_source=csdn_github_accelerator github
https://panjiachen.gitee.io/vue-element-admin/#/login?redirect=%2Fdashboard 在线预览
mpvu和WeUI(小程序)
Ant-Design:阿里巴巴出品,基于React的UI框架
ice-work:(https://v3.ice.work)
Bootstrap:Twitter推出一个用于前端开发的开源工具包
AmazeUI:一款HTML5跨屏前端框架
css预处理器
SASS:基于Ruby,通过服务器处理,功能强大,解析效率高,需学习Ruby语言,上手难度高于LESS
LESS:基于NodeJs,通过客户端处理,使用简单,功能比Sass简单,解析效率低于SASS,一般情况狗使用
webpack打包
一款渐进式JavaScript框架,实现模块化开发,路由,状态等新特性,综合了Angular(模块化)和Reat(虚拟DOM)的优点
前端MV*时代
MVC(同步通信为主):Model View Controller
MVP(异步通信为主):Model View Presenter
MVVM(异步通信为主):Model View ViewModel
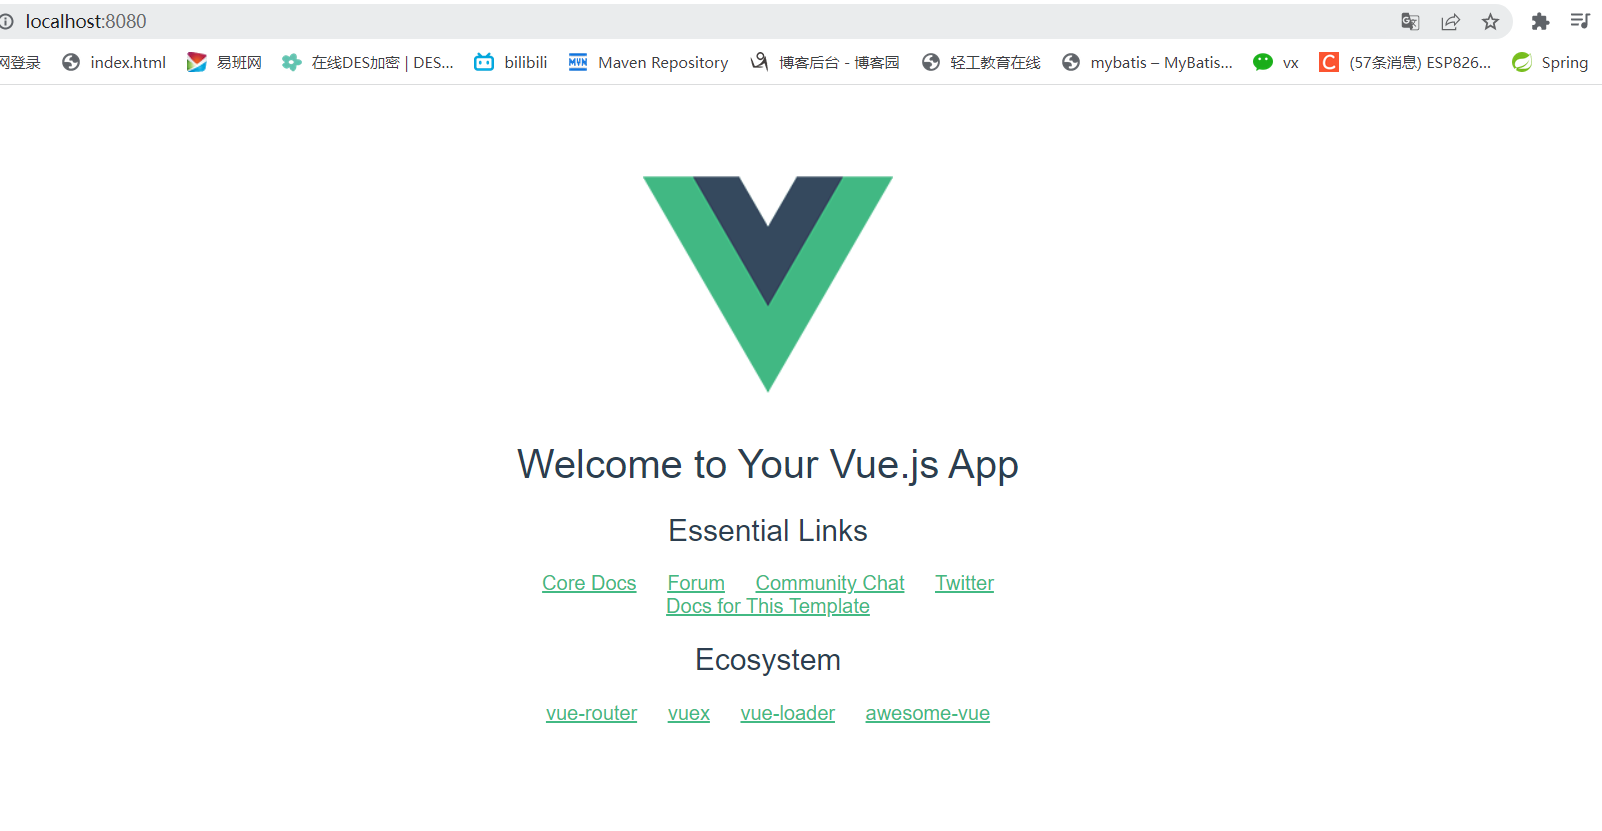
第一个vue程序
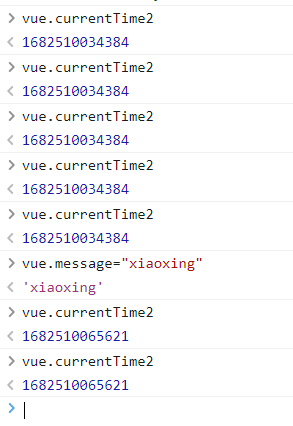
1 2 3 4 5 6 7 8 9 10 11 12 13 14 15 16 17 18 19 20 21 22 | <!DOCTYPE html><html lang="en"><head> <meta charset="UTF-8"> <title>Title</title></head><body><div id="app" > <!--绑定vue的data下的message--> {{message}}</div><script src="https://cdn.jsdelivr.net/npm/vue/dist/vue.js"></script><script> let vm=new Vue({ el:"#app", data:{ message :"xiaoxing" } });</script></body></html> |
结果(双向绑定)
v-bind(绑定span标签的title属性)

v-if和v-else-if
v-for
v-on:click
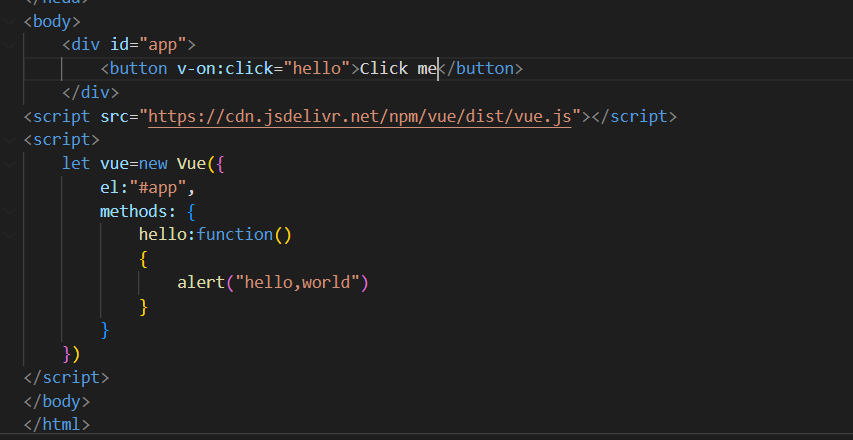
演示

v-model(双向绑定)


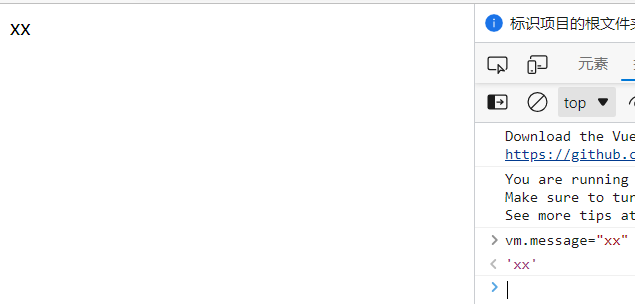
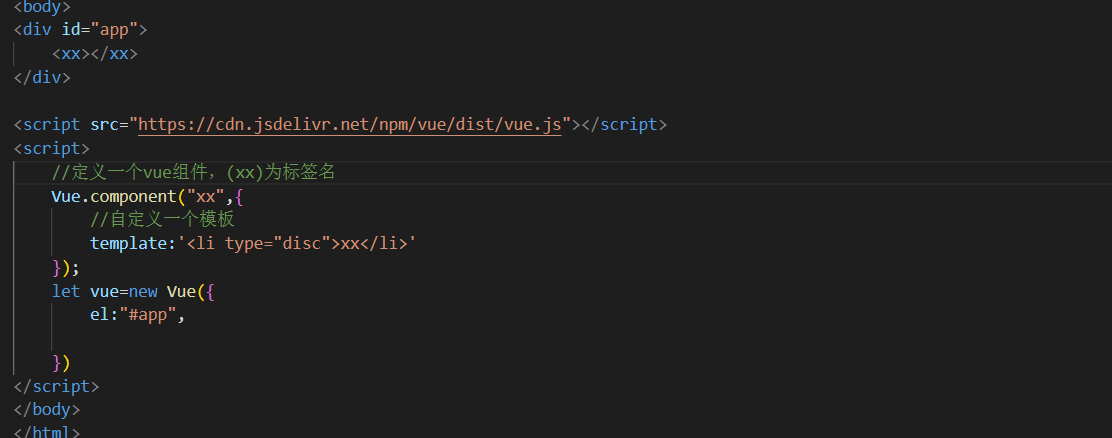
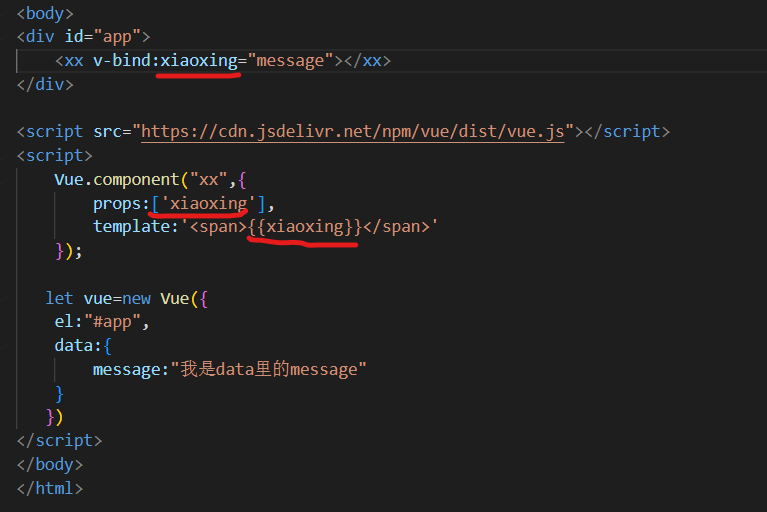
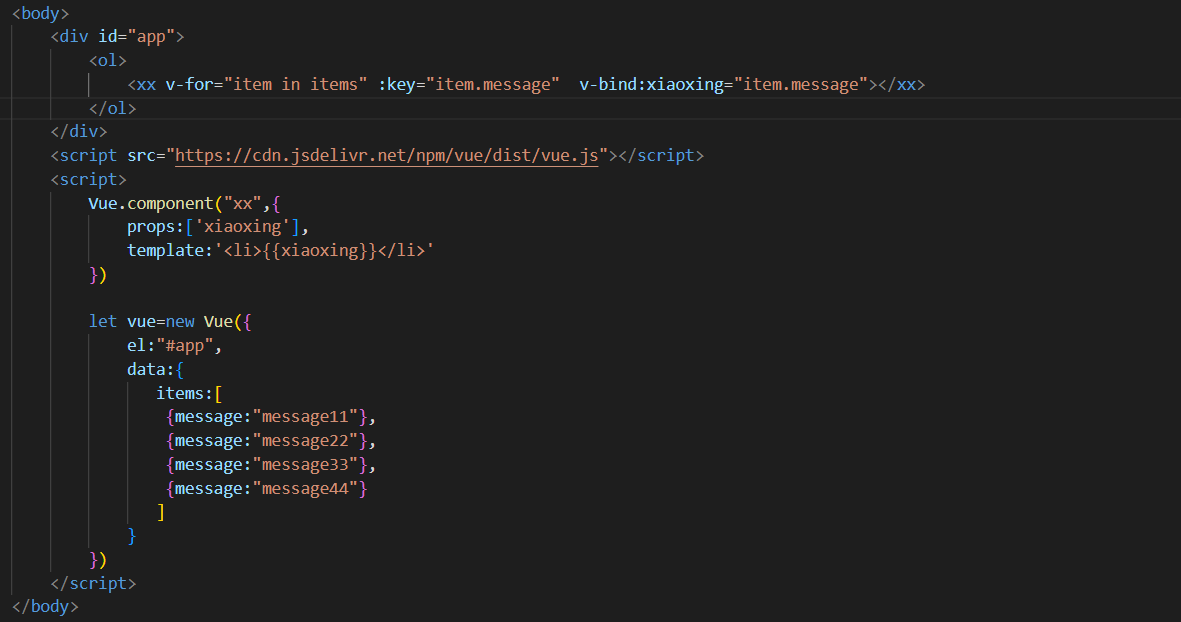
vue组件[ component](自定义标签)
1 2 3 4 | Vue.component("xx",{ //自定义一个模板 template:'<li type="disc">xx</li>' }); |
绑定data中的数据
v-for实现component自定义组件绑定数据(:key 有相同父元素的子元素必须有独特的key。重复的key会造成渲染错误)
vue闪烁问题解决
axios(vscode跨域访问需要安装live server)
cdn:<script src="https://cdn.jsdelivr.net/npm/axios/dist/axios.min.js"></script>
1 2 3 4 5 6 7 8 9 10 11 12 13 14 15 16 17 18 19 20 21 22 23 24 25 26 27 28 29 30 31 32 33 34 35 36 37 38 39 40 41 42 43 | <body> <div id="app"> <xx :data="info"></xx> </div> <script src="https://cdn.jsdelivr.net/npm/vue/dist/vue.js"></script> <script src="https://cdn.jsdelivr.net/npm/axios/dist/axios.min.js"></script> <script> Vue.component( "xx", { props:['data'], template: '<div>'+ '<P>{{data.name}}</p>' + '<P>{{data.url}}</p>' + '<P>{{data.page}}</p>' + '<P>{{data.address.street}}</p>' + '<P>{{data.address.city}}</p>' + '<P>{{data.address.country}}</p>' + '</div>' }) let vue=new Vue({ el:"#app", data(){ return{ info:{ name:null, url:null, page:null, address:{ street:null, city:null, country:null }, } } }, mounted() { axios.get("../data.json").then(response=>(this.info=response.data)); }, }) </script> </body> |
json
1 2 3 4 5 6 7 8 9 10 | { "name":"xiaoxing", "url":"https:www.baidu.com", "page":1, "address":{ "street":"长兴街道", "city":"广州", "country":"中国" }} |
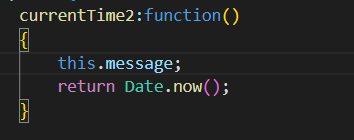
计算属性computed
调用方法时,每次都需要进行计算,有计算过程则必定产生系统开销,如果这个结果是不经常发生变化的就可以将这个结果缓存起来,采用计算属性可以做到这一点。
计算属性的主要特点就是为了将不经常变化的计算结果进行缓存,以节约我们的系统开销
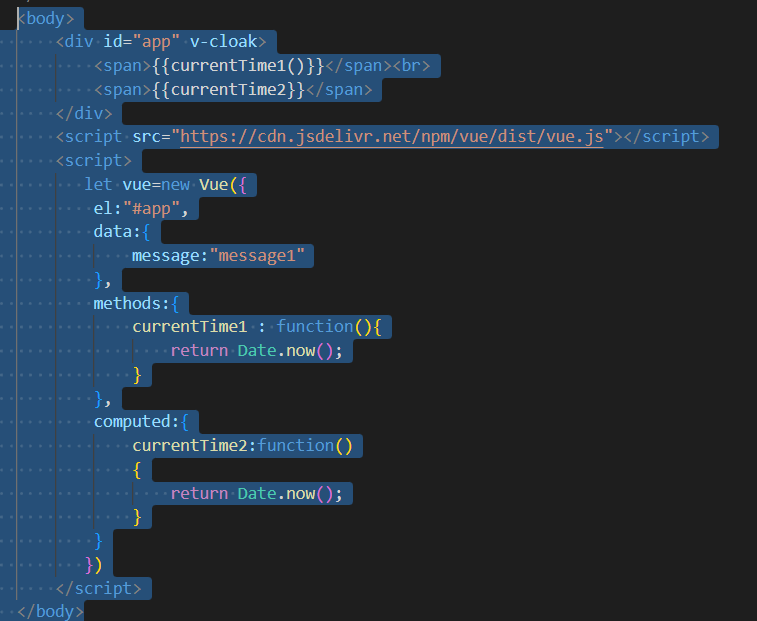
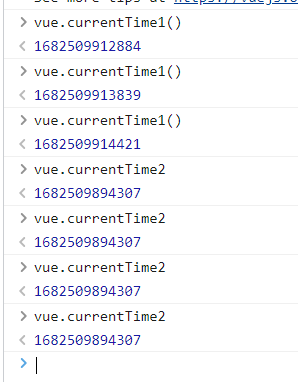
当计算属性的message发生改变,计算属性就会刷新缓存,可以用cache来理解
插槽(slot)
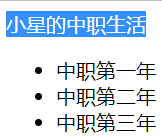
1 2 3 4 5 6 7 8 9 10 11 12 13 14 15 16 17 18 19 20 21 22 23 24 25 26 27 28 29 30 31 32 33 34 35 36 37 38 39 40 41 42 43 44 45 46 47 | <body><div id="app"> <todo> <!-- 指定的slot名插入指定插槽 --> <todo-title slot="title" :title="title"></todo-title> <todo-items slot="items" v-for="item in items" :item="item" :key="item.message" ></todo-items> </todo></div><script src="https://cdn.jsdelivr.net/npm/vue/dist/vue.js"></script><script> // 主标签 slot插槽 // 为slot命名 Vue.component("todo",{ template: `<div> <slot name="title"></slot> <ul> <slot name="items"></slot> </ul> </div>` }); // 子组件1 Vue.component("todo-title",{ props:['title'], template:'<div>{{title}}</div>' }); // 子组件2 Vue.component("todo-items",{ props:['item'], template:'<li>{{item.message}}</li>' }); let vue=new Vue({ el:"#app", data(){ return{ title:"小星的中职生活", items:[ {message:"中职第一年"}, {message:"中职第二年"}, {message:"中职第三年"}, ] } } })</script></body> |
结果:
自定义事件
实现按钮绑定vue下的methods事件

直接绑定并不能操作vue对象的methods方法,就好比组件的获取数据是通过v-bind:来进行数据的传输,事件也是一样的道理

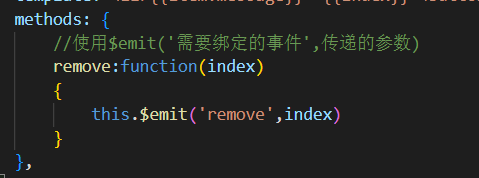
数据绑定使用props,事件绑定使用this.$emit('需要绑定的方法',转递的参数);
结果:

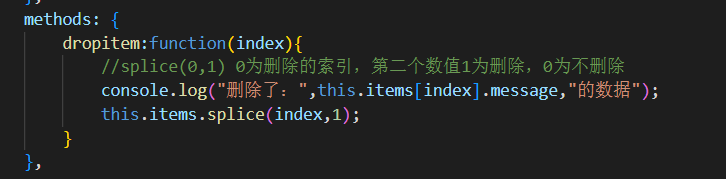
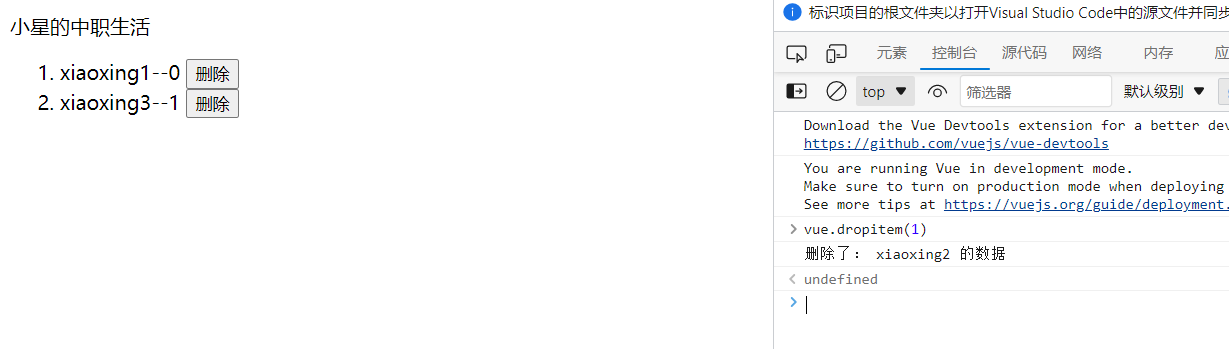
1 2 3 4 5 6 7 8 9 10 11 12 13 14 15 16 17 18 19 20 21 22 23 24 25 26 27 28 29 30 31 32 33 34 35 36 37 38 39 40 41 42 43 44 45 46 47 48 49 50 51 52 53 54 55 56 57 58 59 60 61 62 63 64 65 66 67 | <body> <div id="app"> <xx> <xx-title slot="title" :title="title"></xx-title> <!--item为遍历出来的数值,:item、:index绑定组件里的props的参数--> <!--@remove为绑定组件里的methods下的remove方法,绑定vue对象下的methods方法dropitem(index)--> <xx-item slot="items" v-for="(item,index) in items" :item="item" :index="index" :key="index" @remove="dropitem(index)"></xx-item> </xx> </div> <script src="https://cdn.jsdelivr.net/npm/vue/dist/vue.js"></script> <script type="text/javaScript"> Vue.component( "xx", { template:` <div> <slot name='title'></slot> <ol> <slot name='items'></slot> </ol> </div>` }); Vue.component( "xx-title", { props:['title'], template:`<div><p>{{title}}</p></div>` }); Vue.component( "xx-item", { props:['item','index'], //@click="remove"使用methods的remove方法 template:`<li>{{item.message}}--{{index}} <button @click="remove">删除</button></li>`, methods: { //使用$emit('需要绑定的事件',传递的参数) remove:function(index) { this.$emit('remove',index) } }, }); let vue=new Vue({ el:"#app", data(){ return{ title:"小星的中职生活", items:[ {message:'xiaoxing1'}, {message:'xiaoxing2'}, {message:'xiaoxing3'}, ] } }, methods: { dropitem:function(index){ //splice(0,1) 0为需要操作的索引,第二个数值1为删除当前索引的数据,0为不删除 console.log("删除了:",this.items[index].message,"的数据"); this.items.splice(index,1); } }, }) </script> </body> |
vue插件(Vetur高亮显示,第二个快速创建模板)
vue-cli
环境
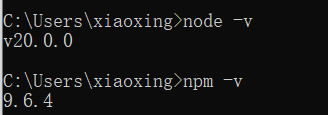
Nodejs:https://nodejs.org/en

安装好Nodejs使用npm -v和node -v测试是否安装成功
npm i -g @vue/cli-init
安装淘宝加速器 cnpm(尽量不使用cnpm,会导致一些奇奇怪怪的问题)
npm install cnpm -g(-g:全局安装)
安装vue-cli
npm install vue-cli -g(安装了才可以使用vue命令)
vue list(查看项目模板)

创建一个基于webpack模板的vue程序
创建项目
vue init webpack vuename(进入指定目录创建项目)
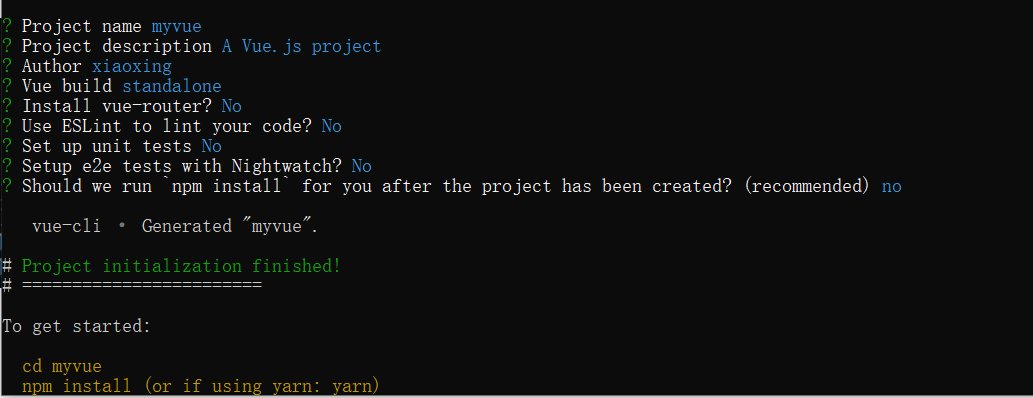
初始化并运行
cd myvue(进入需要运行项目)
npm install(安装所需要的依赖包)
npm run dev(运行项目)

use strict(使用严格检查模式)【es6规范】
webpack
关键字(import、export function dostuff(){}、module "localModule"{})
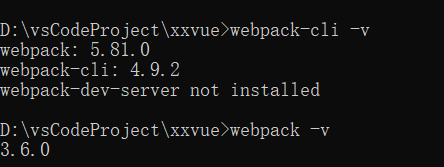
npm install webpack -g (不用指定项目目录)
npm install webpack-cli -g
测试是否安装成功
npm install webpack@3.6.0 -g (指定3.6.0版本)
npm install webpack-cli@4.9.2 -g(@指定安装版本)
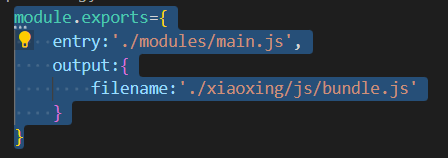
webpack.base.conf.js文件配置
entry:入口文件,指定WebPack用哪个文件作为项目的入口
output:输出,指定WebPack把处理完成的文件放置到指定路径
module:模块,用于处理各种类型的文件
plugins:插件,如:热更新,代码重用等
resolve:设置路径指向
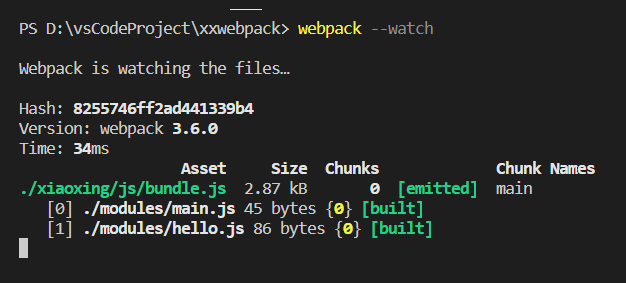
watch:监听,用于设置文件改动后直接打包
export:出口,被访问
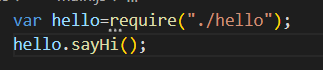
hello.js

require:引用
main.js
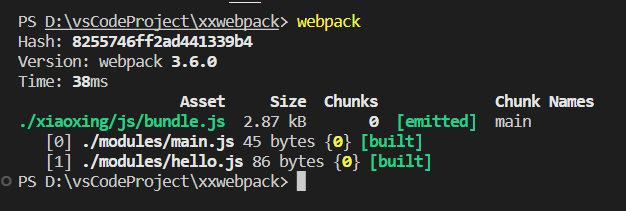
webpack.config.js(webpack打包会找这个文件) bundle.js(建议使用这个命名)
webpack
webpack --watch(实时监听是否改变)
引用

导入跟使用

main.js
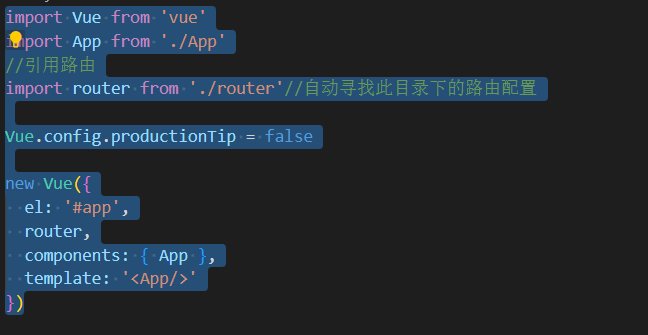
index.js

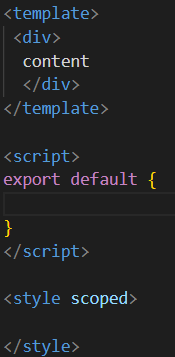
app.vue
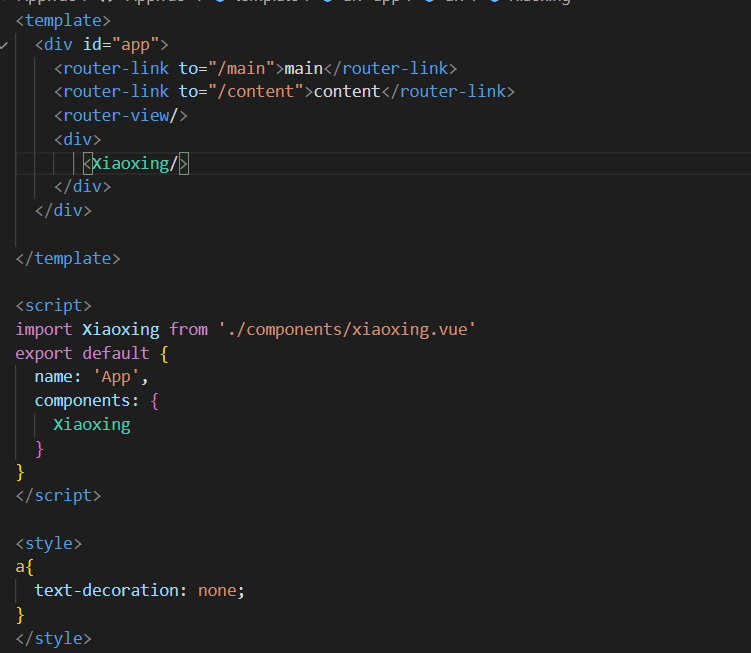
组件
路由模式(默认hash)
hash
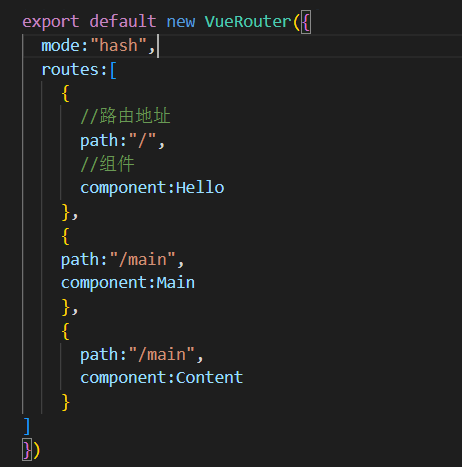

history


嵌套路由(子路由)children
index.js
main.js
1 2 3 4 5 6 7 8 9 10 11 12 13 14 15 16 17 18 19 20 21 22 23 24 25 26 | <template> <div> <h1>首页</h1> <div class="item"> <router-link to="/main/news">新闻</router-link> <router-link to="/main/airs">查看天气</router-link> </div> <!-- 子路由展示视图--> <router-view></router-view> </div></template><script> export default { }</script><style scoped>.item{ margin: 10px; padding-top: 8px; background: skyblue; height: 30px; }</style> |
组件
1 2 3 4 5 6 7 8 9 10 11 12 13 14 15 16 17 | <template> <div> 小星的日常生活 </div></template><script> export default { }</script><style scoped>div{ color: gray;}</style> |
1 2 3 4 5 6 7 8 9 10 11 12 13 14 15 16 17 | <template> <div> 2023-5-1 天气晴 </div></template><script> export default { }</script><style scoped>div{ color: gray;}</style> |
效果

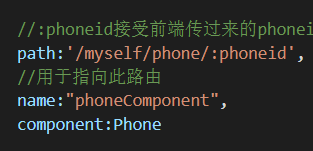
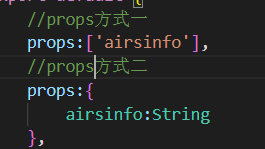
传递参数
方式一
主页面

路由
展示页面
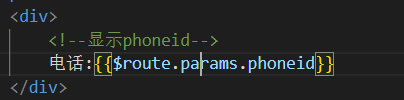
方式二
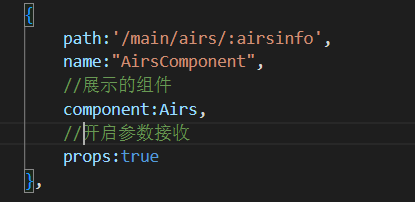
接参数
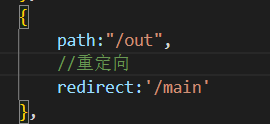
重定向

axios的使用
安装
1 | npm install --save axios vue-axios |
加载
1 2 3 4 5 6 7 8 9 10 11 12 13 14 15 16 17 18 19 20 21 22 23 24 25 26 27 28 29 30 31 32 33 34 35 36 37 38 39 40 41 42 43 44 45 46 47 48 49 50 51 52 53 54 55 56 57 | <template> <div> {{airsinfo}} {{info.name}} {{info.age}} </div></template><script> export default { props:['airsinfo'], beforeRouteEnter:(to,from,next)=>{ console.log("进入如路由之前"); //next每个函数必须需要的属性 //next(false)为返回上一次页面 //next("path")跳转指定页面 例:next("/myself") next(vm=>{ vm.getdata(); }); }, beforeRouteLeave (to, from, next) { console.log("离开了路由"); next(); }, data(){ return{ info:{ name:null, age:null } } }, methods:{ getdata:function(){ // this.axios({ // method: 'get', // //请求json的地址 // url: 'http://localhost:8080/static/data.json', // }).then(function(response){ // console.log(response); // vue.info=response.getdata // }); this.axios({ method:'get', url: 'http://localhost:8080/static/data.json', }).then(response=>(this.info=response.data,console.log(response))) } } }</script><style scoped>div{ color: gray;}</style> |
图标不显示问题
在build目录下的utils.js中添加


【推荐】国内首个AI IDE,深度理解中文开发场景,立即下载体验Trae
【推荐】编程新体验,更懂你的AI,立即体验豆包MarsCode编程助手
【推荐】抖音旗下AI助手豆包,你的智能百科全书,全免费不限次数
【推荐】轻量又高性能的 SSH 工具 IShell:AI 加持,快人一步
· 震惊!C++程序真的从main开始吗?99%的程序员都答错了
· winform 绘制太阳,地球,月球 运作规律
· 【硬核科普】Trae如何「偷看」你的代码?零基础破解AI编程运行原理
· 上周热点回顾(3.3-3.9)
· 超详细:普通电脑也行Windows部署deepseek R1训练数据并当服务器共享给他人