Vue(基础四)_总结五种父子组件之间的通信方式
一、前言
这篇文章主要总结了几种通信方式:
1、方式一:使用props: [ ]和$emit() (适用于单层通信)
2、方式二:$attrs和$listeners(适用于多层)
二、主要内容
(1)父组件向子组件通信
a.步骤:①先给父组件添加自定义属性
②子组件用props:[]接收传来的自定义属性
③子组件就可使用接收到的数据
b.代码如下:

<!DOCTYPE html>
<html lang="en">
<head>
    <meta charset="UTF-8">
    <title>Document</title>
    <style type="text/css">
        *{
            margin:0;
            padding: 0;
        }

        .parent{
            height: 150px;
            width: 400px;
            background-color: blue;
        }

        .child{
            height: 100px;
            width: 200px;
            background-color: pink;
        }
    </style>
</head>
<body>
    <div id='app'>

    </div>
    <script type="text/javascript" src="node_modules/vue/dist/vue.js"></script>
    <script type="text/javascript">

        Vue.component('Child',{

            data(){
                return{

                }
            },

            template:`<div class='child'>
            这是孩子组件
            <input :value='childData'/>


            </div>`,

            props:['childData']

        })


        var Parent = {
            data(){
                return{
                    msg:'这是父组件的数据'
                }
            },

            template:`<div class='parent'>
            这是父组件:
            <Child :childData='msg'></Child>
            </div>
            `
        }

        new Vue({
            el:"#app",
            data(){
                return{

                }
            },

            template:`<Parent></Parent>`,
            components:{
                Parent
            }
        })
    </script>
</body>
</html>
c.测试结果:孩子组件接收到了父组件的数据,并且显示在孩子组件的input框里

d.具体实现:

(2)子组件向父组件通信
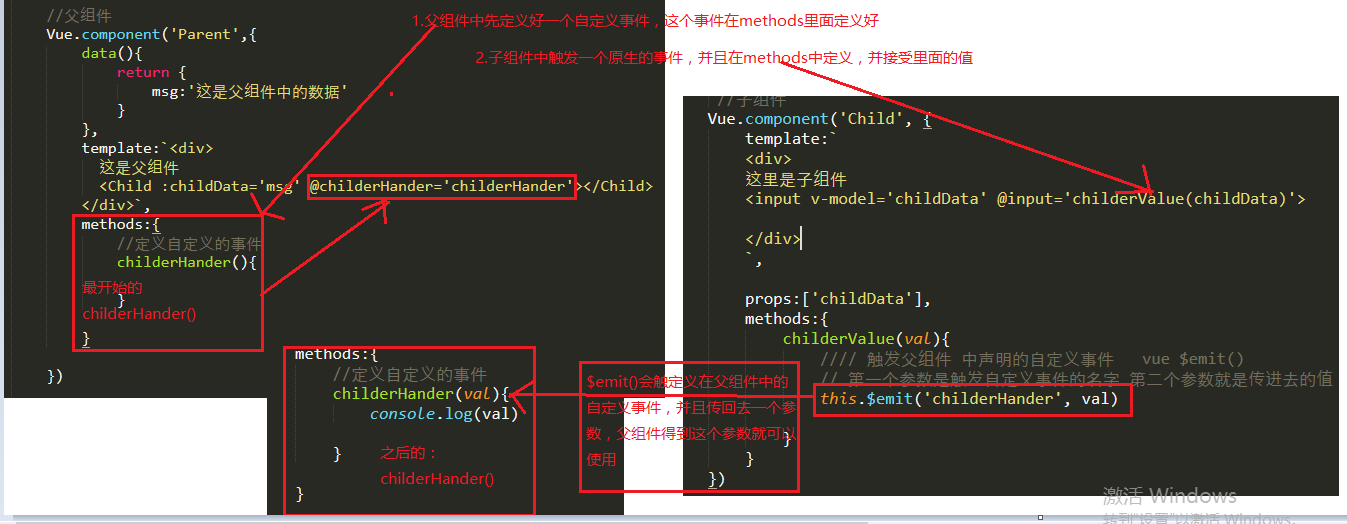
步骤:①现在父组件中定义自定义事件
②子组件中定义一个原生的事件,调用下面methods中定义的
③在子组件的method()中定义一个事件,用$emit(),来触发父组件的事件,
代码如下:

<!DOCTYPE html>
<html lang="en">
<head>
    <meta charset="UTF-8">
    <title>Document</title>
    <style type="text/css">
        *{
            margin:0;
            padding: 0;
        }

        .parent{
            height: 150px;
            width: 400px;
            background-color: blue;
        }

        .child{
            height: 100px;
            width: 200px;
            background-color: pink;
        }
    </style>
</head>
<body>
    <div id='app'>

    </div>
    <script type="text/javascript" src="node_modules/vue/dist/vue.js"></script>
    <script type="text/javascript">

        Vue.component('Child', {
            data(){
                return{
                childData:'孩子'
                }
            },
            template:`<div class='child'>
            这是孩子组件
            <input v-model='childData' @input='childerValue(childData)'/>

            </div>`,

            methods:{
                childerValue:function(val){
                    this.$emit('childerHander', val)
                }

            }

        })

        var Parent = {
            data(){
                return {
                    msg:''


                }
            },

            template:`<div class='parent'>

            <Child @childerHander='childerHander'></Child>
            </div>`,

            methods:{

                childerHander:function(val){
                    console.log(val)

                }
            }
        }


        new Vue({
            el:'#app',
            data(){
                return{


                }
            },
            template:`<div>
            <Parent></Parent>

            </div>`,

            components:{
                Parent
            }


        })
    </script>

</body>
</html>
测试:

具体实现:
-------------------------------------------------------------------------------------------------------------------------------------------------------------------
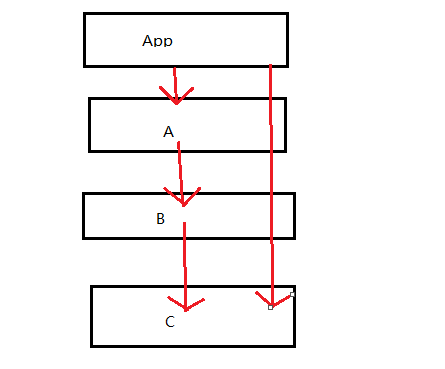
第一种方式适合用于单层嵌套的情况,如果组件中有三层嵌套如果用第一种那么需要在每个子组件中定义props:[]接收,这样实现起来比较麻烦,在vue2.4开始提供了$attrs和$listeners来解决这个问题
能够让组件A之间传递消息给组件C
如下所示:
代码如下:

<!DOCTYPE html>
<html lang="en">
<head>
    <meta charset="UTF-8">
    <title>Document</title>
    <style type="text/css">
        .a{
            width: 400px;
            height: 400px;
            background-color: blue;

        }

        .b{
            width: 300px;
            height: 300px;
            background-color: orange;

        }

        .c{
            width: 200px;
            height: 200px;
            background-color: pink;

        }
    </style>
</head>
<body>
    <div id='app'>
    </div>
    <script type="text/javascript" src="node_modules/vue/dist/vue.js"></script>

    <script type="text/javascript">
        //定义组件cc

        Vue.component('C',{
            data(){
                return{

                }
            },
            template:`<div class='c'>
            这是c组件
             <div>{{$attrs.messagec}}</div>

            </div>`
        })

        Vue.component('B',{
            data(){
                return{

                }
            },
            template:`<div class='b'>
             <C v-bind='$attrs'></C>

            </div>`
        })


        //定义组件A
        Vue.component('A', {
            data(){
                return{

                }
            },

            //1.先接收
            props:['message'],

            template:`<div class='a'>
            <B v-bind='$attrs'></B>

            </div>`
        });


        //定义组件App----A
        var App = {
            data(){
                return{
                    msg:'我是父组件的内容',
                    messagec:'helloc'
                }
            },

            template:`<div>
            这是一个父组件
            <A :messagec='messagec'></A>

            </div>`
        }


        new Vue({
            el:'#app',
            data(){
                return{

                }
            },

            components:{
                App
            },

            template:'<App />'

        })
    </script>
</body>
</html>
测试:

具体实现:

(2)子组件向父组件传递信息

<!DOCTYPE html>
<html lang="en">
<head>
    <meta charset="UTF-8">
    <title>Document</title>
    <style type="text/css">
        .a{
            width: 400px;
            height: 400px;
            background-color: blue;

        }

        .b{
            width: 300px;
            height: 300px;
            background-color: orange;

        }

        .c{
            width: 200px;
            height: 200px;
            background-color: pink;

        }
    </style>
</head>
<body>
    <div id='app'>
    </div>
    <script type="text/javascript" src="node_modules/vue/dist/vue.js"></script>

    <script type="text/javascript">
        //定义组件cc

        Vue.component('C',{
            data(){
                return{

                }
            },
            template:`<div class='c'>
             这是c组件
             <input @input='cClickHandler' />

            </div>`,
            methods:{
                cClickHandler(){
                    alert(1)
                    this.$emit('getCData','这是c的数据')
                }
            }
        })

        Vue.component('B',{
            data(){
                return{

                }
            },
            template:`<div class='b'>
             <C v-on='$listeners'></C>

            </div>`
        })


        //定义组件A
        Vue.component('A', {
            data(){
                return{

                }
            },
            //1.先接收
            props:['message'],

            template:`<div class='a'>
            <B v-on='$listeners'></B>

            </div>`
        });


        //定义组件App----A
        var App = {
            data(){
                return{
                    msg:'我是父组件的内容',
                    messagec:'helloc'
                }
            },
            template:`<div>
            这是一个父组件
            <A v-on:getCData='getCData'></A>
            </div>`,
            methods:{
                getCData(val){
                    console.log(val)
                }
            }
        }


        new Vue({
            el:'#app',
            data(){
                return{

                }
            },

            components:{
                App
            },

            template:'<App />'

        })
    </script>
</body>
</html>
测试如下:

具体实现:

----------------------------------------------------------------------------------------------------------------------------------------------------------------------------------------------------------------
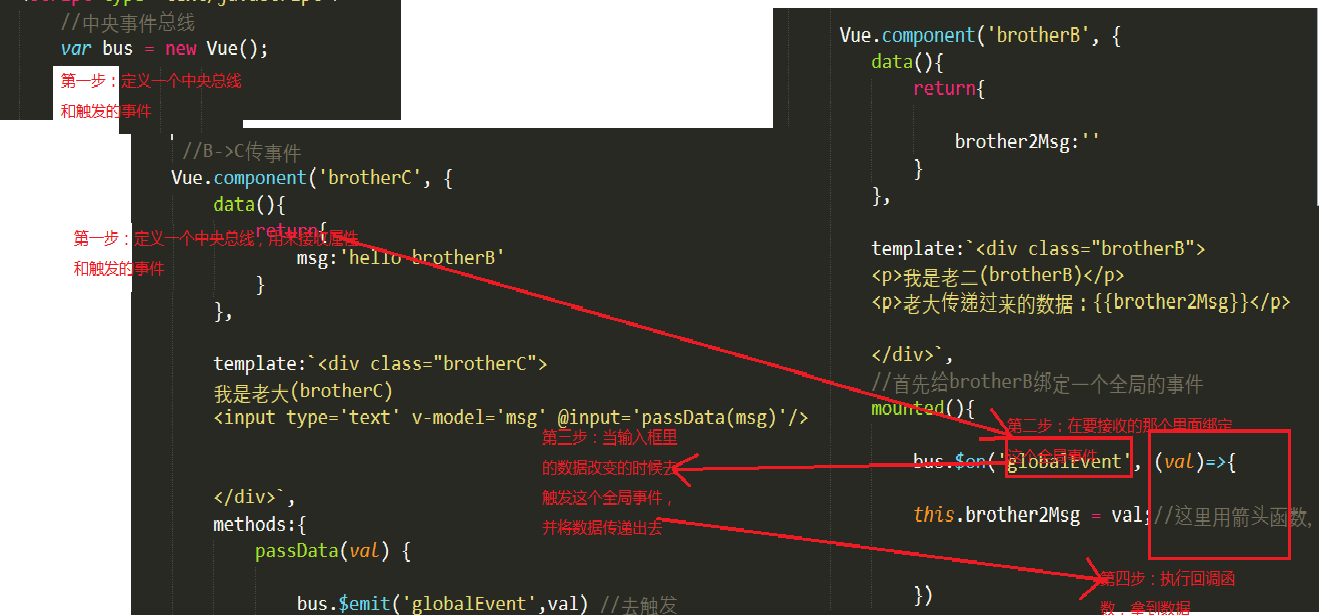
方式三:上面两种方式都是父子组件之间数据的传递,如果两个组件不是父子关系呢?这种情况下可以使用中央事件总线的方式,新建一个Vue事件bus对象,然后通过bus.$emit触发事件,bus.$on监听触发的事件
例子如下:

代码如下:

<!DOCTYPE html>
<html lang="en">
<head>
    <meta charset="UTF-8">
    <title>Document</title>
    <style type="text/css">
        .brotherB{
            width: 400px;
            height: 400px;
            background-color: blue;
        }

        .brotherC{
            width: 200px;
            height: 200px;
            background-color: pink;
        }
    </style>
</head>
<body>

    <div id='app'>

    </div>
    <script type="text/javascript" src="node_modules/vue/dist/vue.js"></script>
    <script type="text/javascript">
        //中央事件总线
        var bus = new Vue();
         //B->C传事件
        Vue.component('brotherC', {
            data(){
                return{
                    msg:'hello brotherB'
                }
            },

            template:`<div class="brotherC">
            我是老大(brotherC)
            <input type='text' v-model='msg' @input='passData(msg)'/>


            </div>`,
            methods:{
                passData(val) {

                    bus.$emit('globalEvent',val) //去触发
                }
            }
        });

         Vue.component('brotherB', {
            data(){
                return{

                    brother2Msg:''
                }
            },

            template:`<div class="brotherB">
            <p>我是老二(brotherB)</p>
            <p>老大传递过来的数据:{{brother2Msg}}</p>

            </div>`,
            //首先给brotherB绑定一个全局的事件
            mounted(){

                bus.$on('globalEvent', (val)=>{

                this.brother2Msg = val;//这里用箭头函数,避免避免this改变


                })
            }


        });

           var App = {
               data(){
                   return{
                       msg:'我是父组件的内容'
                   }
               },

               template:`<div>

               <brotherC></brotherC>
               <brotherB></brotherB>

               </div>`
           }

           new Vue({
               el:"#app",
               data(){
                   return{

                   }
               },

               template:'<App/>',
               components:{
                   App
               }

           })

    </script>

</body>
</html>
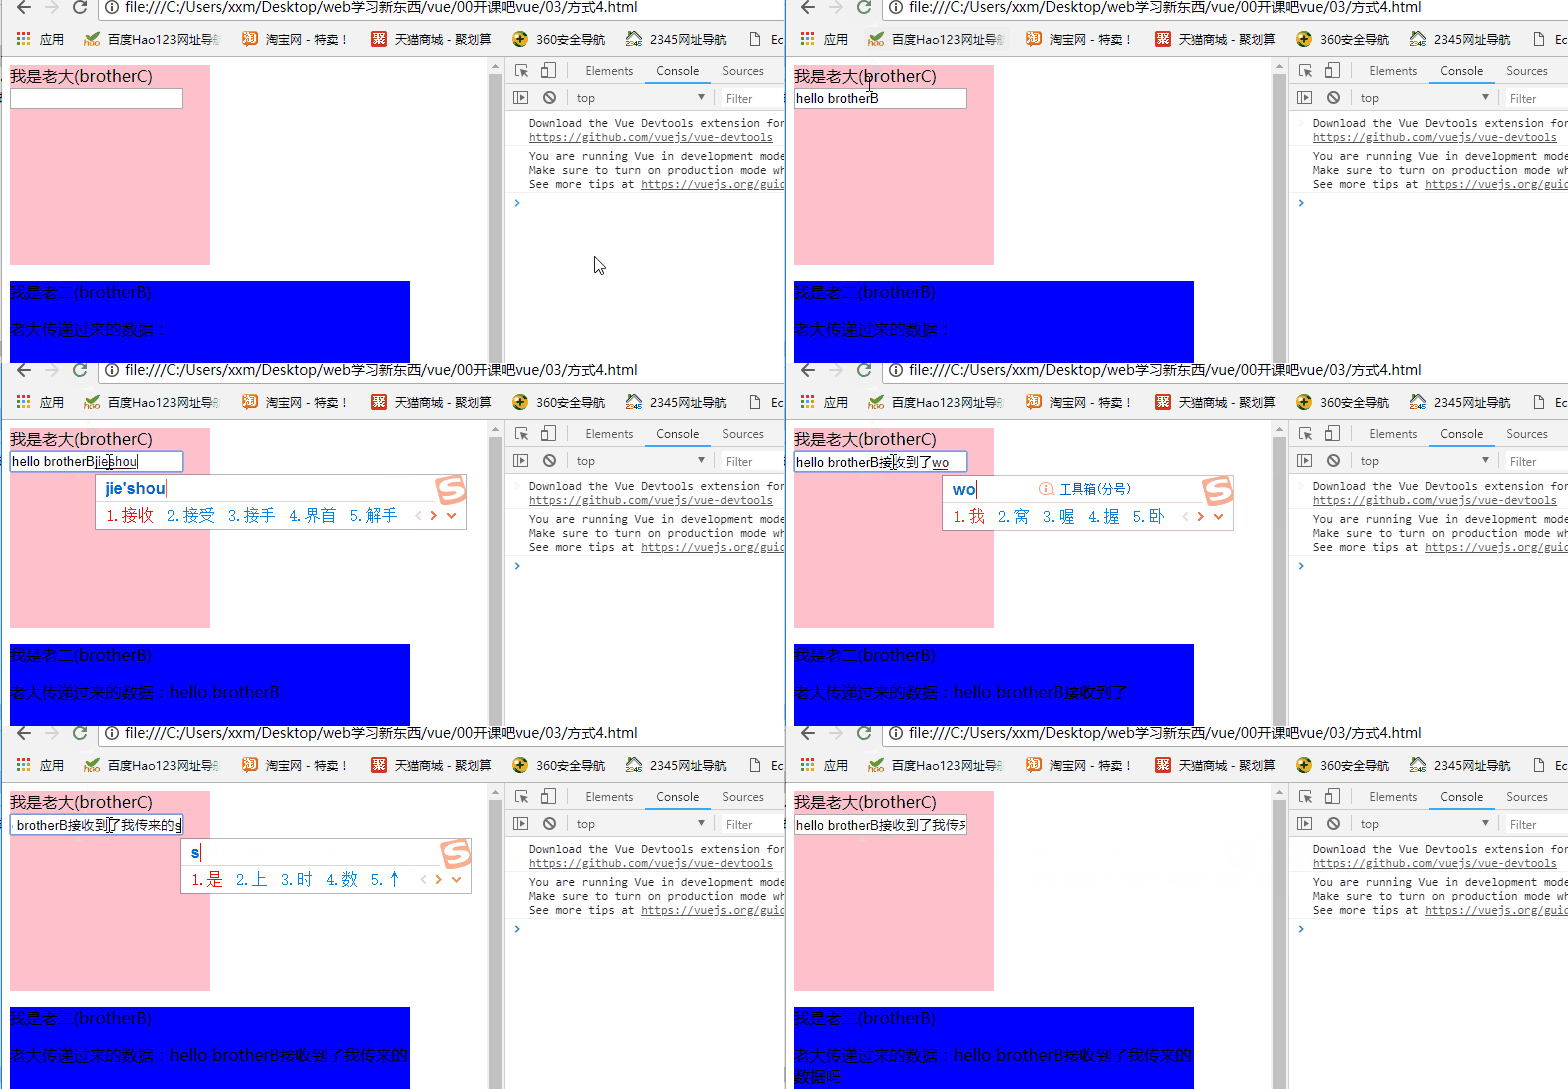
演示效果如下:
具体实现:
------------------------------------------------------------------------------------------------------------------------------------------------------------------------------------------------
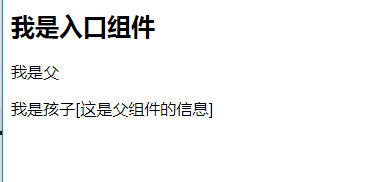
方式四:父组件中通过provide来提供变量,然后在子组件中通过inject来注入变量,不论子组件有多深,只要调用了inject那么就可以注入provider中自定义的属性,而不只仅仅是从prop中接受到的数据,只要在生命周期内,子组件都可以调用

<!DOCTYPE html>
<html lang="en">
<head>
    <meta charset="UTF-8">
    <title>Document</title>
</head>
<body>
    <div id='app'>

    </div>
    <script type="text/javascript" src="node_modules/vue/dist/vue.js"></script>

    <script type="text/javascript">

        Vue.component('Child', {


            data(){
                return {
                    msg:''
                }
            },

            template:`<div>
            我是孩子{{msg}}

            </div>`,
            //2.注入
            inject:['for'],

            created(){
                //3.拿到
                this.msg = this.for
            }
        })


        Vue.component('Parent', {
            template:`<div>
            <p>我是父</p>
            <Child />

            </div>`
        })
        var App = {
            data(){
                return{

                }
            },
            //1。提供
            provide:{
                for:'[这是父组件的信息]'
            },

            template:`<div>
            <h2>我是入口组件</h2>
            <Parent />

            </div>`
        }

        new Vue({
            el:"#app",
            data(){
                return {

                }
            },

            template:'<App/>',
            components:{
                App
            }

        })
    </script>
</body>
</html>
测试如下:
------------------------------------------------------------------------------------------------------------------------------------------------------------
代码实现:

<!DOCTYPE html>
<html lang="en">
<head>
    <meta charset="UTF-8">
    <title>Document</title>
    <style type="text/css">
        .child{
            width: 300px;
            height: 300px;
            background-color: pink;
        }

        .parent{
            width: 500px;
            height: 500px;
            background-color: blue;
        }
    </style>
</head>
<body>
    <div id="app"></div>
    <script src="https://cdn.jsdelivr.net/npm/vue/dist/vue.js"></script>
    <script type="text/javascript">
        Vue.component('Child',{
            data(){
                return{
                    mymessage:''
                }
            },
            template:`<div class="child">
            <input type="text" v-model="mymessage" @input='changeValue'/>

            </div>`,
            methods:{
                changeValue(){
                    this.$parent.message = this.mymessage
                }
            }
        })

        Vue.component("Parent",{
            data(){
                return{
                    message:"hello"
                }
            },
            template:`<div class="parent">
            <p>我是父组件{{message}}</p>

            <Child></Child>

            </div>`,

            methods:{

            }
        })

        var App={
            data(){
                return{

                }
            },
            template:`<div>
            <h2>我是入口组件</h2>
            <Parent />
            </div>`
        }

        new Vue({
            el:"#app",
            data(){
                return{

                }
            },

            template:`<App />`,
            components:{
                App
            }
        })
    </script>
</body>
</html>

<!DOCTYPE html>
<html lang="en">
<head>
    <meta charset="UTF-8">
    <title>Document</title>
    <style type="text/css">
    *{
            margin:0;
            padding: 0;
        }

        .parent{
            height: 150px;
            width: 400px;
            background-color: blue;
        }

        .child{
            height: 100px;
            width: 200px;
            background-color: pink;
        }

    </style>

</head>
<body>
    <div id='app'>

    </div>
    <script type="text/javascript" src="node_modules/vue/dist/vue.js"></script>
     <script type="text/javascript">

         Vue.component('Child', {
         props:{//子组件通过props接收父组件的value  props:[]也可以
        value:String,
        },

        data(){
        return{
            mymessage:this.value //将上面的this.value赋值给mymessage

          }
        },

        template:`<div class='child'>
        <input type="text" v-model='mymessage' @input='changeValue' />

        </div>`,

        methods:{
            changeValue(){//通过$parent将子组件的信息传递给孩子

                this.$parent.message = this.mymessage;
                console.log(this.$parent)
            }
        }


     })


     Vue.component('Parent',{
             //当点击之后,
             template:`<div class='parent'>
             <p>我是父亲组件{{message}}</p>
             <button @click='changeValue'>test</button>
             <Child></Child>


             </div>`,
             methods:{//通过$chidren[0]传递给孩子
                 changeValue(){
                     this.$children[0].mymessage = 'hello'
                 }
             },
             data(){
                 return {
                     message:'hello'
                 }
             }
         })


         var App = {
             data(){
                 return{

                 }
             },
             template:`<div>
             <h2>我是入口组件</h2>
             <Parent/>

             </div>`
         }

          new Vue({
               el:"#app",
               data(){
                   return{

                   }
               },

               template:'<App/>',
               components:{
                   App
               }

           })
     </script>


</body>
</html>
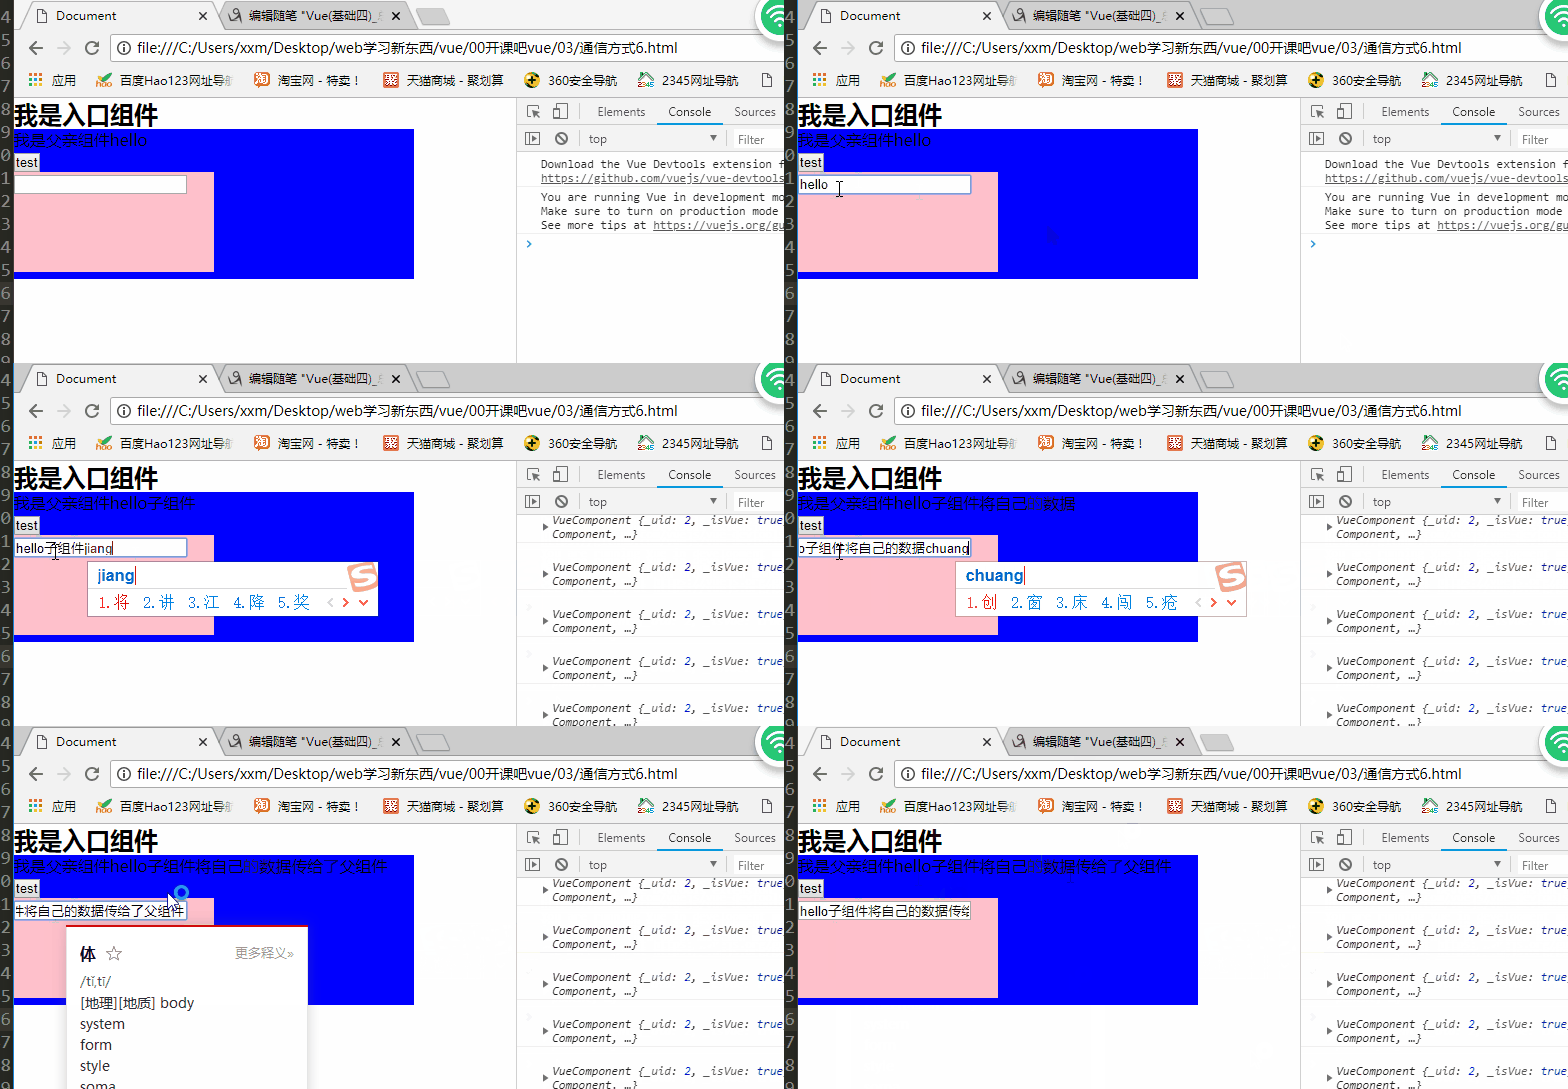
测试:
三、总结
1、常用的方式是前三种


