Vue快速入门(从入门到实战)(IDEA版)
前言
在入门Vue之前最好先了解一下它:Vue.js百度百科
在了解了Vue之后接下来来实际操作一下:
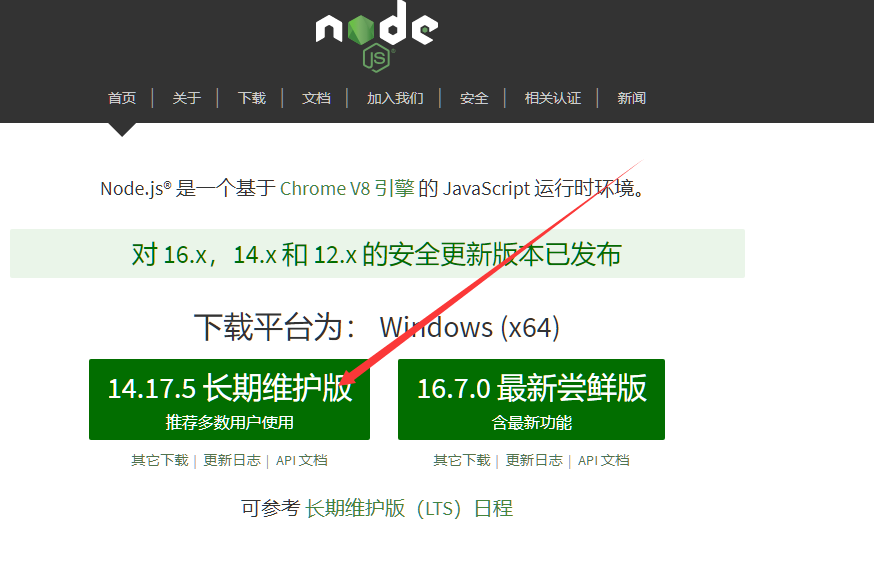
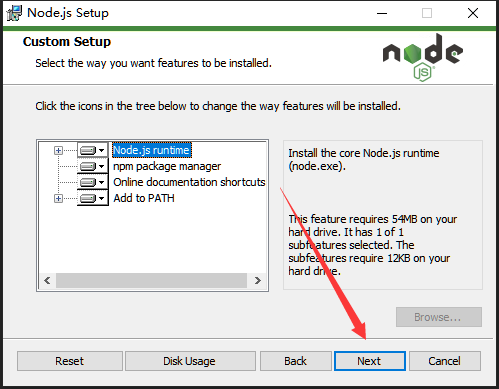
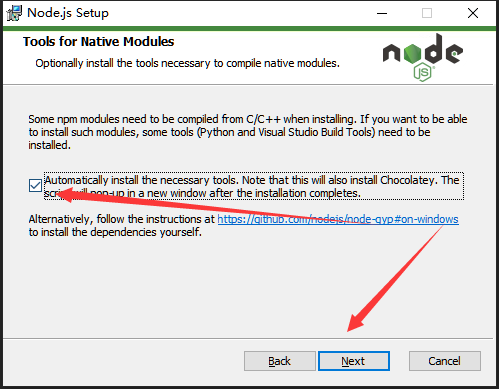
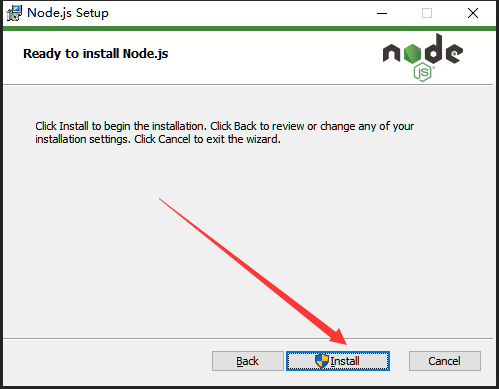
一、安装Node.js
进入Node.js官网下载安装程序进行安装: Node.js官网
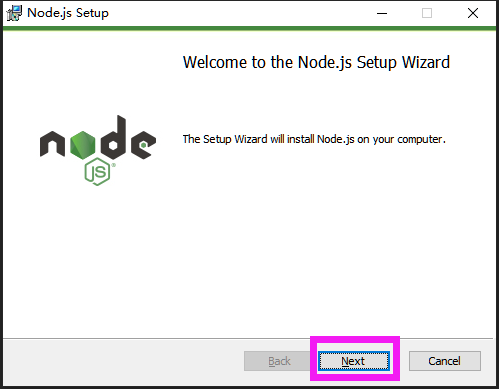
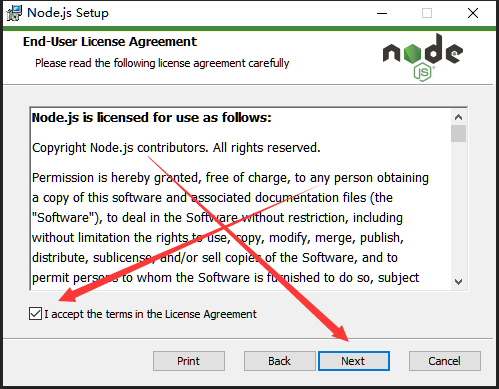
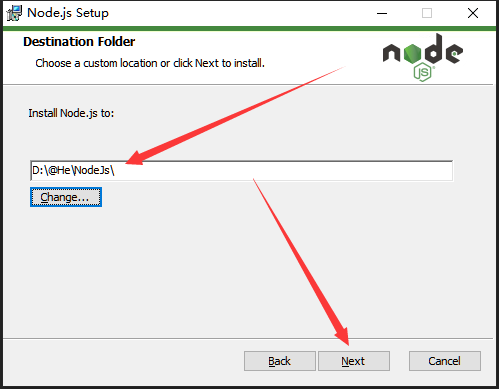
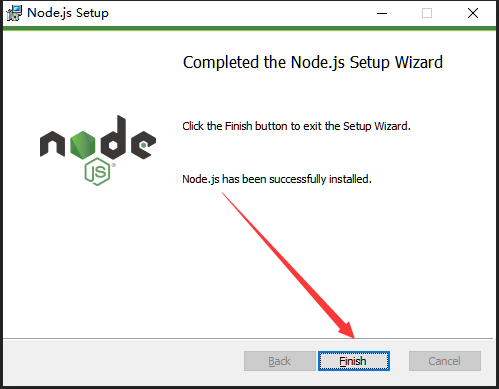
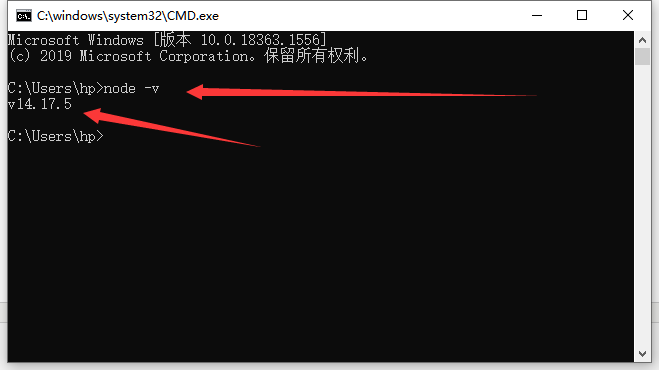
安装完成后,使用CMD(管理员权限)命令窗口输入
node -v
然后回车,打印出版本号即为安装完成!
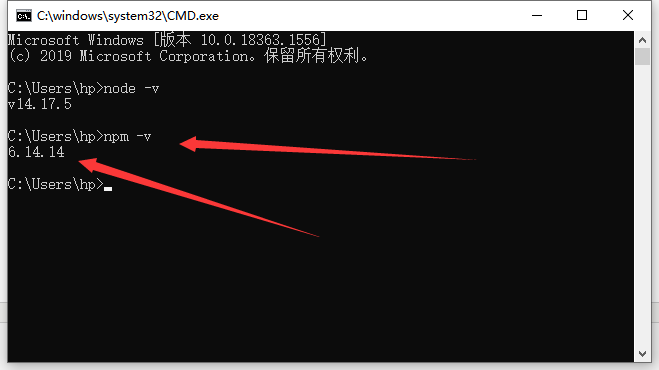
二、NPM
npm版本查看输入 npm -v 然后回车查看:
npm 默认的仓库地址是在国外网站,速度较慢,这里我们设置到淘宝镜像。
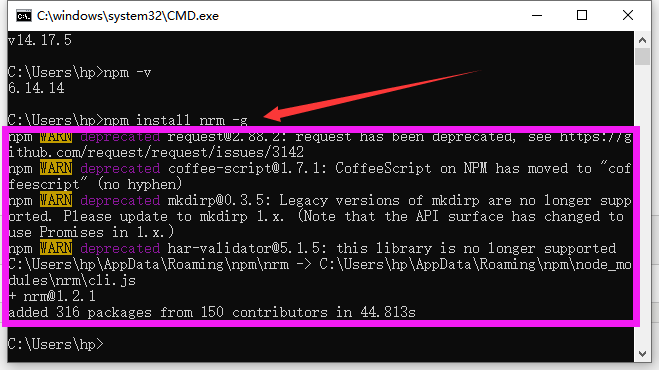
切换镜像我们使用切换镜像工具 :nrm
我们首先安装 nrm,这里 -g 代表全局安装:
npm install nrm -g
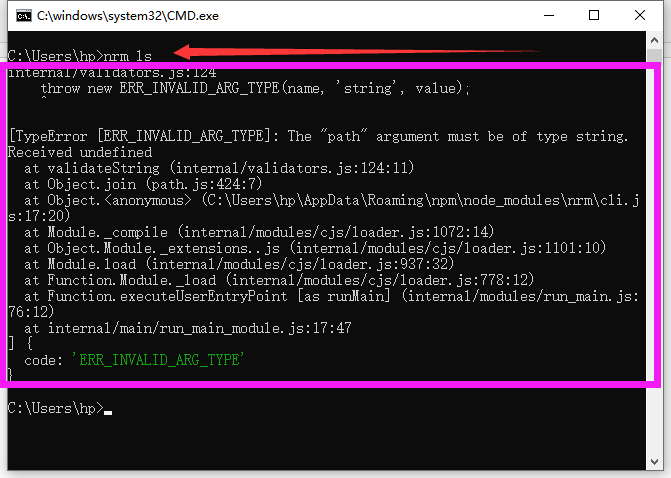
这时输入 nrm ls 会报错:
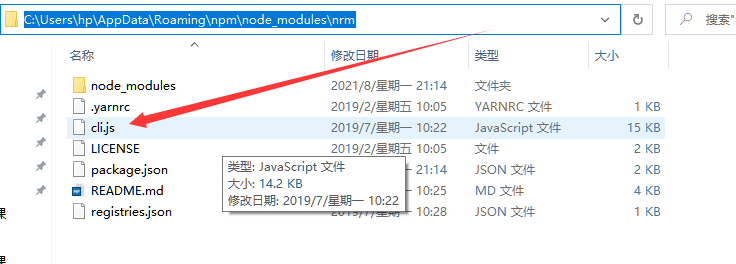
找到这个文件 C:\Users\hp\AppData\Roaming\npm\node_modules\nrm
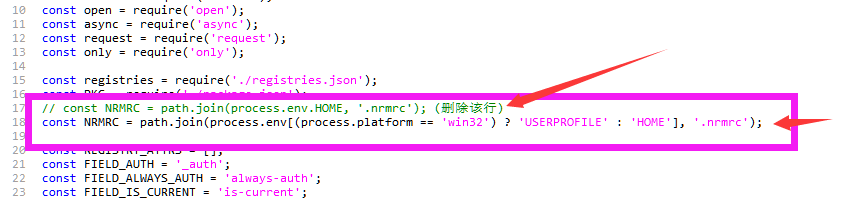
// const NRMRC = path.join(process.env.HOME, '.nrmrc'); (删除该行)
const NRMRC = path.join(process.env[(process.platform == 'win32') ? 'USERPROFILE' : 'HOME'], '.nrmrc');
继续输入 nrm ls:
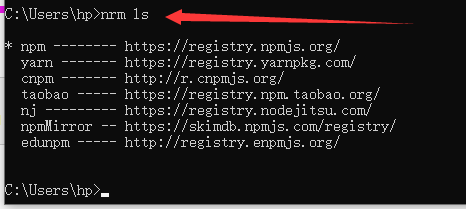
切换到淘宝镜像:
nrm use taobao

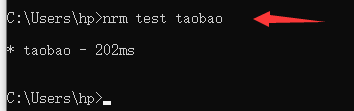
测试一下 nrm test taobao
三、创建工程
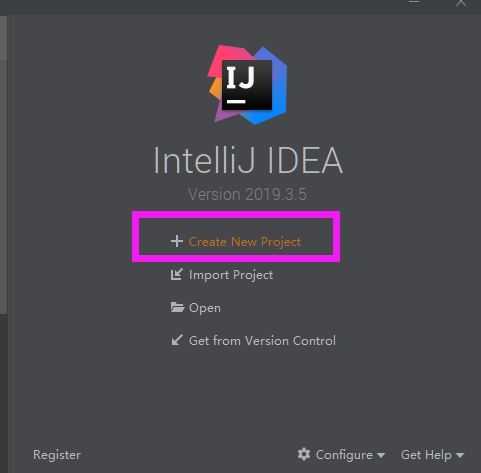
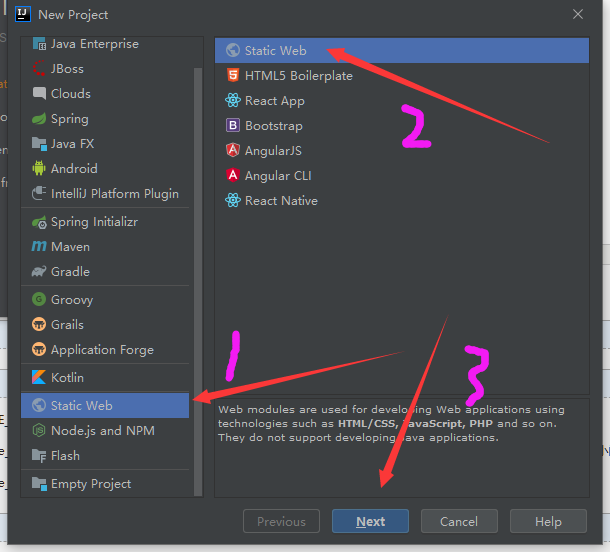
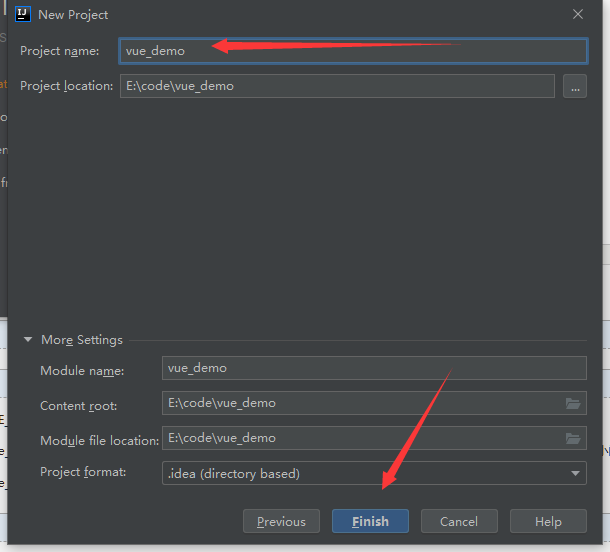
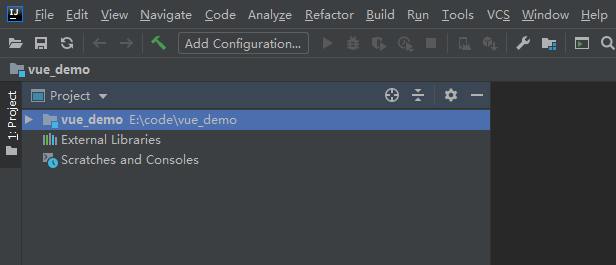
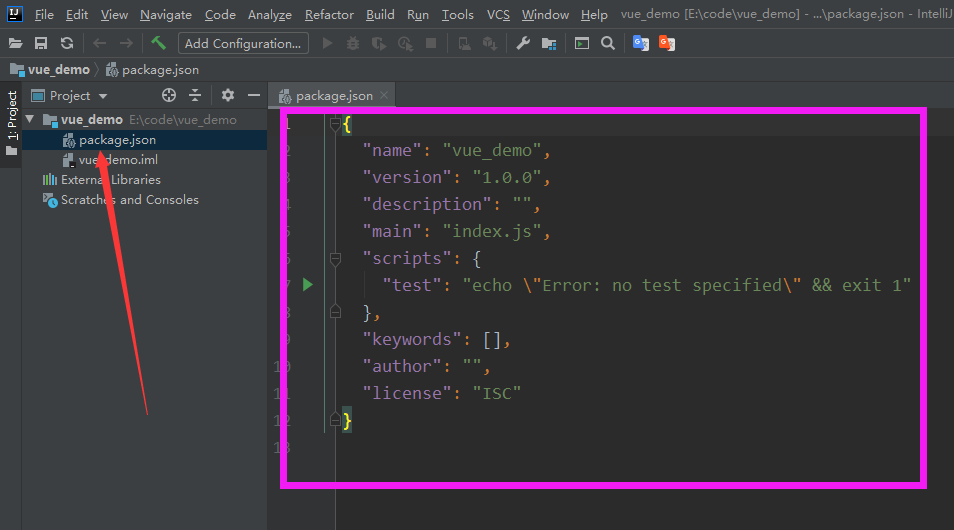
1、创建工程
2、安装Vue
在IDEA的命令窗口输入 npm init -y
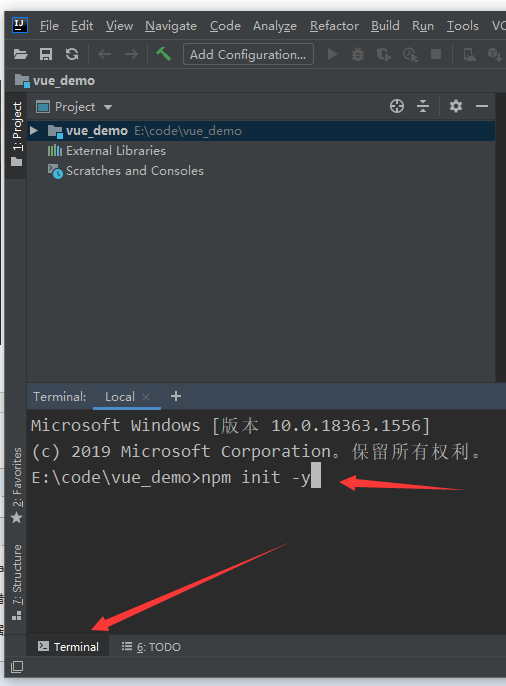
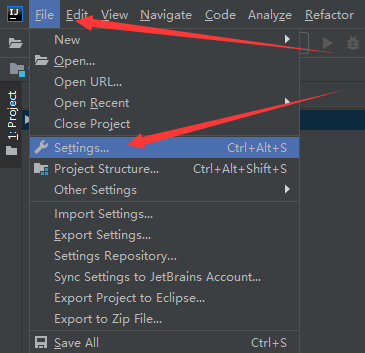
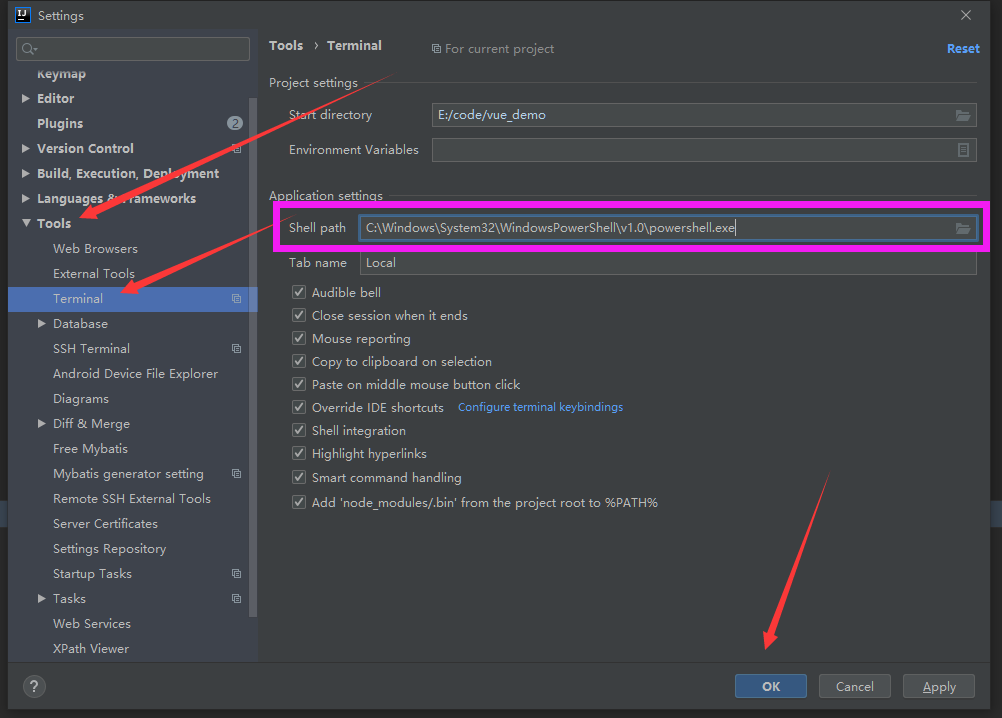
如果回车会报错,那么需要更改一下设置:
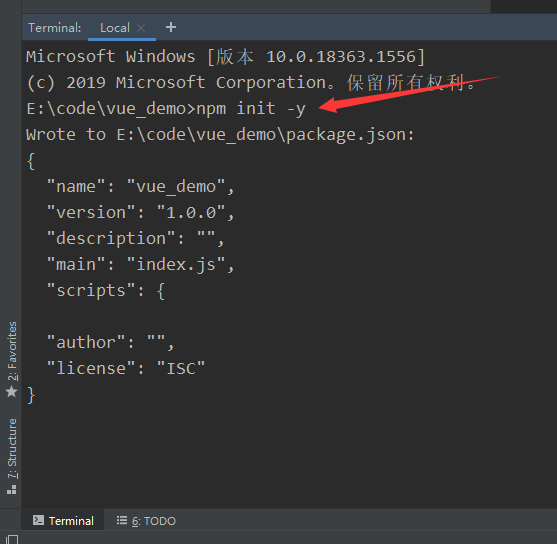
(1):初始化项目:
npm init -y
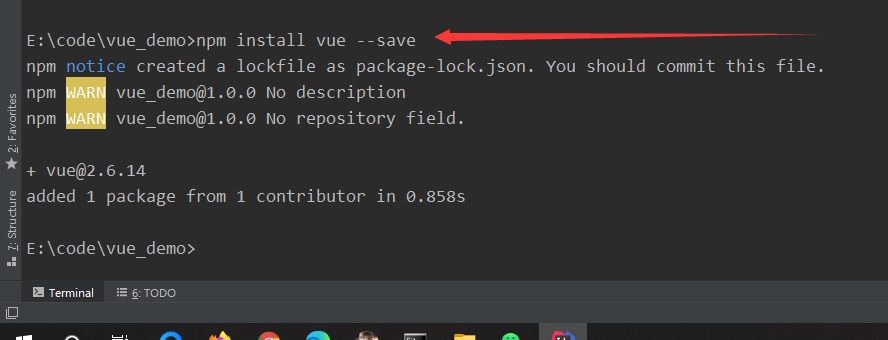
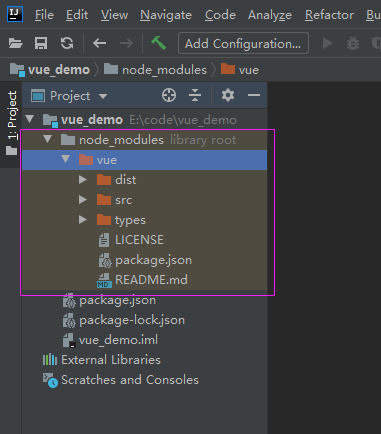
(2):安装Vue:
只在当前项目安装Vue:
npm install vue --save
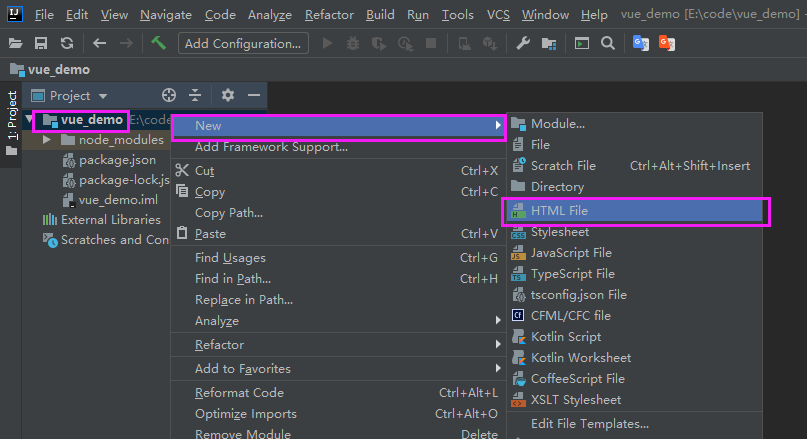
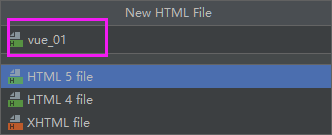
3:创建HTML文件:
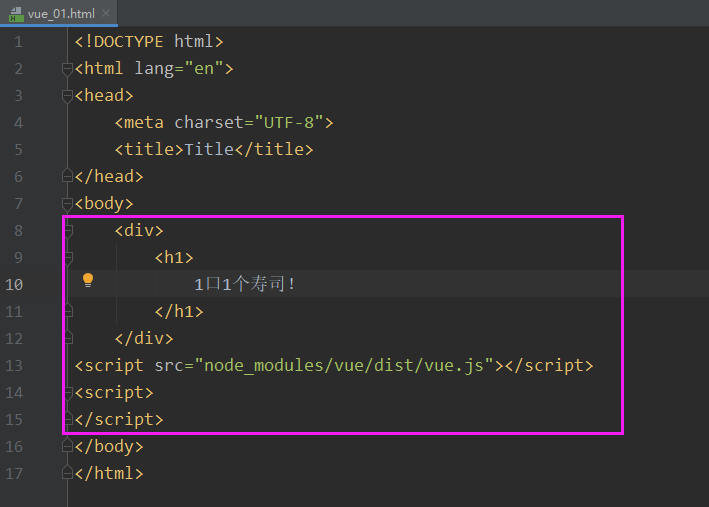
<!DOCTYPE html>
<html lang="en">
<head>
    <meta charset="UTF-8">
    <title>Title</title>
</head>
<body>
    <div>
        <h1>
            1口1个寿司!
        </h1>
    </div>
<script src="node_modules/vue/dist/vue.js"></script>
<script>
</script>
</body>
</html>
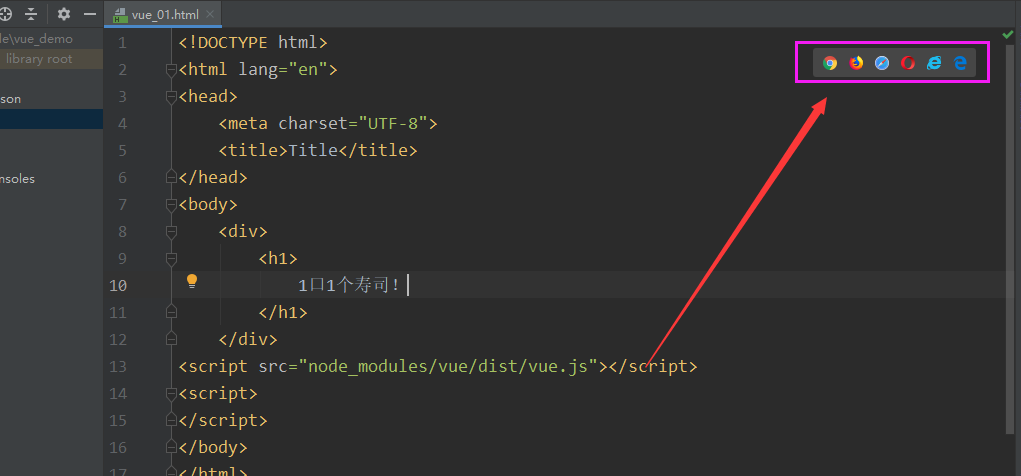
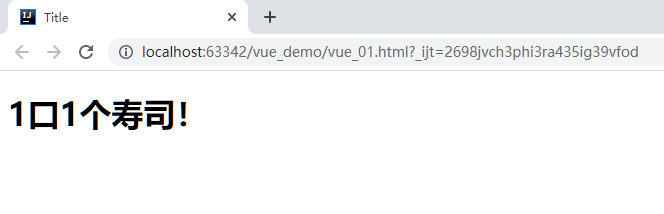
运行看一下效果:
(2):使用Vue:
a:定义属性
首先通过 new Vue() 来创建 Vue 实例
然后构造函数接收一个对象,对象中有一些属性:
el: 是 element 的缩写,通过 id 选中要渲染的页面元素,本例中是一个div;
data:数据,数据是一个对象,里面有很多属性,都可以渲染到视图中;
name:这里我们指定了一个 name 属性;
页面中的 h2 元素中,我们通过 {{name}} 的方式,来渲染刚刚定义的 name 属性。
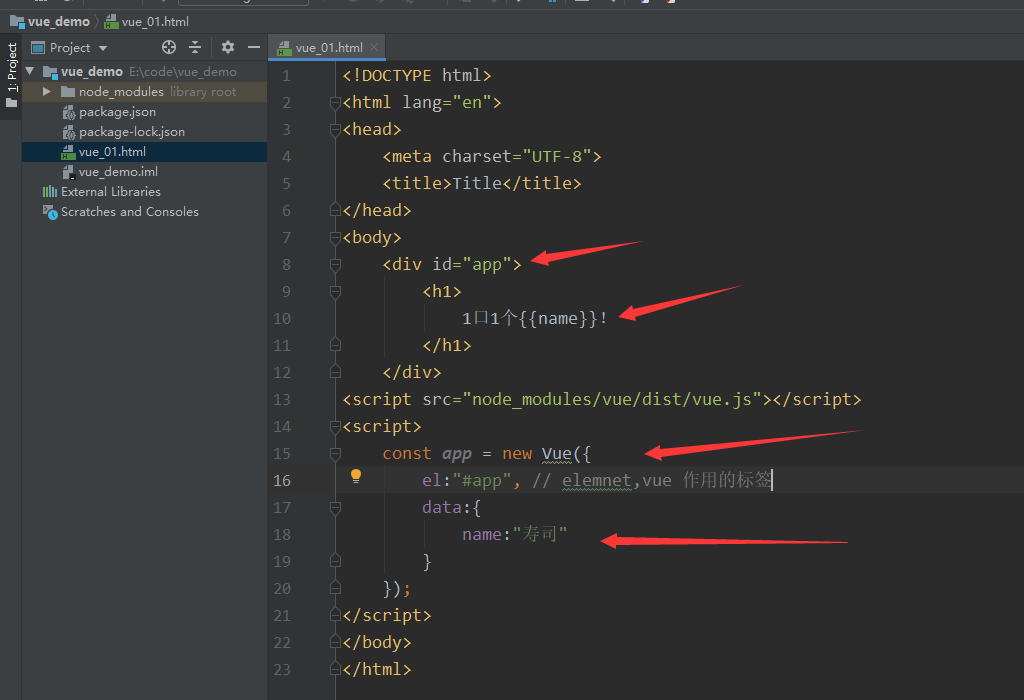
<!DOCTYPE html>
<html lang="en">
<head>
    <meta charset="UTF-8">
    <title>Title</title>
</head>
<body>
    <div id="app">
        <h1>
            1口1个{{name}}!
        </h1>
    </div>
<script src="node_modules/vue/dist/vue.js"></script>
<script>
    const app = new Vue({
        el:"#app", // elemnet,vue 作用的标签
        data:{
            name:"寿司"
        }
    });
</script>
</body>
</html>
运行看一下效果:

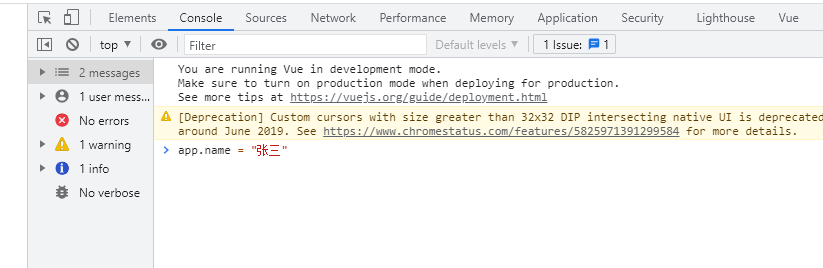
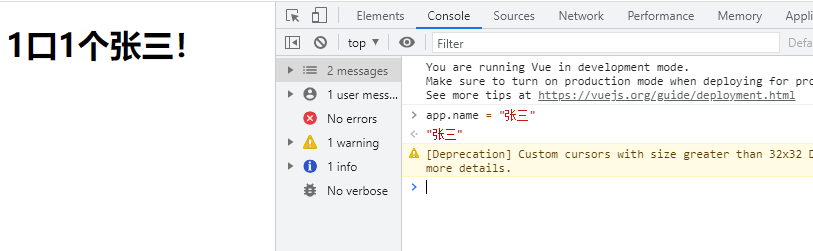
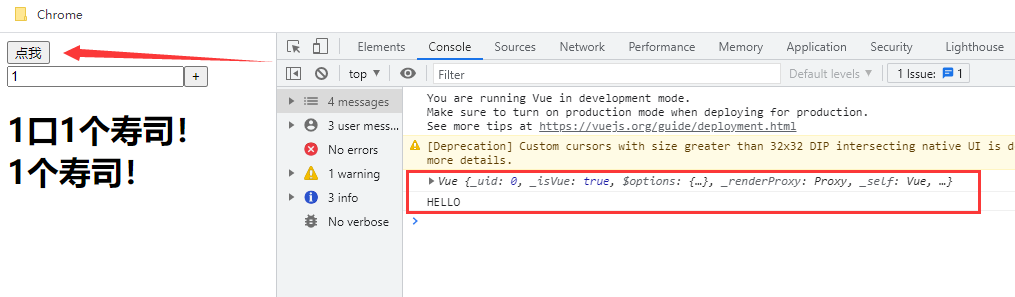
在谷歌浏览器F12控制台输入 app.name = "张三" 然后回车:
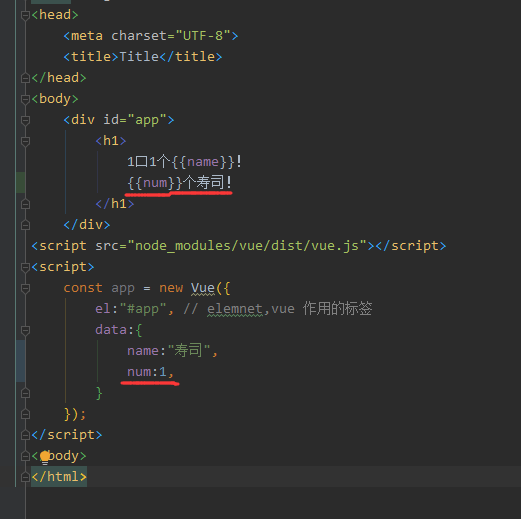
<!DOCTYPE html>
<html lang="en">
<head>
    <meta charset="UTF-8">
    <title>Title</title>
</head>
<body>
    <div id="app">
        <h1>
            1口1个{{name}}!<br>
            {{num}}个寿司!
        </h1>
    </div>
<script src="node_modules/vue/dist/vue.js"></script>
<script>
    const app = new Vue({
        el:"#app", // elemnet,vue 作用的标签
        data:{
            name:"寿司",
            num:1,
        }
    });
</script>
</body>
</html>
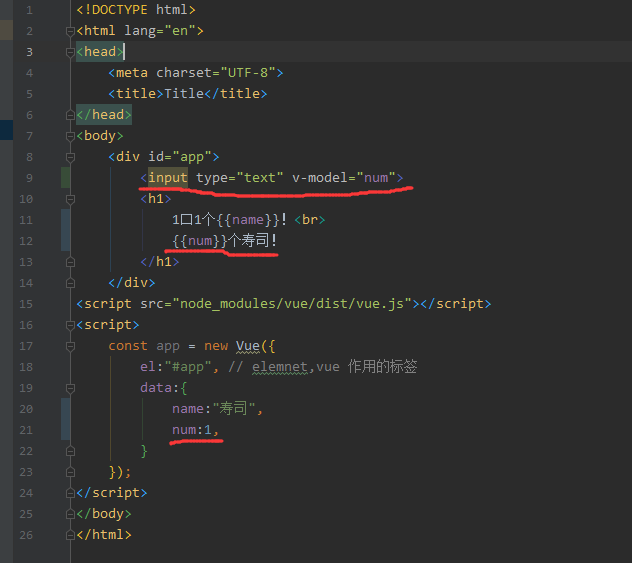
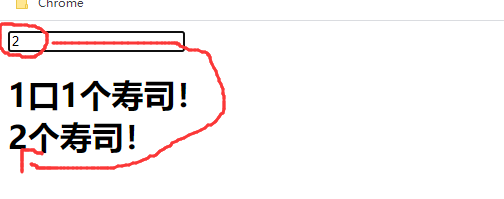
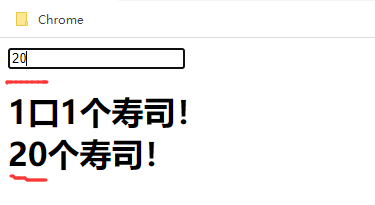
<!DOCTYPE html>
<html lang="en">
<head>
    <meta charset="UTF-8">
    <title>Title</title>
</head>
<body>
    <div id="app">
        <input type="text" v-model="num">
        <h1>
            1口1个{{name}}!<br>
            {{num}}个寿司!
        </h1>
    </div>
<script src="node_modules/vue/dist/vue.js"></script>
<script>
    const app = new Vue({
        el:"#app", // elemnet,vue 作用的标签
        data:{
            name:"寿司",
            num:1,
        }
    });
</script>
</body>
</html>
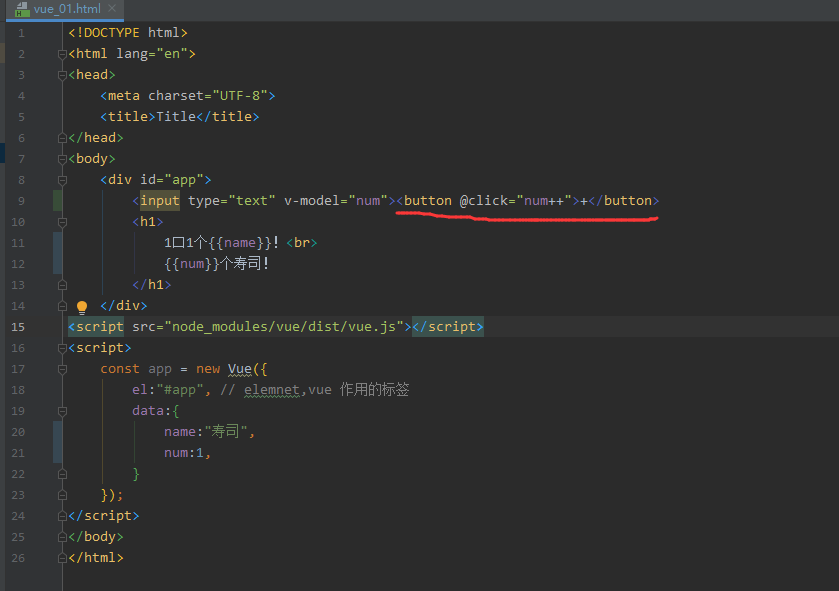
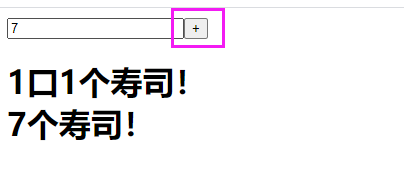
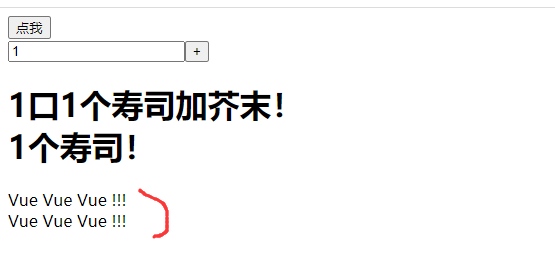
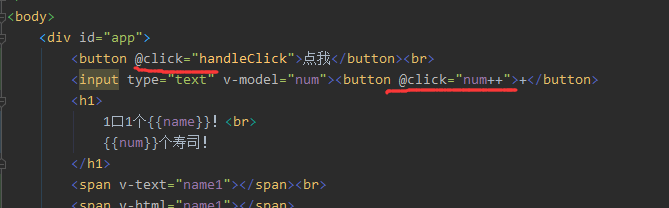
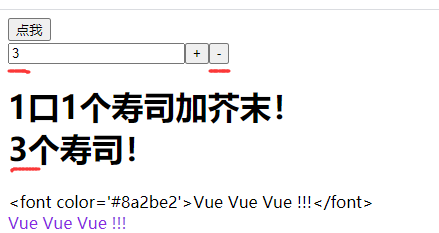
<!DOCTYPE html>
<html lang="en">
<head>
    <meta charset="UTF-8">
    <title>Title</title>
</head>
<body>
    <div id="app">
        <input type="text" v-model="num"><button @click="num++">+</button>
        <h1>
            1口1个{{name}}!<br>
            {{num}}个寿司!
        </h1>
    </div>
<script src="node_modules/vue/dist/vue.js"></script>
<script>
    const app = new Vue({
        el:"#app", // elemnet,vue 作用的标签
        data:{
            name:"寿司",
            num:1,
        }
    });
</script>
</body>
</html>
b:定义属性
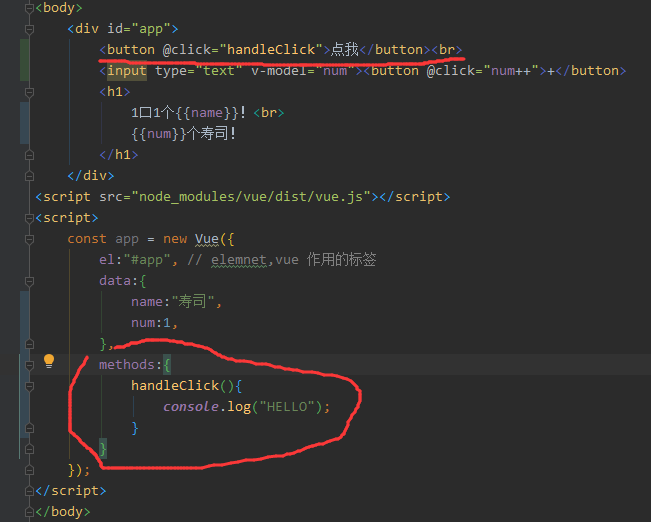
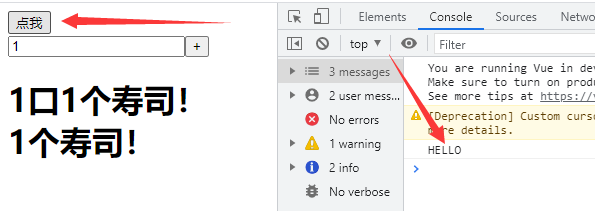
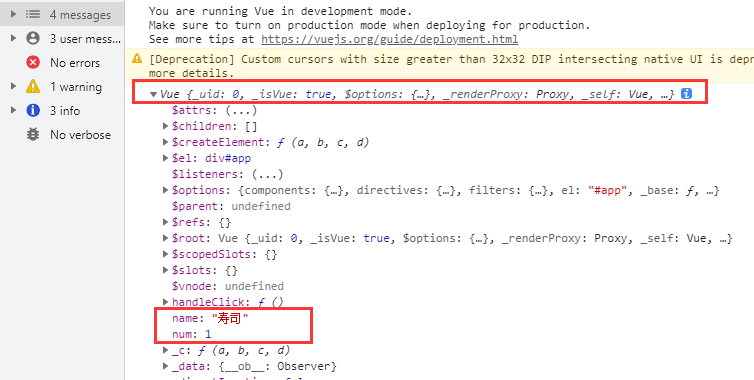
<!DOCTYPE html>
<html lang="en">
<head>
    <meta charset="UTF-8">
    <title>Title</title>
</head>
<body>
    <div id="app">
        <button @click="handleClick">点我</button><br>
        <input type="text" v-model="num"><button @click="num++">+</button>
        <h1>
            1口1个{{name}}!<br>
            {{num}}个寿司!
        </h1>
    </div>
<script src="node_modules/vue/dist/vue.js"></script>
<script>
    const app = new Vue({
        el:"#app", // elemnet,vue 作用的标签
        data:{
            name:"寿司",
            num:1,
        },
        methods:{
            handleClick(){
                console.log("HELLO");
            }
        }
    });
</script>
</body>
</html>
四、Vue生命周期(钩子)
每个Vue实例在被创建时都要经过一系列的初始化过程:
创建实例,装在模板,渲染模板等。Vue为声明周期中的每个状态都设置了钩子函数(监听函数)。
每当Vue实例处于不同的生命周期时,对应的函数就会被触发调用。
1、Vue生命周期介绍
2、渲染函数:钩子函数
例如:created 代表在vue实例创建后;
我们可以在Vue中定义一个 created 函数,代表这个时期的构造函数;
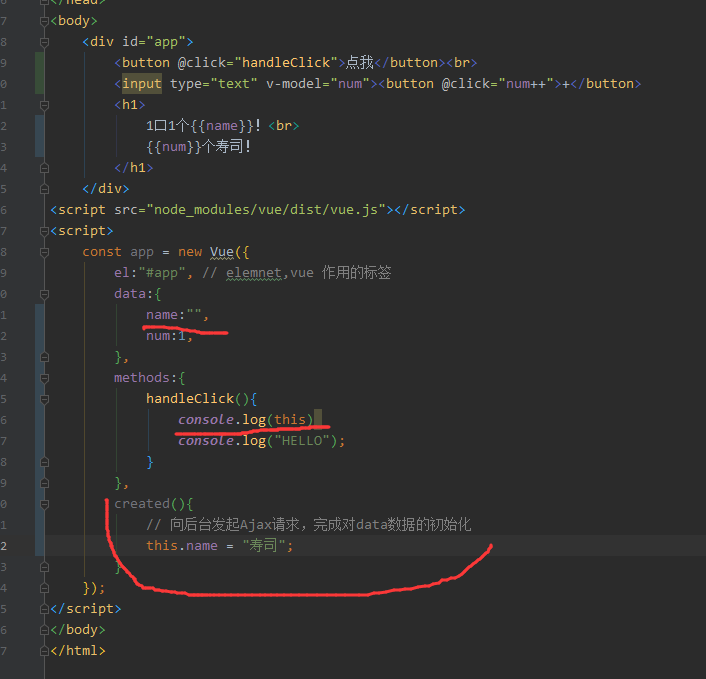
<!DOCTYPE html>
<html lang="en">
<head>
    <meta charset="UTF-8">
    <title>Title</title>
</head>
<body>
    <div id="app">
        <button @click="handleClick">点我</button><br>
        <input type="text" v-model="num"><button @click="num++">+</button>
        <h1>
            1口1个{{name}}!<br>
            {{num}}个寿司!
        </h1>
    </div>
<script src="node_modules/vue/dist/vue.js"></script>
<script>
    const app = new Vue({
        el:"#app", // elemnet,vue 作用的标签
        data:{
            name:"",
            num:1,
        },
        methods:{
            handleClick(){
                console.log(this)
                console.log("HELLO");
            }
        },
        created(){
            // 向后台发起Ajax请求,完成对data数据的初始化
            this.name = "寿司";
        }
    });
</script>
</body>
</html>
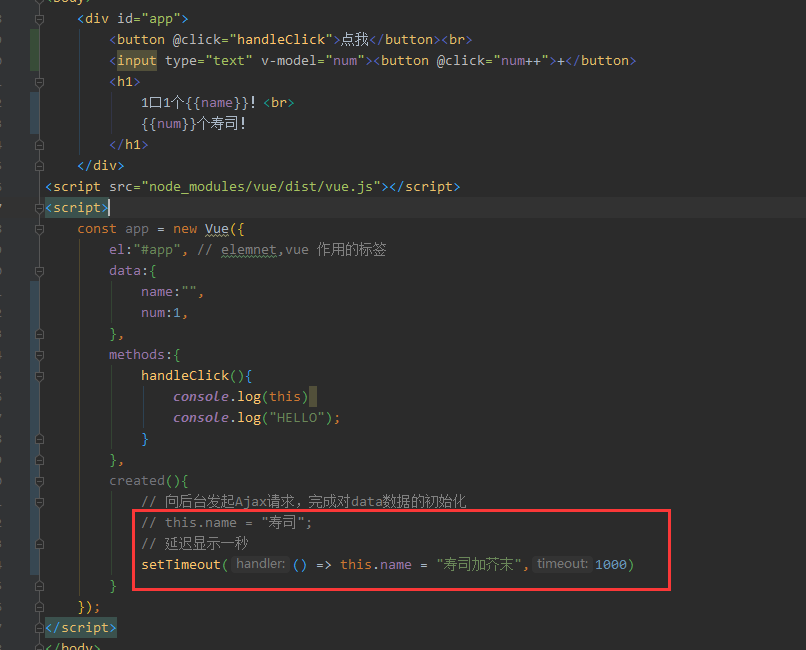
<!DOCTYPE html>
<html lang="en">
<head>
    <meta charset="UTF-8">
    <title>Title</title>
</head>
<body>
    <div id="app">
        <button @click="handleClick">点我</button><br>
        <input type="text" v-model="num"><button @click="num++">+</button>
        <h1>
            1口1个{{name}}!<br>
            {{num}}个寿司!
        </h1>
    </div>
<script src="node_modules/vue/dist/vue.js"></script>
<script>
    const app = new Vue({
        el:"#app", // elemnet,vue 作用的标签
        data:{
            name:"",
            num:1,
        },
        methods:{
            handleClick(){
                console.log(this)
                console.log("HELLO");
            }
        },
        created(){
            // 向后台发起Ajax请求,完成对data数据的初始化
            // this.name = "寿司";
            // 延迟显示一秒
            setTimeout(() => this.name = "寿司加芥末",1000)
        }
    });
</script>
</body>
</html>
五、指令
指令(Directives)是带有 v- 前缀的特殊属性。
例如前面的案例中的 v-model,代表双向绑定。
1、插值表达式
1:花括号,格式 {{表达式}}
说明:
该表达式支持JS语法,可以调用js内置函数(必须有返回值)
表达式必须有返回结果。例如1+1,没有结果的表达式不允许使用,如: var a = 1+1
可以直接获取Vue实例中定义的数据或函数
示例:
HTML:
<div id="app">i{name ) )</div>
JS:
var app =new vue({
    el:"#app",
    data:{
        name:"寿司""
    }
})
2:插值闪烁
使用此方式在网速较慢时会出现问题。在数据未加载完成时,页面会显示出原始的 {{}}
加载完毕后才显示正确数据,我们称为插值闪烁。
3:使用 v-text 和 v-html
使用 v-text 和 v-html 指令来代替 {{}} 说明:
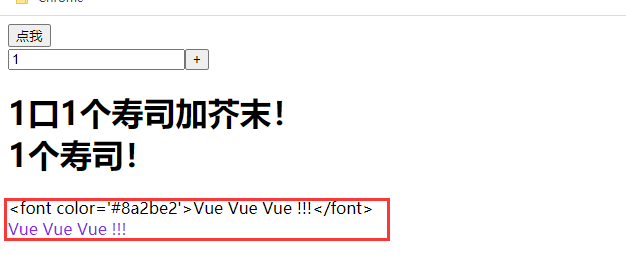
v-text :将数据输出到元素内部,如果输出的数据有 html 代码,回作为普通文本输出:
正常显示,没有什么特殊的地方,继续修改一下代码:
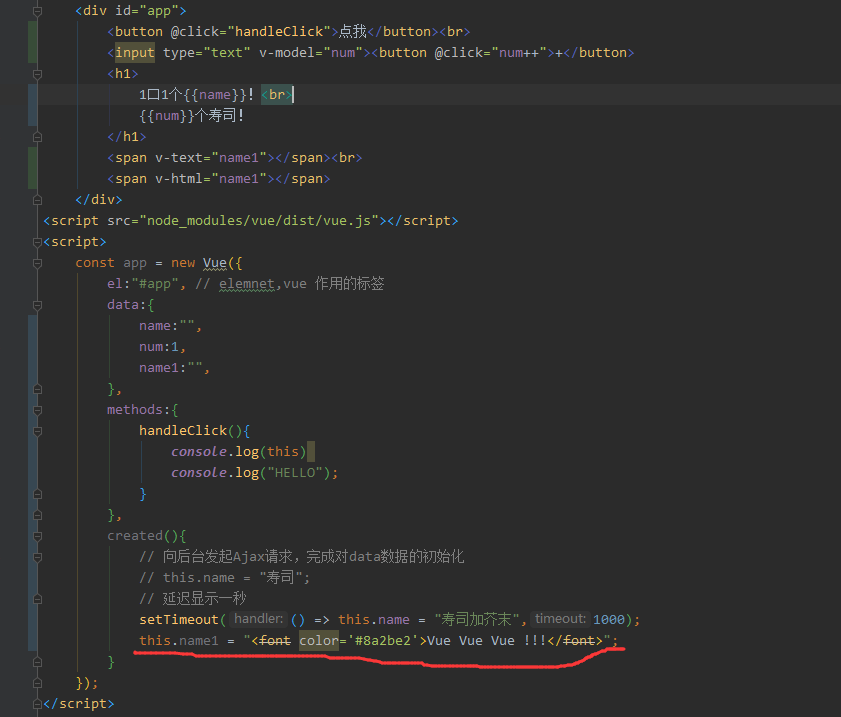
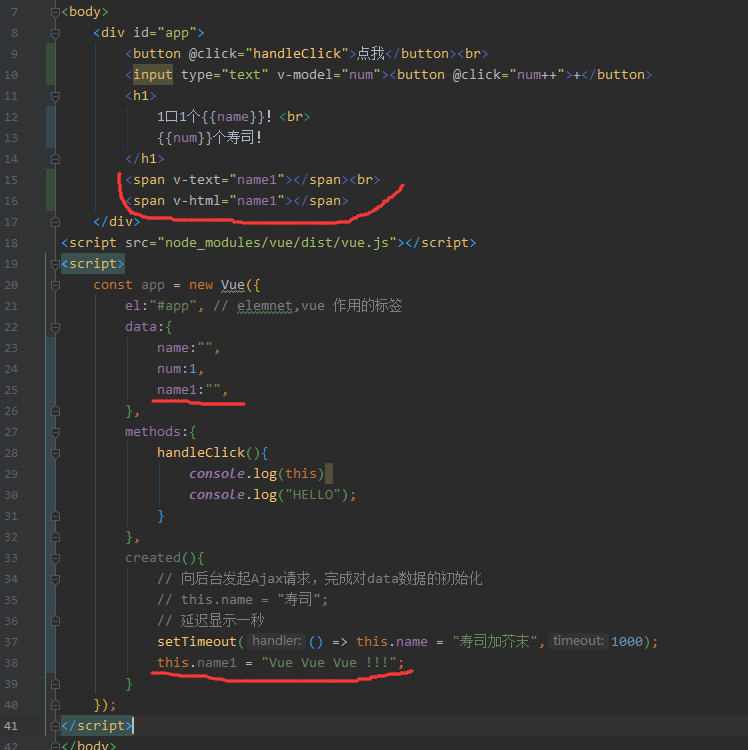
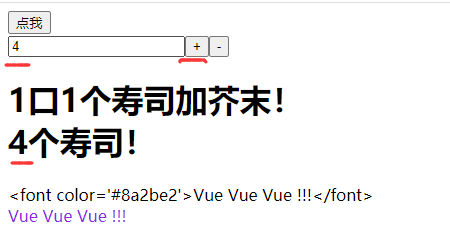
<!DOCTYPE html>
<html lang="en">
<head>
    <meta charset="UTF-8">
    <title>Title</title>
</head>
<body>
    <div id="app">
        <button @click="handleClick">点我</button><br>
        <input type="text" v-model="num"><button @click="num++">+</button>
        <h1>
            1口1个{{name}}!<br>
            {{num}}个寿司!
        </h1>
        <span v-text="name1"></span><br>
        <span v-html="name1"></span>
    </div>
<script src="node_modules/vue/dist/vue.js"></script>
<script>
    const app = new Vue({
        el:"#app", // elemnet,vue 作用的标签
        data:{
            name:"",
            num:1,
            name1:"",
        },
        methods:{
            handleClick(){
                console.log(this)
                console.log("HELLO");
            }
        },
        created(){
            // 向后台发起Ajax请求,完成对data数据的初始化
            // this.name = "寿司";
            // 延迟显示一秒
            setTimeout(() => this.name = "寿司加芥末",1000);
            this.name1 = "<font color='#8a2be2'>Vue Vue Vue !!!</font>";
        }
    });
</script>
</body>
</html>
v-text:将数据输出到元素内部,如果输出的数据有HTML代码,会作为普通文本输出;
v-html:将数据输出到元素内部,如果输出的数据有HTML代码,会被渲染。
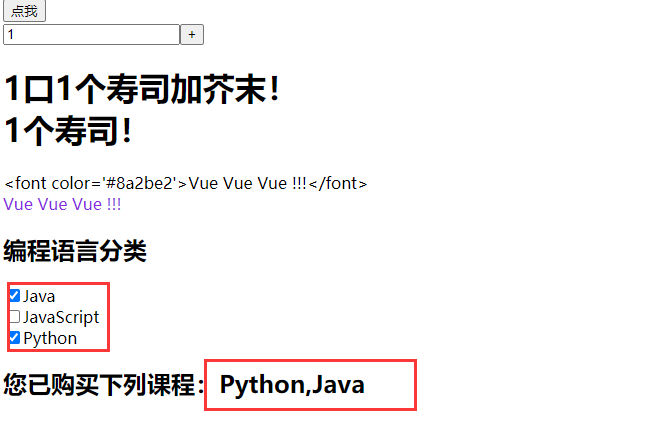
4:v-model
刚才的 v-text 和 v-html 可以看做是单项绑定,数据影响了视图渲染,但是反过来就不行。
v-model 是双向绑定,视图(View)和模型(Model)之间会相互影响。
既然是双向绑定,一定是在视图中可以修改数据,这样就限定了视图的元素类型。
目前的 v-model 的可使用元素有:
input
select
textarea
checkbox
redio
components(Vue中的自定义组件)

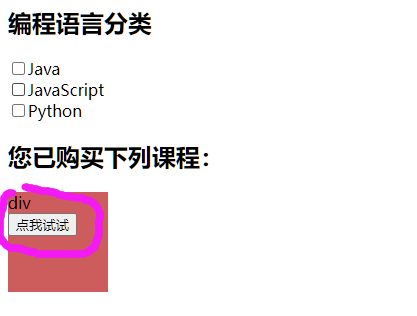
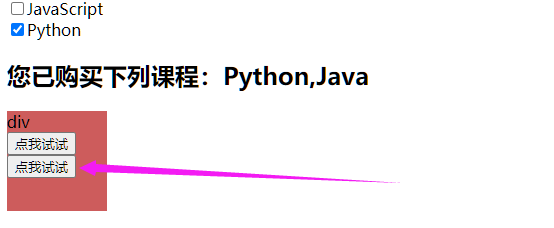
<!DOCTYPE html>
<html lang="en">
<head>
    <meta charset="UTF-8">
    <title>Title</title>
</head>
<body>
    <div id="app">
        <button @click="handleClick">点我</button><br>
        <input type="text" v-model="num"><button @click="num++">+</button>
        <h1>
            1口1个{{name}}!<br>
            {{num}}个寿司!
        </h1>
        <span v-text="name1"></span><br>
        <span v-html="name1"></span>
        <h2>编程语言分类</h2>
        <input type="checkbox" v-model="lessons" value="Java">Java<br>
        <input type="checkbox" v-model="lessons" value="JavaScript">JavaScript<br>
        <input type="checkbox" v-model="lessons" value="Python">Python<br>
        <h2>
            您已购买下列课程:{{lessons.join(",")}}
        </h2>
    </div>
<script src="node_modules/vue/dist/vue.js"></script>
<script>
    const app = new Vue({
        el:"#app", // elemnet,vue 作用的标签
        data:{
            name:"",
            num:1,
            name1:"",
            lessons:[]
        },
        methods:{
            handleClick(){
                console.log(this)
                console.log("HELLO");
            }
        },
        created(){
            // 向后台发起Ajax请求,完成对data数据的初始化
            // this.name = "寿司";
            // 延迟显示一秒
            setTimeout(() => this.name = "寿司加芥末",1000);
            this.name1 = "<font color='#8a2be2'>Vue Vue Vue !!!</font>";
        }
    });
</script>
</body>
</html>
5:v-on
(1):基本用法
v-on 指令用于给页面元素绑定事件。
语法:
v-on:事件名="js片段或函数名"
简写语法:
@事件名="js片段或函数名"
例如 v-on:click='app' 可以简写为 @click='app'
示例:
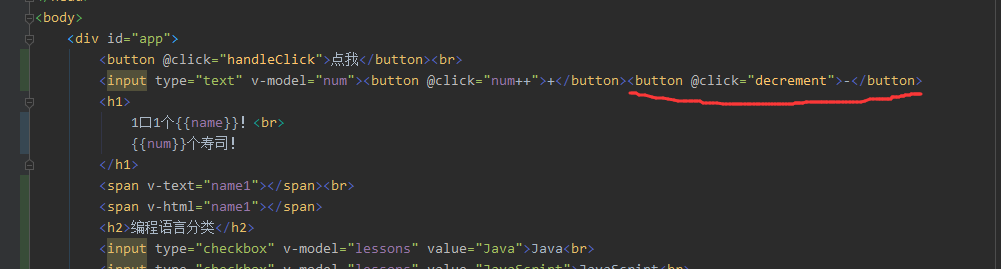
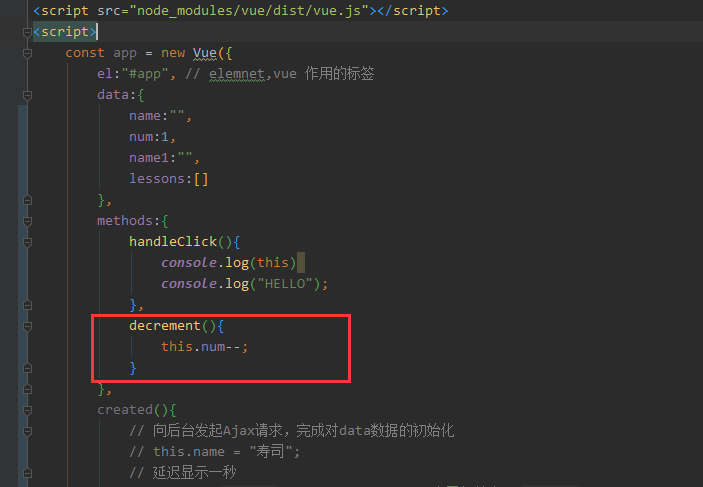
<!DOCTYPE html>
<html lang="en">
<head>
    <meta charset="UTF-8">
    <title>Title</title>
</head>
<body>
    <div id="app">
        <button @click="handleClick">点我</button><br>
        <input type="text" v-model="num"><button @click="num++">+</button><button @click="decrement">-</button>
        <h1>
            1口1个{{name}}!<br>
            {{num}}个寿司!
        </h1>
        <span v-text="name1"></span><br>
        <span v-html="name1"></span>
        <h2>编程语言分类</h2>
        <input type="checkbox" v-model="lessons" value="Java">Java<br>
        <input type="checkbox" v-model="lessons" value="JavaScript">JavaScript<br>
        <input type="checkbox" v-model="lessons" value="Python">Python<br>
        <h2>
            您已购买下列课程:{{lessons.join(",")}}
        </h2>
    </div>
<script src="node_modules/vue/dist/vue.js"></script>
<script>
    const app = new Vue({
        el:"#app", // elemnet,vue 作用的标签
        data:{
            name:"",
            num:1,
            name1:"",
            lessons:[]
        },
        methods:{
            handleClick(){
                console.log(this)
                console.log("HELLO");
            },
            decrement(){
                this.num--;
            }
        },
        created(){
            // 向后台发起Ajax请求,完成对data数据的初始化
            // this.name = "寿司";
            // 延迟显示一秒
            setTimeout(() => this.name = "寿司加芥末",1000);
            this.name1 = "<font color='#8a2be2'>Vue Vue Vue !!!</font>";
        }
    });
</script>
</body>
</html>
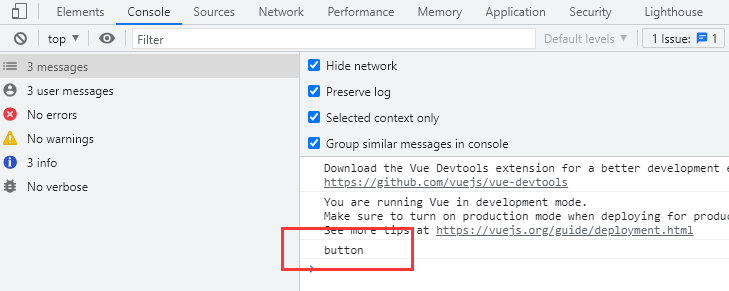
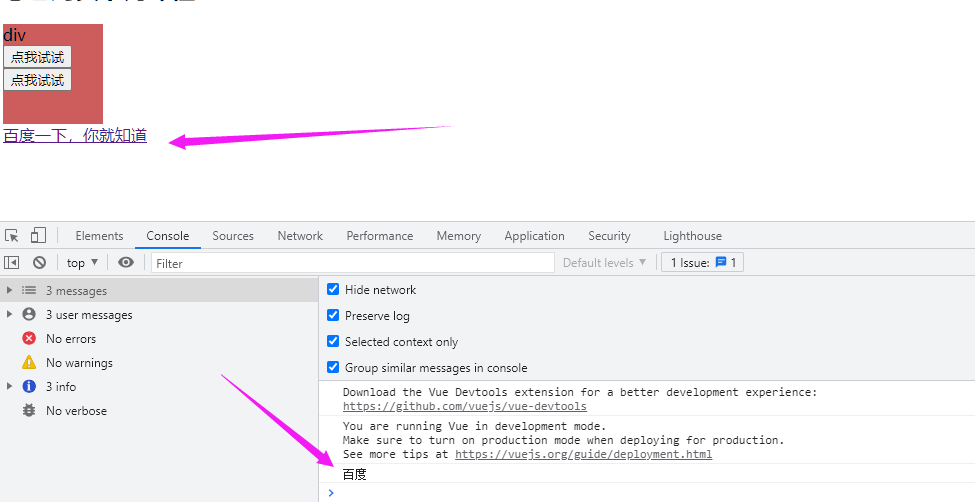
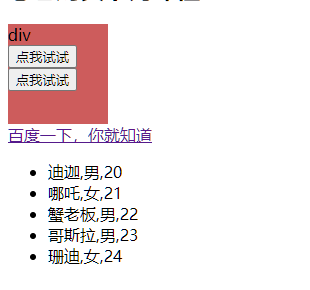
(2):点击事件(包含关系(冒泡))

<!DOCTYPE html>
<html lang="en">
<head>
    <meta charset="UTF-8">
    <title>Title</title>
</head>
<body>
    <div id="app">
        <button @click="handleClick">点我</button><br>
        <input type="text" v-model="num"><button @click="num++">+</button><button @click="decrement">-</button>
        <h1>
            1口1个{{name}}!<br>
            {{num}}个寿司!
        </h1>
        <span v-text="name1"></span><br>
        <span v-html="name1"></span>
        <h2>编程语言分类</h2>
        <input type="checkbox" v-model="lessons" value="Java">Java<br>
        <input type="checkbox" v-model="lessons" value="JavaScript">JavaScript<br>
        <input type="checkbox" v-model="lessons" value="Python">Python<br>
        <h2>
            您已购买下列课程:{{lessons.join(",")}}
        </h2>
        <!--v-on-->
        <div style="width: 100px ;height: 100px; background-color: indianred;" @click="print('div')">
            div<br>
            <button @click="print('button')">点我试试</button>
        </div>
    </div>
<script src="node_modules/vue/dist/vue.js"></script>
<script>
    const app = new Vue({
        el:"#app", // elemnet,vue 作用的标签
        data:{
            name:"",
            num:1,
            name1:"",
            lessons:[]
        },
        methods:{
            handleClick(){
                console.log(this)
                console.log("HELLO");
            },
            decrement(){
                this.num--;
            },
            print(msg){
                console.log(msg)
            }
        },
        created(){
            // 向后台发起Ajax请求,完成对data数据的初始化
            // this.name = "寿司";
            // 延迟显示一秒
            setTimeout(() => this.name = "寿司加芥末",1000);
            this.name1 = "<font color='#8a2be2'>Vue Vue Vue !!!</font>";
        }
    });
</script>
</body>
</html>
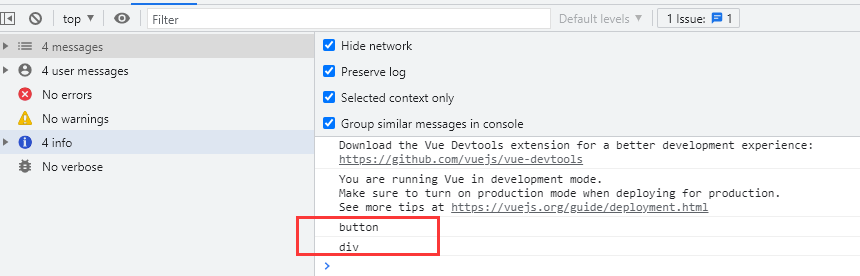
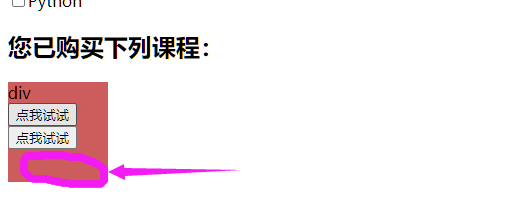
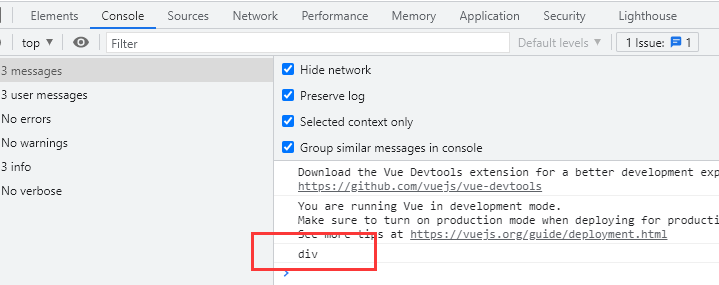
(3):点击事件(设置不自动包含关系(停止冒泡))
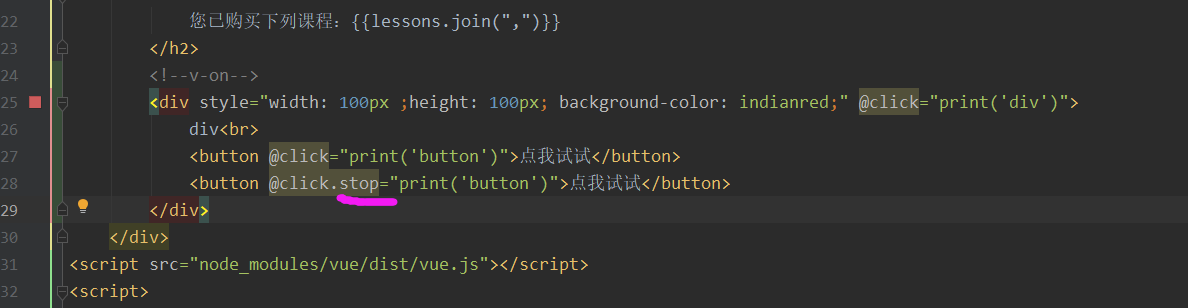
<!DOCTYPE html>
<html lang="en">
<head>
    <meta charset="UTF-8">
    <title>Title</title>
</head>
<body>
    <div id="app">
        <button @click="handleClick">点我</button><br>
        <input type="text" v-model="num"><button @click="num++">+</button><button @click="decrement">-</button>
        <h1>
            1口1个{{name}}!<br>
            {{num}}个寿司!
        </h1>
        <span v-text="name1"></span><br>
        <span v-html="name1"></span>
        <h2>编程语言分类</h2>
        <input type="checkbox" v-model="lessons" value="Java">Java<br>
        <input type="checkbox" v-model="lessons" value="JavaScript">JavaScript<br>
        <input type="checkbox" v-model="lessons" value="Python">Python<br>
        <h2>
            您已购买下列课程:{{lessons.join(",")}}
        </h2>
        <!--v-on-->
        <div style="width: 100px ;height: 100px; background-color: indianred;" @click="print('div')">
            div<br>
            <button @click="print('button')">点我试试</button>
            <button @click.stop="print('button')">点我试试</button>
        </div>
    </div>
<script src="node_modules/vue/dist/vue.js"></script>
<script>
    const app = new Vue({
        el:"#app", // elemnet,vue 作用的标签
        data:{
            name:"",
            num:1,
            name1:"",
            lessons:[]
        },
        methods:{
            handleClick(){
                console.log(this)
                console.log("HELLO");
            },
            decrement(){
                this.num--;
            },
            print(msg){
                console.log(msg)
            }
        },
        created(){
            // 向后台发起Ajax请求,完成对data数据的初始化
            // this.name = "寿司";
            // 延迟显示一秒
            setTimeout(() => this.name = "寿司加芥末",1000);
            this.name1 = "<font color='#8a2be2'>Vue Vue Vue !!!</font>";
        }
    });
</script>
</body>
</html>
(4):事件修饰符
在事件处理程序中调用 event.preventDefault() 或 event.stopPropagation() 是非常常见的需求。
尽管我们可以在方法中轻松实现这点,但更好的方式是:方法知识纯粹的数据逻辑,而不是去处理DOM事件细节。
为了解决这个问题,Vue.js 为 v-on 提供了事件修饰符。
之前提过,修饰符是由点开头的指令后缀来表示的:
stop:阻止事件冒泡;
prevent:阻止默认事件发生;
capture:使用事件捕获模式;
self:只有元素自身触发事件才执行。(冒泡或捕获的都不执行)
once:只执行一次。
(5):阻止默认事件发生
阻止a标签跳转:
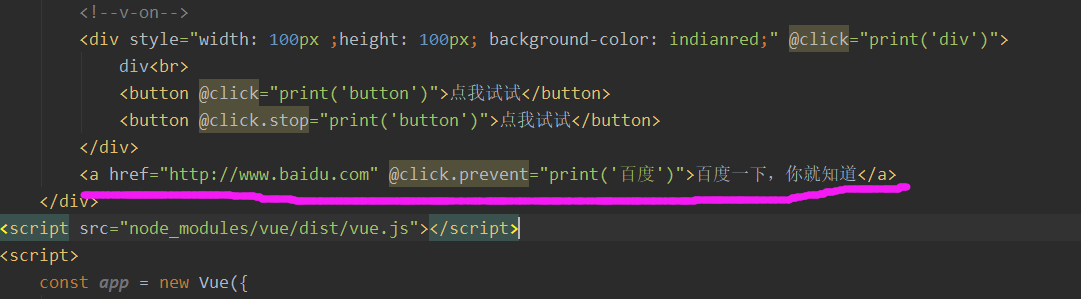
<a href="http://www.baidu.com" @click.prevent="print('百度')">百度一下,你就知道</a>
7:v-for
遍历数据渲染页面是非常常用的需求,Vue中通过 v-for 指令来实现。
(1):遍历数组 语法:v-for=“item in items”
items:要遍历的数组,需要在vue的data中定义好。
item:迭代得到的数组元素的别名。
示例:
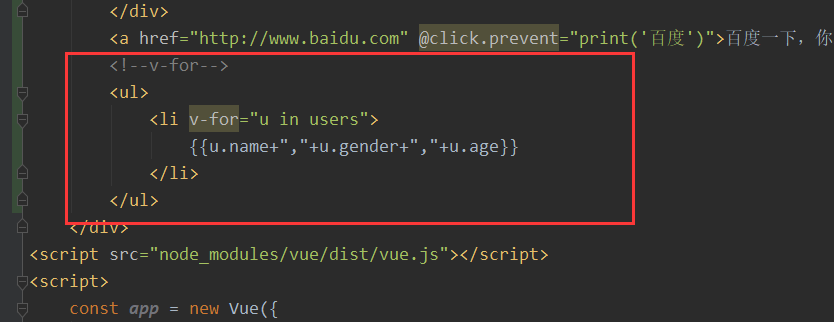
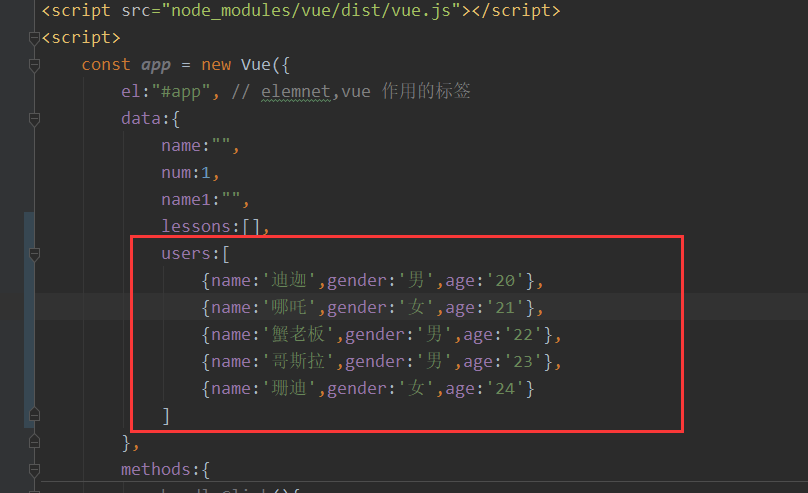
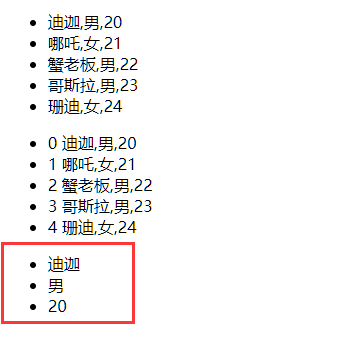
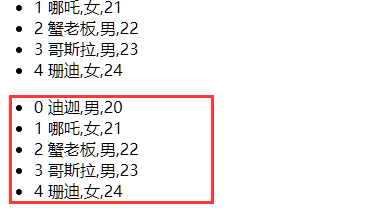
<!DOCTYPE html>
<html lang="en">
<head>
    <meta charset="UTF-8">
    <title>Title</title>
</head>
<body>
    <div id="app">
        <button @click="handleClick">点我</button><br>
        <input type="text" v-model="num"><button @click="num++">+</button><button @click="decrement">-</button>
        <h1>
            1口1个{{name}}!<br>
            {{num}}个寿司!
        </h1>
        <span v-text="name1"></span><br>
        <span v-html="name1"></span>
        <h2>编程语言分类</h2>
        <input type="checkbox" v-model="lessons" value="Java">Java<br>
        <input type="checkbox" v-model="lessons" value="JavaScript">JavaScript<br>
        <input type="checkbox" v-model="lessons" value="Python">Python<br>
        <h2>
            您已购买下列课程:{{lessons.join(",")}}
        </h2>
        <!--v-on-->
        <div style="width: 100px ;height: 100px; background-color: indianred;" @click="print('div')">
            div<br>
            <button @click="print('button')">点我试试</button>
            <button @click.stop="print('button')">点我试试</button>
        </div>
        <a href="http://www.baidu.com" @click.prevent="print('百度')">百度一下,你就知道</a>
        <!--v-for-->
        <ul>
            <li v-for="u in users">
                {{u.name+","+u.gender+","+u.age}}
            </li>
        </ul>
    </div>
<script src="node_modules/vue/dist/vue.js"></script>
<script>
    const app = new Vue({
        el:"#app", // elemnet,vue 作用的标签
        data:{
            name:"",
            num:1,
            name1:"",
            lessons:[],
            users:[
                {name:'迪迦',gender:'男',age:'20'},
                {name:'哪吒',gender:'女',age:'21'},
                {name:'蟹老板',gender:'男',age:'22'},
                {name:'哥斯拉',gender:'男',age:'23'},
                {name:'珊迪',gender:'女',age:'24'}
            ]
        },
        methods:{
            handleClick(){
                console.log(this)
                console.log("HELLO");
            },
            decrement(){
                this.num--;
            },
            print(msg){
                console.log(msg)
            }
        },
        created(){
            // 向后台发起Ajax请求,完成对data数据的初始化
            // this.name = "寿司";
            // 延迟显示一秒
            setTimeout(() => this.name = "寿司加芥末",1000);
            this.name1 = "<font color='#8a2be2'>Vue Vue Vue !!!</font>";
        }
    });
</script>
</body>
</html>
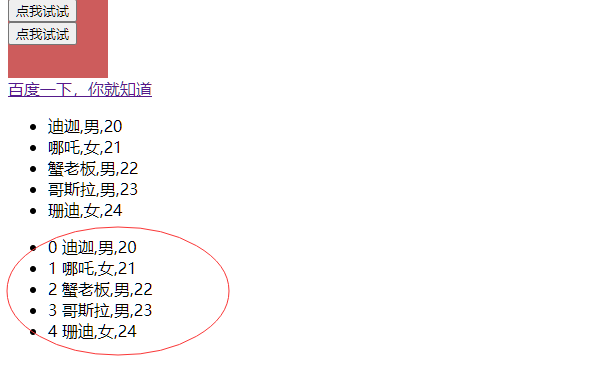
(2):遍历数组:多个参数(数组角标)
在遍历的过程中如果我们需要知道数组角标,可以指定第二个参数:
语法 : v-for=“(item,index) in items”
items:要迭代的数组;
item:迭代所得到的数组元素别名;
index:迭代到的当前元素索引,从0开始;
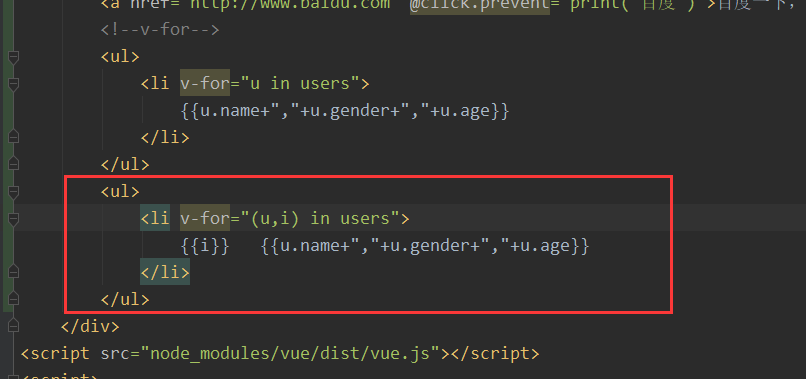
<ul>
     <li v-for="(u,i) in users">
         {{i}}   {{u.name+","+u.gender+","+u.age}}
     </li>
</ul>
(3):遍历对象
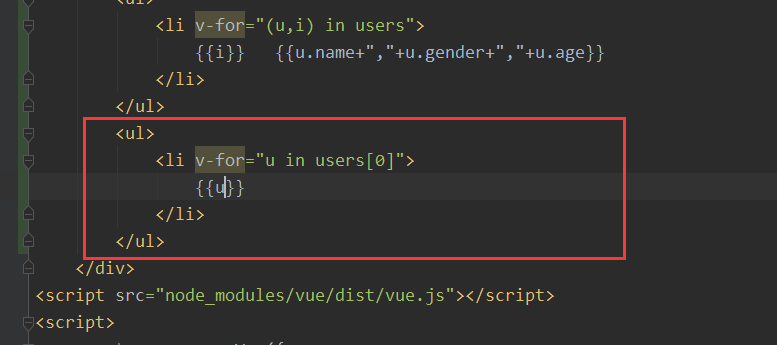
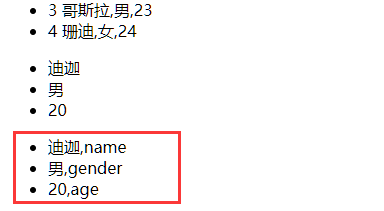
<ul>
    <li v-for="u in users[0]">
        {{u}}
    </li>
</ul>
(4):遍历对象:(多个参数)

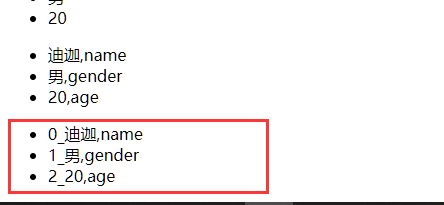
<ul>
    <li v-for="(u,i) in users[0]">
        {{u + "," + i}}
    </li>
</ul>
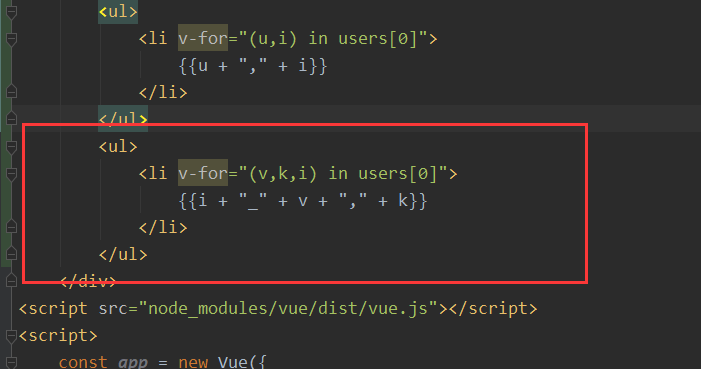
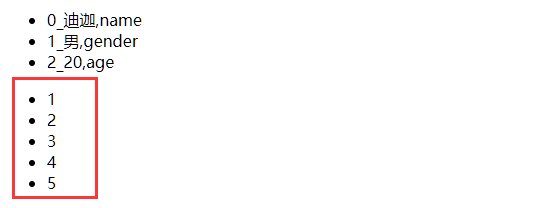
<ul>
    <li v-for="(v,k,i) in users[0]">
        {{i + "_" + v + "," + k}}
    </li>
</ul>
(5):遍历数字
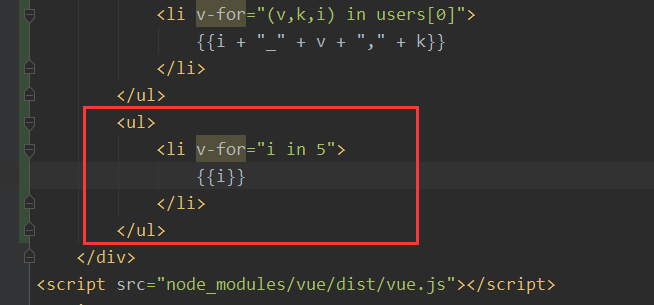
<ul>
    <li v-for="i in 5">
        {{i}}
    </li>
</ul>
8:key
当 Vue.js 用 v-for 正在更新已渲染过的元素列表时,它默认用“就地复用”策略。
如果数据项的顺序被改变,Vue将不会移动DOM元素来匹配数据项的顺序,而是简单复用此处每个元素,并且确保它在特定索引下显示已被渲染过的每个元素。
这个功能可以有效的提高渲染的效率。
但是要实现这个功能,你需要给Vue一些提示,以便它能跟踪每个节点的身份,从而重用和重新排序现有元素
你需要为每项提供一个唯一 key 属性,理想的 key 值是每项都有的且唯一的 ID。
提升加载数据的速度。
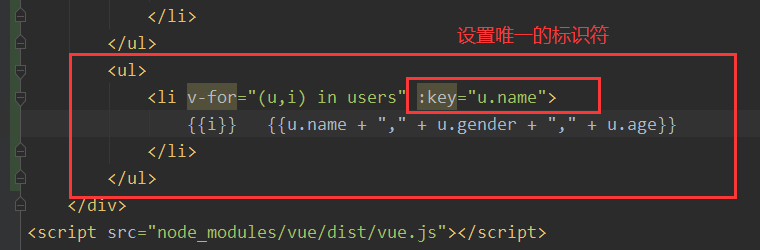
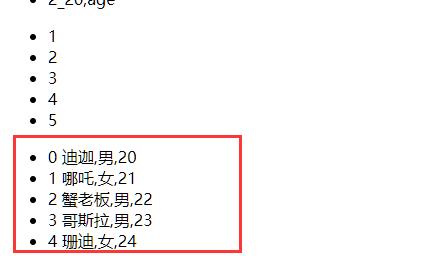
<ul>
    <li v-for="(u,i) in users" :key="u.name">
        {{i}}   {{u.name + "," + u.gender + "," + u.age}}
    </li>
</ul>
绑定数组的角标


<ul>
    <li v-for="(u,i) in users" :key="i">
        {{i}}   {{u.name + "," + u.gender + "," + u.age}}
    </li>
</ul>
9:v-if 和 v-show
v-if 顾名思义,条件判定,当得到结果为true时,所在的元素才会被渲染。
语法: v-if"布尔表达式"
示例:
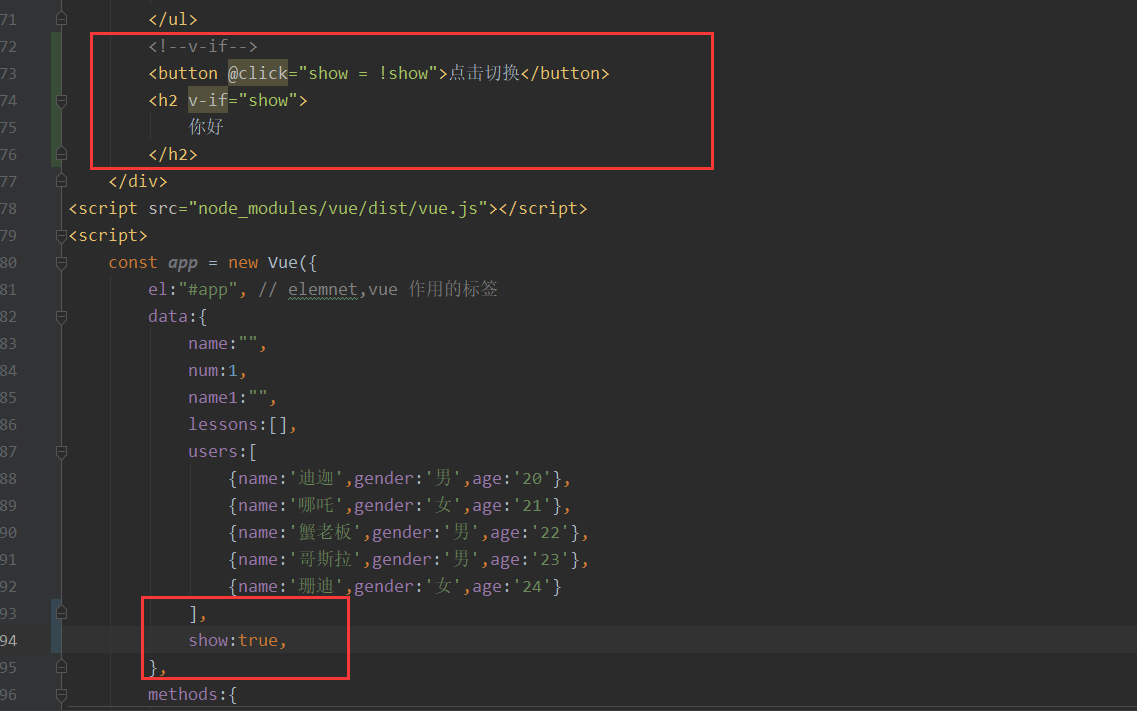
<!DOCTYPE html>
<html lang="en">
<head>
    <meta charset="UTF-8">
    <title>Title</title>
</head>
<body>
    <div id="app">
        <button @click="handleClick">点我</button><br>
        <input type="text" v-model="num"><button @click="num++">+</button><button @click="decrement">-</button>
        <h1>
            1口1个{{name}}!<br>
            {{num}}个寿司!
        </h1>
        <span v-text="name1"></span><br>
        <span v-html="name1"></span>
        <h2>编程语言分类</h2>
        <input type="checkbox" v-model="lessons" value="Java">Java<br>
        <input type="checkbox" v-model="lessons" value="JavaScript">JavaScript<br>
        <input type="checkbox" v-model="lessons" value="Python">Python<br>
        <h2>
            您已购买下列课程:{{lessons.join(",")}}
        </h2>
        <!--v-on-->
        <div style="width: 100px ;height: 100px; background-color: indianred;" @click="print('div')">
            div<br>
            <button @click="print('button')">点我试试</button>
            <button @click.stop="print('button')">点我试试</button>
        </div>
        <a href="http://www.baidu.com" @click.prevent="print('百度')">百度一下,你就知道</a>
        <!--v-for-->
        <ul>
            <li v-for="u in users">
                {{u.name+","+u.gender+","+u.age}}
            </li>
        </ul>
        <ul>
            <li v-for="(u,i) in users">
                {{i}}   {{u.name+","+u.gender+","+u.age}}
            </li>
        </ul>
        <ul>
            <li v-for="u in users[0]">
                {{u}}
            </li>
        </ul>
        <ul>
            <li v-for="(u,i) in users[0]">
                {{u + "," + i}}
            </li>
        </ul>
        <ul>
            <li v-for="(v,k,i) in users[0]">
                {{i + "_" + v + "," + k}}
            </li>
        </ul>
        <ul>
            <li v-for="i in 5">
                {{i}}
            </li>
        </ul>
        <ul>
            <li v-for="(u,i) in users" :key="u.name">
                {{i}}   {{u.name + "," + u.gender + "," + u.age}}
            </li>
        </ul>
        <ul>
            <li v-for="(u,i) in users" :key="i">
                {{i}}   {{u.name + "," + u.gender + "," + u.age}}
            </li>
        </ul>
        <!--v-if-->
        <button @click="show = !show">点击切换</button>
        <h2 v-if="show">
            你好
        </h2>
    </div>
<script src="node_modules/vue/dist/vue.js"></script>
<script>
    const app = new Vue({
        el:"#app", // elemnet,vue 作用的标签
        data:{
            name:"",
            num:1,
            name1:"",
            lessons:[],
            users:[
                {name:'迪迦',gender:'男',age:'20'},
                {name:'哪吒',gender:'女',age:'21'},
                {name:'蟹老板',gender:'男',age:'22'},
                {name:'哥斯拉',gender:'男',age:'23'},
                {name:'珊迪',gender:'女',age:'24'}
            ],
            show:true,
        },
        methods:{
            handleClick(){
                console.log(this)
                console.log("HELLO");
            },
            decrement(){
                this.num--;
            },
            print(msg){
                console.log(msg)
            }
        },
        created(){
            // 向后台发起Ajax请求,完成对data数据的初始化
            // this.name = "寿司";
            // 延迟显示一秒
            setTimeout(() => this.name = "寿司加芥末",1000);
            this.name1 = "<font color='#8a2be2'>Vue Vue Vue !!!</font>";
        }
    });
</script>
</body>
</html>
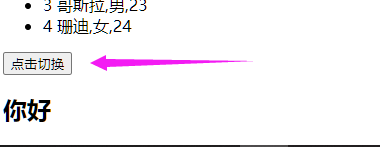
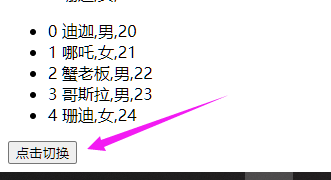
点击后“你好”两个字不显示(点击后触发事件将show改为了false)。
10:v-if 和 v-for 结合以及 v-else
(1):v-if
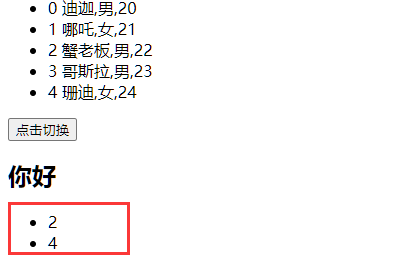
当 v-if 和 v-for 出现在一起的时候,v-for 优先级更高。
也就是说会先遍历,在判断条件。
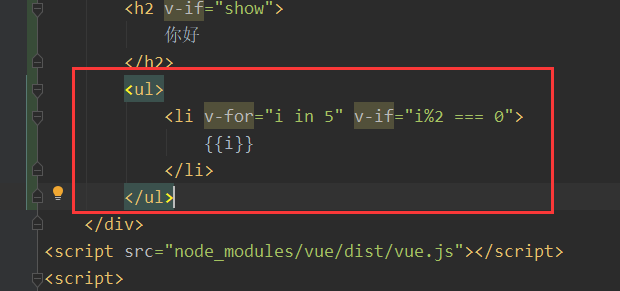
<ul>
    <li v-for="i in 5" v-if="i%2 === 0">
        {{i}}
    </li>
</ul>
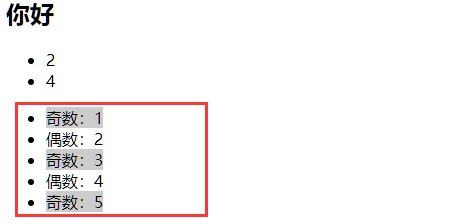
(2):v-else
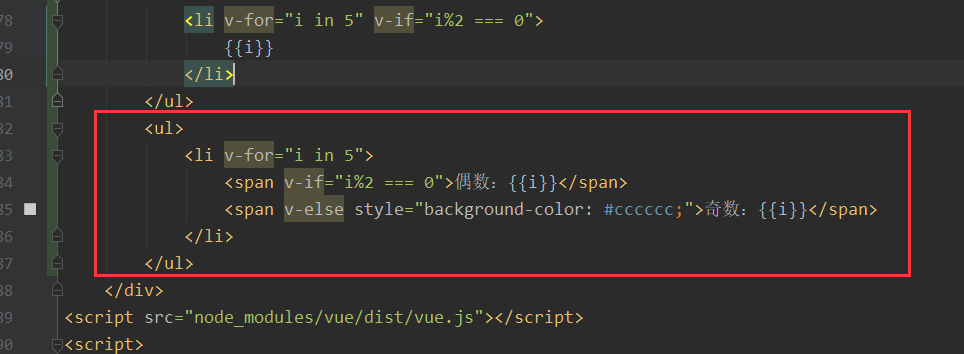
<ul>
    <li v-for="i in 5">
        <span v-if="i%2 === 0">偶数:{{i}}</span>
        <span v-else style="background-color: #cccccc;">奇数:{{i}}</span>
    </li>
</ul>
11:v-show
对比 v-if 和 v-show
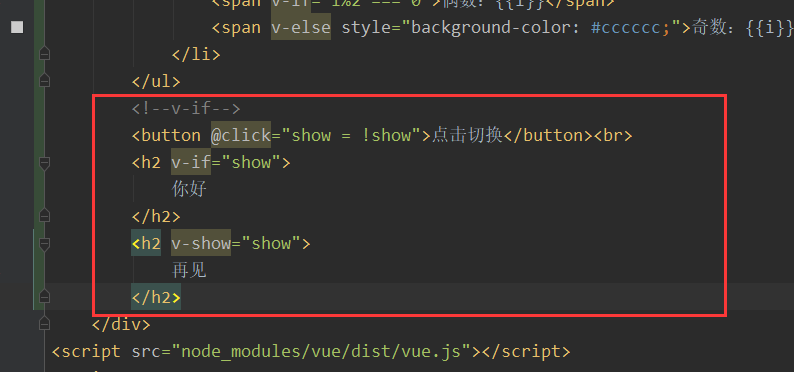
<!--v-if-->
<button @click="show = !show">点击切换</button><br>
<h2 v-if="show">
    你好
</h2>
<h2 v-show="show">
    再见
</h2>
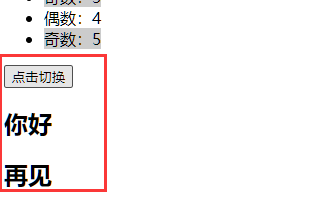
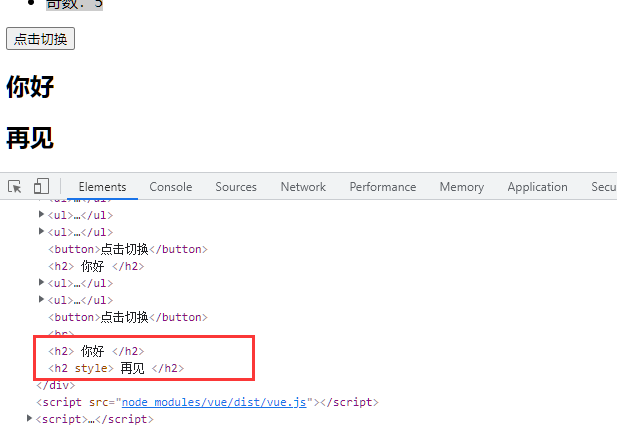
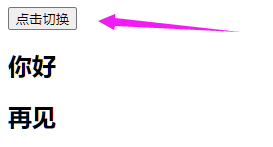
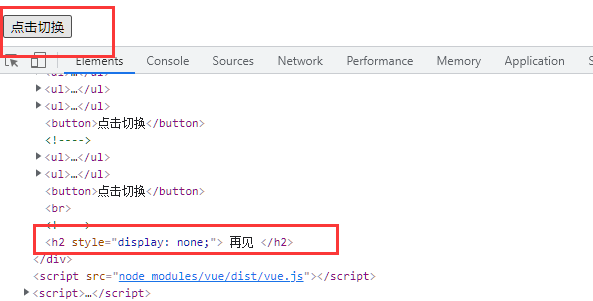
点击之后可以发现,v-if 是直接删除节点而 v-show 是设置 style 属性 display:none 属性隐藏。
12:v-bind
(1):创建新的HTML页面 vue_02
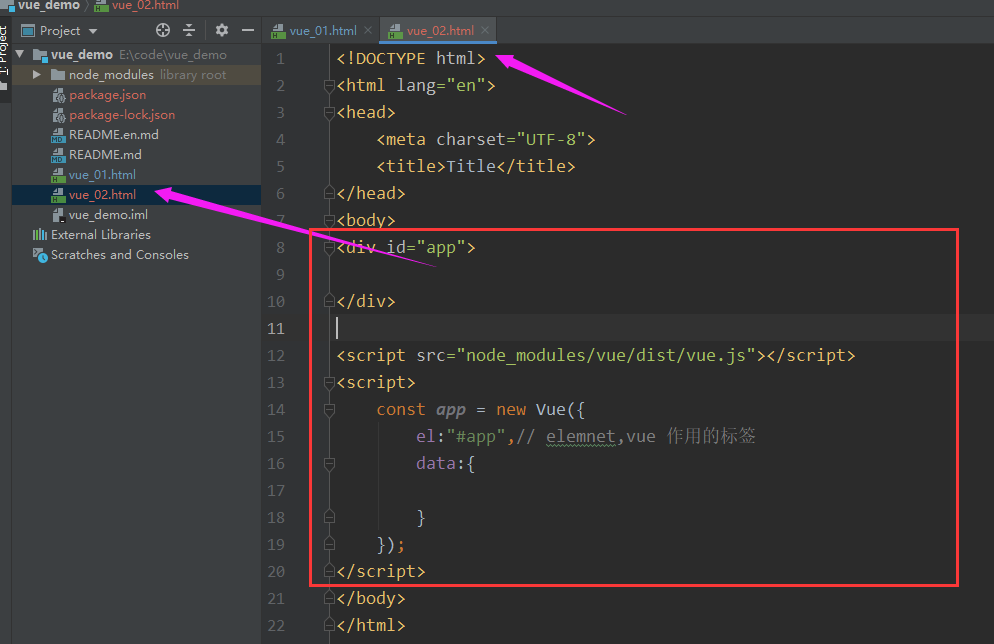
<!DOCTYPE html>
<html lang="en">
<head>
    <meta charset="UTF-8">
    <title>Title</title>
</head>
<body>
<div id="app">

</div>

<script src="node_modules/vue/dist/vue.js"></script>
<script>
    const app = new Vue({
        el:"#app",// elemnet,vue 作用的标签
        data:{

        }
    });
</script>
</body>
</html>
(2):编写CSS样式和HTML:
<!DOCTYPE html>
<html lang="en">
<head>
    <meta charset="UTF-8">
    <title>Title</title>
    <style type="text/css">
        div #box{
            width: 100px;
            height: 100px;
            color: darkgray;
        }
        .red{
            background-color: red;
        }
        .blue{
            background-color: blue;
        }
    </style>
</head>
<body>
    <div id="app">
        <button>红色</button>
        <button>蓝色</button>
        <div id="box" class="red">
            我是盒子<br>
            我是盒子
        </div>
    </div>
<script src="node_modules/vue/dist/vue.js"></script>
<script>
    const app = new Vue({
        el:"#app",// elemnet,vue 作用的标签
        data:{

        }
    });
</script>
</body>
</html>
(3):添加点击切换图片的事件:
a:按照上述正常的解决方案思维是用插值表达式是这样解决的

<body>
    <div id="app">
    <button @click="color='red'">红色</button>
    <button @click="color='blue'">蓝色</button>
        <div id="box" class="{{color}}">
            我是盒子<br>
            我是盒子
        </div>
    </div>
<script src="node_modules/vue/dist/vue.js"></script>
<script>
    const app = new Vue({
        el:"#app",// elemnet,vue 作用的标签
        data:{
            color:"red",
        }
    });
</script>
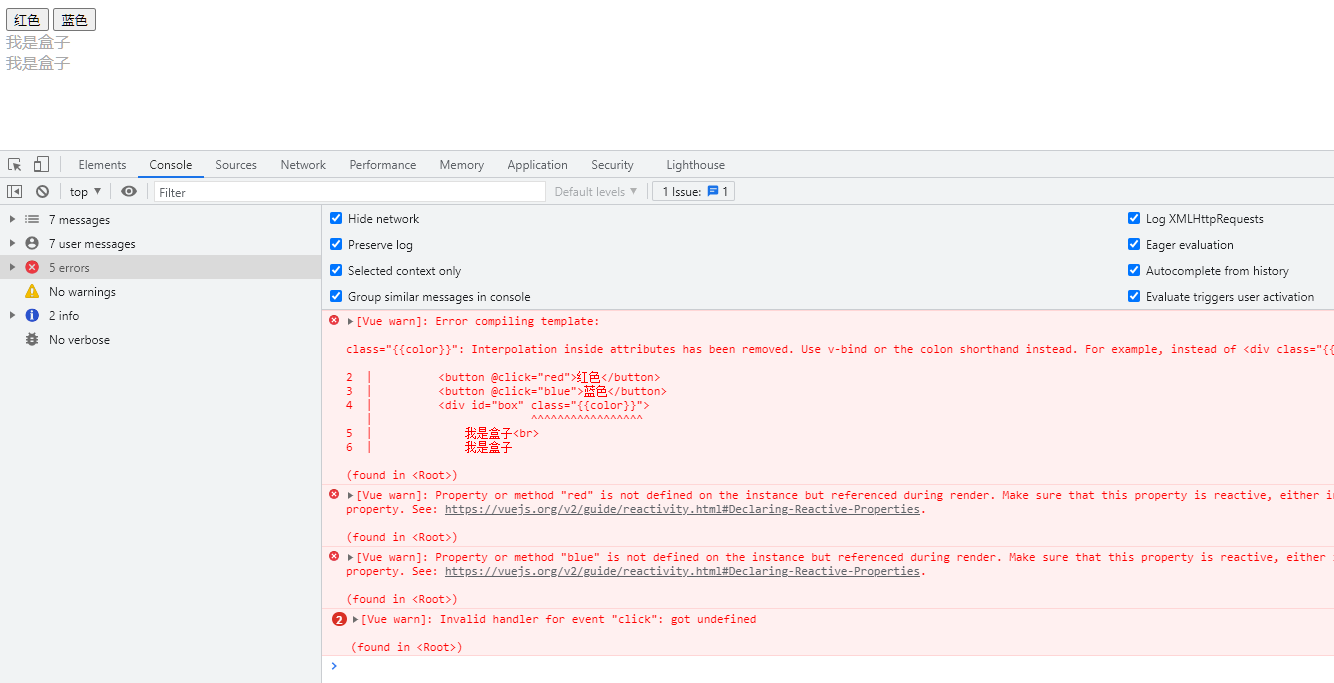
但是事实上上述做法是错误的,插值表达式不可以使用在属性当中。
b:上述解决方式是错误的,下面的代码使用 v-bind
修改上述代码:{:class="color" 等价于 v-bind:class="color"}
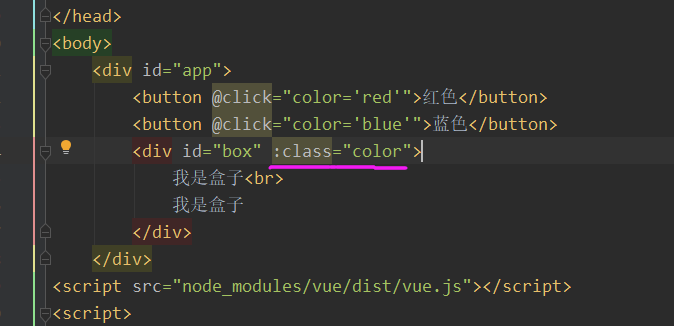
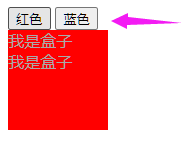
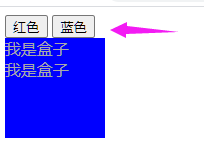
<div id="app">
    <button @click="color='red'">红色</button>
    <button @click="color='blue'">蓝色</button>
    <div id="box" :class="color">
        我是盒子<br>
        我是盒子
    </div>
</div>
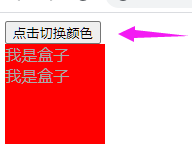
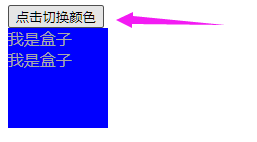
c:v-bind:class 属性的特殊用法:
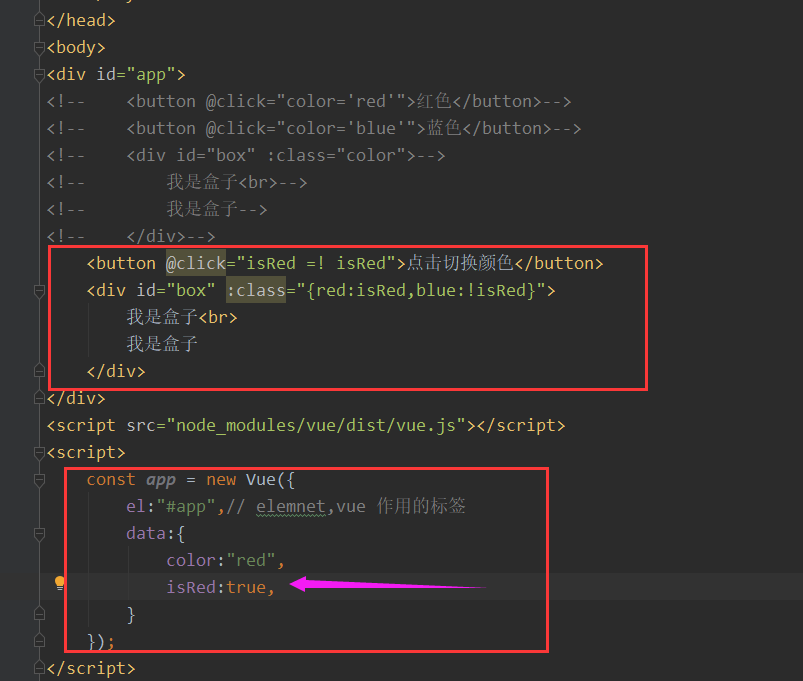
<!DOCTYPE html>
<html lang="en">
<head>
    <meta charset="UTF-8">
    <title>Title</title>
    <style type="text/css">
        div #box{
            width: 100px;
            height: 100px;
            color: darkgray;
        }
        .red{
            background-color: red;
        }
        .blue{
            background-color: blue;
        }
    </style>
</head>
<body>
<div id="app">
<!--    <button @click="color='red'">红色</button>-->
<!--    <button @click="color='blue'">蓝色</button>-->
<!--    <div id="box" :class="color">-->
<!--        我是盒子<br>-->
<!--        我是盒子-->
<!--    </div>-->
    <button @click="isRed =! isRed">点击切换颜色</button>
    <div id="box" :class="{red:isRed,blue:!isRed}">
        我是盒子<br>
        我是盒子
    </div>
</div>
<script src="node_modules/vue/dist/vue.js"></script>
<script>
    const app = new Vue({
        el:"#app",// elemnet,vue 作用的标签
        data:{
            color:"red",
            isRed:true,
        }
    });
</script>
</body>
</html>
13:计算属性
在插值表达式中使用js表达式是非常方便的,而且也经常被用到。
但是如果表达式的内容很长,就会显得不够优雅,而且后期维护起来也不方便。
例如下面这个场景,我们有一个日期的数据,但是是毫秒值:
(a):日期的格式化
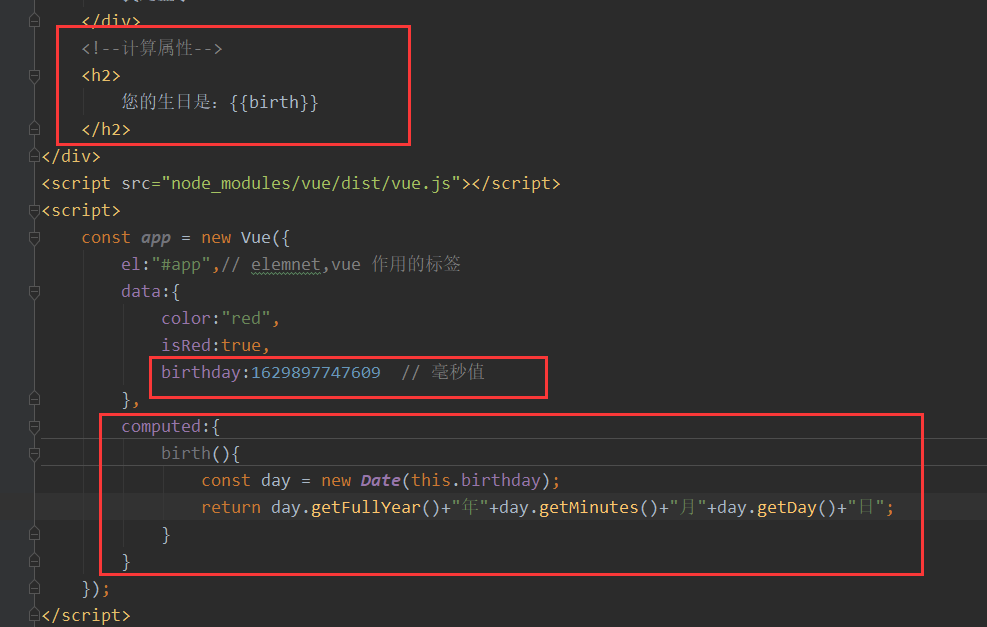
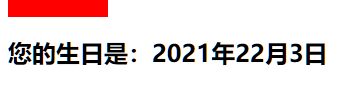
<!DOCTYPE html>
<html lang="en">
<head>
    <meta charset="UTF-8">
    <title>Title</title>
    <style type="text/css">
        div #box{
            width: 100px;
            height: 100px;
            color: darkgray;
        }
        .red{
            background-color: red;
        }
        .blue{
            background-color: blue;
        }
    </style>
</head>
<body>
<div id="app">
<!--    <button @click="color='red'">红色</button>-->
<!--    <button @click="color='blue'">蓝色</button>-->
<!--    <div id="box" :class="color">-->
<!--        我是盒子<br>-->
<!--        我是盒子-->
<!--    </div>-->
    <button @click="isRed =! isRed">点击切换颜色</button>
    <div id="box" :class="{red:isRed,blue:!isRed}">
        我是盒子<br>
        我是盒子
    </div>
    <!--计算属性-->
    <h2>
        您的生日是:{{birth}}
    </h2>
</div>
<script src="node_modules/vue/dist/vue.js"></script>
<script>
    const app = new Vue({
        el:"#app",// elemnet,vue 作用的标签
        data:{
            color:"red",
            isRed:true,
            birthday:1629897747609  // 毫秒值
        },
        computed:{
            birth(){
                const day = new Date(this.birthday);
                return day.getFullYear()+"年"+day.getMinutes()+"月"+day.getDay()+"日";
            }
        }
    });
</script>
</body>
</html>
14:watch
(1):监控
watch 可以让我们监控一个值的变化,从而做出相应的反应。
自动监控 示例:
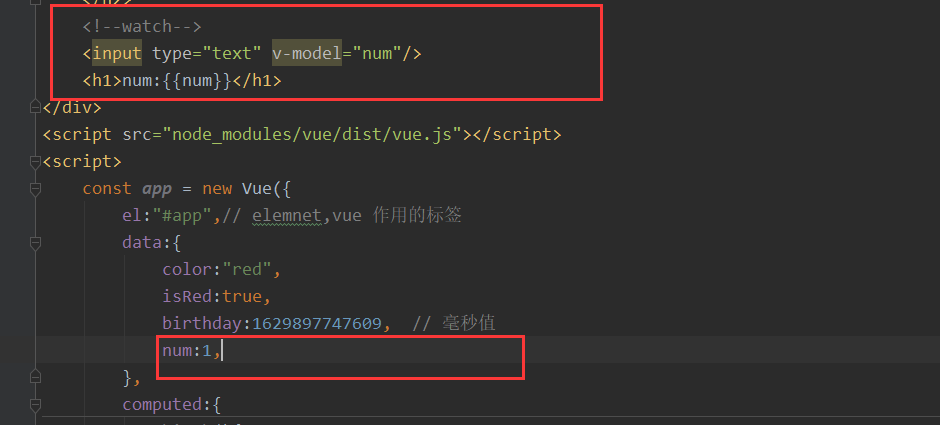
<!DOCTYPE html>
<html lang="en">
<head>
    <meta charset="UTF-8">
    <title>Title</title>
    <style type="text/css">
        div #box{
            width: 100px;
            height: 100px;
            color: darkgray;
        }
        .red{
            background-color: red;
        }
        .blue{
            background-color: blue;
        }
    </style>
</head>
<body>
<div id="app">
<!--    <button @click="color='red'">红色</button>-->
<!--    <button @click="color='blue'">蓝色</button>-->
<!--    <div id="box" :class="color">-->
<!--        我是盒子<br>-->
<!--        我是盒子-->
<!--    </div>-->
    <button @click="isRed =! isRed">点击切换颜色</button>
    <div id="box" :class="{red:isRed,blue:!isRed}">
        我是盒子<br>
        我是盒子
    </div>
    <!--计算属性-->
    <h2>
        您的生日是:{{birth}}
    </h2>
    <!--watch-->
    <input type="text" v-model="num"/>
    <h1>num:{{num}}</h1>
</div>
<script src="node_modules/vue/dist/vue.js"></script>
<script>
    const app = new Vue({
        el:"#app",// elemnet,vue 作用的标签
        data:{
            color:"red",
            isRed:true,
            birthday:1629897747609,  // 毫秒值
            num:1,
        },
        computed:{
            birth(){
                const day = new Date(this.birthday);
                return day.getFullYear()+"年"+day.getMinutes()+"月"+day.getDay()+"日";
            }
        }
    });
</script>
</body>
</html>

(2):浅监控
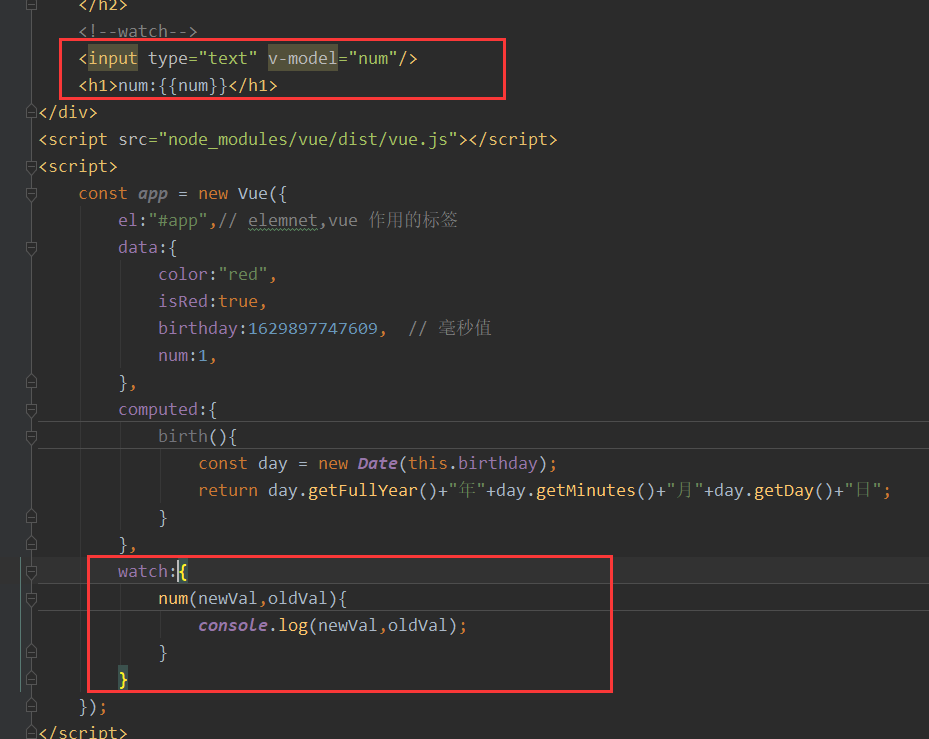
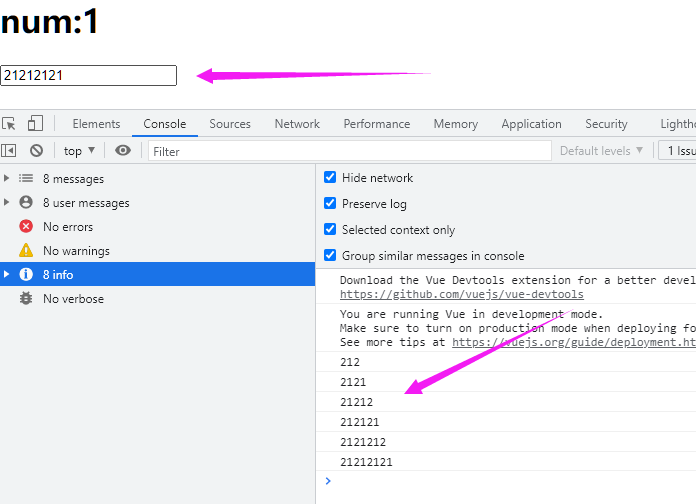
<!DOCTYPE html>
<html lang="en">
<head>
    <meta charset="UTF-8">
    <title>Title</title>
    <style type="text/css">
        div #box{
            width: 100px;
            height: 100px;
            color: darkgray;
        }
        .red{
            background-color: red;
        }
        .blue{
            background-color: blue;
        }
    </style>
</head>
<body>
<div id="app">
<!--    <button @click="color='red'">红色</button>-->
<!--    <button @click="color='blue'">蓝色</button>-->
<!--    <div id="box" :class="color">-->
<!--        我是盒子<br>-->
<!--        我是盒子-->
<!--    </div>-->
    <button @click="isRed =! isRed">点击切换颜色</button>
    <div id="box" :class="{red:isRed,blue:!isRed}">
        我是盒子<br>
        我是盒子
    </div>
    <!--计算属性-->
    <h2>
        您的生日是:{{birth}}
    </h2>
    <!--watch-->
    <input type="text" v-model="num"/>
    <h1>num:{{num}}</h1>
</div>
<script src="node_modules/vue/dist/vue.js"></script>
<script>
    const app = new Vue({
        el:"#app",// elemnet,vue 作用的标签
        data:{
            color:"red",
            isRed:true,
            birthday:1629897747609,  // 毫秒值
            num:1,
        },
        computed:{
            birth(){
                const day = new Date(this.birthday);
                return day.getFullYear()+"年"+day.getMinutes()+"月"+day.getDay()+"日";
            }
        },
        watch:{
            num(newVal,oldVal){
                console.log(newVal,oldVal);
            }
        }
    });
</script>
</body>
</html>
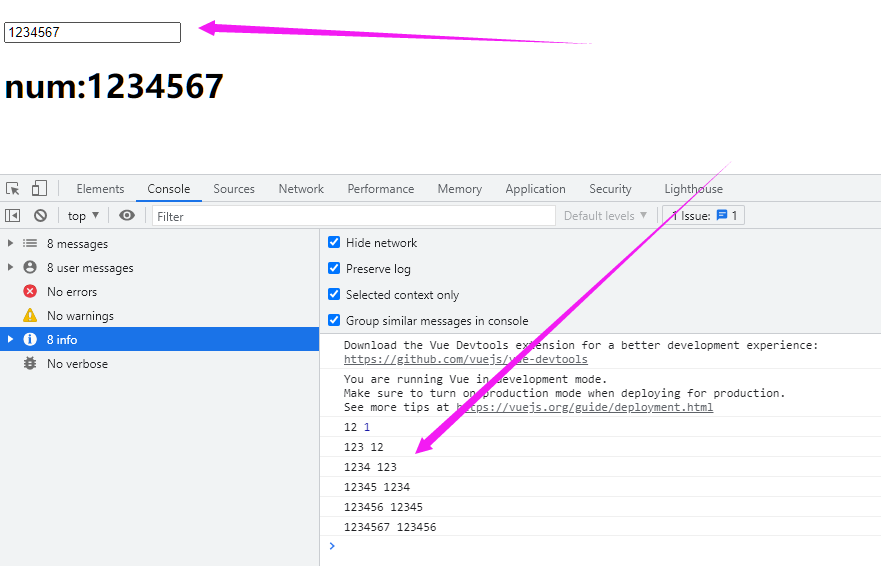
newVal 是新的值,oldVal 是旧的值。
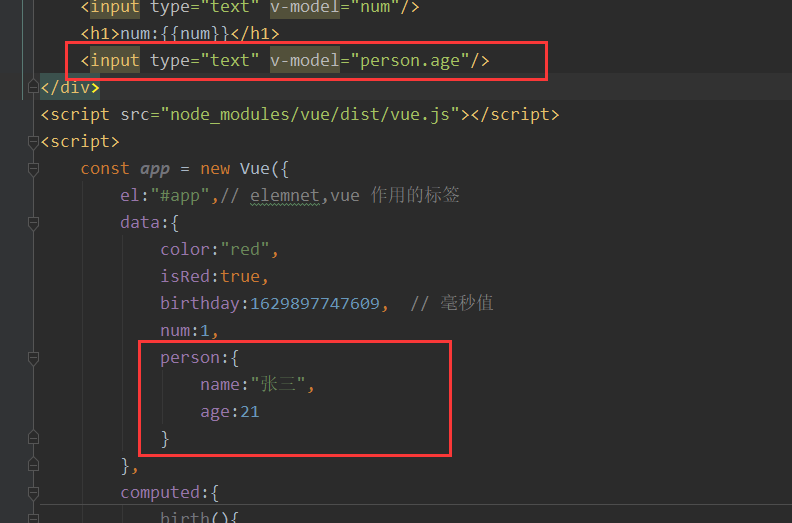
(3):深监控 监控对象
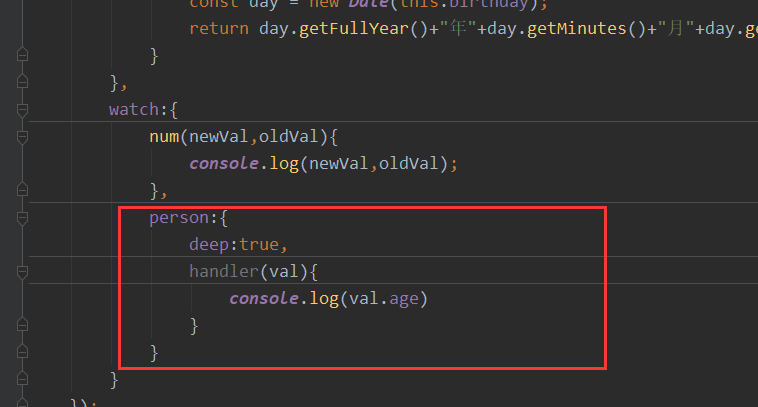
六、组件化
在大型应用开发的时候,页面可以划分成很多部分。
往往不同的页面,也会有相同的部分。例如可能会有相同你的头部导航。
但是如果每个页面都独自开发,这无疑增加了我们开发的成本。
所以我们会把页面的不同部分拆分成独立的组件,然后在不同页面就可以共享这些组件,避免重复开发。
1、定义安全组件
我们通过Vue的 component 方法来定义一个全局组件。
创建一个新的页面。
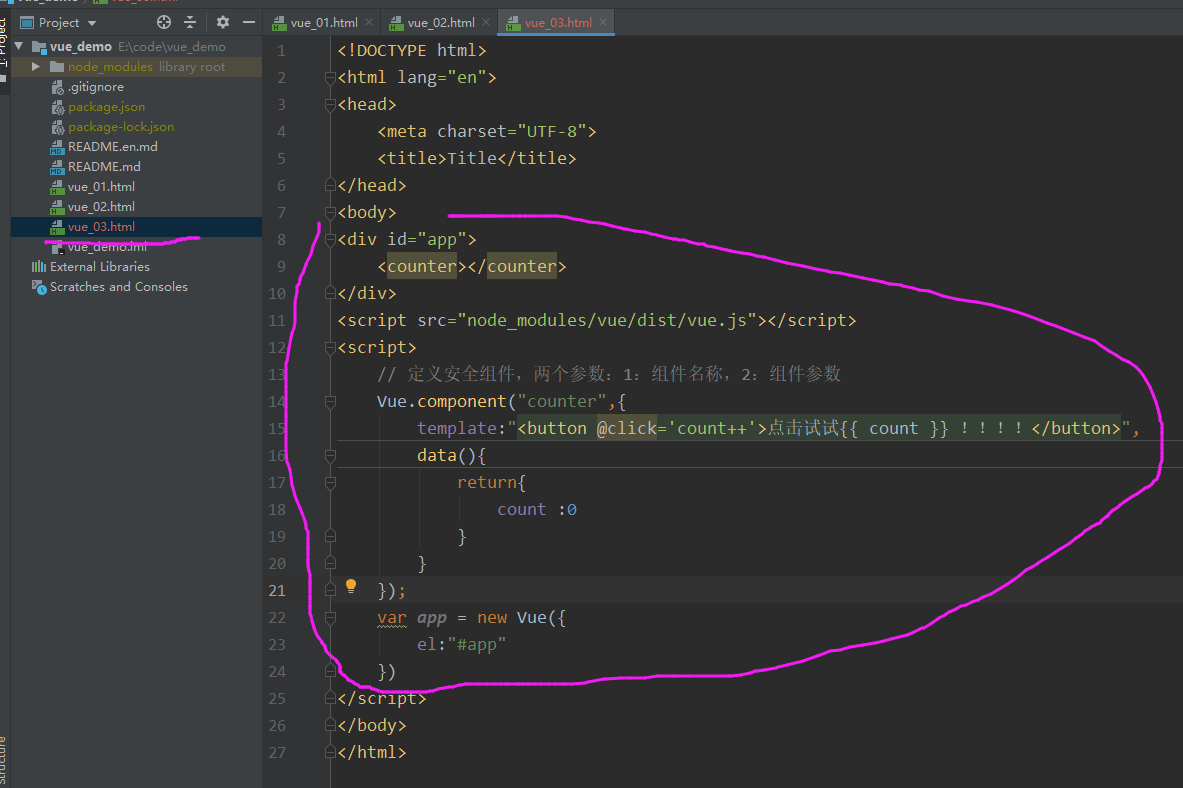
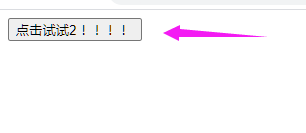
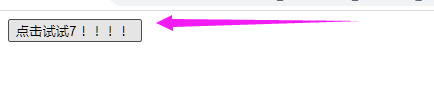
<!DOCTYPE html>
<html lang="en">
<head>
    <meta charset="UTF-8">
    <title>Title</title>
</head>
<body>
<div id="app">
    <counter></counter>
</div>
<script src="node_modules/vue/dist/vue.js"></script>
<script>
    // 定义安全组件,两个参数:1:组件名称,2:组件参数
    Vue.component("counter",{
        template:"<button @click='count++'>点击试试{{ count }} !!!!</button>",
        data(){
            return{
                count :0
            }
        }
    });
    var app = new Vue({
        el:"#app"
    })
</script>
</body>
</html>
2、组件的复用
定义好的组件,可以任意复用次数

<!DOCTYPE html>
<html lang="en">
<head>
    <meta charset="UTF-8">
    <title>Title</title>
</head>
<body>
<div id="app">
    <counter></counter>
    <counter></counter>
    <counter></counter>
</div>
<script src="node_modules/vue/dist/vue.js"></script>
<script>
    // 定义安全组件,两个参数:1:组件名称,2:组件参数
    Vue.component("counter",{
        template:"<button @click='count++'>点击试试{{ count }} !!!!</button>",
        data(){
            return{
                count :0
            }
        }
    });
    var app = new Vue({
        el:"#app"
    })
</script>
</body>
</html>
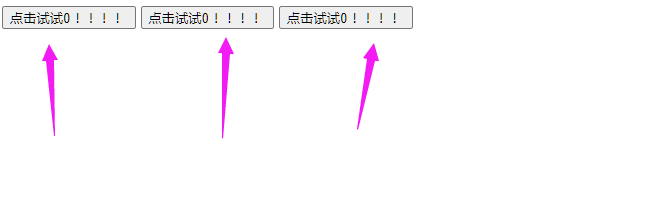

组件的data属性必须是函数!
当我们定义这个 <counter> 组件时,它的data并不是像这样直接提供一个对象:
data:{
     count:0
}
取而代之的是,一个组件的data选项必须是一个函数,因此每个实例可以维护一份被返回对象的独立的拷贝:
data:{
    return{
        count:0
    }
}
如果Vue没有这条规则,点击一个按钮就会影响到其他的所有实例!
3、局部注册
一旦局部注册,就意味着即便以后你不在使用这个组件,它依然会随着Vue的加载而加载。
因此,对于一些不频繁使用的组件,我们会采用局部注册。
我们现在外部定义一个对象,结构与创建组件时传递的第二个参数一致:
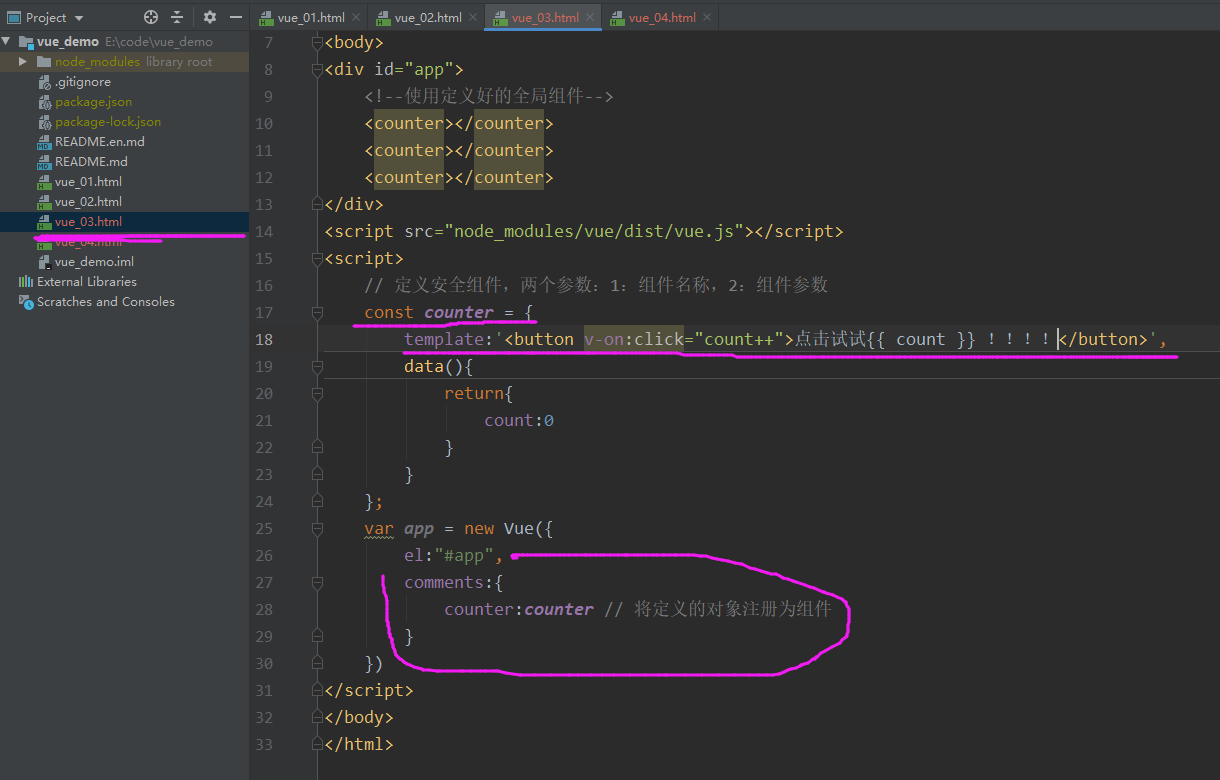
<!DOCTYPE html>
<html lang="en">
<head>
    <meta charset="UTF-8">
    <title>Title</title>
</head>
<body>
<div id="app">
    <!--使用定义好的全局组件-->
    <counter></counter>
    <counter></counter>
    <counter></counter>
</div>
<script src="node_modules/vue/dist/vue.js"></script>
<script>
    // 定义安全组件,两个参数:1:组件名称,2:组件参数
    const counter = {
        template:'<button v-on:click="count++">点击试试{{ count }} !!!!</button>',
        data(){
            return{
                count:0
            }
        }
    };
    var app = new Vue({
        el:"#app",
        comments:{
            counter:counter // 将定义的对象注册为组件
        }
    })
</script>
</body>
</html>
components 就是当前vue对象子组件集合
其实key就是子组件名称
其值就是组件对象的属性。
效果与刚才的全局注册时类似的,不同的是,这个 counter 组件只能在当前的vue实例中使用。
4、组件通信
通常一个单页应用会以一棵嵌套的组件树的形式来组织:
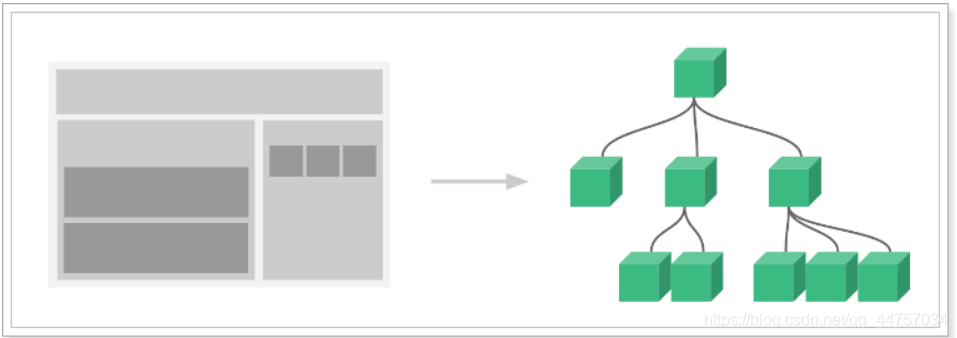
页面首先分成了顶部导航,左侧内容区。
左侧内容区又分为上下两个组件。
右侧边栏中又包含了3个子组件。
各个组件之间以潜逃的关系组合在一起,那么这个时候不可避免的会有组件间通信的需求。
(1):父向子传递:props
比如我们有一个子组件:
Vue.component("introduce",{
    // 直接使用props接收到的属性来渲染页面
    template:'<h3>{{title}}</h3>',
    props:[title] // 通过props来接收一个父组件传递的属性
})
这个子组件中要使用title属性渲染页面,但是自己并没有title属性
通过props来接收父组件属性,名为title
父组件使用子组件,同时传递title属性:
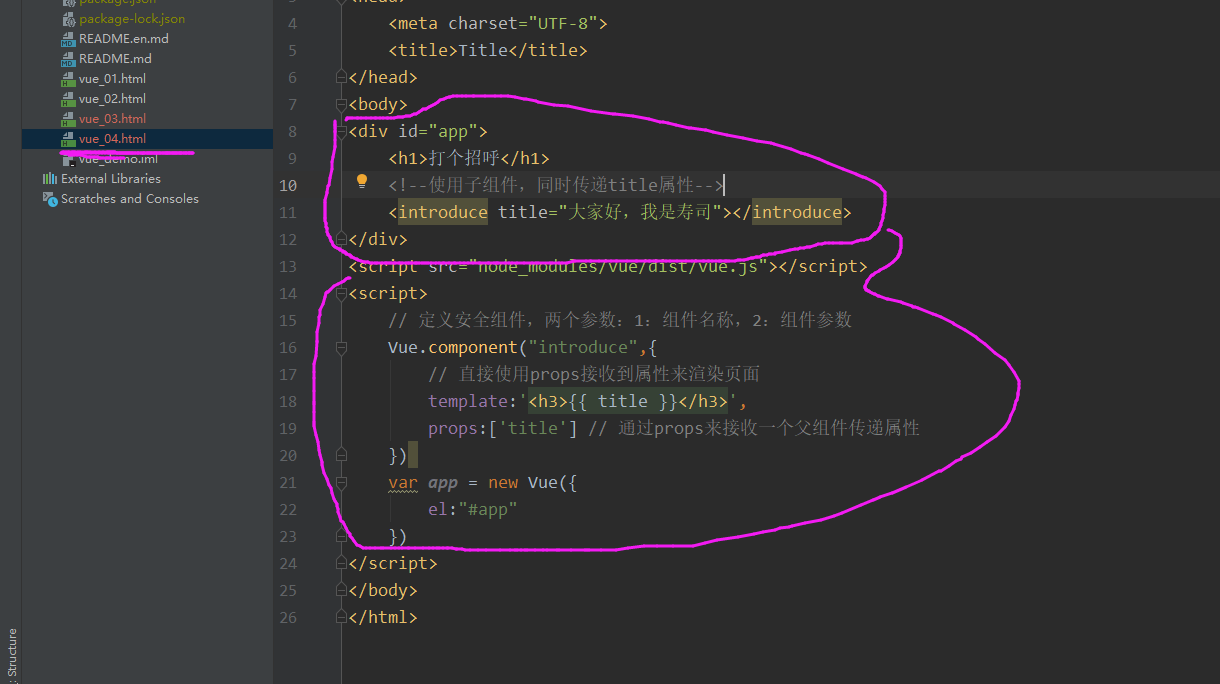
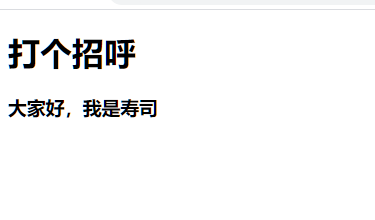
<!DOCTYPE html>
<html lang="en">
<head>
    <meta charset="UTF-8">
    <title>Title</title>
</head>
<body>
<div id="app">
    <h1>打个招呼</h1>
    <!--使用子组件,同时传递title属性-->
    <introduce title="大家好,我是寿司"></introduce>
</div>
<script src="node_modules/vue/dist/vue.js"></script>
<script>
    // 定义安全组件,两个参数:1:组件名称,2:组件参数
    Vue.component("introduce",{
        // 直接使用props接收到属性来渲染页面
        template:'<h3>{{ title }}</h3>',
        props:['title'] // 通过props来接收一个父组件传递属性
    })
    var app = new Vue({
        el:"#app"
    })
</script>
</body>
</html>
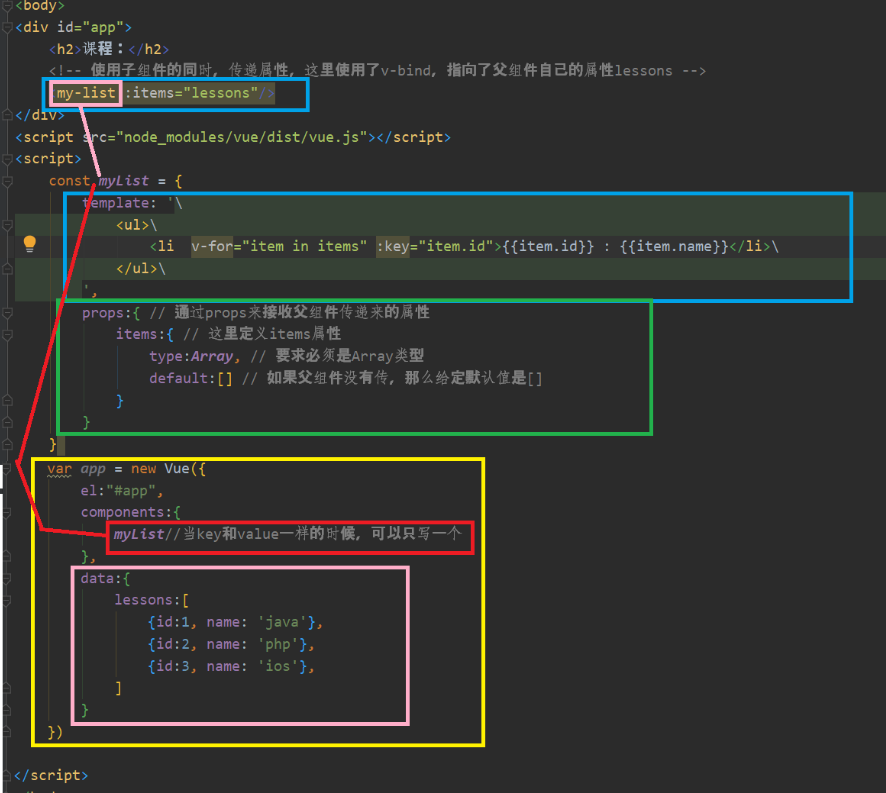
(2):传递复杂属性
我们定义一个子组件:
这个子组件可以对 items 进行迭代,并输出到页面。
但是组件中并未定义items属性。
通过props来定义需要从父组件中接收的属性
items:是要接收的属性的名称
type:限定父组件传递来的必须是数组,否则报错
default:默认值
我们在父组件中使用它
全部代码:
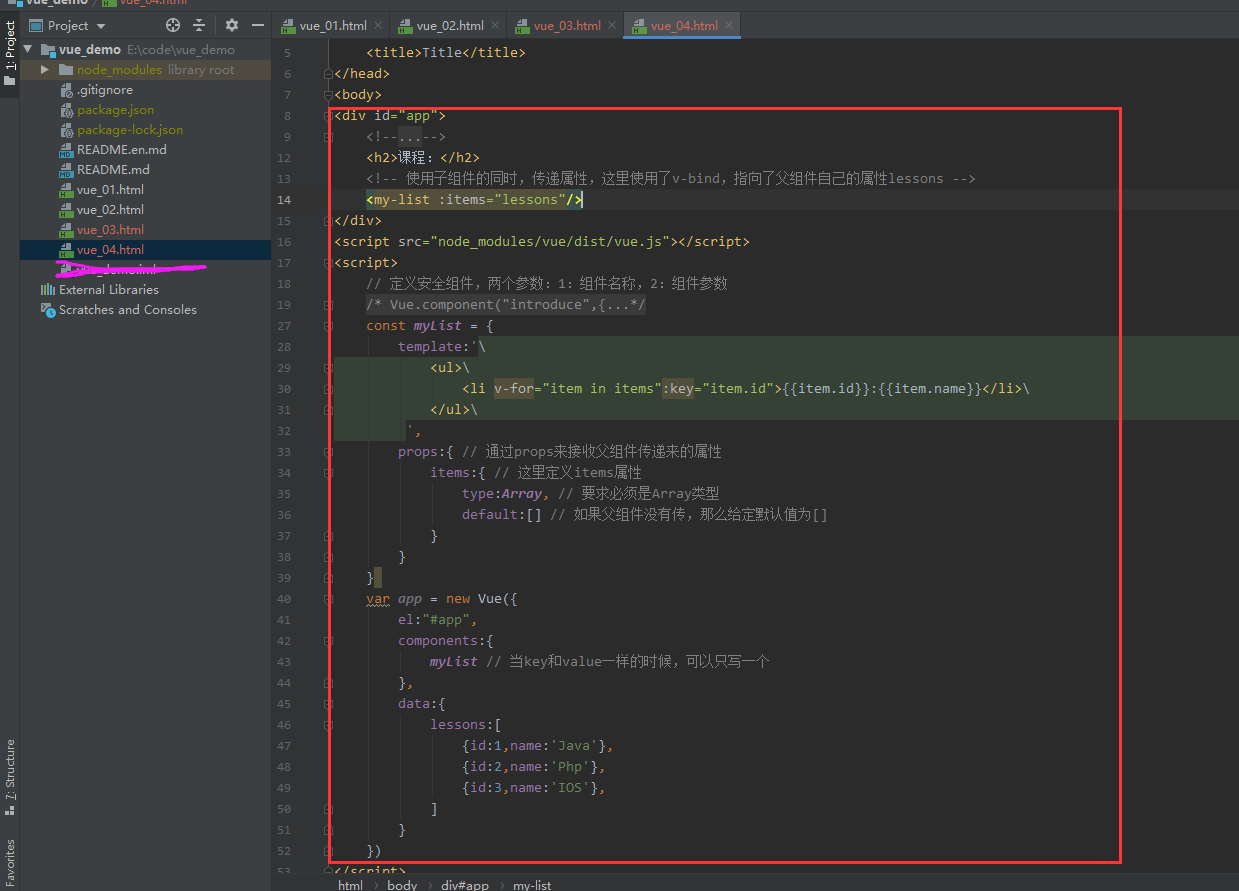
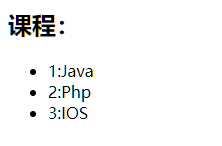
<!DOCTYPE html>
<html lang="en">
<head>
    <meta charset="UTF-8">
    <title>Title</title>
</head>
<body>
<div id="app">
    <h2>课程:</h2>
    <!-- 使用子组件的同时,传递属性,这里使用了v-bind,指向了父组件自己的属性lessons -->
    <my-list :items="lessons"/>
</div>
<script src="node_modules/vue/dist/vue.js"></script>
<script>
    const myList = {
        template:'\
            <ul>\
                <li v-for="item in items":key="item.id">{{item.id}}:{{item.name}}</li>\
            </ul>\
         ',
        props:{ // 通过props来接收父组件传递来的属性
            items:{ // 这里定义items属性
                type:Array, // 要求必须是Array类型
                default:[] // 如果父组件没有传,那么给定默认值为[]
            }
        }
    }
    var app = new Vue({
        el:"#app",
        components:{
            myList // 当key和value一样的时候,可以只写一个
        },
        data:{
            lessons:[
                {id:1,name:'Java'},
                {id:2,name:'Php'},
                {id:3,name:'IOS'},
            ]
        }
    })
</script>
</body>
</html>
(3):子向父通信
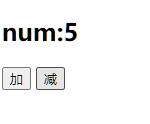
来看这样一个案例:
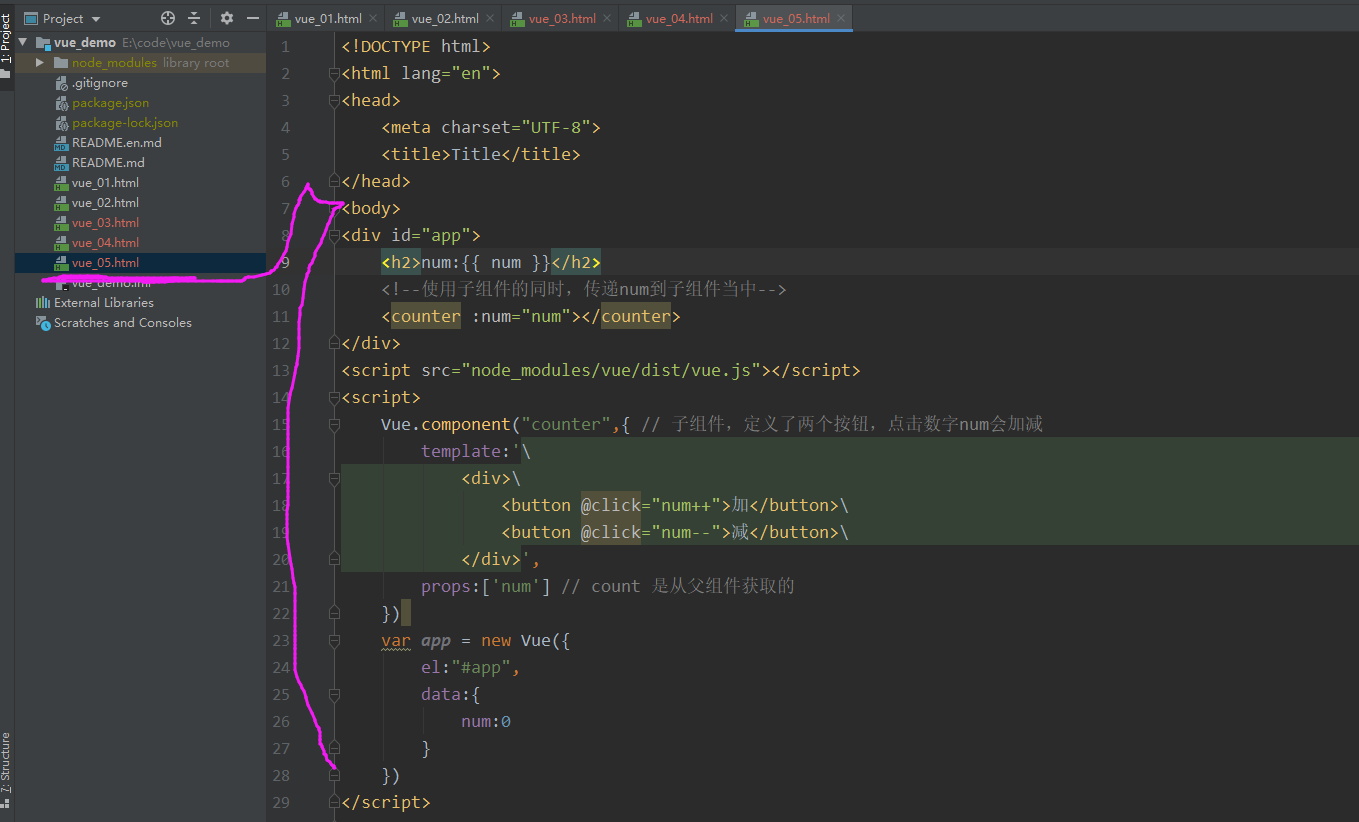
<!DOCTYPE html>
<html lang="en">
<head>
    <meta charset="UTF-8">
    <title>Title</title>
</head>
<body>
<div id="app">
    <h2>num:{{ num }}</h2>
    <!--使用子组件的同时,传递num到子组件当中-->
    <counter :num="num"></counter>
</div>
<script src="node_modules/vue/dist/vue.js"></script>
<script>
    Vue.component("counter",{ // 子组件,定义了两个按钮,点击数字num会加减
        template:'\
            <div>\
                <button @click="num++">加</button>\
                <button @click="num--">减</button>\
            </div>',
        props:['num'] // count 是从父组件获取的
    })
    var app = new Vue({
        el:"#app",
        data:{
            num:0
        }
    })
</script>
</body>
</html>
子组件接收父组件的num属性
子组件定义点击按钮点击后对num进行加减操作
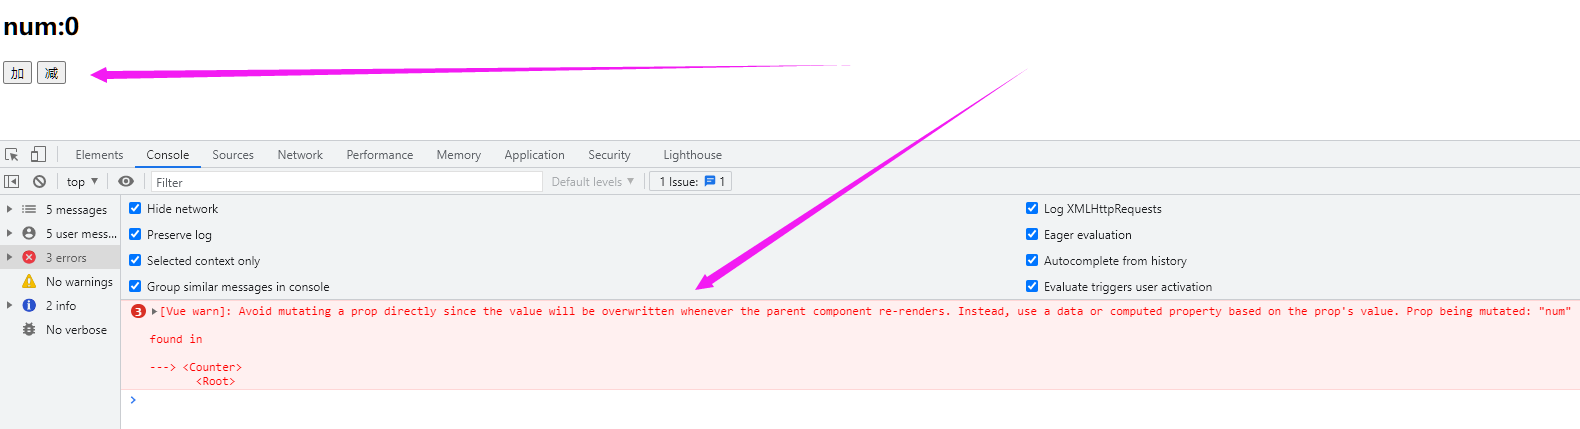
但是尝试运行的时候报了错
子组件接收到父组件属性后,默认是不允许修改的,怎么办?
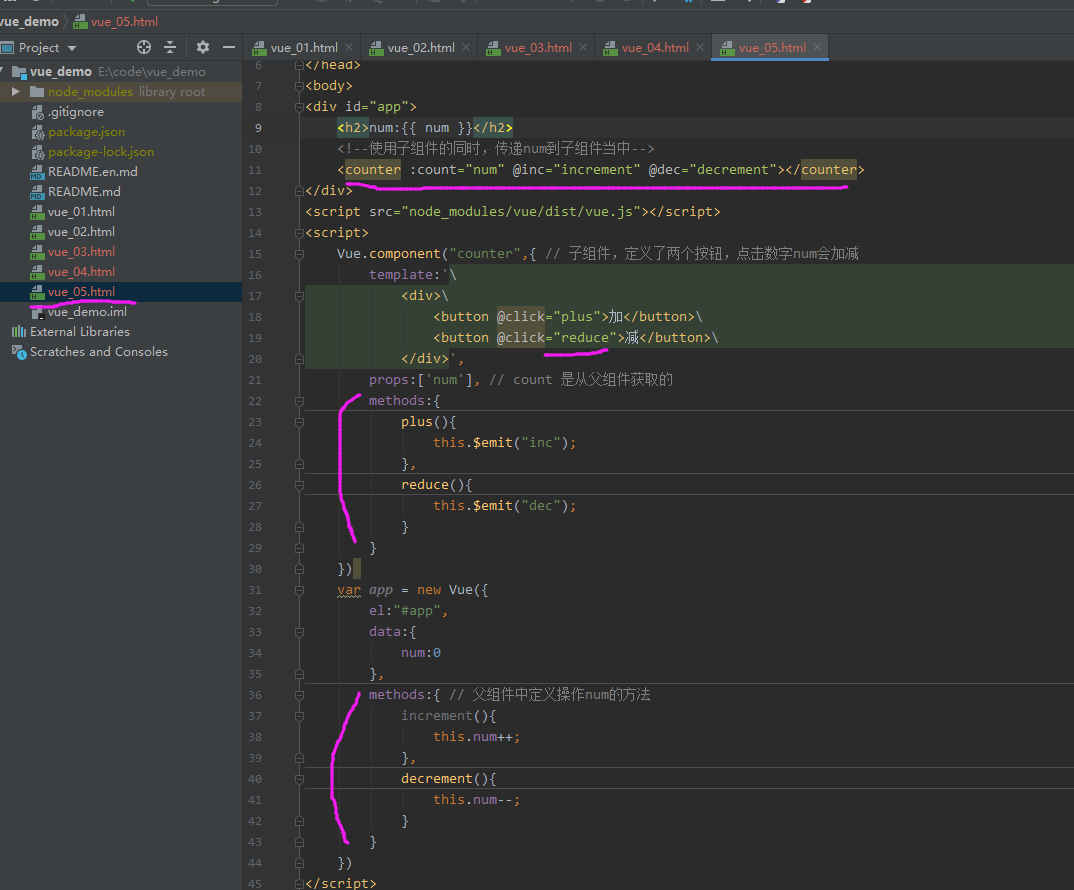
既然只有父组件能修改,那么加和减的操作一定是放到父组件
var app = new Vue({
    el:"#app",
    data:{
        num:0
    },
    methods:{ // 父组件中定义操作num的方法
        increment(){
            this.num++;
        },
        decrement(){
            this.num--;
        }
    }
})
但是,点击按钮是在子组件中,那就是说需要子组件来调用父组件的函数,怎么做?
我们可以通过 v-on 指令将父组件的函数绑定到子组件上:
<div id="app">
    <h2>num: {{num}}</h2>
    <counter :count="num" @inc="increment" @dec="decrement"></counter>
</div>
然后又,当子组件中按钮被点击到,调用绑定的函数:
Vue.component("counter", {
            template:'\
                <div>\
                    <button @click="plus">加</button>  \
                    <button @click="reduce">减</button>  \
                </div>',
            props:['count'],
            methods:{
                plus(){
                    this.$emit("inc");
                },
                reduce(){
                    this.$emit("dec");
                }
            }
        })
Vue提供了一个内置的this.$emit 函数,用来调用父组件绑定的函数:
全部代码和效果:
<!DOCTYPE html>
<html lang="en">
<head>
    <meta charset="UTF-8">
    <title>Title</title>
</head>
<body>
<div id="app">
    <h2>num:{{ num }}</h2>
    <!--使用子组件的同时,传递num到子组件当中-->
    <counter :count="num" @inc="increment" @dec="decrement"></counter>
</div>
<script src="node_modules/vue/dist/vue.js"></script>
<script>
    Vue.component("counter",{ // 子组件,定义了两个按钮,点击数字num会加减
        template:'\
            <div>\
                <button @click="plus">加</button>\
                <button @click="reduce">减</button>\
            </div>',
        props:['num'], // count 是从父组件获取的
        methods:{
            plus(){
                this.$emit("inc");
            },
            reduce(){
                this.$emit("dec");
            }
        }
    })
    var app = new Vue({
        el:"#app",
        data:{
            num:0
        },
        methods:{ // 父组件中定义操作num的方法
            increment(){
                this.num++;
            },
            decrement(){
                this.num--;
            }
        }
    })
</script>
</body>
</html>
线上gitee地址:Vue_Demo
时间仓促,如有错误欢迎指出,欢迎在评论区讨论,如对您有帮助还请点个推荐、关注支持一下
作者:博客园 - 凉年技术
出处:http://www.cnblogs.com/xxhxs-21/
本文版权归作者和博客园共有,欢迎转载,但未经作者同意必须在文章页面给出原文链接,否则保留追究法律责任的权利。
若内容有侵犯您权益的地方,请公告栏处联系本人,本人定积极配合处理解决。
