自定义ImageView之圆形、圆角、爱心、动态旗帜效果
目 录(本篇字数:1555)
-
介绍
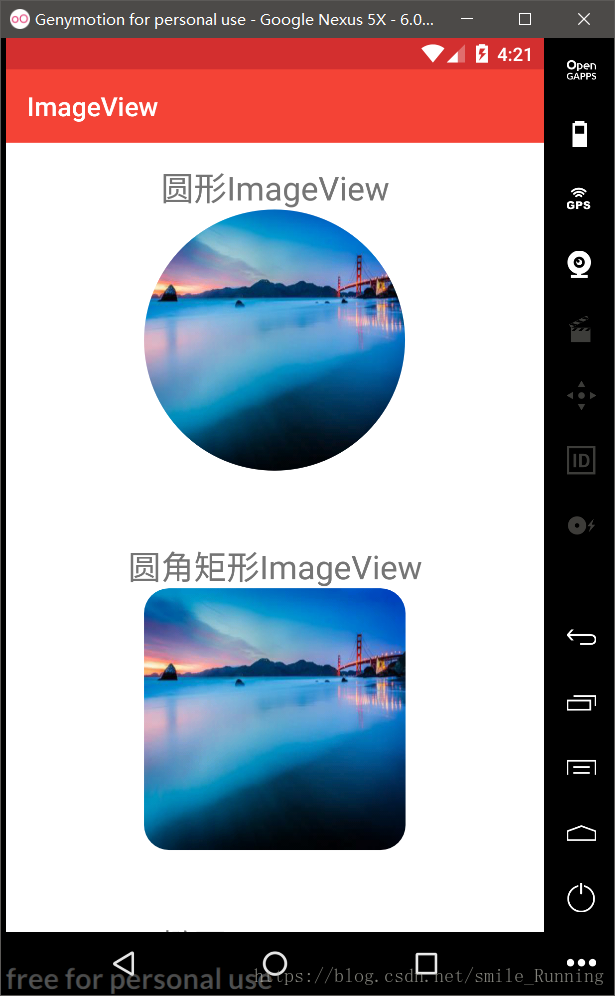
今天,我们继续上篇文章提到的自定义View之实现一个简单显示图片的SimpleImageView控件来进一步实现:CircleImageView(圆形效果)、LoveImageView(爱心效果)、FlagImageView(动态旗帜效果)、RoundRectImageView(圆角矩形效果)等等显示不同形状的图片。
既然这篇文章的代码是沿用上篇的自定义View之从零打造一个简单的图片显示控件 —— SimpleImageView,所以在此篇文章中,我就不再去介绍实现SimpleImageView的步骤了。那么,我默认你已经实现了上篇文章所简述的代码。那就开始吧,我们先来看一波实现的效果图。
这篇的内容主要运用了Paint类的着色器(Shader)效果,通过BitmapShader类为图片设置了Shader,然后再通过画笔(Paint)将其画出,利用画笔绘制各种各样的图形。
实现效果的对比图:

-
自定义ImageView代码
/**
 * @Created by xww.
 * @Creation time 2018/8/8.
 */

public class CircleImageView extends View {

    private Paint mPaint;
    private Drawable mDrawable;
    private BitmapShader mBitmapShader;
    private int mWidth;
    private int mHeight;

    @SuppressLint("Recycle")
    private void initAttrs(AttributeSet attrs) {
        if (attrs != null) {
            TypedArray array = null;
            try {
                array = getContext().obtainStyledAttributes(attrs, R.styleable.RectangleImageView);
                mDrawable = array.getDrawable(R.styleable.RectangleImageView_src);
                if (mDrawable == null) {
                    throw new NullPointerException("drawable is not null");
                }
                mWidth = mDrawable.getIntrinsicWidth();
                mHeight = mDrawable.getIntrinsicHeight();
            } finally {
                if (array != null) {
                    array.recycle();
                }
            }
        }
    }

    public CircleImageView(Context context, @Nullable AttributeSet attrs) {
        super(context, attrs);
        mPaint = new Paint();
        mPaint.setAntiAlias(true);
        initAttrs(attrs);
    }

    @Override
    protected void onMeasure(int widthMeasureSpec, int heightMeasureSpec) {
        super.onMeasure(widthMeasureSpec, heightMeasureSpec);
        setMeasuredDimension(measureWidth(widthMeasureSpec), measureHeight(heightMeasureSpec));
    }

    @SuppressLint("DrawAllocation")
    @Override
    protected void onDraw(Canvas canvas) {
        super.onDraw(canvas);
        if (mDrawable == null) {
            return;
        }
        final int width = canvas.getWidth();
        final int height = canvas.getHeight();

        /**
         * 绘制圆形图片
         */
        mBitmapShader = new BitmapShader(drawableToBitmap(mDrawable), Shader.TileMode.CLAMP, Shader.TileMode.CLAMP);
        mPaint.setShader(mBitmapShader);
        canvas.drawCircle(width / 2, height / 2, width / 2, mPaint);
    }

    private int measureWidth(int widthMeasureSpec) {
        int widthSize = MeasureSpec.getSize(widthMeasureSpec);
        int widthMode = MeasureSpec.getMode(widthMeasureSpec);
        switch (widthMode) {
            case MeasureSpec.UNSPECIFIED:
            case MeasureSpec.AT_MOST:
                break;
            case MeasureSpec.EXACTLY:
                mWidth = widthSize;
                break;
        }
        return mWidth;
    }

    private int measureHeight(int heightMeasureSpec) {
        int heightSize = MeasureSpec.getSize(heightMeasureSpec);
        int heightMode = MeasureSpec.getMode(heightMeasureSpec);
        switch (heightMode) {
            case MeasureSpec.UNSPECIFIED:
            case MeasureSpec.AT_MOST:
                break;
            case MeasureSpec.EXACTLY:
                mHeight = heightSize;
                break;
        }
        return mHeight;
    }

    private Bitmap drawableToBitmap(Drawable drawable) {
        Bitmap.Config config = drawable.getOpacity() != PixelFormat.OPAQUE ? Bitmap.Config.ARGB_8888 : Bitmap.Config.RGB_565;
        Bitmap bitmap = Bitmap.createBitmap(mWidth, mHeight, config);
        Canvas canvas = new Canvas(bitmap);
        drawable.setBounds(0, 0, mWidth, mHeight);
        drawable.draw(canvas);
        return bitmap;
    }
}
一、圆形ImageView效果
关键代码:
利用canvas绘制圆形的效果。
        /**
         * 绘制圆形图片
         */
        mBitmapShader = new BitmapShader(drawableToBitmap(mDrawable), Shader.TileMode.CLAMP, Shader.TileMode.CLAMP);
        mPaint.setShader(mBitmapShader);
        canvas.drawCircle(width / 2, height / 2, width / 2, mPaint);
二、圆角矩形ImageView效果
关键代码:
将本段代码替换圆形图片的注释部分的代码即可。
        /**
         * 绘制圆角矩形图片
         */
        mBitmapShader = new BitmapShader(drawableToBitmap(mDrawable), Shader.TileMode.CLAMP, Shader.TileMode.CLAMP);
        mPaint.setShader(mBitmapShader);
        canvas.drawRoundRect(0, 0, width, height, 50, 50, mPaint);
三、椭圆形ImageView效果

关键代码:
将本段代码替换圆形图片的注释部分的代码即可。
        mBitmapShader = new BitmapShader(drawableToBitmap(mDrawable), Shader.TileMode.CLAMP, Shader.TileMode.CLAMP);
        mPaint.setShader(mBitmapShader);
        canvas.drawOval(0, 0, width-50, height-200, mPaint);
四、三角形ImageView效果
关键代码:
简单介绍一下,利用路径来绘制一个三角形,将本段代码替换圆形图片的注释部分的代码即可。
        mBitmapShader = new BitmapShader(drawableToBitmap(mDrawable), Shader.TileMode.CLAMP, Shader.TileMode.CLAMP);
        mPaint.setShader(mBitmapShader);
        Path path = new Path();
        path.moveTo(width / 2, 0);
        path.lineTo(width, height);
        path.lineTo(0, height);
        path.close();
        canvas.drawPath(path, mPaint);
五、爱心形ImageView效果
关键代码:
将本段代码替换圆形图片的注释部分的代码即可。
        /**
         * 调用drawLove()方法
         */
        mBitmapShader = new BitmapShader(drawableToBitmap(mDrawable), Shader.TileMode.CLAMP, Shader.TileMode.CLAMP);
        mPaint.setShader(mBitmapShader);
        drawLove(canvas);


    private void drawLove(Canvas canvas) {
        //(17*(x^2))-(16*abs(x)*y)+(17*(y^2))<255 x(-5,5) y(-5,5) (心形函数方程式)

        int loveWidth = 500;//心型宽度,必须是偶数
        int oneLine = loveWidth / 2;//一条轴长度
        float scale = oneLine / 5f;//实际坐标比上方程式坐标,倍数

        for (int i = 0; i < oneLine; i++) {
            for (int j = 0; j < oneLine; j++) {
                //根据表达式xy的范围,所以要把坐标系的范围也缩小
                float xf = i / scale;
                float yf = j / scale;

                if ((17 * Math.pow(xf, 2) - 16 * Math.abs(xf) * yf + 17 * Math.pow(yf, 2)) < 255) {
                    canvas.drawPoint(250 - xf * scale, 250 - yf * scale, mPaint);
                    canvas.drawPoint(250 + xf * scale, 250 - yf * scale, mPaint);
                }

                if ((17 * Math.pow(xf, 2) - 16 * Math.abs(xf) * (-yf) + 17 * Math.pow(yf, 2)) < 255) {
                    canvas.drawPoint(250 - xf * scale, 250 + yf * scale, mPaint);
                    canvas.drawPoint(250 + xf * scale, 250 + yf * scale, mPaint);
                }
            }
        }
    }
六、动态旗帜ImageView效果
关键代码:
将本类所有代码,替换之前的代码即可。
/**
 * 旗帜飘扬的动态效果
 *
 * @Created by xww.
 * @Creation time 2018/8/8.
 */
public class FlagImageView extends View {

    //将图像分成多少格
    private int WIDTH = 200;
    private int HEIGHT = 200;
    //交点坐标的个数
    private int COUNT = (WIDTH + 1) * (HEIGHT + 1);
    //用于保存COUNT的坐标
    //x0, y0, x1, y1......
    private float[] verts = new float[COUNT * 2];
    //用于保存原始的坐标
    private float[] orig = new float[COUNT * 2];
    private Bitmap mBitmap;
    private float K = 1;

    public FlagImageView(Context context, AttributeSet attrs) {
        super(context, attrs);
        initView();
    }

    private void initView() {
        int index = 0;
        mBitmap = BitmapFactory.decodeResource(getResources(), R.drawable.bg_loop_ad_2);
        float bmWidth = mBitmap.getWidth();
        float bmHeight = mBitmap.getHeight();

        for (int i = 0; i < HEIGHT + 1; i++) {
            float fy = bmHeight * i / HEIGHT;
            for (int j = 0; j < WIDTH + 1; j++) {
                float fx = bmWidth * j / WIDTH;
                //X轴坐标 放在偶数位
                verts[index * 2 + 0] = fx;
                orig[index * 2 + 0] = verts[index * 2 + 0];
                //Y轴坐标 放在奇数位
                //向下移动200
                verts[index * 2 + 1] = fy + 200;
                orig[index * 2 + 1] = verts[index * 2 + 1];
                index += 1;
            }
        }
    }


    @Override
    protected void onDraw(Canvas canvas) {
        for (int i = 0; i < HEIGHT + 1; i++) {
            for (int j = 0; j < WIDTH + 1; j++) {
                verts[(i * (WIDTH + 1) + j) * 2 + 0] += 0;
                //利用正弦函数的周期性
                float offsetY = (float) Math.sin((float) j / WIDTH * 2 * Math.PI + K * 2 * Math.PI);
                verts[(i * (WIDTH + 1) + j) * 2 + 1] = orig[(i * (WIDTH + 1) + j) * 2 + 1] + offsetY * 50;
            }
        }
        //平移 旗帜飘扬效果
        K += 0.1F;
        canvas.drawBitmapMesh(mBitmap, WIDTH, HEIGHT, verts, 0, null, 0, null);
        invalidate();
    }
}
当然,如果你觉得效果还不够丰富,可以自己利用画布绘制更多的形状效果。
©原文链接:https://blog.csdn.net/smile_Running/article/details/81872881
@作者博客:_Xu2WeI
@更多博文:查看作者的更多博文
