搭建NFS服务器
前言
NFS(Network File System):网络文件系统,实现让客户端通过网络访问不同主机上磁盘里的数据,主要用在类Unix系统上实现文件共享的一种方法。环境说明
Centos7# cat /etc/redhat-release
CentOS Linux release 7.9.2009 (Core)
本例环境
| Name | IP adress | 说明 |
|---|---|---|
| server | 192.168.10.150 | 服务端ip |
| Windows Client | 192.168.1.116 | windows客户端 |
| Vmnet8 | 192.168.10.1 | 虚拟机vm8网卡 |
注:centos7.4后,支持NFS v4.2不需要rpcbind,但NFS v3需要rpcbind服务
服务端
NFS服务器 需要的软件 :nfs-utils 和rpcbind
NFs服务器 需要启动的服务 :nfs和rpcbind
NFS服务器 配置文件 /etc/exports
NFS环境条件:①保证客户机与NFS服务器网络通信正常,②systemctl stop firewalld关闭服务器端防火墙
服务端安装
使用yum安装NFS安装包 列出所有已经安装的包
yum list installed
查看nfs-utils 软件是否安装,更新
yum info nfs-utils
查看rpcbind 软件是否安装,更新
yum info rpcbind
使用yum安装NFS安装包
yum install nfs-utils
注:因为rpcbind属于nfs-utils的依赖,会自动安装。
[root@aubin aubin]# yum info rpcbind
已加载插件:fastestmirror, langpacks
Loading mirror speeds from cached hostfile
* base: mirrors.ustc.edu.cn
* extras: mirrors.ustc.edu.cn
* updates: mirrors.ustc.edu.cn
已安装的软件包
名称 :rpcbind
架构 :x86_64
版本 :0.2.0
发布 :49.el7
大小 :101 k
源 :installed
来自源:base
简介 : Universal Addresses to RPC Program Number Mapper
网址 :http://git.linux-nfs.org/?p=steved/rpcbind.git;a=summary
协议 : BSD
描述 : The rpcbind utility is a server that converts RPC program numbers into
: universal addresses. It must be running on the host to be able to make
: RPC calls on a server on that machine.
服务端配置
      查看nfs服务是否启动
      systemctl status nfs

      查看rpcbind服务是否启动
      systemctl status rpcbind

      启动nfs服务
      systemctl start nfs

      启动rpcbind服务
      systemctl start rpvbind

      防火墙需要打开rpc-bind和nfs服务
      firewall-cmd --zone=public --permanent --add-service={rpc-bind,mountd,nfs}
首先简单学一次防火墙知识
systemctl start|stop|restart|enable|disable  firewalld
启动|停止|重启|加入启动项|禁止启动项|

注意
firwall-cmd:是Linux提供的操作firewall的一个工具
--permanent:表示设置为持久;


重启防火墙
firewall-cmd --reload

开放tcp的8080端口(修改后需要重启防火墙方可生效)
firewall-cmd --zone=public --add-port=8080/tcp --permanent

查看开放的端口
firewall-cmd --list-ports

关闭端口
firewall-cmd --zone=public --remove-port=8080/tcp --permanent
配置共享目录
NFS配置文件/etc/exports
基本格式: 共享路径 客户端主机(选项)
共享路径:NFS服务器上用来共享的目录
客户端主机:允许访问共享目录的客户机(ip地址,网段,*)
| 选项 | 说明 |
|---|---|
| ro | 只读 |
| rw | 读写 |
| root_squash | 屏蔽远程root |
| no_root_squash | 不屏蔽远程root |
服务启动后,配置一个共享目录
[root@aubin /]# mkdir date
[root@aubin /]# chmod 755 date
[root@aubin /]# stat date

向/etc/exports文件进行配置
[root@aubin /]# vi /etc/exports
[root@aubin /]# cat /etc/exports
/date/   192.168.10.0/24(rw,sync,no_root_squash,no_all_squash)


#/date:共享目录文件位置
#192.168.10.0/24:指客户端ip范围,*代表所有
#rw:权限,可读可写
#sync:同步共享目录
#no_root_squash:可以使用root授权
#no_all_squash:可以使用普通用户授权


保存后,重启nfs服务
[root@aubin /]# systemctl restart nfs


检查本地的共享目录
[root@aubin /]# showmount -e localhost
Export list for localhost:
/date 192.168.10.0/24


服务器配置好,再配置客户端,连接服务端,就可以使用共享目录了
Windows客户端
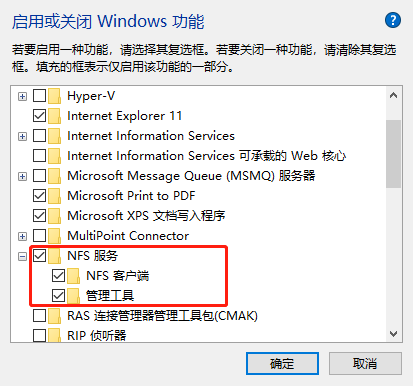
Windows安装nfs服务
注:需要升级为专业版win10激活码
J7QT3-3GCPG-9GVWT-CH2XR-GMRJM
VK7JG-NPHTM-C97JM-9MPGT-3V66T

cmd 进入终端,此处输入的ip是虚拟机下centos7的ip
C:\Users\hhh>showmount -e 192.168.10.150
导出列表在 192.168.10.150:
/date                              192.168.10.0/24
挂载
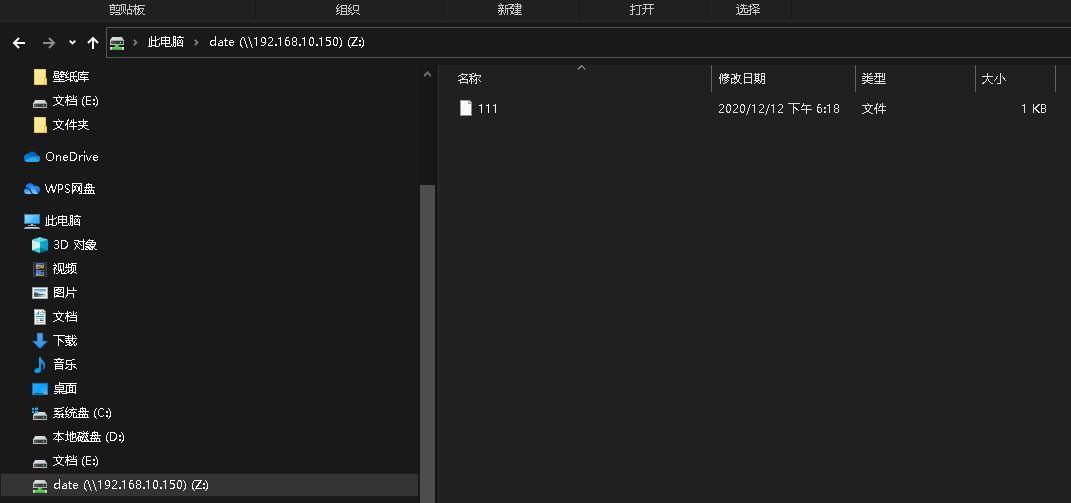
将centos7目录/date挂载到windwos 名为Z,成功后显示Z图标
可进行从windows访问Linux服务器设定的共享目录
C:\Users\hhh>mount 192.168.10.150:/date Z:
Z: 现已成功连接到 192.168.10.150:/date

命令已成功完成。
1.查看是否成功(可视化)

2.查看是否成功(代码化)
C:\Users\hhh>mount

本地    远程                                 属性
-------------------------------------------------------------------------------
Z:       \\192.168.10.150\date                  UID=-2, GID=-2
                                                rsize=131072, wsize=131072
                                                mount=soft, timeout=1.6
                                                retry=1, locking=no
                                                fileaccess=755, lang=GB2312-80
                                                casesensitive=no
                                                sec=sys
测试
在linux下目录/date中创建111文件,并写入内容

[root@aubin /]# cd /date
[root@aubin date]# vim 111
[root@aubin date]# tree /date
/date
└── 111

0 directories, 1 file
查看windows10,网络Z盘

参考文档
https://www.cnblogs.com/zengzhihua/p/9890106.html
https://www.cnblogs.com/mchina/archive/2013/01/03/2840040.html
https://qizhanming.com/blog/2018/08/08/how-to-install-nfs-on-centos-7
当你的才华配不上你的野心,努力的时候到了!

