SpringBoot
SpringBoot --> 自动装配!
引言:Spring Boot(构建一切)--Spring Cloud(协调一切)--Spring Cloud Data Flow(连接一切)
JavaConfig配置类:用Java方法来配置Spring IoC容器
使用两个注解:
1)@Configuration :放在一个类的上面,表示这个类是作为配置文件使用的。<beans/>
2)@Bean:声明对象,把对象注入到容器中。<bean/>
自动配置(核心)--META-INF/spring.factories(核心文件)
核心思想:约定大于配置!
web框架开发演变:Servlet+Tomcat+jsp -> Structs2框架 -> SpringMVC+Spring+Mybatis->SpringBoot+Mybatis
1、快速构建使用
IDEA创建并使用
一、创建项目
1、创建一个新项目
2、选择spring initalizr , 可以看到默认就是去官网的快速构建工具那里实现
3、填写项目信息
4、选择初始化的组件(初学勾选 Web 即可)
5、填写项目路径
6、等待项目构建成功
二、编写Controller请求控制
@RestController
public class HelloController {

    @RequestMapping("/hello")
    public String hello() {
        return "Hello World";
    }

}
三、从主程序启动项目,浏览器发起请求,看页面返回;控制台输出了 Tomcat(内置) 访问的端口号!默认不带项目名
浏览器访问localhost:8080/hello
四、分析pom文件
<!-- 父依赖 -->
<parent>
    <groupId>org.springframework.boot</groupId>
    <artifactId>spring-boot-starter-parent</artifactId>
    <version>2.2.5.RELEASE</version>
    <relativePath/>
</parent>

<dependencies>
    <!-- web场景启动器 -->
    <dependency>
        <groupId>org.springframework.boot</groupId>
        <artifactId>spring-boot-starter-web</artifactId>
    </dependency>
    <!-- springboot单元测试 -->
    <dependency>
        <groupId>org.springframework.boot</groupId>
        <artifactId>spring-boot-starter-test</artifactId>
        <scope>test</scope>
        <!-- 剔除依赖 -->
        <exclusions>
            <exclusion>
                <groupId>org.junit.vintage</groupId>
                <artifactId>junit-vintage-engine</artifactId>
            </exclusion>
        </exclusions>
    </dependency>
</dependencies>

<build>
    <plugins>
        <!-- 打包插件 -->
        <plugin>
            <groupId>org.springframework.boot</groupId>
            <artifactId>spring-boot-maven-plugin</artifactId>
        </plugin>


        <!--
            在工作中,很多情况下我们打包是不想执行测试用例的
            可能是测试用例不完事,或是测试用例会影响数据库数据
            跳过测试用例执
            -->
        <plugin>
            <groupId>org.apache.maven.plugins</groupId>
            <artifactId>maven-surefire-plugin</artifactId>
            <configuration>
                <!--跳过项目运行测试用例-->
                <skipTests>true</skipTests>
            </configuration>
        </plugin>
    </plugins>
</build>
banner图案:https://www.bootschool.net/ascii 置于项目下resources目录下banner.txt
2.SpringBoot运行原理
(1)启动器 spring-boot-starter 分析
<dependency>
    <groupId>org.springframework.boot</groupId>
    <artifactId>spring-boot-starter-web</artifactId>
</dependency>springboot-boot-starter-xxx:就是spring-boot的场景启动器
使用什么功能,只需要找对应启动器,会自动导入对应环境所有的依赖
(2)主启动类分析
//@SpringBootApplication 来标注一个主程序类
//说明这是一个Spring Boot应用
@SpringBootApplication
public class SpringbootApplication {

   public static void main(String[] args) {
     //以为是启动了一个方法,没想到启动了一个服务
      SpringApplication.run(SpringbootApplication.class, args);
   }

}
@Import:Spring底层注解@import , 给容器中导入一个组件
1 @SpringBootApplication:标注为SpringBoot的主配置类
1.1 @SpringBootConfiguration:SpringBoot的配置类 ,标注在某个类上 , 表示这是一个SpringBoot的配置类;
1.1.1 @Configuration:说明这是一个配置类 ,配置类就是对应Spring的xml 配置文件
1.1.1.1 @Component:启动类本身也是Spring中的一个组件而已,负责启动应用!
1.2 @EnableAutoConfiguration :开启自动配置功能
1.2.1 @AutoConfigurationPackage:自动配置包
1.2.1.1 @Import({Registrar.class}) 自动注册表:将主启动类的所在包及包下面所有子包里面的所有组件扫描到Spring容器 ;
1.2.2 @Import({AutoConfigurationImportSelector.class}):自动配置导入选择器
#JavaConfig配置类
@Configure 配置容器的位置,beans
@Bean 注入bean对象,bean 。返回值是对象(Class),方法名是beanId。方法的返回值注册到IOC容器,默认是byName(实质是byId)
#将配置文件中配置的每一个属性的值,映射到这个组件中;告诉SpringBoot将本类中的所有属性和配置文件中相关的配置进行绑定参数 prefix = “person” : 将配置文件中的person下面的所有属性一一对应
@ConfigurationProperties(prefix = "person")
源码分析
//获取候选配置
protected List<String> getCandidateConfigurations(AnnotationMetadata metadata, AnnotationAttributes attributes) {
    //这里的getSpringFactoriesLoaderFactoryClass()方法
    //返回的就是我们最开始看的启动自动导入配置文件的注解类;EnableAutoConfiguration
    List<String> configurations = SpringFactoriesLoader.loadFactoryNames(this.getSpringFactoriesLoaderFactoryClass(), this.getBeanClassLoader());
    Assert.notEmpty(configurations, "No auto configuration classes found in META-INF/spring.factories. If you are using a custom packaging, make sure that file is correct.");
    return configurations;
}

//加载FactoryNames
public static List<String> loadFactoryNames(Class<?> factoryClass, @Nullable ClassLoader classLoader) {
    String factoryClassName = factoryClass.getName();
    //这里它又调用了 loadSpringFactories 方法
    return (List)loadSpringFactories(classLoader).getOrDefault(factoryClassName, Collections.emptyList());
}

//加载SpringFactories
private static Map<String, List<String>> loadSpringFactories(@Nullable ClassLoader classLoader) {
    //获得classLoader , 我们返回可以看到这里得到的就是EnableAutoConfiguration标注的类本身
    MultiValueMap<String, String> result = (MultiValueMap)cache.get(classLoader);
    if (result != null) {
        return result;
    } else {
        try {
            //去获取一个资源 "META-INF/spring.factories"
            Enumeration<URL> urls = classLoader != null ? classLoader.getResources("META-INF/spring.factories") : ClassLoader.getSystemResources("META-INF/spring.factories");
            LinkedMultiValueMap result = new LinkedMultiValueMap();

            //将读取到的资源遍历,封装成为一个Properties
            while(urls.hasMoreElements()) {
                URL url = (URL)urls.nextElement();
                UrlResource resource = new UrlResource(url);
                Properties properties = PropertiesLoaderUtils.loadProperties(resource);
                Iterator var6 = properties.entrySet().iterator();

                while(var6.hasNext()) {
                    Entry<?, ?> entry = (Entry)var6.next();
                    String factoryClassName = ((String)entry.getKey()).trim();
                    String[] var9 = StringUtils.commaDelimitedListToStringArray((String)entry.getValue());
                    int var10 = var9.length;

                    for(int var11 = 0; var11 < var10; ++var11) {
                        String factoryName = var9[var11];
                        result.add(factoryClassName, factoryName.trim());
                    }
                }
            }

            cache.put(classLoader, result);
            return result;
        } catch (IOException var13) {
            throw new IllegalArgumentException("Unable to load factories from location [META-INF/spring.factories]", var13);
        }
    }
}

//从spring.factories读取的资源配置 -->spring-boot-actuator-autoconfigure
D:\maven-repository\repository\org\springframework\boot\spring-boot-actuator-autoconfigure\2.1.4.RELEASE\spring-boot-actuator-autoconfigure-2.1.4.RELEASE.jar!\META-INF\spring.factories
/*
    发现spring.factories文件里面里的类全是JavaConfig配置类
    所以自动配置真正实现是从classpath中搜寻所有的META-INF/spring.factories配置文件 ,
    并将其中对应的 org.springframework.boot.autoconfigure. 包下的配置项,通过反射实例化为对应标注了 @Configuration的JavaConfig形式的IOC容器配置类 , 然后将这些都汇总成为一个实例并加载到IOC容器中。
*/

最后的结论:
1、SpringBoot在启动的时候从类路径下的META-INF/spring.factories中获取EnableAutoConfiguration指定的值
2、将这些值作为自动配置类导入容器 , 自动配置类就生效 , 帮我们进行自动配置工作;
3、整个J2EE的整体解决方案和自动配置都在springboot-autoconfigure的jar包中;
4、它会给容器中导入非常多的自动配置类 (xxxAutoConfiguration), 就是给容器中导入这个场景需要的所有组件 , 并配置好这些组件 ;
5、有了自动配置类 , 免去了我们手动编写配置注入功能组件等的工作;
1.3 @ComponentScan:自动扫描并加载符合条件的组件或者bean(@Component的类) , 将这个bean定义加载到IOC容器中
(3)SpringApplication 启动服务
一部分是SpringApplication的实例化,二是run方法的执行(开启一个服务)
1.判断应用类型是普通的(运行完就终止)还是web项目
2.推断并设置main方法的定义类,找到运行主类
3.监听器会处理上下文的一些bean
3.yaml配置
yaml基础语法
说明:语法要求严格!
1、空格不能省略
2、以缩进来控制层级关系,只要是左边对齐的一列数据都是同一个层级的。
3、属性和值的大小写都是十分敏感的。
4、字面量:普通的值 [ 数字,布尔值,字符串 ]:字符串默认不用加上双引号或者单引号
注意:
-
“ ” 双引号,不会转义字符串里面的特殊字符 , 特殊字符会作为本身想表示的意思;
比如 :name: "kuang \n shen" 输出 :kuang 换行 shen
-
'' 单引号,会转义特殊字符 , 特殊字符最终会变成和普通字符一样输出
比如 :name: ‘kuang \n shen’ 输出 :kuang \n shen
约定大于配置:约定配置【application.properties、application.yml】
application.properties
server.port=8081
application.yml
#多环境切换
1、profile是Spring对不同环境提供不同配置功能的支持,可以通过激活不同的环境版本,实现快速切换环境;
2、虚拟机运行时刻通过参数来指定运行环境
java -jar spring-boot-config.jar --spring.config.location=F:/application.properties
默认使用application.properties主配置文件
application.properties
#比如在配置文件中指定使用dev环境,我们可以通过设置不同的端口号进行测试;
#我们启动SpringBoot,就可以看到已经切换到dev下的配置了;
spring.profiles.active=dev
application.yml
server:
   port: 8080
spring:
   profiles:
     active: dev
---
server:
  port: 8081
spring:
  profiles: dev
---
server:
  port: 8082
spring:
  profiles: test
实体类注入配置文件
1、指定文件注入 resources/person.properties name=zs
@PropertySource(value = "classpath:person.properties")
@Component //注册bean
public class Person {

    @Value("${name}")
    private String name;

    ......
}
2、yaml注入
查看代码
#对象
student1:
    name: xm
    age: 3
#行内写法
student2: {name: xz,age: 3}

student3:
  #基础类型赋值
  name: zs
  age: 20
  sex: true
  birthday: 2019/02/12
  #map写法 yml默认不写"",但“”可以将转义符转义
  location: {province: "陕\n西",city: '西安',zone: 莲湖区}
  #数组、集合写法一样
  skill:
    - 编程
    - 金融
  hobbies: 足球,篮球 #中括号可以省
  #  hobbies: [足球,篮球]
  #    - 足球
  #    - 篮球
  #对象类型
  pet: {nickname: wc,species: hsq} #nickname、nickName、nick-name均可
#    nickname: wc
#    species: hsq
  email: 12@qq.com

person:
  name: xiaoming_${random.uuid}
  age: 5
  happy: false
  birth: 2022/01/20
  map: {k1: v1,k2: v2}
  lists:
    - code
    - music
    - girl
  hello: nohappy
  dog:
    #person.hello存在,person.hello__旺旺:hello_旺旺  #三目运算符
    name: ${person.hello:hello}_旺旺
    age: 4

dog:
  first-name: z
  last_name: s
@ConfigurationProperties(prefix = "person")
@Component //注册bean
public class Person {
@Value("${name}")
private String name;
......
}3、两种注入对比
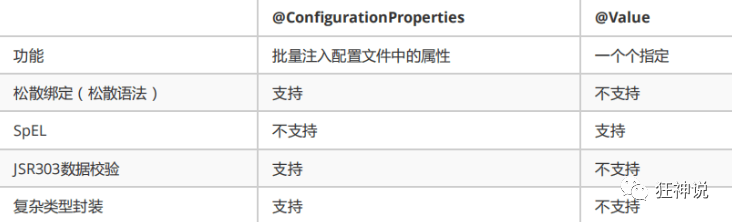
1、@ConfigurationProperties只需要写一次即可 , @Value则需要每个字段都添加
2、松散绑定:这个什么意思呢? 比如我的yml中写的last-name,这个和lastName是一样的, - 后面跟着的字母默认是大写的。这就是松散绑定。可以测试一下
3、JSR303数据校验 , 这个就是我们可以在字段是增加一层过滤器验证 , 可以保证数据的合法性
4、复杂类型封装,yml中可以封装对象 , 使用value就不支持
结论:
配置yml和配置properties都可以获取到值 , 强烈推荐 yml;
如果我们在某个业务中,只需要获取配置文件中的某个值,可以使用一下 @value;
如果说,我们专门编写了一个JavaBean来和配置文件进行一一映射,就直接@configurationProperties,不要犹豫!
使用@ConfigurationProperties时, 在配置文件中配置的任何类型元数据均可以绑定到Javabean属性
但是@Value只能绑定到配置文件中的基本数据类型数据
IDEA中设置编码格式为UTF-8: settings-->FileEncodings 中配置

4、JSP303校验
Springboot中可以用@validated来校验数据,如果数据异常则会统一抛出异常
@Component //注册bean
@ConfigurationProperties(prefix = "person")
@Validated  //数据校验
public class Person {

    @Email(message="邮箱格式错误") //name必须是邮箱格式
    private String name;
}
使用数据校验,可以保证数据的正确性
@NotNull(message="名字不能为空")
private String userName;
@Max(value=120,message="年龄最大不能查过120")
private int age;
@Email(message="邮箱格式错误")
private String email;

空检查
@Null       验证对象是否为null
@NotNull    验证对象是否不为null, 无法查检长度为0的字符串
@NotBlank   检查约束字符串是不是Null还有被Trim的长度是否大于0,只对字符串,且会去掉前后空格.
@NotEmpty   检查约束元素是否为NULL或者是EMPTY.

Booelan检查
@AssertTrue     验证 Boolean 对象是否为 true
@AssertFalse    验证 Boolean 对象是否为 false

长度检查
@Size(min=, max=) 验证对象(Array,Collection,Map,String)长度是否在给定的范围之内
@Length(min=, max=) string is between min and max included.

日期检查
@Past       验证 Date 和 Calendar 对象是否在当前时间之前
@Future     验证 Date 和 Calendar 对象是否在当前时间之后
@Pattern    验证 String 对象是否符合正则表达式的规则

.......等等
除此以外,我们还可以自定义一些数据校验规则
5、yml常用配置
配置文件的几个存放位置
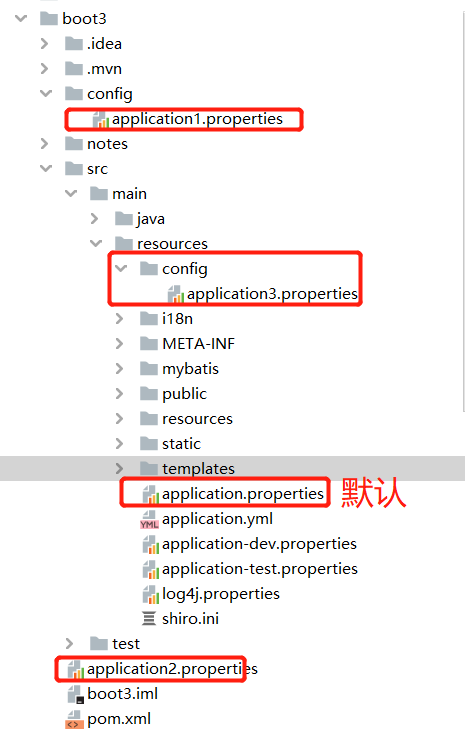
application1、application2对应file:./config/和file:./ 与Src平级
其他两个在resources目录下,对应classpath:./config/和classpath:./
注意:每个properties都会执行,properties与yml互补数据
application.yml
server:
  servlet:
      context-path: /kuang
  port: 8080

server:
  port: 8886
spring:
  profiles:
    active: dev
---
server:
  port: 8887
spring:
  profiles: dev
---
server:
  port: 8888
spring:
    profiles: test
    datasource:
       type: com.alibaba.druid.pool.DruidDataSource
       username: root
       password: root
       url: jdbc:mysql://localhost:3306/bcp?serverTimezone=UTC&useUnicode=true&characterEncoding=utf-8
       driver-class-name: com.mysql.cj.jdbc.Driver

    #SpringBoot默认是不注入这些的,需要自己绑定
    #druid数据源专有配置
    initialSize: 5
    minIdle: 5
    maxActive: 20
    maxWait: 60000
    timeBetweenEvictionRunsMillis: 60000
    minEvictableIdleTimeMillis: 300000
    validationQuery: SELECT 1 FROM DUAL
    testWhileIdle: true
    testOnBorrow: false
    testOnReturn: false
    poolPreparedStatements: true

    #配置监控统计拦截的filters,stat:监控统计、log4j:日志记录、wall:防御sql注入
    #如果允许报错,java.lang.ClassNotFoundException: org.apache.Log4j.Properity
    #则导入log4j 依赖就行
    filters: stat,wall,log4j
    maxPoolPreparedStatementPerConnectionSize: 20
    useGlobalDataSourceStat: true
    connectionProperties: druid.stat.mergeSql=true;druid.stat.slowSqlMillis=500
application.properties
#项目访问名
server.servlet.context-path=/kuang

#端口号
server.port:8080

#前缀后缀
spring.mvc.view.prefix=/WEB-INF/
spring.mvc.view.suffix=.jsp

#编码格式
server.spring.http.encoding.charset=UTF-8

##MessageSourceAutoConfiguration
#配置文件的真实位置 国家化转换
spring.messages.basename=i18n.login

#时间日期格式化!
spring.mvc.format.date=yyyy-MM-dd HH:mm:ss

#整合mysql
spring.datasource.username=root
spring.datasource.password=root
spring.datasource.url=jdbc:mysql://localhost:3306/bcp?serverTimezone=UTC&useUnicode=true&characterEncoding=utf-8
spring.datasource.driver-class-name=com.mysql.cj.jdbc.Driver

#整合mybatis
mybatis.type-aliases-package=com.example.boot3.entity
mybatis.mapper-locations=classpath:mybatis/mapper/*.xml

#整合mail
spring.mail.username=1289775791@qq.com
#smtp授权码 yojpirelhenjbabh ogixalawweaafhje
spring.mail.password=ogixalawweaafhje
spring.mail.host=smtp.qq.com
#开启加密验证
spring.mail.properties.mail.smtp.ssl.enable=true

#上传下载
spring.servlet.multipart.max-file-size=100MB
spring.servlet.multipart.max-request-size=100MB
multipart.location=F://uploadFiles
upload.path=F://images

#log日志
logging.level.root=info
logging.level.com.example.springboot_mybatis.dao=debug
logging.level.com.example.springboot_mybatis.controller=debug

#配置 redis
spring.redis.host=192.168.30.120
spring.redis.port=6379
spring.redis.database=14
spring.redis.password=a@1nercita

#开启springboot的调试类,查看生效的自动配置类
debug=true

#关闭默认图标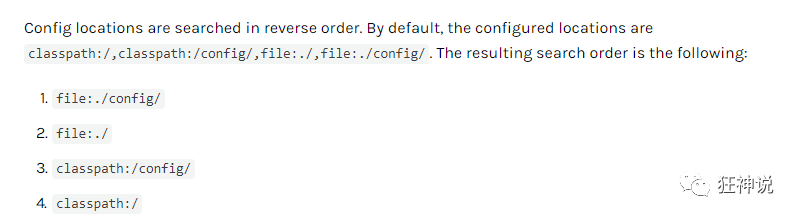
spring.mvc.favicon.enabled=false配置文件加载位置:官方参考文档:优先级1234,4为默认
4、SpringBoot自动装配原理
一句话总结 :根据当前不同的条件判断,决定这个配置类是否生效!
@Conditional指定的条件成立,才给容器中添加组件,配置配里面的所有内容才生效
-
一但这个配置类生效;这个配置类就会给容器中添加各种组件;
-
这些组件的属性是从对应的properties类中获取的,这些类里面的每一个属性又是和配置文件绑定的;
-
所有在配置文件中能配置的属性都是在xxxxProperties类中封装着;
-
配置文件能配置什么就可以参照某个功能对应的这个属性类

xxxxAutoConfigurartion:自动配置类;给容器中添加组件
xxxxProperties:封装配置文件中相关属性;
1、SpringBoot启动会加载大量的自动配置类
2、我们看我们需要的功能有没有在SpringBoot默认写好的自动配置类当中;
3、我们再来看这个自动配置类中到底配置了哪些组件;(只要我们要用的组件存在在其中,我们就不需要再手动配置了)
4、给容器中自动配置类添加组件的时候,会从properties类中获取某些属性。我们只需要在配置文件中指定这些属性的值即可;
#开启springboot的调试类,查看哪些自动配置类生效
debug=true
Positive matches:(自动配置类启用的:正匹配)
Negative matches:(没有启动,没有匹配成功的自动配置类:负匹配)
Unconditional classes: (没有条件的类)
5.自定义实现starter依赖并编写自动配置类
1.创建1个Module创建SpringBoot项目mystarter-spring-boot-starter-autoconfigure
(1)配置pom.xml文件
<dependencies>
    <!--可以去掉,方便测试-->
    <dependency>
        <groupId>org.springframework.boot</groupId>
        <artifactId>spring-boot-starter-web</artifactId>
    </dependency>

    <dependency>
        <groupId>org.springframework.boot</groupId>
        <artifactId>spring-boot-starter</artifactId>
    </dependency>
</dependencies>
(2)编写自动配置项类
META-INF/spring.factories
# Auto Configure
org.springframework.boot.autoconfigure.EnableAutoConfiguration=\
  com.kuang.autoconfiguretion.HelloServiceAutoConfiguration
(3)编写属性类
@ConfigurationProperties(prefix = "kuang.hello")
public class HelloProperties {

    private String prefix;
    private String suffix;

    public String getPrefix() {
        return prefix;
    }

    public void setPrefix(String prefix) {
        this.prefix = prefix;
    }

    public String getSuffix() {
        return suffix;
    }

    public void setSuffix(String suffix) {
        this.suffix = suffix;
    }
}
(4)编写自动配置类(ps:本方法返回值可以写成属性类,如果需要穿参数,需要在包一层业务类HelloService)
@Configuration 配置beans
@Bean 将bean注册到IOC容器 返回值就是bean对象,参数名就是beanId
@Configuration
@ConditionalOnWebApplication //web应用生效
@EnableConfigurationProperties(HelloProperties.class)
public class HelloServiceAutoConfiguration {

    @Autowired
    HelloProperties helloProperties;

    @Bean
    public HelloService helloService(){
        HelloService service = new HelloService();
        service.setHelloProperties(helloProperties);
        return service;
    }

}
(5)编写业务类,可以拼接字符串
public class HelloService {

    HelloProperties helloProperties;

    public HelloProperties getHelloProperties() {
        return helloProperties;
    }

    public void setHelloProperties(HelloProperties helloProperties) {
        this.helloProperties = helloProperties;
    }

    public String sayHello(String name){
        return helloProperties.getPrefix() + name + helloProperties.getSuffix();
    }

}
(6)本地测试(内部测试:可修改)
##application.properties配置
kuang.hello.prefix="ppp"
kuang.hello.suffix="sss"

##Controller配置
@RestController
public class HelloController {

    @Autowired
    private HelloService service;

    @RequestMapping("/hello2")
    public String say(){
        return service.sayHello(",,");
    }
}(7)新建Module创建Maven项目mystarter-spring-boot-starter自定义启动类引用自动配置类
只需要配置pom.xml
<!-- 启动器 -->
<dependencies>
    <!--  引入自动配置模块 -->
    <dependency>
        <groupId>com.kuang</groupId>
        <artifactId>mystarter-spring-boot-starter-autoconfigure</artifactId>
        <version>0.0.1-SNAPSHOT</version>
    </dependency>
</dependencies>
先install SpringBoot项目的自动配置类,再install maven的starter启动器
(8)外部测试(导入依赖jar)
快速构建SpringBoot,导入web启动器并配置pom.xml
<dependency>
    <groupId>com.kuang</groupId>
    <artifactId>mystarter-spring-boot-starter</artifactId>
    <version>1.0-SNAPSHOT</version>
</dependency>
配置application.properties,属性值参照properties类
kuang.hello.prefix="hello"
kuang.hello.suffix="mySpringBootStart"
直接注入该对象即可访问
@RestController
public class HelloController {

    @Autowired
    private HelloService helloService;

    @RequestMapping("/hello")
    public String sayHai(){
        return helloService.sayHello(",,");
    }
}
6、整合JDBC
对于数据访问层,无论是 SQL(关系型数据库) 还是 NOSQL(非关系型数据库),Spring Boot 底层都是采用 Spring Data 的方式进行统一处理。
Spring Boot 底层都是采用 Spring Data 的方式进行统一处理各种数据库
Sping Data 官网:https://spring.io/projects/spring-data
数据库相关的启动器 ,参考官方文档:https://docs.spring.io/spring-boot/docs/2.2.5.RELEASE/reference/htmlsingle/#using-boot-starter
一、Hikari数据源
(1)、引入依赖
<dependency>
    <groupId>org.springframework.boot</groupId>
    <artifactId>spring-boot-starter-jdbc</artifactId>
</dependency>
<dependency>
    <groupId>mysql</groupId>
    <artifactId>mysql-connector-java</artifactId>
    <scope>runtime</scope>
</dependency>
(2)编写yaml配置
spring:
  datasource:
    username: root
    password: 123456
    #?serverTimezone=UTC解决时区的报错
    url: jdbc:mysql://localhost:3306/bcp?serverTimezone=UTC&useUnicode=true&characterEncoding=utf-8
    driver-class-name: com.mysql.cj.jdbc.Driver
(3)测试注入Hikari数据源
默认数据源:com.zaxxer.hikari.HikariDataSource
评价:HikariDataSource 号称 Java WEB 当前速度最快的数据源,相比于传统的 C3P0 、DBCP、Tomcat jdbc 等连接池更加优秀
Spring Boot 不仅提供了默认的数据源,同时默认已经配置好了 JdbcTemplate 放在了容器中,程序员只需自己注入即可使用
Spring Boot 2.2.5 默认使用HikariDataSource 数据源,而以前版本,如 Spring Boot 1.5 默认使用 org.apache.tomcat.jdbc.pool.DataSource 作为数据源
@SpringBootTest
class SpringbootDataJdbcApplicationTests {

    //DI注入数据源
    @Autowired
    DataSource dataSource;

    @Test
    public void contextLoads() throws SQLException {
        //看一下默认数据源
        System.out.println(dataSource.getClass());
        //获得连接
        Connection connection =   dataSource.getConnection();
        System.out.println(connection);
        //关闭连接
        connection.close();
    }
}
测试jdbcTemplate
查看代码
@RestController
@RequestMapping("/jdbc")
public class JdbcController {
/**
* Spring Boot 默认提供了数据源,默认提供了 org.springframework.jdbc.core.JdbcTemplate
* JdbcTemplate 中会自己注入数据源,用于简化 JDBC操作
* 还能避免一些常见的错误,使用起来也不用再自己来关闭数据库连接
*/
@Autowired
JdbcTemplate jdbcTemplate;
//查询employee表中所有数据
//List 中的1个 Map 对应数据库的 1行数据
//Map 中的 key 对应数据库的字段名,value 对应数据库的字段值
@GetMapping("/list")
public List<Map<String, Object>> userList(){
String sql = "select * from employee";
List<Map<String, Object>> maps = jdbcTemplate.queryForList(sql);
return maps;
}
//新增一个用户
@GetMapping("/add")
public String addUser(){
//插入语句,注意时间问题
String sql = "insert into employee(last_name, email,gender,department,birth)" +
" values ('狂神说','24736743@qq.com',1,101,'"+ new Date().toLocaleString() +"')";
jdbcTemplate.update(sql);
//查询
return "addOk";
}
//修改用户信息
@GetMapping("/update/{id}")
public String updateUser(@PathVariable("id") int id){
//插入语句
String sql = "update employee set last_name=?,email=? where id="+id;
//数据
Object[] objects = new Object[2];
objects[0] = "秦疆";
objects[1] = "24736743@sina.com";
jdbcTemplate.update(sql,objects);
//查询
return "updateOk";
}
//删除用户
@GetMapping("/delete/{id}")
public String delUser(@PathVariable("id") int id){
//插入语句
String sql = "delete from employee where id=?";
jdbcTemplate.update(sql,id);
//查询
return "deleteOk";
}
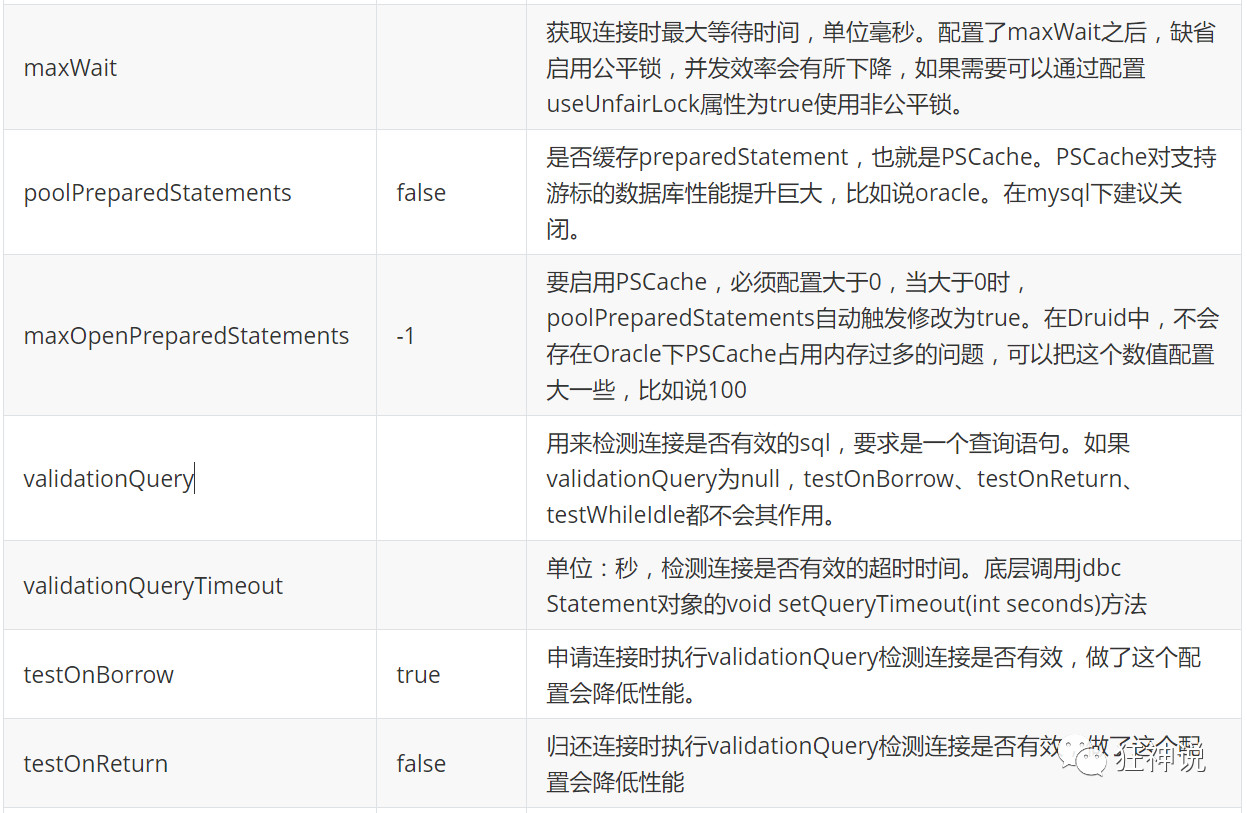
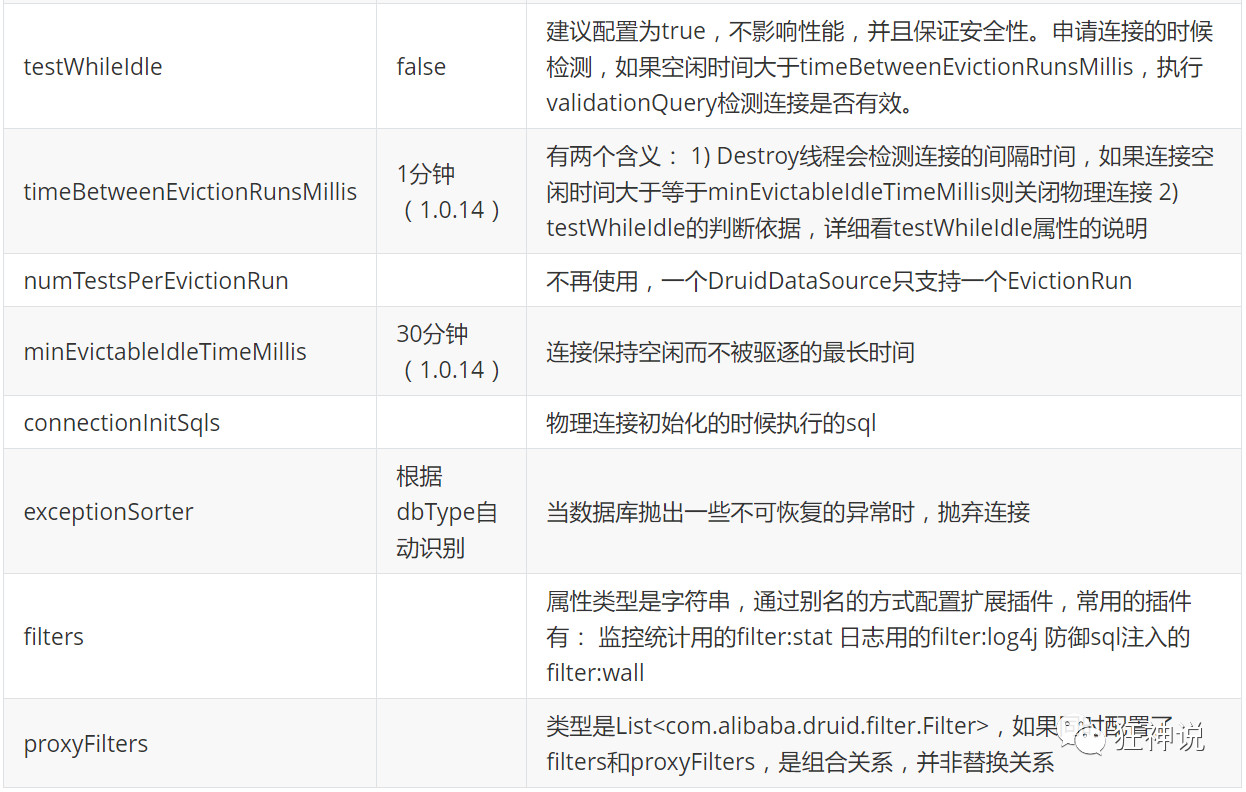
}二、Druid数据源(德鲁伊)-->监控 DB 池连接和 SQL 的执行情况
为什么要使用Druid? 为了提高性能操作数据库的时候,又不得不使用数据库连接池。
Druid 是阿里巴巴开源平台上一个数据库连接池实现,结合了 C3P0、DBCP 等 DB 池的优点,同时加入了日志监控
Github地址:https://github.com/alibaba/druid/
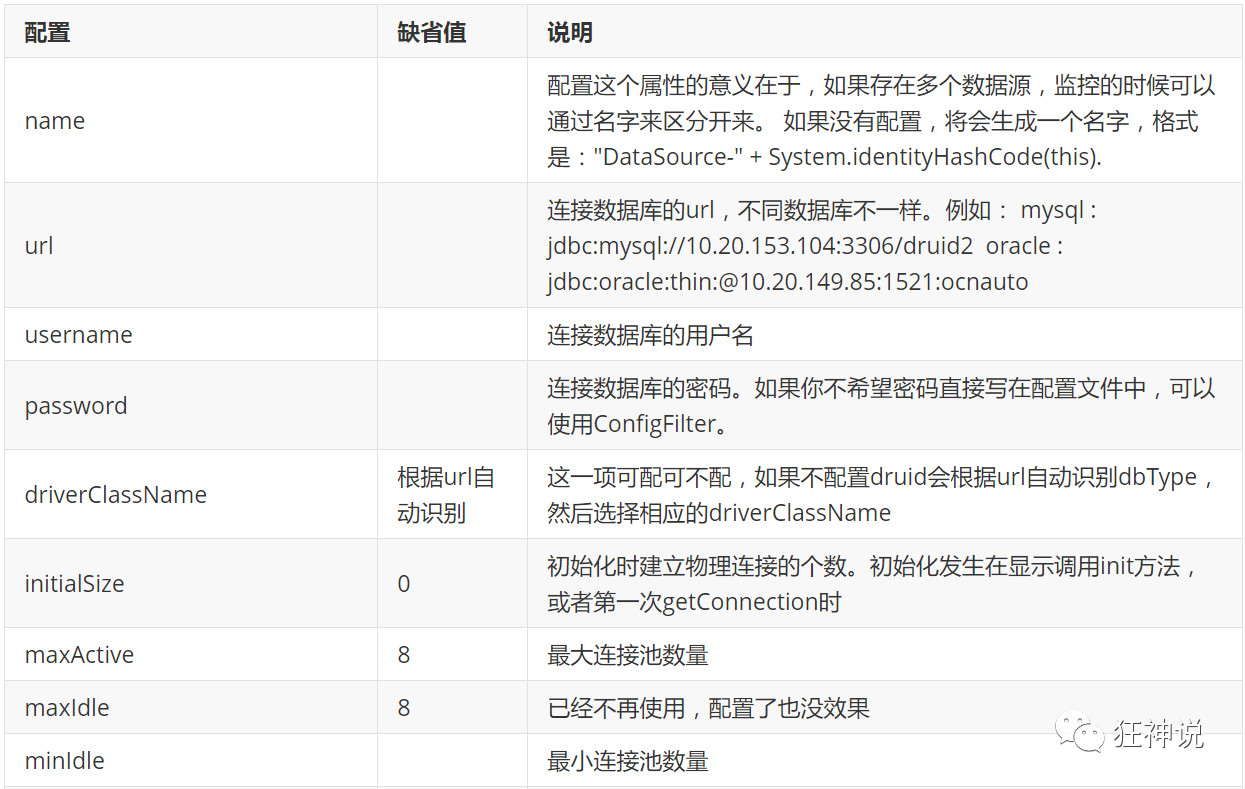
com.alibaba.druid.pool.DruidDataSource 基本配置参数如下:
(1)导入依赖
<!-- https://mvnrepository.com/artifact/com.alibaba/druid -->
<dependency>
    <groupId>com.alibaba</groupId>
    <artifactId>druid</artifactId>
    <version>1.1.21</version>
</dependency>

<!--日志监控-->
<!-- https://mvnrepository.com/artifact/log4j/log4j -->
<dependency>
    <groupId>log4j</groupId>
    <artifactId>log4j</artifactId>
    <version>1.2.17</version>
</dependency>
(2)yaml配置,通过type指定数据源。默认是Hikari
spring:
  datasource:
    username: root
    password: 123456
    url: jdbc:mysql://localhost:3306/springboot?serverTimezone=UTC&useUnicode=true&characterEncoding=utf-8
    driver-class-name: com.mysql.cj.jdbc.Driver
    type: com.alibaba.druid.pool.DruidDataSource # 自定义数据源

     #Spring Boot 默认是不注入这些属性值的,需要自己绑定
    #druid 数据源专有配置
    initialSize: 5
    minIdle: 5
    maxActive: 20
    maxWait: 60000
    timeBetweenEvictionRunsMillis: 60000
    minEvictableIdleTimeMillis: 300000
    validationQuery: SELECT 1 FROM DUAL
    testWhileIdle: true
    testOnBorrow: false
    testOnReturn: false
    poolPreparedStatements: true

    #配置监控统计拦截的filters,stat:监控统计、log4j:日志记录、wall:防御sql注入
    #如果允许时报错  java.lang.ClassNotFoundException: org.apache.log4j.Priority
    #则导入 log4j 依赖即可,Maven 地址:https://mvnrepository.com/artifact/log4j/log4j
    filters: stat,wall,log4j
    maxPoolPreparedStatementPerConnectionSize: 20
    useGlobalDataSourceStat: true
    connectionProperties: druid.stat.mergeSql=true;druid.stat.slowSqlMillis=500
(3)将yaml的配置注册到IOC容器中
@Configuration
public class DruidConfig {

    /*
       将自定义的 Druid数据源添加到容器中,不再让 Spring Boot 自动创建
       绑定全局配置文件中的 druid 数据源属性到 com.alibaba.druid.pool.DruidDataSource从而让它们生效
       @ConfigurationProperties(prefix = "spring.datasource"):作用就是将 全局配置文件中
       前缀为 spring.datasource的属性值注入到 com.alibaba.druid.pool.DruidDataSource 的同名参数中
     */
    @ConfigurationProperties(prefix = "spring.datasource")
    @Bean
    public DataSource druidDataSource() {
        return new DruidDataSource();
    }

}
(4)测试Druid连接
@SpringBootTest
class SpringbootDataJdbcApplicationTests {

    //DI注入数据源
    @Autowired
    DataSource dataSource;

    @Test
    public void contextLoads() throws SQLException {
        //看一下默认数据源
        System.out.println(dataSource.getClass());
        //获得连接
        Connection connection =   dataSource.getConnection();
        System.out.println(connection);

        DruidDataSource druidDataSource = (DruidDataSource) dataSource;
        System.out.println("druidDataSource 数据源最大连接数:" + druidDataSource.getMaxActive());
        System.out.println("druidDataSource 数据源初始化连接数:" + druidDataSource.getInitialSize());

        //关闭连接
        connection.close();
    }
}
(5)配置Druid数据源监控
配置完毕后,我们可以选择访问 :http://localhost:8080/druid/login.html
//配置 Druid 监控管理后台的Servlet;
//内置 Servlet 容器时没有web.xml文件,所以使用 Spring Boot 的注册 Servlet 方式
@Bean
public ServletRegistrationBean statViewServlet() {
    ServletRegistrationBean bean = new ServletRegistrationBean(new StatViewServlet(), "/druid/*");

    // 这些参数可以在 com.alibaba.druid.support.http.StatViewServlet
    // 的父类 com.alibaba.druid.support.http.ResourceServlet 中找到
    Map<String, String> initParams = new HashMap<>();
    initParams.put("loginUsername", "admin"); //后台管理界面的登录账号
    initParams.put("loginPassword", "123456"); //后台管理界面的登录密码

    //后台允许谁可以访问
    //initParams.put("allow", "localhost"):表示只有本机可以访问
    //initParams.put("allow", ""):为空或者为null时,表示允许所有访问
    initParams.put("allow", "");
    //deny:Druid 后台拒绝谁访问
    //initParams.put("kuangshen", "192.168.1.20");表示禁止此ip访问

    //设置初始化参数
    bean.setInitParameters(initParams);
    return bean;
}
(6)、配置Druid过滤器
//配置 Druid 监控 之  web 监控的 filter
//WebStatFilter:用于配置Web和Druid数据源之间的管理关联监控统计
@Bean
public FilterRegistrationBean webStatFilter() {
    FilterRegistrationBean bean = new FilterRegistrationBean();
    bean.setFilter(new WebStatFilter());

    //exclusions:设置哪些请求进行过滤排除掉,从而不进行统计
    Map<String, String> initParams = new HashMap<>();
    initParams.put("exclusions", "*.js,*.css,/druid/*,/jdbc/*");
    bean.setInitParameters(initParams);

    //"/*" 表示过滤所有请求
    bean.setUrlPatterns(Arrays.asList("/*"));
    return bean;
}
7、整合Mybatis
(1)导入依赖
<!--mybatis-->
<dependency>
    <groupId>org.mybatis.spring.boot</groupId>
    <artifactId>mybatis-spring-boot-starter</artifactId>
    <version>2.1.1</version>
</dependency>

<!--lombok-->
<dependency>
    <groupId>org.projectlombok</groupId>
    <artifactId>lombok</artifactId>
    <optional>true</optional>
</dependency>

<!--maven资源过滤配置-->
<resources>
    <resource>
        <directory>src/main/java</directory>
        <includes>
            <include>**/*.xml</include>
        </includes>
        <filtering>true</filtering>
    </resource>
</resources>
(2)application.properties配置 (properties、yml互补数据)
#整合mybatis
mybatis.type-aliases-package=com.nercita.myspringboot.pojo
mybatis.mapper-locations=classpath:mybatis/mapper/*.xml
(3)配置Druid并测试,参考6
(4)项目目录创建mapper目录以及mapper下的接口DepartmentMapper
//@Mapper : 表示本类是一个 MyBatis 的 Mapper
@Mapper
@Repository
public interface DepartmentMapper {

    // 获取所有部门信息
    List<Department> getDepartments();

    // 通过id获得部门
    Department getDepartment(Integer id);

}(5)资源目录创建mapper并创建对应的Mapper映射文件【核心】
<?xml version="1.0" encoding="UTF-8" ?>
<!DOCTYPE mapper
        PUBLIC "-//mybatis.org//DTD Mapper 3.0//EN"
        "http://mybatis.org/dtd/mybatis-3-mapper.dtd">

<mapper namespace="com.kuang.mapper.DepartmentMapper">

    <select id="getDepartments" resultType="Department">
       select * from department;
    </select>

    <select id="getDepartment" resultType="Department" parameterType="int">
       select * from department where id = #{id};
    </select>

</mapper>
别名映射实体类
 <?xml version="1.0" encoding="UTF-8" ?>
<!DOCTYPE mapper
        PUBLIC "-//mybatis.org//DTD Mapper 3.0//EN"
        "http://mybatis.org/dtd/mybatis-3-mapper.dtd">
<mapper namespace="com.kuang.mapper.EmployeeMapper">

    <resultMap id="EmployeeMap" type="Employee">
        <id property="id" column="eid"/>
        <result property="lastName" column="last_name"/>
        <result property="email" column="email"/>
        <result property="gender" column="gender"/>
        <result property="birth" column="birth"/>
        <association property="eDepartment"  javaType="Department">
            <id property="id" column="did"/>
            <result property="departmentName" column="dname"/>
        </association>
    </resultMap>

    <select id="getEmployees" resultMap="EmployeeMap">
        select e.id as eid,last_name,email,gender,birth,d.id as did,d.department_name as dname
        from department d,employee e
        where d.id = e.department
    </select>

    <insert id="save" parameterType="Employee">
        insert into employee (last_name,email,gender,department,birth)
        values (#{lastName},#{email},#{gender},#{department},#{birth});
    </insert>

    <select id="get" resultType="Employee">
        select * from employee where id = #{id}
    </select>

    <delete id="delete" parameterType="int">
        delete from employee where id = #{id}
    </delete>

</mapper>
(6)Controller测试
@RestController
public class DepartmentController {

    @Autowired
    DepartmentMapper departmentMapper;

    // 查询全部部门
    @GetMapping("/getDepartments")
    public List<Department> getDepartments(){
        return departmentMapper.getDepartments();
    }

    // 查询全部部门
    @GetMapping("/getDepartment/{id}")
    public Department getDepartment(@PathVariable("id") Integer id){
        return departmentMapper.getDepartment(id);
    }

}
8、整合Redis
(1)导入依赖 #底层连接jedis->lettuce
<dependency>
    <groupId>org.springframework.boot</groupId>
    <artifactId>spring-boot-starter-data-redis</artifactId>
</dependency>
#jedis:采用的直连,多个线程操作不安全
#lettuce:采用netty,实例可以在多个线程中进行共享,不存在线程不安全的情况
(2)配置application.properties
# SpringBoot 所有的配置类都有一个自动配置类 RedisAutoConfiguration
# 自动配置类都会绑定一个 properties 配置文件 RedisProperties
spring.redis.host=192.168.30.120
spring.redis.port=6379
spring.redis.password=a@1nercita
spring.redis.database=14
(3)自定义RedisTemplate的bean对象
不用再考虑编码问题
定义了一个RedisTemplate存储对象
@Configuration
public class RedisConfig {

    /*
        自己定义了一个RedisTemplate
        <bean id="redisTemplate" class="RedisTemplate">
     */
    @Bean
    public RedisTemplate<String, Object> redisTemplate(RedisConnectionFactory factory) throws UnknownHostException {
        //为了自己开发方便,一般使用<String, Object>
        RedisTemplate<String, Object> template = new RedisTemplate();
        template.setConnectionFactory(factory);

        //序列化配置
        Jackson2JsonRedisSerializer jackson2JsonRedisSerializer = new Jackson2JsonRedisSerializer(Object.class);
        ObjectMapper om = new ObjectMapper(); //转义
        om.setVisibility(PropertyAccessor.ALL, JsonAutoDetect.Visibility.ANY);
        om.enableDefaultTyping(ObjectMapper.DefaultTyping.NON_FINAL);
        om.activateDefaultTyping(LaissezFaireSubTypeValidator.instance,ObjectMapper.DefaultTyping.NON_FINAL, JsonTypeInfo.As.PROPERTY);
        jackson2JsonRedisSerializer.setObjectMapper(om);

        //String 序列化
        StringRedisSerializer stringRedisSerializer = new StringRedisSerializer();
        //key采用string的序列化
        template.setKeySerializer(stringRedisSerializer);
        //hash的key采用string序列化
        template.setHashKeySerializer(stringRedisSerializer);
        //value序列化方式采用jackson
        template.setValueSerializer(jackson2JsonRedisSerializer);
        //hash的value序列化采用
        template.setHashKeySerializer(jackson2JsonRedisSerializer);
        template.afterPropertiesSet();

        return template;
    }
}
(4)RedisUtil工具类包装
RedisUtil
@Component
public final class RedisUtil {

    @Autowired
    private RedisTemplate<String, Object> redisTemplate;

    // =============================common============================
    /**
     * 指定缓存失效时间
     * @param key  键
     * @param time 时间(秒)
     */
    public boolean expire(String key, long time) {
        try {
            if (time > 0) {
                redisTemplate.expire(key, time, TimeUnit.SECONDS);
            }
            return true;
        } catch (Exception e) {
            e.printStackTrace();
            return false;
        }
    }

    /**
     * 根据key 获取过期时间
     * @param key 键 不能为null
     * @return 时间(秒) 返回0代表为永久有效
     */
    public long getExpire(String key) {
        return redisTemplate.getExpire(key, TimeUnit.SECONDS);
    }


    /**
     * 判断key是否存在
     * @param key 键
     * @return true 存在 false不存在
     */
    public boolean hasKey(String key) {
        try {
            return redisTemplate.hasKey(key);
        } catch (Exception e) {
            e.printStackTrace();
            return false;
        }
    }


    /**
     * 删除缓存
     * @param key 可以传一个值 或多个
     */
    @SuppressWarnings("unchecked")
    public void del(String... key) {
        if (key != null && key.length > 0) {
            if (key.length == 1) {
                redisTemplate.delete(key[0]);
            } else {
                redisTemplate.delete((Collection<String>) CollectionUtils.arrayToList(key));
            }
        }
    }


    // ============================String=============================

    /**
     * 普通缓存获取
     * @param key 键
     * @return 值
     */
    public Object get(String key) {
        return key == null ? null : redisTemplate.opsForValue().get(key);
    }

    /**
     * 普通缓存放入
     * @param key   键
     * @param value 值
     * @return true成功 false失败
     */

    public boolean set(String key, Object value) {
        try {
            redisTemplate.opsForValue().set(key, value);
            return true;
        } catch (Exception e) {
            e.printStackTrace();
            return false;
        }
    }


    /**
     * 普通缓存放入并设置时间
     * @param key   键
     * @param value 值
     * @param time  时间(秒) time要大于0 如果time小于等于0 将设置无限期
     * @return true成功 false 失败
     */

    public boolean set(String key, Object value, long time) {
        try {
            if (time > 0) {
                redisTemplate.opsForValue().set(key, value, time, TimeUnit.SECONDS);
            } else {
                set(key, value);
            }
            return true;
        } catch (Exception e) {
            e.printStackTrace();
            return false;
        }
    }


    /**
     * 递增
     * @param key   键
     * @param delta 要增加几(大于0)
     */
    public long incr(String key, long delta) {
        if (delta < 0) {
            throw new RuntimeException("递增因子必须大于0");
        }
        return redisTemplate.opsForValue().increment(key, delta);
    }


    /**
     * 递减
     * @param key   键
     * @param delta 要减少几(小于0)
     */
    public long decr(String key, long delta) {
        if (delta < 0) {
            throw new RuntimeException("递减因子必须大于0");
        }
        return redisTemplate.opsForValue().increment(key, -delta);
    }


    // ================================Map=================================

    /**
     * HashGet
     * @param key  键 不能为null
     * @param item 项 不能为null
     */
    public Object hget(String key, String item) {
        return redisTemplate.opsForHash().get(key, item);
    }

    /**
     * 获取hashKey对应的所有键值
     * @param key 键
     * @return 对应的多个键值
     */
    public Map<Object, Object> hmget(String key) {
        return redisTemplate.opsForHash().entries(key);
    }

    /**
     * HashSet
     * @param key 键
     * @param map 对应多个键值
     */
    public boolean hmset(String key, Map<String, Object> map) {
        try {
            redisTemplate.opsForHash().putAll(key, map);
            return true;
        } catch (Exception e) {
            e.printStackTrace();
            return false;
        }
    }


    /**
     * HashSet 并设置时间
     * @param key  键
     * @param map  对应多个键值
     * @param time 时间(秒)
     * @return true成功 false失败
     */
    public boolean hmset(String key, Map<String, Object> map, long time) {
        try {
            redisTemplate.opsForHash().putAll(key, map);
            if (time > 0) {
                expire(key, time);
            }
            return true;
        } catch (Exception e) {
            e.printStackTrace();
            return false;
        }
    }


    /**
     * 向一张hash表中放入数据,如果不存在将创建
     *
     * @param key   键
     * @param item  项
     * @param value 值
     * @return true 成功 false失败
     */
    public boolean hset(String key, String item, Object value) {
        try {
            redisTemplate.opsForHash().put(key, item, value);
            return true;
        } catch (Exception e) {
            e.printStackTrace();
            return false;
        }
    }

    /**
     * 向一张hash表中放入数据,如果不存在将创建
     *
     * @param key   键
     * @param item  项
     * @param value 值
     * @param time  时间(秒) 注意:如果已存在的hash表有时间,这里将会替换原有的时间
     * @return true 成功 false失败
     */
    public boolean hset(String key, String item, Object value, long time) {
        try {
            redisTemplate.opsForHash().put(key, item, value);
            if (time > 0) {
                expire(key, time);
            }
            return true;
        } catch (Exception e) {
            e.printStackTrace();
            return false;
        }
    }


    /**
     * 删除hash表中的值
     *
     * @param key  键 不能为null
     * @param item 项 可以使多个 不能为null
     */
    public void hdel(String key, Object... item) {
        redisTemplate.opsForHash().delete(key, item);
    }


    /**
     * 判断hash表中是否有该项的值
     *
     * @param key  键 不能为null
     * @param item 项 不能为null
     * @return true 存在 false不存在
     */
    public boolean hHasKey(String key, String item) {
        return redisTemplate.opsForHash().hasKey(key, item);
    }


    /**
     * hash递增 如果不存在,就会创建一个 并把新增后的值返回
     *
     * @param key  键
     * @param item 项
     * @param by   要增加几(大于0)
     */
    public double hincr(String key, String item, double by) {
        return redisTemplate.opsForHash().increment(key, item, by);
    }


    /**
     * hash递减
     *
     * @param key  键
     * @param item 项
     * @param by   要减少记(小于0)
     */
    public double hdecr(String key, String item, double by) {
        return redisTemplate.opsForHash().increment(key, item, -by);
    }


    // ============================set=============================

    /**
     * 根据key获取Set中的所有值
     * @param key 键
     */
    public Set<Object> sGet(String key) {
        try {
            return redisTemplate.opsForSet().members(key);
        } catch (Exception e) {
            e.printStackTrace();
            return null;
        }
    }


    /**
     * 根据value从一个set中查询,是否存在
     *
     * @param key   键
     * @param value 值
     * @return true 存在 false不存在
     */
    public boolean sHasKey(String key, Object value) {
        try {
            return redisTemplate.opsForSet().isMember(key, value);
        } catch (Exception e) {
            e.printStackTrace();
            return false;
        }
    }


    /**
     * 将数据放入set缓存
     *
     * @param key    键
     * @param values 值 可以是多个
     * @return 成功个数
     */
    public long sSet(String key, Object... values) {
        try {
            return redisTemplate.opsForSet().add(key, values);
        } catch (Exception e) {
            e.printStackTrace();
            return 0;
        }
    }


    /**
     * 将set数据放入缓存
     *
     * @param key    键
     * @param time   时间(秒)
     * @param values 值 可以是多个
     * @return 成功个数
     */
    public long sSetAndTime(String key, long time, Object... values) {
        try {
            Long count = redisTemplate.opsForSet().add(key, values);
            if (time > 0)
                expire(key, time);
            return count;
        } catch (Exception e) {
            e.printStackTrace();
            return 0;
        }
    }


    /**
     * 获取set缓存的长度
     *
     * @param key 键
     */
    public long sGetSetSize(String key) {
        try {
            return redisTemplate.opsForSet().size(key);
        } catch (Exception e) {
            e.printStackTrace();
            return 0;
        }
    }


    /**
     * 移除值为value的
     *
     * @param key    键
     * @param values 值 可以是多个
     * @return 移除的个数
     */

    public long setRemove(String key, Object... values) {
        try {
            Long count = redisTemplate.opsForSet().remove(key, values);
            return count;
        } catch (Exception e) {
            e.printStackTrace();
            return 0;
        }
    }

    // ===============================list=================================

    /**
     * 获取list缓存的内容
     *
     * @param key   键
     * @param start 开始
     * @param end   结束 0 到 -1代表所有值
     */
    public List<Object> lGet(String key, long start, long end) {
        try {
            return redisTemplate.opsForList().range(key, start, end);
        } catch (Exception e) {
            e.printStackTrace();
            return null;
        }
    }


    /**
     * 获取list缓存的长度
     *
     * @param key 键
     */
    public long lGetListSize(String key) {
        try {
            return redisTemplate.opsForList().size(key);
        } catch (Exception e) {
            e.printStackTrace();
            return 0;
        }
    }


    /**
     * 通过索引 获取list中的值
     *
     * @param key   键
     * @param index 索引 index>=0时, 0 表头,1 第二个元素,依次类推;index<0时,-1,表尾,-2倒数第二个元素,依次类推
     */
    public Object lGetIndex(String key, long index) {
        try {
            return redisTemplate.opsForList().index(key, index);
        } catch (Exception e) {
            e.printStackTrace();
            return null;
        }
    }


    /**
     * 将list放入缓存
     *
     * @param key   键
     * @param value 值
     */
    public boolean lSet(String key, Object value) {
        try {
            redisTemplate.opsForList().rightPush(key, value);
            return true;
        } catch (Exception e) {
            e.printStackTrace();
            return false;
        }
    }


    /**
     * 将list放入缓存
     * @param key   键
     * @param value 值
     * @param time  时间(秒)
     */
    public boolean lSet(String key, Object value, long time) {
        try {
            redisTemplate.opsForList().rightPush(key, value);
            if (time > 0)
                expire(key, time);
            return true;
        } catch (Exception e) {
            e.printStackTrace();
            return false;
        }

    }


    /**
     * 将list放入缓存
     *
     * @param key   键
     * @param value 值
     * @return
     */
    public boolean lSet(String key, List<Object> value) {
        try {
            redisTemplate.opsForList().rightPushAll(key, value);
            return true;
        } catch (Exception e) {
            e.printStackTrace();
            return false;
        }

    }


    /**
     * 将list放入缓存
     *
     * @param key   键
     * @param value 值
     * @param time  时间(秒)
     * @return
     */
    public boolean lSet(String key, List<Object> value, long time) {
        try {
            redisTemplate.opsForList().rightPushAll(key, value);
            if (time > 0)
                expire(key, time);
            return true;
        } catch (Exception e) {
            e.printStackTrace();
            return false;
        }
    }


    /**
     * 根据索引修改list中的某条数据
     *
     * @param key   键
     * @param index 索引
     * @param value 值
     * @return
     */

    public boolean lUpdateIndex(String key, long index, Object value) {
        try {
            redisTemplate.opsForList().set(key, index, value);
            return true;
        } catch (Exception e) {
            e.printStackTrace();
            return false;
        }
    }


    /**
     * 移除N个值为value
     *
     * @param key   键
     * @param count 移除多少个
     * @param value 值
     * @return 移除的个数
     */

    public long lRemove(String key, long count, Object value) {
        try {
            Long remove = redisTemplate.opsForList().remove(key, count, value);
            return remove;
        } catch (Exception e) {
            e.printStackTrace();
            return 0;
        }

    }

}
4.测试
传递带汉字的对象
//真实的开发都适用json来传递对象
        User user = new User("吴中生", 3);
//        String jsonUser = new ObjectMapper().writeValueAsString(user);
        redisTemplate.opsForValue().set("user",user);
        System.out.println(redisTemplate.opsForValue().get("user"));
9、整合SpringSecurity安全框架
Spring Security 是针对Spring项目的安全框架,也是Spring Boot底层安全模块默认的技术选型。
记住几个类:
-
WebSecurityConfigurerAdapter:自定义Security策略
-
AuthenticationManagerBuilder:自定义认证策略
-
@EnableWebSecurity:开启WebSecurity模式
Spring Security的两个主要目标是 “认证”[Authentication] 和 “授权”[Authorization](访问控制)。
(1)导入依赖--Spring Security
<!--security-->
<dependency>
   <groupId>org.springframework.boot</groupId>
   <artifactId>spring-boot-starter-security</artifactId>
</dependency>

<!--security-thymeleaf整合包-->
<dependency>
    <groupId>org.thymeleaf.extras</groupId>
    <artifactId>thymeleaf-extras-springsecurity5</artifactId>
    <version>3.0.4.RELEASE</version>
</dependency>
(2)编写 Spring Security 配置类
参考官网:https://spring.io/projects/spring-security
查看代码
@EnableWebSecurity
public class SecurityConfig extends WebSecurityConfigurerAdapter {

    @Autowired
    private DataSource dataSource;

    //链式编程
    //授权
    @Override
    protected void configure(HttpSecurity http) throws Exception {
        //首页所有人可以访问,功能页只有对应有权限的人才能访问
        http.authorizeHttpRequests()
                //请求授权规则
            .antMatchers("/").permitAll()
            .antMatchers("/level1/**").hasAnyRole("vip1")
            .antMatchers("/level2/**").hasAnyRole("vip2")
            .antMatchers("/level3/**").hasAnyRole("vip3");

        //没有权限默认到登录页面
        http.formLogin();

        //防止网站攻击:get,post
        http.csrf().disable();//关闭csrf功能


        //注销
//        http.logout().deleteCookies("remove").invalidateHttpSession(false);
//        http.logout().logoutUrl("/");
        http.logout().logoutSuccessUrl("/login");

        //开启记住我功能 cookie 默认保存两周
        http.rememberMe().rememberMeParameter("remember");

        //没有权限回到默认登录页面,需要开启登录的页面
        //定制登录页
        http.formLogin().loginPage("/toLogin").loginProcessingUrl("/login").usernameParameter("name").passwordParameter("pwd");

    }

    /*
        认证,springboot 2.1.x 可直接使用
        密码编码:passwordEncoder
        Spring Security 5.0+ 新增了很多的加密方法
        spring security 官方推荐的是使用bcrypt加密方式。
     */
    @Override
    protected void configure(AuthenticationManagerBuilder auth) throws Exception {
        auth.inMemoryAuthentication().passwordEncoder(new BCryptPasswordEncoder())
        //给不同的用户配置不同的角色
            .withUser("12@qq.c").password(new BCryptPasswordEncoder().encode("1")).roles("vip1","vip2")
            .and().withUser("root").password(new BCryptPasswordEncoder().encode("1")).roles("vip1","vip2","vip3")
            .and().withUser("guest").password(new BCryptPasswordEncoder().encode("1")).roles("vip1");

        //jdbc
//        User.UserBuilder users = User.builder();
//        auth.jdbcAuthentication().dataSource(dataSource)
//            .withDefaultSchema()
//            .withUser(users.username("user").password("password").roles("USER"))
//            .withUser(users.username("admin").password("password").roles("USER","ADMIN"));

    }
}
(3)页面显示控制
<!--未登录-->
<div sec:authorize="!isAuthenticated()">
    <a class="item" th:href="@{/toLogin}">
        <i class="address card icon"></i> 登录
    </a>
</div>

<!--已登录,用户名+注销-->
<div sec:authorize="isAuthenticated()">
    <a class="item">
        用户名:<span sec:authentication="principal.username"></span>
        角色:<span sec:authentication="principal.authorities"></span>
    </a>
    <a class="item" th:href="@{/logout}">
        <i class="sign-out icon"></i> 注销
    </a>
</div>
10、整合Shiro安全框架
密码认证shiro框架做,更安全,不用像Spring security一样自己做对比。
(1)导入依赖
<!--shiro整合spring的包-->
<dependency>
    <groupId>org.apache.shiro</groupId>
    <artifactId>shiro-spring</artifactId>
    <version>1.9.0</version>
</dependency>

<!--shiro-thymeleaf整合包-->
<dependency>
    <groupId>com.github.theborakompanioni</groupId>
    <artifactId>thymeleaf-extras-shiro</artifactId>
    <version>2.0.0</version>
</dependency>
(2)配置Java类注册bean
查看代码
@Configuration
public class ShiroConfig {

    //ShiroFilterFactoryBean
    @Bean
    public ShiroFilterFactoryBean getShiroFilterFactoryBean(@Qualifier("securityManager") DefaultWebSecurityManager defaultWebSecurityManager){
        ShiroFilterFactoryBean bean = new ShiroFilterFactoryBean();
        bean.setSecurityManager(defaultWebSecurityManager);

        //添加shiro内置过滤器
        /*
            anon:无需认证就可以访问
            authc:必须认证了才能访问
            user:必须拥有记住我功能才能用
            perms:拥有对某个资源的权限才能访问
            role:拥有某个角色权限才能访问
         */
        Map<String,String> filterMap = new LinkedHashMap<>();
//        filterMap.put("/user/add","authc");
//        filterMap.put("/user/update","authc");
        filterMap.put("/user/add","perms[user:add]"); //进入拦截的页面就会被授权
        filterMap.put("/user/update","perms[user:update]"); //进入拦截的页面就会被授权
        filterMap.put("/user/*","authc");
        filterMap.put("/index","authc");
        bean.setFilterChainDefinitionMap(filterMap);

        //设置登录的请求
        bean.setLoginUrl("/toLogin");

        //未授权页面 跳转
        bean.setUnauthorizedUrl("/unauthorized");
        return bean;
    }


    //DefaultWebSecurityManager
    @Bean(name="securityManager")
    public DefaultWebSecurityManager getDefaultWebSecurityManager(@Qualifier("userRealm") UserRealm userRealm){
        DefaultWebSecurityManager defaultWebSecurityManager = new DefaultWebSecurityManager();
        //关联UserRealm
        defaultWebSecurityManager.setRealm(userRealm);
        return defaultWebSecurityManager;
    }

    //创建Realm对象
    @Bean(name="userRealm")
    public UserRealm userRealm(){
        return new UserRealm();
    }

    //整合ShiroDialect
    @Bean
    public ShiroDialect getShiroDialect(){
        return new ShiroDialect();
    }
}
(3)创建Realm对象
查看代码
public class UserRealm extends AuthorizingRealm {

    @Autowired
    private UserService userService;

    //授权
    @Override
    protected AuthorizationInfo doGetAuthorizationInfo(PrincipalCollection principals) {
        System.out.println("执行了=>授权 doGetAuthorizationInfo");

        //SimpleAuthenticationInfo
        SimpleAuthorizationInfo info = new SimpleAuthorizationInfo();


        //所有用户授权
        //info.addStringPermission("user:add");


        //拿到当前登录的这个对象
        Subject subject = SecurityUtils.getSubject();
        LoginUser currentUser = (LoginUser) subject.getPrincipal();//认证的user

        //设置当前用户权限
        info.addStringPermission(currentUser.getPerms());
        //info
        return info;
    }

    //认证
    @Override
    protected AuthenticationInfo doGetAuthenticationInfo(AuthenticationToken token) throws AuthenticationException {
        System.out.println("执行了=>认证 doGetAuthorizationInfo");

        //用户名,密码 数据中取
//        String name="root";
//        String pwd = "root";
        UsernamePasswordToken userToken = (UsernamePasswordToken) token;
        String loginPwd =String.valueOf(userToken.getPassword());
        LoginUser user = userService.queryByName(userToken.getUsername());
        if(user == null){
            return null;//UnknownAccountException
        }
        if(!userToken.getUsername().equals(user.getName())){
            return null;//抛异常,UnknownAccountException
        }

        //密码验证
        //加密 md5
        HashedCredentialsMatcher hashedCredentialsMatcher = new HashedCredentialsMatcher();
        //加密算法的名称
        hashedCredentialsMatcher.setHashAlgorithmName("MD5");
        //是否让它 进行16进制的编码
//        hashedCredentialsMatcher.isStoredCredentialsHexEncoded();
        // 迭代的次数
        //hashedCredentialsMatcher.setHashIterations(3);
        SimpleHash simpleHash = new SimpleHash("MD5",loginPwd );
        String s = simpleHash.toHex();
//        return new SimpleAuthenticationInfo("",s,"");


        Subject subject = SecurityUtils.getSubject();
        Session session = subject.getSession();
        session.setAttribute("loginUser",user);


        //密码认证,shiro做
        //user -> 授权 subject.getPrincipal();
        return new SimpleAuthenticationInfo(user,user.getPassword(),"");


    }
}

 浙公网安备 33010602011771号