SpringBoot-常见问题(一)
参考:
https://www.cnblogs.com/nihaorz/p/10528121.html
https://www.cnblogs.com/tanwei81/p/6814022.html
目录:
常见注解
常见依赖
SpringBoot之常用注解
在spring boot中,摒弃了spring以往项目中大量繁琐的配置,遵循约定大于配置的原则,通过自身默认配置,极大的降低了项目搭建的复杂度。同样在spring boot中,大量注解的使用,使得代码看起来更加简洁,提高开发的效率。这些注解不光包括spring boot自有,也有一些是继承自spring的。
本文中将spring boot项目中常用的一些核心注解归类总结,并结合实际使用的角度来解释其作用。
• 项目配置注解
1、@SpringBootApplication 注解
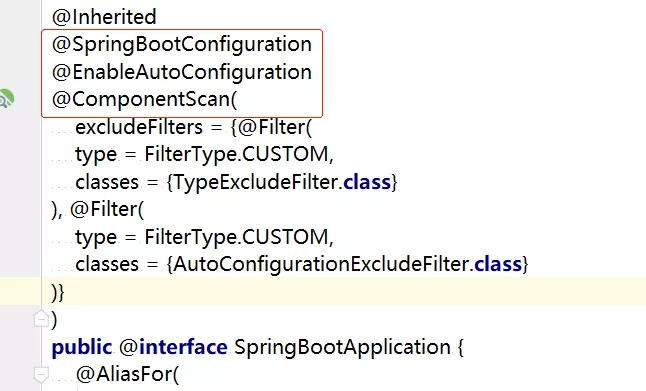
查看源码可发现,@SpringBootApplication是一个复合注解,包含了@SpringBootConfiguration,@EnableAutoConfiguration,@ComponentScan这三个注解。
这三个注解的作用分别为:
-
@SpringBootConfiguration:标注当前类是配置类,这个注解继承自@Configuration。并会将当前类内声明的一个或多个以@Bean注解标记的方法的实例纳入到srping容器中,并且实例名就是方法名。
-
@EnableAutoConfiguration:是自动配置的注解,这个注解会根据我们添加的组件jar来完成一些默认配置,我们做微服时会添加spring-boot-starter-web这个组件jar的pom依赖,这样配置会默认配置springmvc 和tomcat。
-
@ComponentScan:扫描当前包及其子包下被@Component,@Controller,@Service,@Repository注解标记的类并纳入到spring容器中进行管理。等价于<context:component-scan>的xml配置文件中的配置项。

大多数情况下,这3个注解会被同时使用,基于最佳实践,这三个注解就被做了包装,成为了@SpringBootApplication注解。
2、@ServletComponentScan:Servlet、Filter、Listener 可以直接通过 @WebServlet、@WebFilter、@WebListener 注解自动注册,这样通过注解servlet ,拦截器,监听器的功能而无需其他配置,所以这次相中使用到了filter的实现,用到了这个注解。
3、@MapperScan:spring-boot支持mybatis组件的一个注解,通过此注解指定mybatis接口类的路径,即可完成对mybatis接口的扫描。
它和@mapper注解是一样的作用,不同的地方是扫描入口不一样。@mapper需要加在每一个mapper接口类上面。所以大多数情况下,都是在规划好工程目录之后,通过@MapperScan注解配置路径完成mapper接口的注入。
添加mybatis相应组建依赖之后。就可以使用该注解。

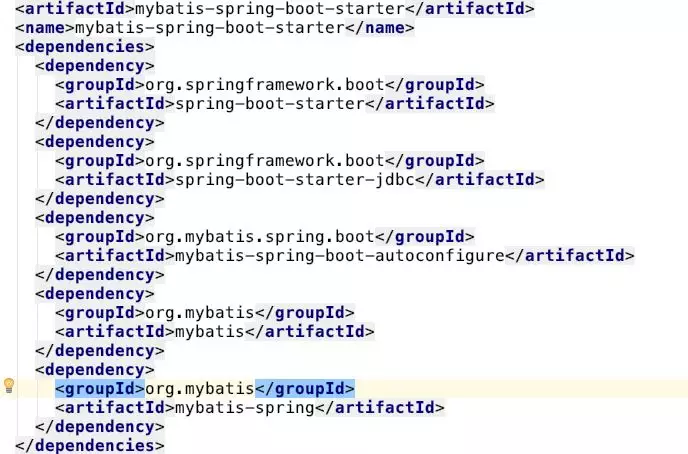
进一步查看mybatis-spring-boot-starter包,可以找到这里已经将mybatis做了包装。
这也是spring的一个理念,不重复造轮子,整合优秀的资源进入spring的体系中。

4、资源导入注解:@ImportResource @Import @PropertySource 这三个注解都是用来导入自定义的一些配置文件。
@ImportResource(locations={}) 导入其他xml配置文件,需要标准在主配置类上。
导入property的配置文件 @PropertySource指定文件路径,这个相当于使用spring的<importresource/>标签来完成配置项的引入。
@import注解是一个可以将普通类导入到spring容器中做管理
• controller 层
1、@Controller 表明这个类是一个控制器类,和@RequestMapping来配合使用拦截请求,如果不在method中注明请求的方式,默认是拦截get和post请求。这样请求会完成后转向一个视图解析器。但是在大多微服务搭建的时候,前后端会做分离。所以请求后端只关注数据处理,后端返回json数据的话,需要配合@ResponseBody注解来完成。
这样一个只需要返回数据的接口就需要3个注解来完成,大多情况我们都是需要返回数据。也是基于最佳实践,所以将这三个注解进一步整合。
@RestController 是@Controller 和@ResponseBody的结合,一个类被加上@RestController 注解,数据接口中就不再需要添加@ResponseBody。更加简洁。
同样的情况,@RequestMapping(value="",method= RequestMethod.GET ),我们都需要明确请求方式。这样的写法又会显得比较繁琐,于是乎就有了如下的几个注解。
| 普通风格 | Rest风格 |
|
@RequestMapping(value=“”,method = RequestMethod.GET) |
@GetMapping(value =“”) |
|
@RequestMapping(value=“”,method = RequestMethod.POST) |
@PostMapping(value =“”) |
|
@RequestMapping(value=“”,method = RequestMethod.PUT) |
@PutMapping(value =“”) |
|
@RequestMapping(value=“”,method = RequestMethod.DELETE) |
@DeleteMapping(value =“”) |
这几个注解是 @RequestMapping(value="",method= RequestMethod.xxx )的最佳实践。为了代码的更加简洁。
2、@CrossOrigin:@CrossOrigin(origins = "", maxAge = 1000) 这个注解主要是为了解决跨域访问的问题。这个注解可以为整个controller配置启用跨域,也可以在方法级别启用。
我们在项目中使用这个注解是为了解决微服在做定时任务调度编排的时候,会访问不同的spider节点而出现跨域问题。
3、@Autowired:这是个最熟悉的注解,是spring的自动装配,这个个注解可以用到构造器,变量域,方法,注解类型上。当我们需要从bean 工厂中获取一个bean时,Spring会自动为我们装配该bean中标记为@Autowired的元素。
4、@EnablCaching@EnableCaching: 这个注解是spring framework中的注解驱动的缓存管理功能。自spring版本3.1起加入了该注解。其作用相当于spring配置文件中的cache manager标签。
5、@PathVariable:路径变量注解,@RequestMapping中用{}来定义url部分的变量名,如:

同样可以支持变量名加正则表达式的方式,变量名:[正则表达式]。

• servcie层注解
1、@Service:这个注解用来标记业务层的组件,我们会将业务逻辑处理的类都会加上这个注解交给spring容器。事务的切面也会配置在这一层。当让 这个注解不是一定要用。有个泛指组件的注解,当我们不能确定具体作用的时候 可以用泛指组件的注解托付给spring容器。
2、@Resource:@Resource和@Autowired一样都可以用来装配bean,都可以标注字段上,或者方法上。 @resource注解不是spring提供的,是属于J2EE规范的注解。
两个之前的区别就是匹配方式上有点不同,@Resource默认按照名称方式进行bean匹配,@Autowired默认按照类型方式进行bean匹配。
• 持久层注解
1、@Repository:@Repository注解类作为DAO对象,管理操作数据库的对象。
总得来看,@Component, @Service, @Controller, @Repository是spring注解,注解后可以被spring框架所扫描并注入到spring容器来进行管理
@Component是通用注解,其他三个注解是这个注解的拓展,并且具有了特定的功能。
通过这些注解的分层管理,就能将请求处理,义务逻辑处理,数据库操作处理分离出来,为代码解耦,也方便了以后项目的维护和开发。
所以我们在正常开发中,如果能用@Service, @Controller, @Repository其中一个标注这个类的定位的时候,就不要用@Component来标注。
2、@Transactional: 通过这个注解可以声明事务,可以添加在类上或者方法上。
在spring boot中 不用再单独配置事务管理,一般情况是我们会在servcie层添加了事务注解,即可开启事务。要注意的是,事务的开启只能在public 方法上。并且主要事务切面的回滚条件。正常我们配置rollbackfor exception时 ,如果在方法里捕获了异常就会导致事务切面配置的失效。
• 其他相关注解
-
@ControllerAdvice 和 @RestControllerAdvice:通常和@ExceptionHandler、@InitBinder、@ModelAttribute一起配合使用。
-
@ControllerAdvice 和 @ExceptionHandler 配合完成统一异常拦截处理。
-
@RestControllerAdvice 是 @ControllerAdvice 和 @ResponseBody的合集,可以将异常以json的格式返回数据。
如下面对数据异常返回的统一处理。

这里是对平时用到的一些注解做了归纳,及应用说明。还有其他更深的知识还需要在后续的用中继续学习。
via:https://mp.weixin.qq.com/s/eE9bLX5invvMjGePprO2Ew
[springBoot系列]--springBoot注解大全
一、注解(annotations)列表
@SpringBootApplication:包含了@ComponentScan、@Configuration和@EnableAutoConfiguration注解。其中@ComponentScan让spring Boot扫描到Configuration类并把它加入到程序上下文。
@Configuration 等同于spring的XML配置文件;使用Java代码可以检查类型安全。
@EnableAutoConfiguration 自动配置。
@ComponentScan 组件扫描,可自动发现和装配一些Bean。
@Component可配合CommandLineRunner使用,在程序启动后执行一些基础任务。
@RestController注解是@Controller和@ResponseBody的合集,表示这是个控制器bean,并且是将函数的返回值直 接填入HTTP响应体中,是REST风格的控制器。
@Autowired自动导入。
@PathVariable获取参数。
@JsonBackReference解决嵌套外链问题。
@RepositoryRestResourcepublic配合spring-boot-starter-data-rest使用。
二、注解(annotations)详解
@SpringBootApplication:申明让spring boot自动给程序进行必要的配置,这个配置等同于:@Configuration ,@EnableAutoConfiguration 和 @ComponentScan 三个配置。
package com.example.myproject;
import org.springframework.boot.SpringApplication;
import org.springframework.boot.autoconfigure.SpringBootApplication;

@SpringBootApplication // same as @Configuration @EnableAutoConfiguration @ComponentScan
public class Application {
public static void main(String[] args) {
SpringApplication.run(Application.class, args);
}
}
@ResponseBody:表示该方法的返回结果直接写入HTTP response body中,一般在异步获取数据时使用,用于构建RESTful的api。在使用@RequestMapping后,返回值通常解析为跳转路径,加上@responsebody后返回结果不会被解析为跳转路径,而是直接写入HTTP response body中。比如异步获取json数据,加上@responsebody后,会直接返回json数据。该注解一般会配合@RequestMapping一起使用。示例代码:
@RequestMapping(“/test”)
@ResponseBody
public String test(){
return”ok”;
}
@Controller:用于定义控制器类,在spring 项目中由控制器负责将用户发来的URL请求转发到对应的服务接口(service层),一般这个注解在类中,通常方法需要配合注解@RequestMapping。示例代码:
@Controller
@RequestMapping(“/demoInfo”)
publicclass DemoController {
@Autowired
private DemoInfoService demoInfoService;

@RequestMapping("/hello")
public String hello(Map<String,Object> map){
   System.out.println("DemoController.hello()");
   map.put("hello","from TemplateController.helloHtml");
   //会使用hello.html或者hello.ftl模板进行渲染显示.
   return"/hello";
}
}
@RestController:用于标注控制层组件(如struts中的action),@ResponseBody和@Controller的合集。示例代码:
package com.kfit.demo.web;

import org.springframework.web.bind.annotation.RequestMapping;
import org.springframework.web.bind.annotation.RestController;


@RestController
@RequestMapping(“/demoInfo2”)
publicclass DemoController2 {

@RequestMapping("/test")
public String test(){
   return"ok";
}
}
@RequestMapping:提供路由信息,负责URL到Controller中的具体函数的映射。
@EnableAutoConfiguration:Spring Boot自动配置(auto-configuration):尝试根据你添加的jar依赖自动配置你的Spring应用。例如,如果你的classpath下存在HSQLDB,并且你没有手动配置任何数据库连接beans,那么我们将自动配置一个内存型(in-memory)数据库”。你可以将@EnableAutoConfiguration或者@SpringBootApplication注解添加到一个@Configuration类上来选择自动配置。如果发现应用了你不想要的特定自动配置类,你可以使用@EnableAutoConfiguration注解的排除属性来禁用它们。
@ComponentScan:表示将该类自动发现扫描组件。个人理解相当于,如果扫描到有@Component、@Controller、@Service等这些注解的类,并注册为Bean,可以自动收集所有的Spring组件,包括@Configuration类。我们经常使用@ComponentScan注解搜索beans,并结合@Autowired注解导入。可以自动收集所有的Spring组件,包括@Configuration类。我们经常使用@ComponentScan注解搜索beans,并结合@Autowired注解导入。如果没有配置的话,Spring Boot会扫描启动类所在包下以及子包下的使用了@Service,@Repository等注解的类。
@Configuration:相当于传统的xml配置文件,如果有些第三方库需要用到xml文件,建议仍然通过@Configuration类作为项目的配置主类——可以使用@ImportResource注解加载xml配置文件。
@Import:用来导入其他配置类。
@ImportResource:用来加载xml配置文件。
@Autowired:自动导入依赖的bean
@Service:一般用于修饰service层的组件
@Repository:使用@Repository注解可以确保DAO或者repositories提供异常转译,这个注解修饰的DAO或者repositories类会被ComponetScan发现并配置,同时也不需要为它们提供XML配置项。
@Bean:用@Bean标注方法等价于XML中配置的bean。
@Value:注入Spring boot application.properties配置的属性的值。示例代码:
@Value(value = “#{message}”)
private String message;
@Inject:等价于默认的@Autowired,只是没有required属性;
@Component:泛指组件,当组件不好归类的时候,我们可以使用这个注解进行标注。
@Bean:相当于XML中的,放在方法的上面,而不是类,意思是产生一个bean,并交给spring管理。
@AutoWired:自动导入依赖的bean。byType方式。把配置好的Bean拿来用,完成属性、方法的组装,它可以对类成员变量、方法及构造函数进行标注,完成自动装配的工作。当加上(required=false)时,就算找不到bean也不报错。
@Qualifier:当有多个同一类型的Bean时,可以用@Qualifier(“name”)来指定。与@Autowired配合使用。@Qualifier限定描述符除了能根据名字进行注入,但能进行更细粒度的控制如何选择候选者,具体使用方式如下:
@Autowired
@Qualifier(value = “demoInfoService”)
private DemoInfoService demoInfoService;
@Resource(name=”name”,type=”type”):没有括号内内容的话,默认byName。与@Autowired干类似的事。
三、JPA注解
@Entity:@Table(name=”“):表明这是一个实体类。一般用于jpa这两个注解一般一块使用,但是如果表名和实体类名相同的话,@Table可以省略
@MappedSuperClass:用在确定是父类的entity上。父类的属性子类可以继承。
@NoRepositoryBean:一般用作父类的repository,有这个注解,spring不会去实例化该repository。
@Column:如果字段名与列名相同,则可以省略。
@Id:表示该属性为主键。
@GeneratedValue(strategy = GenerationType.SEQUENCE,generator = “repair_seq”):表示主键生成策略是sequence(可以为Auto、IDENTITY、native等,Auto表示可在多个数据库间切换),指定sequence的名字是repair_seq。
@SequenceGeneretor(name = “repair_seq”, sequenceName = “seq_repair”, allocationSize = 1):name为sequence的名称,以便使用,sequenceName为数据库的sequence名称,两个名称可以一致。
@Transient:表示该属性并非一个到数据库表的字段的映射,ORM框架将忽略该属性。如果一个属性并非数据库表的字段映射,就务必将其标示为@Transient,否则,ORM框架默认其注解为@Basic。@Basic(fetch=FetchType.LAZY):标记可以指定实体属性的加载方式
@JsonIgnore:作用是json序列化时将Java bean中的一些属性忽略掉,序列化和反序列化都受影响。
@JoinColumn(name=”loginId”):一对一:本表中指向另一个表的外键。一对多:另一个表指向本表的外键。
@OneToOne、@OneToMany、@ManyToOne:对应hibernate配置文件中的一对一,一对多,多对一。
四、springMVC相关注解
@RequestMapping:@RequestMapping(“/path”)表示该控制器处理所有“/path”的UR L请求。RequestMapping是一个用来处理请求地址映射的注解,可用于类或方法上。
用于类上,表示类中的所有响应请求的方法都是以该地址作为父路径。该注解有六个属性:
params:指定request中必须包含某些参数值是,才让该方法处理。
headers:指定request中必须包含某些指定的header值,才能让该方法处理请求。
value:指定请求的实际地址,指定的地址可以是URI Template 模式
method:指定请求的method类型, GET、POST、PUT、DELETE等
consumes:指定处理请求的提交内容类型(Content-Type),如application/json,text/html;
produces:指定返回的内容类型,仅当request请求头中的(Accept)类型中包含该指定类型才返回
@RequestParam:用在方法的参数前面。
@RequestParam
String a =request.getParameter(“a”)。
@PathVariable:路径变量。如
RequestMapping(“user/get/mac/{macAddress}”)
public String getByMacAddress(@PathVariable String macAddress){
//do something;
}
参数与大括号里的名字一样要相同。
五、全局异常处理
@ControllerAdvice:包含@Component。可以被扫描到。统一处理异常。
@ExceptionHandler(Exception.class):用在方法上面表示遇到这个异常就执行以下方法。
springboot常用Starter介绍
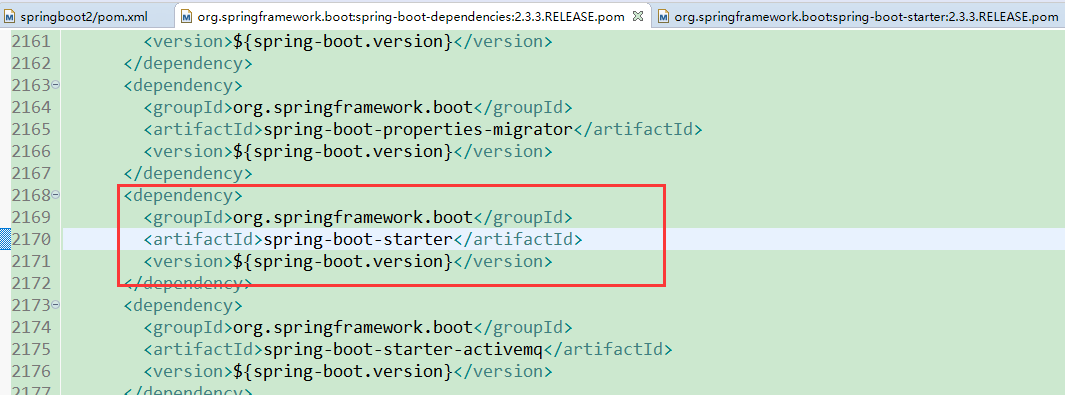
1.starter的依赖,这里以pom.xml中的spring-boot-starter为例,通过ctrl+鼠标点击可以查看start中具体的依赖


2官网

3常用的starter
spring-boot-starter-activemq
spring-boot-starter-aop
spring-boot-starter-data-redis
spring-boot-starter-freemarker
spring-boot-starter-thymeleaf
spring-boot-starter-webflux
4常见的starter
spring-boot-starter
这是Spring Boot的核心启动器,包含了自动配置、日志和YAML。
spring-boot-starter-amqp
通过spring-rabbit来支持AMQP协议(Advanced Message Queuing Protocol. 。
spring-boot-starter-aop
支持面向方面的编程即AOP,包括spring-aop和AspectJ。
spring-boot-starter-artemis
通过Apache Artemis支持JMS的API(Java Message Service API. 。
spring-boot-starter-batch
支持Spring Batch,包括HSQLDB数据库。
spring-boot-starter-cache
支持Spring的Cache抽象。
spring-boot-starter-cloud-connectors
支持Spring Cloud Connectors,简化了在像Cloud Foundry或Heroku这样的云平台上连接服务。
spring-boot-starter-data-elasticsearch
支持ElasticSearch搜索和分析引擎,包括spring-data-elasticsearch。
spring-boot-starter-data-gemfire
支持GemFire分布式数据存储,包括spring-data-gemfire。
spring-boot-starter-data-jpa
支持JPA(Java Persistence API. ,包括spring-data-jpa、spring-orm、Hibernate。
spring-boot-starter-data-mongodb
支持MongoDB数据,包括spring-data-mongodb。
spring-boot-starter-data-rest
通过spring-data-rest-webmvc,支持通过REST暴露Spring Data数据仓库。
spring-boot-starter-data-solr
支持Apache Solr搜索平台,包括spring-data-solr。
spring-boot-starter-freemarker
支持FreeMarker模板引擎。
spring-boot-starter-groovy-templates
支持Groovy模板引擎。
spring-boot-starter-hateoas
通过spring-hateoas支持基于HATEOAS的RESTful Web服务。
spring-boot-starter-hornetq
通过HornetQ支持JMS。
spring-boot-starter-integration
支持通用的spring-integration模块。
spring-boot-starter-jdbc
支持JDBC数据库。
spring-boot-starter-jersey
支持Jersey RESTful Web服务框架。
spring-boot-starter-jta-atomikos
通过Atomikos支持JTA分布式事务处理。
spring-boot-starter-jta-bitronix
通过Bitronix支持JTA分布式事务处理。
spring-boot-starter-mail
支持javax.mail模块。
spring-boot-starter-mobile
支持spring-mobile。
spring-boot-starter-mustache
支持Mustache模板引擎。
spring-boot-starter-redis
支持Redis键值存储数据库,包括spring-redis。
spring-boot-starter-security
支持spring-security。
spring-boot-starter-social-facebook
支持spring-social-facebook
spring-boot-starter-social-linkedin
支持pring-social-linkedin
spring-boot-starter-social-twitter
支持pring-social-twitter
spring-boot-starter-test
支持常规的测试依赖,包括JUnit、Hamcrest、Mockito以及spring-test模块。
spring-boot-starter-thymeleaf
支持Thymeleaf模板引擎,包括与Spring的集成。
spring-boot-starter-velocity
支持Velocity模板引擎。
spring-boot-starter-web
S支持全栈式Web开发,包括Tomcat和spring-webmvc。
spring-boot-starter-websocket
支持WebSocket开发。
spring-boot-starter-ws
支持Spring Web Services。
Spring Boot应用启动器面向生产环境的还有2种,具体如下:
spring-boot-starter-actuator
增加了面向产品上线相关的功能,比如测量和监控。
spring-boot-starter-remote-shell
增加了远程ssh shell的支持。
最后,Spring Boot应用启动器还有一些替换技术的启动器,具体如下:
spring-boot-starter-jetty
引入了Jetty HTTP引擎(用于替换Tomcat. 。
spring-boot-starter-log4j
支持Log4J日志框架。
spring-boot-starter-logging
引入了Spring Boot默认的日志框架Logback。
spring-boot-starter-tomcat
引入了Spring Boot默认的HTTP引擎Tomcat。
spring-boot-starter-undertow
引入了Undertow HTTP引擎(用于替换Tomcat.
SpringBoot企业常用的starter
SpringBoot企业常用的starter
Editor:SimpleWu
SpringBoot简介#
Spring Boot是由Pivotal团队提供的全新框架,其设计目的是用来简化新Spring应用的初始搭建以及开发过程。该框架使用了特定的方式来进行配置,从而使开发人员不再需要定义样板化的配置。通过这种方式,Boot致力于在蓬勃发展的快速应用开发领域(rapid application development)成为领导者。
Spring Boot让我们的Spring应用变的更轻量化。比如:你可以仅仅依靠一个Java类来运行一个Spring引用。你也可以打包你的应用为jar并通过使用java -jar来运行你的Spring Web应用。
Spring Boot的主要优点:
- 为所有Spring开发者更快的入门
- 开箱即用,提供各种默认配置来简化项目配置
- 内嵌式容器简化Web项目
- 没有冗余代码生成和XML配置的要求
在下面的代码中只要有一定基础会发现这写代码实例非常简单对于开发者来说几乎是“零配置”。
SpringBoot运行#
开发工具:jdk8,IDEA,STS,eclipse(需要安装STS插件)这些都支持快速启动SpringBoot工程。我这里就不快速启动了,使用maven工程。学习任何一项技术首先就要精通HelloWord,那我们来跑个初体验。
首先只用maven我们创建的maven工程直接以jar包的形式创建就行了,首先我们来引入SpringBoot的依赖
首先我们需要依赖SpringBoot父工程,这是每个项目中必须要有的。
<!--引入SpringBoot父依赖-->
<parent>
		<groupId>org.springframework.boot</groupId>
		<artifactId>spring-boot-starter-parent</artifactId>
		<version>2.0.5.RELEASE</version>
		<relativePath/>
</parent>
<!--编码与JAVA版本-->
<properties>
		<project.build.sourceEncoding>UTF-8</project.build.sourceEncoding>
		<project.reporting.outputEncoding>UTF-8</project.reporting.outputEncoding>
		<java.version>1.8</java.version>
</properties>
我们启动WEB模块当然必须要引入WEB模块的依赖
<dependencies>
		<!--引入SpringBoot-WEB模块-->
		<dependency>
			<groupId>org.springframework.boot</groupId>
			<artifactId>spring-boot-starter-web</artifactId>
		</dependency>
	</dependencies>
我们需要编写一个SpringBoot启动类,SpringbootFirstExperienceApplication.java
@SpringBootApplication
public class SpringbootFirstExperienceApplication {

	public static void main(String[] args) {
		SpringApplication.run(SpringbootFirstExperienceApplication.class, args);
	}
}
到了这里我们直接把他当成SpringMVC来使用就行了,不过这里默认是不支持JSP官方推荐使用模板引擎,后面会写到整合JSP。这里我就不写Controller了。
@SpringBootApplication:之前用户使用的是3个注解注解他们的main类。分别是@Configuration,@EnableAutoConfiguration,@ComponentScan。由于这些注解一般都是一起使用,spring boot提供了一个统一的注解@SpringBootApplication。
注意事项:我们使用这个注解在不指定扫描路径的情况下,SpringBoot只能扫描到和SpringbootFirstExperienceApplication同包或子包的Bean;
SpringBoot目录结构#
在src/main/resources中我们可以有几个文件夹:
templates:用来存储模板引擎的,Thymeleaf,FreeMarker,Velocity等都是不错的选择。
static:存储一些静态资源,css,js等
public:在默认SpringBoot工程中是不生成这个文件夹的,但是在自动配置中我们可以有这个文件夹用来存放公共的资源(html等)
application.properties:这个文件名字是固定的,SpringBoot启动会默认加载这些配置在这里面可以配置端口号,访问路径,数据库连接信息等等。这个文件非常重要,当然官方中推出了一个yml格式这是非常强大的数据格式。
整合JdbcTemplate#
引入依赖:
	<parent>
		<groupId>org.springframework.boot</groupId>
		<artifactId>spring-boot-starter-parent</artifactId>
		<version>1.5.2.RELEASE</version>
	</parent>
	<dependencies>
        <!--引入WEB模块-->
		<dependency>
			<groupId>org.springframework.boot</groupId>
			<artifactId>spring-boot-starter-web</artifactId>
		</dependency>
         <!--引入JDBC模块-->
		<dependency>
			<groupId>org.springframework.boot</groupId>
			<artifactId>spring-boot-starter-jdbc</artifactId>
		</dependency>
         <!--引入数据库驱动-->
		<dependency>
			<groupId>mysql</groupId>
			<artifactId>mysql-connector-java</artifactId>
		</dependency>
		<dependency>
			<groupId>org.springframework.boot</groupId>
			<artifactId>spring-boot-starter-test</artifactId>
			<scope>test</scope>
		</dependency>
	</dependencies>
配置application.properties,虽然说是“零配置”但是这些必要的肯定要指定,否则它怎么知道连那个数据库?
spring.datasource.url=jdbc:mysql://localhost:3306/mybatis
spring.datasource.username=root
spring.datasource.password=root
spring.datasource.driver-class-name=com.mysql.jdbc.Driver
使用方式:
@Service
public class EmployeeService {
	@Autowired
	private JdbcTemplate jdbcTemplate;

	public boolean saveEmp(String name,String email,String gender){
		String sql = "insert into tal_employee values(null,?,?,?)";
		int result = jdbcTemplate.update(sql, name,email,gender);
		System.out.println("result : " + result);
		return result > 0 ? true:false;
	}
}
@RestController
public class EmployeeController {

	@Autowired
	private EmployeeService employeeService;

	@RequestMapping("/save")
	public String insert(String name,String email,String gender){
		boolean result = employeeService.saveEmp(name, email, gender);
		if(result){
			return "success";
		}
		return "error";
	}
}
这里我们直接返回一个文本格式。
@RestController#
在上面的代码中我们使用到这个注解修改我们的Controller类而是不使用@Controller这个注解,其实中包含了@Controller,同时包含@ResponseBody既然修饰在类上面那么就是表示这个类中所有的方法都是@ResponseBody所以在这里我们返回字符串在前台我们会以文本格式展示,如果是对象那么它会自动转换成json格式返回。
整合JSP#
在创建整合JSP的时候指定要选WAR,一定要选WAR。
引入依赖:
<parent>
    <groupId>org.springframework.boot</groupId>
    <artifactId>spring-boot-starter-parent</artifactId>
    <version>1.5.2.RELEASE</version>
</parent>
<dependencies>
    <!-- SpringBoot WEB组件 -->
    <dependency>
        <groupId>org.springframework.boot</groupId>
        <artifactId>spring-boot-starter-web</artifactId>
    </dependency>
    <!-- 整合JSP依赖 -->
    <dependency>
        <groupId>org.springframework.boot</groupId>
        <artifactId>spring-boot-starter-tomcat</artifactId>
    </dependency>
    <dependency>
        <groupId>org.apache.tomcat.embed</groupId>
        <artifactId>tomcat-embed-jasper</artifactId>
    </dependency>
</dependencies>
然后我们只需要配置试图解析器路径就可以了。
#配置试图解析器前缀
spring.mvc.view.prefix=/WEB-INF/views/
#配置试图解析器后缀
spring.mvc.view.suffix=.jsp
整合JPA#
同样的整合JPA我们只需要启动我们SpringBoot已经集成好的模块即可。
添加依赖:
<parent>
		<groupId>org.springframework.boot</groupId>
		<artifactId>spring-boot-starter-parent</artifactId>
		<version>1.5.2.RELEASE</version>
	</parent>
	<dependencies>
		<dependency>
			<groupId>org.springframework.boot</groupId>
			<artifactId>spring-boot-starter-web</artifactId>
		</dependency>
        <!--启动JPA组件-->
		<dependency>
			<groupId>org.springframework.boot</groupId>
			<artifactId>spring-boot-starter-data-jpa</artifactId>
		</dependency>
		<dependency>
			<groupId>org.springframework.boot</groupId>
			<artifactId>spring-boot-starter-test</artifactId>
			<scope>test</scope>
		</dependency>
		<dependency>
			<groupId>mysql</groupId>
			<artifactId>mysql-connector-java</artifactId>
		</dependency>
	</dependencies>
启动JPA组件后直接配置数据库连接信息就可以使用JPA功能。
Application.properties
spring.datasource.url=jdbc:mysql://localhost:3306/mybatis
spring.datasource.username=root
spring.datasource.password=root
spring.datasource.driver-class-name=com.mysql.jdbc.Driver
实体类:Employee.java
@Table(name="tal_employee")
@Entity
public class Employee implements Serializable{
	@Id
	@GeneratedValue(strategy = GenerationType.AUTO)
	private Integer id;
	@Column(name="last_Name")
	private String lastName;
	private String email;
	private String gender;
	//get set 省略
}
EmployeeDao接口:
public interface EmployeeDao extends JpaRepository<Employee, Integer>{
}
EmployeeController.java:
@Controller
public class EmployeeController {
	@Autowired
	private EmployeeDao employeeDao;

	@ResponseBody
	@RequestMapping("/emps")
	public List<Employee> getEmployees(){
		List<Employee> employees = employeeDao.findAll();
		System.out.println(employees);
		return employees;
	}
}
整合MyBatis#
引入依赖:
<parent>
		<groupId>org.springframework.boot</groupId>
		<artifactId>spring-boot-starter-parent</artifactId>
		<version>1.5.2.RELEASE</version>
	</parent>
	<dependencies>
		<dependency>
			<groupId>org.springframework.boot</groupId>
			<artifactId>spring-boot-starter-web</artifactId>
		</dependency>
        <!--引入对JDBC的支持-->
		<dependency>
			<groupId>org.springframework.boot</groupId>
			<artifactId>spring-boot-starter-jdbc</artifactId>
		</dependency>
         <!--引入对logging的支持-->
		<dependency>
			<groupId>org.springframework.boot</groupId>
			<artifactId>spring-boot-starter-logging</artifactId>
		</dependency>
		<!-- SpringBoot MyBatis启动器 -->
		<dependency>
			<groupId>org.mybatis.spring.boot</groupId>
			<artifactId>mybatis-spring-boot-starter</artifactId>
			<version>1.2.2</version>
		</dependency>
		<dependency>
			<groupId>org.springframework.boot</groupId>
			<artifactId>spring-boot-starter-test</artifactId>
			<scope>test</scope>
		</dependency>
		<dependency>
			<groupId>mysql</groupId>
			<artifactId>mysql-connector-java</artifactId>
		</dependency>
	</dependencies>
配置application.properties
spring.datasource.url=jdbc:mysql://localhost:3306/mybatis
spring.datasource.username=root
spring.datasource.password=root
spring.datasource.driver-class-name=com.mysql.jdbc.Driver
##############datasource classpath 数据连接池地址##############
#spring.datasource.type=com.alibaba.druid.pool.DruidDataSource

#指定我们的mapper.xml位置
mybatis.mapper-locations=classpath:com/simple/springboot/mybatis/dao/mapper/*.xml
#entity.class 指定我们实体类所在包位置
mybatis.type-aliases-package=com.simple.springboot.mybatis.entity
当然这里还有很多属性如果想要使用可以参考官方文档。到了这里其他就不写了,把他当作SSM使用就ok。
注意事项:在我们的Dao层接口中一定要在类上加上注解@Mapper否则无法扫描到。
AOP功能使用#
在我们SpringBoot中使用AOP非常简单。
package com.simple.springboot.aop;

import org.aspectj.lang.ProceedingJoinPoint;
import org.aspectj.lang.annotation.After;
import org.aspectj.lang.annotation.AfterThrowing;
import org.aspectj.lang.annotation.Around;
import org.aspectj.lang.annotation.Aspect;
import org.aspectj.lang.annotation.Before;
import org.aspectj.lang.annotation.Pointcut;
import org.springframework.stereotype.Component;

@Aspect
@Component
public class SpringBootAspect {

	/**
	 * 定义一个切入点
	 * @author:SimpleWu
	 * @Date:2018年10月12日
	 */
	@Pointcut(value="execution(* com.simple.springboot.util.*.*(..))")
	public void aop(){}

	/**
	 * 定义一个前置通知
	 * @author:SimpleWu
	 * @Date:2018年10月12日
	 */
	@Before("aop()")
	public void aopBefore(){
		System.out.println("前置通知 SpringBootAspect....aopBefore");
	}

	/**
	 * 定义一个后置通知
	 * @author:SimpleWu
	 * @Date:2018年10月12日
	 */
	@After("aop()")
	public void aopAfter(){
		System.out.println("后置通知  SpringBootAspect....aopAfter");
	}

	/**
	 * 处理未处理的JAVA异常
	 * @author:SimpleWu
	 * @Date:2018年10月12日
	 */
	@AfterThrowing(pointcut="aop()",throwing="e")
	public void exception(Exception e){
		System.out.println("异常通知 SpringBootAspect...exception .." + e);
	}

	/**
	 * 环绕通知
	 * @author:SimpleWu
	 * @throws Throwable
	 * @Date:2018年10月12日
	 */
	@Around("aop()")
	public void around(ProceedingJoinPoint invocation) throws Throwable{
		System.out.println("SpringBootAspect..环绕通知 Before");
		invocation.proceed();
		System.out.println("SpringBootAspect..环绕通知 After");
	}
}
任务调度#
SpringBoot已经集成好一个调度功能。
@Component
public class ScheduledTasks {
	private static final SimpleDateFormat dateFormat = new SimpleDateFormat("HH:mm:ss");

	/**
	 * 任务调度,每隔5秒执行一次
	 * @author:SimpleWu
	 * @Date:2018年10月12日
	 */

	@Scheduled(fixedRate = 1000)
    public void reportCurrentTime() {
        System.out.println("现在时间:" + dateFormat.format(new Date()));
    }
}
然后启动的时候我们必须要在主函数类上加上注解:@EnableScheduling(翻译过来就是开启调度)
/**
 * SpringBoot使用任务调度
 * @EnableScheduling标注程序开启任务调度
 * @author :SimpleWu
 * @Date:2018年10月12日
 */

@SpringBootApplication
@EnableScheduling
public class App {
	public static void main(String[] args) {
		SpringApplication.run(App.class, args);
	}
}
整合RabbitMq#
安装RabbitMq
由于RabbitMQ依赖Erlang, 所以需要先安装Erlang。
sudo yum install -y make gcc gcc-c++ m4 openssl openssl-devel ncurses-devel unixODBC unixODBC-devel java java-devel
sudo yum install epel-release
sudo yum install erlang
sudo yum install socat
下载RabbitMQ,并且安装
sudo wget http://www.rabbitmq.com/releases/rabbitmq-server/v3.6.15/rabbitmq-server-3.6.15-1.el7.noarch.rpm
sudo yum install rabbitmq-server-3.6.15-1.el7.noarch.rpm
进入cd /etc/rabbitmq/ 创建vim rabbitmq.config
[{rabbit, [{loopback_users, []}]}].
这里的意思是开放使用,rabbitmq默认创建的用户guest,密码也是guest,这个用户默认只能是本机访问,localhost或者127.0.0.1,从外部访问需要添加上面的配置。如果没有找到清除日志
rm rabbit\@rabbit@localhost-sasl.log
最好还是直接sudo rabbitmqctl set_user_tags root administrator ,给root用户赋值管理员权限
RabbitMQ,基本操作
# 添加开机启动RabbitMQ服务
systemctl enable rabbitmq-server.service
# 查看服务状态
systemctl status  rabbitmq-server.service
# 启动服务
systemctl start rabbitmq-server.service
# 停止服务
systemctl stop rabbitmq-server.service
# 查看当前所有用户
rabbitmqctl list_users
# 查看默认guest用户的权限
rabbitmqctl list_user_permissions guest
# 由于RabbitMQ默认的账号用户名和密码都是guest。为了安全起见, 先删掉默认用户
rabbitmqctl delete_user guest
# 添加新用户
rabbitmqctl add_user username password
# 设置用户tag
rabbitmqctl set_user_tags username administrator
# 赋予用户默认vhost的全部操作权限
rabbitmqctl set_permissions -p / username ".*" ".*" ".*"
# 查看用户的权限
rabbitmqctl list_user_permissions username
如果只从命令行操作RabbitMQ,多少有点不方便。幸好RabbitMQ自带了web管理界面,只需要启动插件便可以使用。
rabbitmq-plugins enable rabbitmq_management
访问: http://服务器IP:15672
整合RabbitMq
导入Maven依赖
<!--SpringBoot2.x-->
<parent>
        <groupId>org.springframework.boot</groupId>
        <artifactId>spring-boot-starter-parent</artifactId>
        <version>2.1.4.RELEASE</version>
        <relativePath/> <!-- lookup parent from repository -->
</parent>
<!--设置JAVA版本-->
<properties>
        <java.version>1.8</java.version>
</properties>
<!--引入依赖-->
<dependencies>
		<!--启动RabbitmQ-->
        <dependency>
            <groupId>org.springframework.boot</groupId>
            <artifactId>spring-boot-starter-amqp</artifactId>
        </dependency>
		<!--启动WEB-->
        <dependency>
            <groupId>org.springframework.boot</groupId>
            <artifactId>spring-boot-starter-web</artifactId>
        </dependency>
		<!--启动TEST-->
        <dependency>
            <groupId>org.springframework.boot</groupId>
            <artifactId>spring-boot-starter-test</artifactId>
            <scope>test</scope>
        </dependency>
</dependencies>
设置application.properties配置文件
spring.application.name=springboot-rabbitmq
#RabbitMq所在服务器IP
spring.rabbitmq.host=192.168.197.133
#连接端口号
spring.rabbitmq.port=5672
#用户名
spring.rabbitmq.username=root
#用户密码
spring.rabbitmq.password=123456
# 开启发送确认
spring.rabbitmq.publisher-confirms=true
# 开启发送失败退回
spring.rabbitmq.publisher-returns=true
spring.rabbitmq.virtual-host=/
创建RabbitMq队列初始化类,初始化队列
/**
 * @author SimpleWu
 * @Date 2019-05-17
 * 该类初始化队列
 */
@Configuration
public class RabbitMqInitialization {

    /**
     * 创建队列 队列名字为SayQueue
     * @return
     */
    @Bean
    public Queue SayQueue() {
        return new Queue("SayQueue");
    }

}
创建生产者
/**
 * @author SimpleWu
 * @Date 2019-05-17
 * 生产者
 */
@Component
public class SayProducer {

    @Autowired
    private RabbitTemplate rabbitTemplate;

    public void send(String name){
        String sendMsg = "hello:    " + name + "   " + new Date();
		//指定队列
        this.rabbitTemplate.convertAndSend("SayQueue", sendMsg);
    }
}
创建消费者
@RabbitListener:当监听到队列 SayQueue 中有消息时则会进行接收并处理
@RabbitHandler :标注在类上面表示当有收到消息的时候,就交给 @RabbitHandler 的方法处理,具体使用哪个方法处理,根据 MessageConverter 转换后的参数类型
/**
 * @author SimpleWu
 * @Date 2019-05-17
 * 消费者
 * queues 指定监听的队列
 */

@Component
@RabbitListener(queues = "SayQueue")
public class SayConsumer {

    @RabbitHandler
    public void process(String hello) {
        System.out.println("SayConsumer  : " + hello);
    }

}
创建接口进行测试
@RestController
public class SayController {

    @Autowired
    private SayProducer sayProducer;

    @RequestMapping("/send/{name}")
    public String send(@PathVariable String name){
        sayProducer.send(name);
        return "Send Succcess SimpleWu";
    }

}
启动类就用IDEA默认生成的就好了。
http://10.192.132.22:8080/send/First 发送请求
消费者接受消息:SayConsumer : hello: First Tue May 07 17:57:02 CST 2019
注:在传输对象时一定要序列化
整合邮件发送#
导入依赖
<!--启动邮箱发送依赖-->
<dependency>
	<groupId>org.springframework.boot</groupId>
	<artifactId>spring-boot-starter-mail</artifactId>
</dependency>
配置Properties文件
#根据类型配置
spring.mail.host=smtp.qq.com
spring.mail.port=465
spring.mail.username=450255266@qq.com
#对于qq邮箱而言 密码指的就是发送方的授权码
spring.mail.password=看不见我-0-
spring.mail.protocol=smtp
spring.mail.properties.mail.smtp.auth=true
spring.mail.properties.mail.smtp.ssl.enable=true
spring.mail.default-encoding=UTF-8
#是否用启用加密传送的协议验证项
#注意:在spring.mail.password处的值是需要在邮箱设置里面生成的授权码,这个不是真实的密码。
spring.mail.host 需要根据不同的邮箱类型配置不同的服务器地址
发送邮箱
/**
 * @author SimpleWu
 * @data 2019=05-17
 * 发送邮件
 */
@Component
public class EmailService {
    @Autowired
    private JavaMailSender javaMailSender;

    public void sendSimpleMail(){
        MimeMessage message = null;
        try {
            message = javaMailSender.createMimeMessage();
            MimeMessageHelper helper = new MimeMessageHelper(message, true);
            helper.setFrom("450255266@qq.com");
            helper.setTo("450255266@qq.com");
            helper.setSubject("标题:发送Html内容");

            StringBuffer context = new StringBuffer();
            context.append("<p style='color:red'>");
            context.append("Hello SpringBoot Email Start SimpleWu!!");
            context.append("</p>");
            helper.setText(context.toString(),true);//设置true发送html邮件

            //带附件
            //FileSystemResource fileSystemResource=new FileSystemResource(new File("D:\2019-05-07.pdf"));
            //helper.addAttachment("邮箱附件",fileSystemResource);
            javaMailSender.send(message);
        } catch (MessagingException e) {
            e.printStackTrace();
        }
    }
}
注:最好使用异步接口发送邮件,并且发送邮件的服务器为单独部署。
Spring Boot常用的maven依赖
 <!--继承springboot父项目,依赖会自动匹配版本号-->
    <parent>
        <groupId>org.springframework.boot</groupId>
        <artifactId>spring-boot-starter-parent</artifactId>
        <version>1.5.7.RELEASE</version>
    </parent>

    <dependencies>

        <!--引入springboot的web支持,帮你封装好了很多个依赖-->
        <dependency>
            <groupId>org.springframework.boot</groupId>
            <artifactId>spring-boot-starter-web</artifactId>
        </dependency>

        <!--springboot中集成jsp,下面三个 注意scope属性影响打war包-->
        <dependency>
            <groupId>jstl</groupId>
            <artifactId>jstl</artifactId>
            <version>1.2</version>
        </dependency>
        <dependency>
            <groupId>org.springframework.boot</groupId>
            <artifactId>spring-boot-starter-tomcat</artifactId>
            <scope>provided</scope>
        </dependency>
        <dependency>
            <groupId>org.apache.tomcat.embed</groupId>
            <artifactId>tomcat-embed-jasper</artifactId>
            <scope>provided</scope>
        </dependency>

        <!--springboot整合mybatis,阿里的数据源,mysql或者Oracle-->
        <dependency>
            <groupId>org.mybatis.spring.boot</groupId>
            <artifactId>mybatis-spring-boot-starter</artifactId>
            <version>1.3.1</version>
        </dependency>
        <dependency>
            <groupId>com.alibaba</groupId>
            <artifactId>druid</artifactId>
            <version>1.1.12</version>
        </dependency>
        <dependency>
            <groupId>com.oracle</groupId>
            <artifactId>ojdbc6</artifactId>
            <version>6.0</version>
        </dependency>
        <!--<dependency>
            <groupId>mysql</groupId>
            <artifactId>mysql-connector-java</artifactId>
        </dependency>-->

        <!-- fastjson格式转换 -->
        <dependency>
            <groupId>com.alibaba</groupId>
            <artifactId>fastjson</artifactId>
            <version>1.2.15</version>
        </dependency>

        <!--引入springboot测试依赖-->
        <dependency>
            <groupId>org.springframework.boot</groupId>
            <artifactId>spring-boot-starter-test</artifactId>
            <scope>test</scope>
        </dependency>

        <!--引入lombok-->
        <dependency>
            <groupId>org.projectlombok</groupId>
            <artifactId>lombok</artifactId>
            <version>1.18.8</version>
            <scope>provided</scope>
        </dependency>

        <!--引入devtools全局热部署,谨慎使用,和redis反序列化有缓存冲突,反序列化时报错-->
        <dependency>
            <groupId>org.springframework.boot</groupId>
            <artifactId>spring-boot-devtools</artifactId>
            <optional>true</optional>
        </dependency>

        <!--引入jedis-->
        <dependency>
            <groupId>redis.clients</groupId>
            <artifactId>jedis</artifactId>
            <version>2.9.0</version>
        </dependency>
        <!-- 引入一个工具包 -->
        <dependency>
            <groupId>org.apache.commons</groupId>
            <artifactId>commons-lang3</artifactId>
            <version>3.4</version>
        </dependency>

    </dependencies>


    <build>
        <!--引入jsp运行插件-->
        <plugins>
            <plugin>
                <groupId>org.springframework.boot</groupId>
                <artifactId>spring-boot-maven-plugin</artifactId>
                <configuration>
                    <fork>true</fork>
                    <!-- spring-boot:run 中文乱码解决 -->
                    <jvmArguments>-Dfile.encoding=UTF-8</jvmArguments>
                    <!--指定入口类,打包的时候用-->
                    <mainClass>com.baizhi.Application</mainClass>
                </configuration>
            </plugin>
        </plugins>
    </build>


【推荐】国内首个AI IDE,深度理解中文开发场景,立即下载体验Trae
【推荐】编程新体验,更懂你的AI,立即体验豆包MarsCode编程助手
【推荐】抖音旗下AI助手豆包,你的智能百科全书,全免费不限次数
【推荐】轻量又高性能的 SSH 工具 IShell:AI 加持,快人一步