
spring-AOP实现原理(二)
参考:
https://www.cnblogs.com/pypua/p/11351772.html
https://blog.csdn.net/yhl_jxy/article/details/80633194
https://www.cnblogs.com/liuling/archive/2013/05/25/asm.html
CGLIB动态代理实现原理
一 CGLIB介绍
CGLIB(Code Generation Library)是一个开源项目!是一个强大的,高性能,高质量的Code生成类库,
它可以在运行期扩展Java类与实现Java接口。Hibernate用它来实现PO(Persistent Object 持久化对象)字节码的动态生成。
CGLIB是一个强大的高性能的代码生成包。它广泛的被许多AOP的框架使用,例如Spring AOP为他们提供方法的interception(拦截)。CGLIB包的底层是通过使用一个小而快的字节码处理框架ASM,来转换字节码并生成新的类。
除了CGLIB包,脚本语言例如Groovy和BeanShell,也是使用ASM来生成java的字节码。当然不鼓励直接使用ASM,
因为它要求你必须对JVM内部结构包括class文件的格式和指令集都很熟悉。
二 CGLIB动态代理实例
使用JDK创建动态代理有一个限制, 即它只能为接口创建代理实例. 对于没有定义接口的业务方法的类, 使用CGlib 进行动态代理.
CGLib是一个强大的, 高性能的代码生成库. 被广泛应用于 AOP 框架. 用以提供方法拦截操作.
CGLib采用底层的字节码技术, 可以为一个类创建子类, 在子类中采用方法拦截的技术拦截所有父类方法的调用, 并织入横切逻辑.
实现一个业务类,注意,这个业务类并没有实现任何接口:

package com.lanhuigu.spring.proxy.cglib;

public class HelloService {

    public HelloService() {
        System.out.println("HelloService构造");
    }

    /**
     * 该方法不能被子类覆盖,Cglib是无法代理final修饰的方法的
     */
    final public String sayOthers(String name) {
        System.out.println("HelloService:sayOthers>>"+name);
        return null;
    }

    public void sayHello() {
        System.out.println("HelloService:sayHello");
    }
}
自定义MethodInterceptor:
package com.proxy.cglib;

import java.lang.reflect.Method;

import net.sf.cglib.proxy.Enhancer;
import net.sf.cglib.proxy.MethodInterceptor;
import net.sf.cglib.proxy.MethodProxy;

/**
 * @author pypua
 * @date 2019年8月14日 上午10:57:56
 *
 */
public class MyMethodInterceptor implements MethodInterceptor{


    //疑问?
        //好像并没有持有被代理对象的引用
        public Object getInstance(Class clazz) throws Exception{

            Enhancer enhancer = new Enhancer();
            //把父类设置为谁?
            //这一步就是告诉cglib,生成的子类需要继承哪个类
            enhancer.setSuperclass(clazz);
            //设置回调
            enhancer.setCallback(this);

            //第一步、生成源代码
            //第二步、编译成class文件
            //第三步、加载到JVM中,并返回被代理对象
            return enhancer.create();
        }
         /**
         * sub:cglib生成的代理对象
         * method:被代理对象方法
         * objects:方法入参
         * methodProxy: 代理方法
         */
        @Override
        public Object intercept(Object sub, Method method, Object[] objects, MethodProxy methodProxy) throws Throwable {
            System.out.println("======插入前置通知======");
            Object object = methodProxy.invokeSuper(sub, objects);
            System.out.println("======插入后者通知======");
            return object;
        }

}
生成CGLIB代理对象调用目标方法:
package com.lanhuigu.spring.proxy.cglib;
package com.proxy.cglib;


/**
 * @author pypua
 * @date 2019年8月14日 上午11:02:51
 *
 */
public class Client {

    public static void main(String[] args) {
            //JDK的动态代理是通过接口来进行强制转换的
            //生成以后的代理对象,可以强制转换为接口

            //CGLib的动态代理是通过生成一个被代理对象的子类,然后重写父类的方法
            //生成以后的对象,可以强制转换为被代理对象(也就是用自己写的类)
            //子类引用赋值给父类
    try {
        HelloService obj = (HelloService)new MyMethodInterceptor().getInstance(HelloService.class);
        obj.sayHello();
        obj.sayOthers("sfsdfsd");
    } catch (Exception e) {
        e.printStackTrace();
    }
}
}
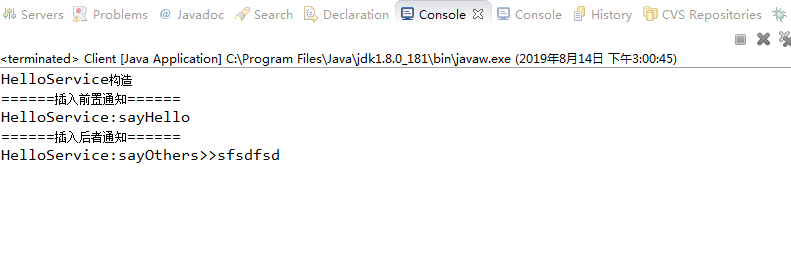
运行结果:
三 CGLIB动态代理源码分析
实现CGLIB动态代理必须实现MethodInterceptor(方法拦截器)接口,源码如下:
/*
 * Copyright 2002,2003 The Apache Software Foundation
 *
 *  Licensed under the Apache License, Version 2.0 (the "License");
 * you may not use this file except in compliance with the License.
 * You may obtain a copy of the License at
 *
 *      http://www.apache.org/licenses/LICENSE-2.0
 *
 *  Unless required by applicable law or agreed to in writing, software
 * distributed under the License is distributed on an "AS IS" BASIS,
 * WITHOUT WARRANTIES OR CONDITIONS OF ANY KIND, either express or implied.
 * See the License for the specific language governing permissions and
 * limitations under the License.
 */
package net.sf.cglib.proxy;

/**
 * General-purpose {@link Enhancer} callback which provides for "around advice".
 * @author Juozas Baliuka <a href="mailto:baliuka@mwm.lt">baliuka@mwm.lt</a>
 * @version $Id: MethodInterceptor.java,v 1.8 2004/06/24 21:15:20 herbyderby Exp $
 */
public interface MethodInterceptor
extends Callback
{
    /**
     * All generated proxied methods call this method instead of the original method.
     * The original method may either be invoked by normal reflection using the Method object,
     * or by using the MethodProxy (faster).
     * @param obj "this", the enhanced object
     * @param method intercepted Method
     * @param args argument array; primitive types are wrapped
     * @param proxy used to invoke super (non-intercepted method); may be called
     * as many times as needed
     * @throws Throwable any exception may be thrown; if so, super method will not be invoked
     * @return any value compatible with the signature of the proxied method. Method returning void will ignore this value.
     * @see MethodProxy
     */
    public Object intercept(Object obj, java.lang.reflect.Method method, Object[] args,
                               MethodProxy proxy) throws Throwable;

}
这个接口只有一个intercept()方法,这个方法有4个参数:
1)obj表示增强的对象,即实现这个接口类的一个对象;
2)method表示要被拦截的方法;
3)args表示要被拦截方法的参数;
4)proxy表示要触发父类的方法对象;
在上面的Client代码中,通过Enhancer.create()方法创建代理对象,create()方法的源码:
/**
     * Generate a new class if necessary and uses the specified
     * callbacks (if any) to create a new object instance.
     * Uses the no-arg constructor of the superclass.
     * @return a new instance
     */
    public Object create() {
        classOnly = false;
        argumentTypes = null;
        return createHelper();
    }
该方法含义就是如果有必要就创建一个新类,并且用指定的回调对象创建一个新的对象实例,使用的父类的参数的构造方法来实例化父类的部分。核心内容在createHelper()中,源码如下:
private Object createHelper() {
        preValidate();
        Object key = KEY_FACTORY.newInstance((superclass != null) ? superclass.getName() : null,
                ReflectUtils.getNames(interfaces),
                filter == ALL_ZERO ? null : new WeakCacheKey<CallbackFilter>(filter),
                callbackTypes,
                useFactory,
                interceptDuringConstruction,
                serialVersionUID);
        this.currentKey = key;
        Object result = super.create(key);
        return result;
    }
preValidate()方法校验callbackTypes、filter是否为空,以及为空时的处理。
通过newInstance()方法创建EnhancerKey对象,作为Enhancer父类AbstractClassGenerator.create()方法
创建代理对象的参数。
protected Object create(Object key) {
        try {
            ClassLoader loader = getClassLoader();
            Map<ClassLoader, ClassLoaderData> cache = CACHE;
            ClassLoaderData data = cache.get(loader);
            if (data == null) {
                synchronized (AbstractClassGenerator.class) {
                    cache = CACHE;
                    data = cache.get(loader);
                    if (data == null) {
                        Map<ClassLoader, ClassLoaderData> newCache = new WeakHashMap<ClassLoader, ClassLoaderData>(cache);
                        data = new ClassLoaderData(loader);
                        newCache.put(loader, data);
                        CACHE = newCache;
                    }
                }
            }
            this.key = key;
            Object obj = data.get(this, getUseCache());
            if (obj instanceof Class) {
                return firstInstance((Class) obj);
            }
            return nextInstance(obj);
        } catch (RuntimeException e) {
            throw e;
        } catch (Error e) {
            throw e;
        } catch (Exception e) {
            throw new CodeGenerationException(e);
        }
    }
真正创建代理对象方法在nextInstance()方法中,该方法为抽象类AbstractClassGenerator的一个方法,签名如下:
abstract protected Object nextInstance(Object instance) throws Exception;
在子类Enhancer中实现,实现源码如下:
protected Object nextInstance(Object instance) {
        EnhancerFactoryData data = (EnhancerFactoryData) instance;

        if (classOnly) {
            return data.generatedClass;
        }

        Class[] argumentTypes = this.argumentTypes;
        Object[] arguments = this.arguments;
        if (argumentTypes == null) {
            argumentTypes = Constants.EMPTY_CLASS_ARRAY;
            arguments = null;
        }
        return data.newInstance(argumentTypes, arguments, callbacks);
    }
看看data.newInstance(argumentTypes, arguments, callbacks)方法,
第一个参数为代理对象的构成器类型,第二个为代理对象构造方法参数,第三个为对应回调对象。
最后根据这些参数,通过反射生成代理对象,源码如下:
/**
         * Creates proxy instance for given argument types, and assigns the callbacks.
         * Ideally, for each proxy class, just one set of argument types should be used,
         * otherwise it would have to spend time on constructor lookup.
         * Technically, it is a re-implementation of {@link Enhancer#createUsingReflection(Class)},
         * with "cache {@link #setThreadCallbacks} and {@link #primaryConstructor}"
         *
         * @see #createUsingReflection(Class)
         * @param argumentTypes constructor argument types
         * @param arguments constructor arguments
         * @param callbacks callbacks to set for the new instance
         * @return newly created proxy
         */
        public Object newInstance(Class[] argumentTypes, Object[] arguments, Callback[] callbacks) {
            setThreadCallbacks(callbacks);
            try {
                // Explicit reference equality is added here just in case Arrays.equals does not have one
                if (primaryConstructorArgTypes == argumentTypes ||
                        Arrays.equals(primaryConstructorArgTypes, argumentTypes)) {
                    // If we have relevant Constructor instance at hand, just call it
                    // This skips "get constructors" machinery
                    return ReflectUtils.newInstance(primaryConstructor, arguments);
                }
                // Take a slow path if observing unexpected argument types
                return ReflectUtils.newInstance(generatedClass, argumentTypes, arguments);
            } finally {
                // clear thread callbacks to allow them to be gc'd
                setThreadCallbacks(null);
            }

        }
最后生成代理对象:
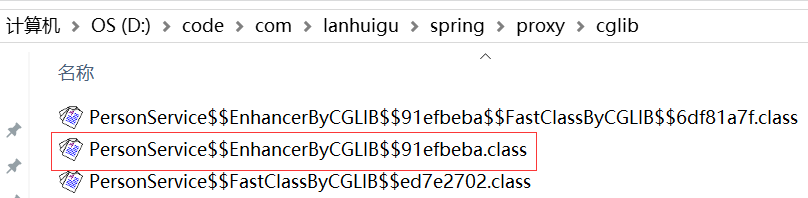
将其反编译后代码如下:
package com.lanhuigu.spring.proxy.cglib;

import java.lang.reflect.Method;
import net.sf.cglib.core.ReflectUtils;
import net.sf.cglib.core.Signature;
import net.sf.cglib.proxy.*;

public class HelloService$$EnhancerByCGLIB$$4da4ebaf extends HelloService
    implements Factory
{

    private boolean CGLIB$BOUND;
    public static Object CGLIB$FACTORY_DATA;
    private static final ThreadLocal CGLIB$THREAD_CALLBACKS;
    private static final Callback CGLIB$STATIC_CALLBACKS[];
    private MethodInterceptor CGLIB$CALLBACK_0; // 拦截器
    private static Object CGLIB$CALLBACK_FILTER;
    private static final Method CGLIB$sayHello$0$Method; // 被代理方法
    private static final MethodProxy CGLIB$sayHello$0$Proxy; // 代理方法
    private static final Object CGLIB$emptyArgs[];
    private static final Method CGLIB$equals$1$Method;
    private static final MethodProxy CGLIB$equals$1$Proxy;
    private static final Method CGLIB$toString$2$Method;
    private static final MethodProxy CGLIB$toString$2$Proxy;
    private static final Method CGLIB$hashCode$3$Method;
    private static final MethodProxy CGLIB$hashCode$3$Proxy;
    private static final Method CGLIB$clone$4$Method;
    private static final MethodProxy CGLIB$clone$4$Proxy;

    static void CGLIB$STATICHOOK1()
    {
        Method amethod[];
        Method amethod1[];
        CGLIB$THREAD_CALLBACKS = new ThreadLocal();
        CGLIB$emptyArgs = new Object[0];
        // 代理类
        Class class1 = Class.forName("com.lanhuigu.spring.proxy.cglib.HelloService$$EnhancerByCGLIB$$4da4ebaf");
        // 被代理类
        Class class2;
        amethod = ReflectUtils.findMethods(new String[] {
            "equals", "(Ljava/lang/Object;)Z", "toString", "()Ljava/lang/String;", "hashCode", "()I", "clone", "()Ljava/lang/Object;"
        }, (class2 = Class.forName("java.lang.Object")).getDeclaredMethods());
        Method[]  = amethod;
        CGLIB$equals$1$Method = amethod[0];
        CGLIB$equals$1$Proxy = MethodProxy.create(class2, class1, "(Ljava/lang/Object;)Z", "equals", "CGLIB$equals$1");
        CGLIB$toString$2$Method = amethod[1];
        CGLIB$toString$2$Proxy = MethodProxy.create(class2, class1, "()Ljava/lang/String;", "toString", "CGLIB$toString$2");
        CGLIB$hashCode$3$Method = amethod[2];
        CGLIB$hashCode$3$Proxy = MethodProxy.create(class2, class1, "()I", "hashCode", "CGLIB$hashCode$3");
        CGLIB$clone$4$Method = amethod[3];
        CGLIB$clone$4$Proxy = MethodProxy.create(class2, class1, "()Ljava/lang/Object;", "clone", "CGLIB$clone$4");
        amethod1 = ReflectUtils.findMethods(new String[] {
            "sayHello", "()V"
        }, (class2 = Class.forName("com.lanhuigu.spring.proxy.cglib.HelloService")).getDeclaredMethods());
        Method[] 1 = amethod1;
        CGLIB$sayHello$0$Method = amethod1[0];
        CGLIB$sayHello$0$Proxy = MethodProxy.create(class2, class1, "()V", "sayHello", "CGLIB$sayHello$0");
    }

    final void CGLIB$sayHello$0()
    {
        super.sayHello();
    }

    public final void sayHello()
    {
      MethodInterceptor var10000 = this.CGLIB$CALLBACK_0;
      if(this.CGLIB$CALLBACK_0 == null) {
         CGLIB$BIND_CALLBACKS(this);
         var10000 = this.CGLIB$CALLBACK_0;
      }

      if(var10000 != null) {
         // 调用拦截器
         var10000.intercept(this, CGLIB$setPerson$0$Method, CGLIB$emptyArgs, CGLIB$setPerson$0$Proxy);
      } else {
         super.sayHello();
      }
    }
    ......
    ......
}
从代理对象反编译源码可以知道,代理对象继承于HelloService,拦截器调用intercept()方法,intercept()方法由自定义MyMethodInterceptor实现,所以,最后调用MyMethodInterceptor中的intercept()方法,从而完成了由代理对象访问到目标对象的动态代理实现。
JDK动态代理和 CGLib 动态代理的特点:
JDK动态代理:
(1)代理类继承 Proxy 类, 并且实现委托类接口, 主要通过代理类调用 InvocationHandler 实现类的重写方法 invoke() 来实现动态代理.
(2)只能对接口进行代理. (只能对实现接口的委托类进行代理)
(3)底层使用反射机制进行方法调用.
CGLib动态代理:
(1)代理类继承了委托类, 在代理方法中, 会判断是否存在实现了 MethodInterceptor 接口的对象, 若存在则调用对象的 invoke() 方法, 对委托方法进行代理.
(2)不能对 final 类以及 final , private方法进行代理.
(3)底层将方法全部放入一个数组中, 通过索引直接进行方法调用.
AOP(这里的AOP指的是面向切面编程思想,而不是Spring AOP)主要的的实现技术主要有Spring AOP和AspectJ。
1、AspectJ的底层技术。
AspectJ的底层技术是静态代理,即用一种AspectJ支持的特定语言编写切面,通过一个命令来编译,生成一个新的代理类,该代理类增强了业务类,这是在编译时增强,相对于下面说的运行时增强,编译时增强的性能更好。
2、Spring AOP
Spring AOP采用的是动态代理,在运行期间对业务方法进行增强,所以不会生成新类,对于动态代理技术,Spring AOP提供了对JDK动态代理的支持以及CGLib的支持。
JDK动态代理只能为接口创建动态代理实例,而不能对类创建动态代理。需要获得被目标类的接口信息(应用Java的反射技术),生成一个实现了代理接口的动态代理类(字节码),再通过反射机制获得动态代理类的构造函数,利用构造函数生成动态代理类的实例对象,在调用具体方法前调用invokeHandler方法来处理。
CGLib动态代理需要依赖asm包,把被代理对象类的class文件加载进来,修改其字节码生成子类。
但是Spring AOP基于注解配置的情况下,需要依赖于AspectJ包的标准注解,但是不需要额外的编译以及AspectJ的织入器,而基于XML配置不需要。
java字节码框架ASM的学习
一、什么是ASM
ASM是一个java字节码操纵框架,它能被用来动态生成类或者增强既有类的功能。ASM 可以直接产生二进制 class 文件,也可以在类被加载入 Java 虚拟机之前动态改变类行为。Java class 被存储在严格格式定义的 .class文件里,这些类文件拥有足够的元数据来解析类中的所有元素:类名称、方法、属性以及 Java 字节码(指令)。ASM从类文件中读入信息后,能够改变类行为,分析类信息,甚至能够根据用户要求生成新类。
使用ASM框架需要导入asm的jar包,下载链接:asm-3.2.jar。
二、如何使用ASM
ASM框架中的核心类有以下几个:
① ClassReader:该类用来解析编译过的class字节码文件。
② ClassWriter:该类用来重新构建编译后的类,比如说修改类名、属性以及方法,甚至可以生成新的类的字节码文件。
③ ClassAdapter:该类也实现了ClassVisitor接口,它将对它的方法调用委托给另一个ClassVisitor对象。
示例1.通过asm生成类的字节码
 1 package com.asm3;
 2
 3 import java.io.File;
 4 import java.io.FileNotFoundException;
 5 import java.io.FileOutputStream;
 6 import java.io.IOException;
 7
 8 import org.objectweb.asm.ClassWriter;
 9 import org.objectweb.asm.Opcodes;
10
11 /**
12  * 通过asm生成类的字节码
13  * @author Administrator
14  *
15  */
16 public class GeneratorClass {
17
18     public static void main(String[] args) throws IOException {
19         //生成一个类只需要ClassWriter组件即可
20         ClassWriter cw = new ClassWriter(0);
21         //通过visit方法确定类的头部信息
22         cw.visit(Opcodes.V1_5, Opcodes.ACC_PUBLIC+Opcodes.ACC_ABSTRACT+Opcodes.ACC_INTERFACE,
23                 "com/asm3/Comparable", null, "java/lang/Object", new String[]{"com/asm3/Mesurable"});
24         //定义类的属性
25         cw.visitField(Opcodes.ACC_PUBLIC+Opcodes.ACC_FINAL+Opcodes.ACC_STATIC,
26                 "LESS", "I", null, new Integer(-1)).visitEnd();
27         cw.visitField(Opcodes.ACC_PUBLIC+Opcodes.ACC_FINAL+Opcodes.ACC_STATIC,
28                 "EQUAL", "I", null, new Integer(0)).visitEnd();
29         cw.visitField(Opcodes.ACC_PUBLIC+Opcodes.ACC_FINAL+Opcodes.ACC_STATIC,
30                 "GREATER", "I", null, new Integer(1)).visitEnd();
31         //定义类的方法
32         cw.visitMethod(Opcodes.ACC_PUBLIC+Opcodes.ACC_ABSTRACT, "compareTo",
33                 "(Ljava/lang/Object;)I", null, null).visitEnd();
34         cw.visitEnd(); //使cw类已经完成
35         //将cw转换成字节数组写到文件里面去
36         byte[] data = cw.toByteArray();
37         File file = new File("D://Comparable.class");
38         FileOutputStream fout = new FileOutputStream(file);
39         fout.write(data);
40         fout.close();
41     }
42 }
生成一个类的字节码文件只需要用到ClassWriter类即可,生成Comparable.class后用javap指令对其进行反编译:javap -c Comparable.class >test.txt ,编译后的结果如下:
1 public interface com.asm3.Comparable extends com.asm3.Mesurable {
2   public static final int LESS;
3
4   public static final int EQUAL;
5
6   public static final int GREATER;
7
8   public abstract int compareTo(java.lang.Object);
9 }
注:一个编译后的java类不包含package和import段,因此在class文件中所有的类型都使用的是全路径。

 浙公网安备 33010602011771号