

28线程
进程:计算机执行的任务
线程:执行任务中的小任务 多线程
计算机再执行过程中,再同一时间只能让cpu的一个核执行一个进程。进程有多个线程构成,再同一时刻Cpu只能处理一个线程。
引入多线程
当线程被cpu执行时cpu开始工作,线程需要和软硬件进行交互,这个时候cpu就是处于空闲状态
引用多线程可以提高cpu的使用效率

创建多线程的方式-----(Thead)
1.继承Thread类,重写run方法(线程代码逻辑所在的地方,调用start方法,开启线程. 有一个不好的地方就是java是单继承所以我们继承了Thread后就不能继承其他类
,所以我们通常采用第二种方法 实现接口
public class ThreadDemo {

    public static void main(String[] args) {
        //线程执行---执行线程逻辑所在的类
        Demo d=new Demo();
        //标记线程可以被cpu执行
        d.start();
        for(int i=0;i<10;i++)
        {
            System.out.println("main:"+i);
        }
    }

}
//线程任务的执行的代码逻辑
class Demo extends Thread{
    //重写方法----实现线程的代码逻辑
    @Override
    public void run() {
        for(int i=0;i<10;i++)
        {
            System.out.println("i"+i);
        }
    }
}
2.实现Runnable接口,重写run方法(线程代码逻辑),通过Runnable接口的实现类对象构建Thread类对象,调用start方法开启线程
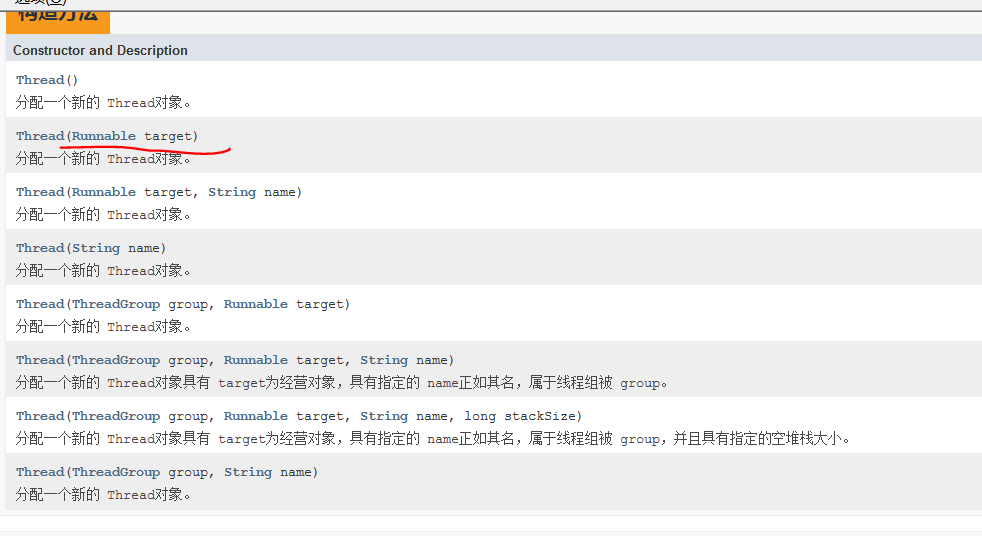
public class ThreadDemo2 {

    public static void main(String[] args) {
        //通过Runnable实现类对象构建Thread类对象
        Thread t=new Thread(new TDemo() );
        //开启线程
        t.start();
        for(int i=0;i<10;i++)
        {
            System.out.println("main:"+i);
        }

    }

}
//线程代码逻辑所在类,实现Runnable接口
class TDemo implements Runnable{
    //重写方法 --线程代码逻辑
    @Override
    public void run() {
        for(int i=0;i<10;i++)
        {
            System.out.println("i"+i);
        }

    }
}

3.实现Callable接口,重写call方法(现阶段了解就好)
import java.util.concurrent.Callable;
import java.util.concurrent.ExecutionException;
import java.util.concurrent.Executor;
import java.util.concurrent.ExecutorService;
import java.util.concurrent.Executors;
import java.util.concurrent.Future;

public class ThreadDemo3 {
public static void main(String[] args) throws InterruptedException, ExecutionException {
    //创建线程类对象
    DTDemo1 dt=new DTDemo1();
    //获取执行服务器,
    ExecutorService e=Executors.newCachedThreadPool();
    //把你想要操作的东西放到执行服务器上
    Future<Integer> f =e.submit(dt);
    System.out.println(f.get());
}
}
//Integer 重写方法返回值类型
class DTDemo1 implements Callable<Integer>{
    //重写方法----线程代码逻辑所在的地方
    @Override
    public Integer call() throws Exception {
        // TODO Auto-generated method stub
        return 20;
    }

}
因为底层多线程之间存在抢占问题,抢占发生再代码的每一步,导致了数据安全问题
为了排除我们多线程的抢占问题我们采用加锁的策略,有两种 1.同步代码块锁,同步方法锁
同步代码块锁--synchtonized(锁对象){} ----锁对象指的是 可以被线程共享--方法区里的内容可以被所有线程共享(对多少个线程对象进行加锁,这些对象都是同步的)
同步方法锁--在方法上加上synchronized,如果这个方法是静态方法锁对象就是类名.class,如果这个方法是非静态方法锁对象就是this,构造器和属性上不能夹synchronized
同步:多个线程每次只能执行一个(一个一个)
异步:多个线程每次可以执行多个(抢占)
同步一定是安全的
安全的不一定是同步
不安全一定是异步
异步不一定不安全
从微观上同步一定是安全的,异步一定是不安全的

public class SellTicketDemo {
    public static void main(String[] args) {
        //创建票类对象
        Ticket t=new Ticket();
        //设置票数
        t.setCount(100);
        //四个售票员
        Seller s1=new Seller(t);
        Seller s2=new Seller(t);
        Seller s3=new Seller(t);
        Seller s4=new Seller(t);
        //开启线程  并给每个线程
        new Thread(s1,"A").start();
        new Thread(s2,"B").start();
        new Thread(s3,"C").start();
        new Thread(s4,"D").start();
    }
}
//模拟卖票的过程---线程的代码逻辑
class Seller implements Runnable{
    //引入票类
    Ticket t;
    //有参构造
    public  Seller(Ticket t) {
        this.t=t;
    }
    //线程的代码逻辑---买票的过程
    //同步方法锁是直接加在方法上 同步方法锁如果是非静态方法那么他的锁对象是this
    //如果是静态方法的话,那么锁对象就是类名.class
    @Override
    public synchronized void run() {
        while(true)
        {
            //同步代码块锁---()中的是锁对象 ----被线程共享,只要是能被所有对象共享的就可以,锁对象必须被所有被执行的线程共享 方法区中的就可以因为方法区(是被所有的线程共享的)但是范围太大了,能小的锁就小得锁
            synchronized (Seller.class)
            {
                if(t.getCount()<=0) //票买完的时候就是票数为0
                {
                    break;
                }
                //设置新的票数
                t.setCount(t.getCount()-1);
                //打印出具体是那个售票员卖的----具体是那个线程执行的
                //Thread.currentThread()当前正在执行的线程
                System.out.println(Thread.currentThread().getName()+"买了一张票,还剩"+t.getCount()+"票");

            }


        }

    }

}

//表示票类
class Ticket{
    //属性
    //票数
    private int count;

    public int getCount() {
        return count;
    }

    public void setCount(int count) {
        this.count = count;
    }

}
锁之间的相互嵌套----死锁
public class DeadLoackDemo {
    //
    static Print p=new Print();
    static Scan s=new Scan();
    public static void main(String[] args) {
        //开启线程
        new Thread(new Runnable() {

            @Override
            public void run() {
                // TODO Auto-generated method stub
                //打印信息
                synchronized (p) {
                    p.print();
                    //让线程进行休眠---线程释放执行权
                    try {
                        Thread.sleep(20);
                    } catch (InterruptedException e) {
                        // TODO Auto-generated catch block
                        e.printStackTrace();
                    }
                    //扫描
                    synchronized (s) {
                        s.sacnn();
                    }

                }
            }
        }).start();
        new Thread(new Runnable() {

            @Override
            public void run() {
                // TODO Auto-generated method stub
                //先扫描
                synchronized (s) {
                    s.sacnn();

                    synchronized (p) {
                        p.print();
                    }
                }
            }
        }).start();
    }
}


//打印机
class Print{
    public void print(){
        System.out.println("在打印东西...");
    }
}

//扫描仪
class Scan{
    public void sacnn(){
        System.out.println("在扫描信息...");
    }
}
如果破解死锁:上面的死锁出现的问题是两个线程需要同一个锁,如果一个走一个等待那么就不会产生死锁现象,所以我们需要控制锁一个锁走完再让另一个线程获取这个锁
package cn.tedu.thread;


public class WaitNotifyDemo {
    public static void main(String[] args) {
        //创建学生类对象
        Student s=new Student();
        s.setName("lili");
        s.setGender('女');
        //开启线程
        new Thread(new Ask(s)).start();
        new Thread(new Change(s)).start();
    }
}


//线程所在的类---问问题
class Ask implements Runnable{
    // 引入学生类对象
    private Student s;

    public Ask(Student s){
            this.s=s;
        }

    @Override
    public void run() {
        // TODO Auto-generated method stub
        //表示问问题的结果
        while(true){
            synchronized (s) { //防止多线程抢占,保证性别
                //释放线程执行权---等待
                if(s.flag==false)
                try {
                    //让线程等待----相当于堵塞主要是为了挨个回答问题
                    s.wait();
                } catch (InterruptedException e) {
                    // TODO Auto-generated catch block
                    e.printStackTrace();
                }
                //输出
                System.out.println
                ("老师你好,我是"+s.getName()
                +",是一个"+s.getGender()+
                "生,想问问题...");
                //唤醒线程
                s.notify();
                //改变布尔值
                s.flag=false;

            }

        }
    }

}


//线程所在的类---换学生
class Change implements Runnable{
    //引入学生类对象
    private Student s;
    public Change(Student s){
        this.s=s;
    }
    @Override
    public void run() {
        // TODO Auto-generated method stub
        while(true){
            synchronized (s) { //防止多线程的抢占---保证性别
                //线程等待
                if(s.flag==true)
                try {
                    s.wait();
                } catch (InterruptedException e) {
                    // TODO Auto-generated catch block
                    e.printStackTrace();
                }
                //
                if (s.getName().equals("tom")) {
                    s.setName("lili");
                    s.setGender('女');
                } else {
                    s.setName("tom");
                    s.setGender('男');
                }
                //线程唤醒
                s.notify(); //唤醒阻塞的线程,CPU可以将阻塞的线程抢执行权了。
                //改变布尔值
                s.flag=true;
            }

        }
    }}


//学生类
class Student{
    //属性
    private String name;
    private char gender;
    //
    boolean flag=true;
    public char getGender() {
        return gender;
    }

    public void setGender(char gender) {
        this.gender = gender;
    }

    public String getName() {
        return name;
    }

    public void setName(String name) {
        this.name = name;
    }

}
wait、notify、notifyAll是线程中通信可以使用的方法。线程中调用了wait方法,则进入阻塞状态,只有等另一个线程调用与wait同一个对象的notify方法。这里有个特殊的地方,调用wait或者notify,前提是需要获取锁,也就是说,需要在同步块中做以上操作。
等待唤醒的前提唤醒一个 是得有锁
notify()随机唤醒 肯定给你唤醒一个 作用 唤醒阻塞的线程,CPU可以将阻塞的线程抢执行权了。两个对象的话就是一个线程执行一次,因为只有一种情况,一个线程再执行,另一个再阻塞
wait和sleep的区别
sleep--用于是线程进入休眠状态(需要制定休眠的时间,到了这个时间才会唤醒),在其s0leep时间段内,该线程不会获得执行的机会,即使系统种没有其他可以运行的线程如果线程没有加锁,就会释放线程的执行权,如果加锁就不会释放执行权,但是会有CPU的切换 ,可以指定休眠时间 这是Thread的静态方法
wait---如果指定等待时间,就必须等到时间结束才能唤醒,如果不指定时间就只能手动唤醒,如果线程加锁就会释放锁也能释放执行权,如果没有加锁就释放执行权,是Object里的普通方法
线程状态:
当线程被创建并启动以后,它既不是以启动就进入了执行状态,也不是一致处于执行状态,在线程的生命周期中,他要径路新建,就绪,运行,阻塞和死亡5种状态。 尤其是线程启动以后,它不能一直“霸占”
着CPU独自运行,所以CPU需要在多条线程之间切换,于是线程状态也会多次在运行、阻塞之间切换
1.新建:当程序使用new关键字创建了一个线程之后,该线程就处于新建状态,此时它和其他java对象一样,仅仅有java虚拟机为其分配了内存,并初始化了其成员变量的值。此时的线程对象没有表现出任何线程的动态特征,程序也不会执行线程的线程执行体。
2.就绪状态:当线程对象调用了start()方法之后,该线程处于就绪状态,java虚拟机会为其创建方法调用栈和程序计数器,处于这个状态下的线程并没有开始运行,它只是表示该线程可以运行了,至于该线程何时开始运行,取决于jvm里线程调度器的调度
不要对已经处于启动状态的线程再次调用start方法,否则将引发IllegalThreadStateException异常
如果程序希望调用子线程的start()方法后子线程立即开始执行,程序可以使用Thread.sleep(1)来让当前运行的线程(主线程)睡眠一毫秒---1毫秒就够了,因为在这1毫秒内CPU不会空闲,它就会去执行另一条就绪状态的线程,这样就可以让我们的子线程立即获得执行


守护线程
需要手动开启,如果被守护线程执行结束,守护线程也随着结束,反之不是 如果有多个线程,除了守护
线程,其他的都是被守护线程 ,java中最大的守护线程是GC
package cn.tedu.thread;

public class DemonDemo {

    public static void main(String[] args) {
        //创建出小兵对象
        Thread t1=new Thread(new Soilder(),"小兵1");
        Thread t2=new Thread(new Soilder(),"小兵2");
        Thread t3=new Thread(new Soilder(),"小兵3");
        Thread t4=new Thread(new Soilder(),"小兵4");
        //设置守护线程
        t1.setDaemon(true); //true代表手动开启守护线程
        t2.setDaemon(true);
        t3.setDaemon(true);
        t4.setDaemon(true);
        //开启线程
        t1.start();
        t2.start();
        t3.start();
        t4.start();
        //被守护线程
        for(int i=10;i>=0;i--){
            System.out.println("boss剩余"+i);
        }
    }

}


//线程类---小兵
class Soilder implements Runnable{

    @Override
    public void run() {
        // TODO Auto-generated method stub
        //输出每个小兵的剩余血量
        for(int i=10;i>=0;i--){
            System.out.println
            (Thread.currentThread().
                    getName()+"还剩"+i+"滴血...");
        }
        //线程走的太快就让慢点,方便自己查看结果
        try {
            Thread.sleep(10);
        } catch (InterruptedException e) {
            // TODO Auto-generated catch block
            e.printStackTrace();
        }
    }

}

前台线程死亡后,jvm会通知后台线程死亡,但从它接受命令,到它做出响应,需要一定时间,而且要将某个线程设置为后台线程,必须在该线程启动之前设置,也就是说setDaemon(true)必须在start()方法调用之前否则会引发IllegalThreadStateException


线程优先级:
优先级(1-10),理论上优先级越大越有机会抢到执行权,理论上如果线程1与线程2之间的优先级之差大于5,那么线程1强到执行权的机会比线程2大一点。就算你设置成10和1差距也不大,功能比较鸡肋
package cn.tedu.thread;

public class PririotyDemo {

    public static void main(String[] args) {
        Thread t1=new Thread(new PDemo(),"A");
        Thread t2=new Thread(new PDemo(),"B");
        //设置优先级
        t1.setPriority(1);
        t2.setPriority(9);
        //开启线程
        t1.start();
        t2.start();
    }

}


class PDemo implements Runnable{

    @Override
    public void run() {
        // TODO Auto-generated method stub
        for(int i=0;i<10;i++){
            System.out.println(Thread.currentThread().getName());
        }
    }
    //
}
生产者和消费者问题

//生产消费模型
public class WaitNotifyText {
    public static void main(String[] args) {
        //商品对象
        Product p=new Product();
        //开启线程
        new Thread(new Productor(p)).start();
        new Thread(new Productor(p)).start();
        new Thread(new Consumer(p)).start();
        new Thread(new Consumer(p)).start();

    }
}


//模拟生产过程---线程逻辑代码
class Productor implements Runnable{
    //引入商品类
    Product p;
    public Productor(Product p){
        this.p=p;
    }
    //重写
    @Override
    public void run() {
        while (true) {
            synchronized (p) {
                while(p.flag==true)//加上while保证线程一定会进行判断
                    try {
                        p.wait();
                    } catch (InterruptedException e) {
                        // TODO Auto-generated catch block
                        e.printStackTrace();
                    }
                // TODO Auto-generated method stub
                // 此时生产的最大值
                int max = 1000 - p.getNum();// 减去上次剩余
                // 随机生产的商品数量
                int count = (int) (Math.random() * (max + 1));
                // 设置新的商品数量
                p.setNum(p.getNum() + count);
                // 输出
                System.out.println("此次生产了" + count + "个商品,还剩余" + p.getNum() + "个商品...");
                //唤醒
                //p.notify();//随机唤醒一个
                p.notifyAll();
                p.flag=true;
            }

        }
    }

}


//模拟消费过程
class Consumer implements Runnable{
    // 引入商品类
    Product p;

    public Consumer(Product p){
            this.p=p;
        }
    @Override
    public void run() {
        // TODO Auto-generated method stub
        while (true) {
            synchronized (p) {
                while(p.flag==false)
                    try {
                        p.wait();
                    } catch (InterruptedException e) {
                        // TODO Auto-generated catch block
                        e.printStackTrace();
                    }
                // 此次消费最大值
                int max = p.getNum();
                // 此次消费的随机商品数量
                int count = (int) (Math.random() * (max + 1));
                // 设置新的商品数量
                p.setNum(p.getNum() - count);
                // 输出
                System.out.println("此次消费了" + count + "个商品,还剩余" + p.getNum() + "个商品...");
                //唤醒
                //p.notify();
                p.notifyAll();
                p.flag=false;
            }

        }
    }


}


//商品类
class Product{
    //商品数量
    private int num;
    //
    boolean flag=true;
    public int getNum() {
        return num;
    }

    public void setNum(int num) {
        this.num = num;
    }

}
