在Visual Studio 2010中创建多项目(解决方案)模板【二】
在Visual Studio 2010中创建多项目(解决方案)模板【二】
在上文中 我给大家介绍了多项目解决方案模板的创建,在文章的最后我们遇到了一个问题,就是$safeprojectname$这个模板参数(宏)所指代的意义在各 个项目中都不一样,而我们却希望它能够简单地指代用户所输入的项目名称。本文将从这个问题出发,讨论在Visual Studio 2010中是如何使用Template Wizard来设计复杂的多项目解决方案的。
Template Wizard的基本应用
创建Template Wizard项目
在CMSProjectTemplate解决方案下,新建一个C# Class Library,取名为CMSProjectTemplateWizard,在该项目上添加 Microsoft.VisualStudio.TemplateWizardInterface以及EnvDTE的引用(注意:此时需要将EnvDTE 的Embed Interop Types设置为False),然后新建一个名为RootWizardImpl的类,使其继承于 Microsoft.VisualStudio.TemplateWizard.IWizard接口,然后实现该接口中的方法。 RootWizardImpl类的代码如下:
|
1
2
3
4
5
6
7
8
9
10
11
12
13
14
15
16
17
18
19
20
21
22
23
24
25
26
27
28
29
30
31
32
|
public class RootWizardImpl : IWizard{ private string safeprojectname; private static Dictionary<string, string> globalParameters = new Dictionary<string, string>(); public static IEnumerable<KeyValuePair<string, string>> GlobalParameters { get { return globalParameters; } } #region IWizard Members public void BeforeOpeningFile(EnvDTE.ProjectItem projectItem) { } public void ProjectFinishedGenerating(EnvDTE.Project project) { } public void ProjectItemFinishedGenerating(EnvDTE.ProjectItem projectItem) { } public void RunFinished() { } public void RunStarted(object automationObject, Dictionary<string, string> replacementsDictionary, WizardRunKind runKind, object[] customParams) { safeprojectname = replacementsDictionary["$safeprojectname$"]; globalParameters["$safeprojectname$"] = safeprojectname; } public bool ShouldAddProjectItem(string filePath) { return true; } #endregion} |
在上面的代码中,我们仅实现了RunStarted方法,在这个方法中,我们首先通过replacementsDictionary将“根项目” (也就是对Visual Studio而言的那个单一项目)的$safeprojectname$的值取出,然后将其放到一个静态字典集合globalParameters中,这 个globalParameters会在后面子项目的TemplateWizard中使用,以替代子项目中$safeprojectname$的值。
顺便说一下RunStarted方法的几个参数:
- automationObject:DTE的自动化对象,它可以被转换成DTE接口的实例,以便在代码中操作Visual Studio IDE
- replacementsDictionary:包含了所有内嵌的和自定义的模板参数(宏),这些参数值会在项目完成创建时,替换掉项目各个文件中所出现的与之对应的参数(宏)
- WizardRunKind:指代Template Wizard的执行类型,比如是创建Item Template、Project Template还是Multiple-Project Template
- customParams:包含了来自vstemplate文件的自定义参数。在vstemplate文件中,可以在WizardData XML节点下设置这些自定义的值
现在,让我们继续在CMSProjectTemplateWizard项目中新建一个名为ChildWizardImpl的类,同样让其继承于Microsoft.VisualStudio.TemplateWizard.IWizard接口,具体代码如下:
|
1
2
3
4
5
6
7
8
9
10
11
12
13
14
15
16
17
18
19
20
21
22
23
24
|
public class ChildWizardImpl : IWizard{ #region IWizard Members public void BeforeOpeningFile(EnvDTE.ProjectItem projectItem) { } public void ProjectFinishedGenerating(EnvDTE.Project project) { } public void ProjectItemFinishedGenerating(EnvDTE.ProjectItem projectItem) { } public void RunFinished() { } public void RunStarted(object automationObject, Dictionary<string, string> replacementsDictionary, WizardRunKind runKind, object[] customParams) { string safeprojectname = RootWizardImpl.GlobalParameters.Where(p => p.Key == "$safeprojectname$").First().Value; replacementsDictionary["$safeprojectname$"] = safeprojectname; } public bool ShouldAddProjectItem(string filePath) { return true; } #endregion} |
接下来,我们需要对CMSProjectTemplateWizard进行数字签名,可以直接在项目上直接单击鼠标右键,选择Properties,在打开的项目属性标签页上选择Signing,并为项目制定一个强名称密钥文件:
重新编译CMSProjectTemplateWizard,然后打开Visual Studio 2010 Command Prompt工具,在命令提示符中使用gacutil.exe将编译出来的程序集安装到GAC中:
现在我们已经创建了一个Template Wizard项目,接下来,我们需要调整CMSProjectTemplate的设置,使其能够使用已创建的Template Wizard
在CMSProjectTemplate中使用Template Wizard
打开CMSProjectTemplate.vstemplate文件,在文件的底部TemplateContent节点之后加入WizardExtension节点,设置节点的内容如下:
|
1
2
3
4
|
<WizardExtension> <Assembly>CMSProjectTemplateWizard, Version=1.0.0.0, Culture=neutral, PublicKeyToken=52319e57efa35eb8</Assembly> <FullClassName>CMSProjectTemplateWizard.RootWizardImpl</FullClassName></WizardExtension> |
逐一打开CMSProjectTemplate\CMSTemplate下的所有子目录,修改每个目录下的 MyTemplate.vstemplate文件,在文件的底部TemplateContent节点之后加入WizardExtension节点,设置节 点的内容如下:
|
1
2
3
4
|
<WizardExtension> <Assembly>CMSProjectTemplateWizard, Version=1.0.0.0, Culture=neutral, PublicKeyToken=52319e57efa35eb8</Assembly> <FullClassName>CMSProjectTemplateWizard.ChildWizardImpl</FullClassName></WizardExtension> |
重新编译CMSProjectTemplate项目,并将编译输出的ZIP文件复制到<User_Documents>\Visual Studio 2010\Templates\ProjectTemplates\Visual C#目录下。
重新测试CMSProjectTemplate
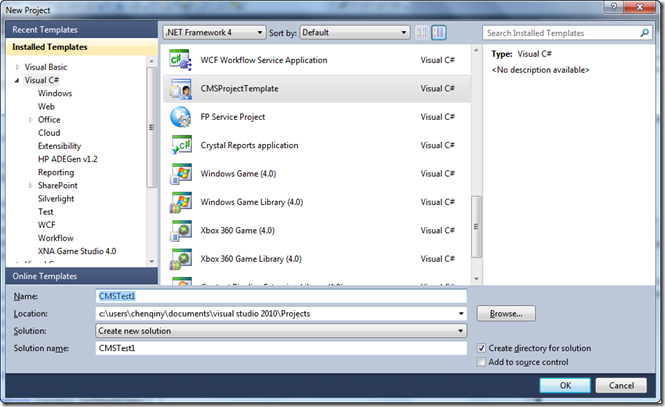
现在让我们重新新建一个CMSProjectTemplate的项目,在Visual Studio 2010中单击File –> New –> Project菜单,在弹出的对话框中选择CMSProjectTemplate,并输入项目名称然后单击OK按钮:
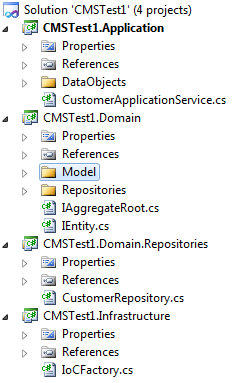
在Visual Studio 2010完成了项目的创建后,我们得到如下的解决方案:
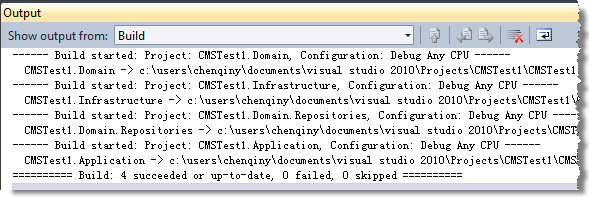
编译CMSTest1解决方案,我们发现,我们的CMSTest1解决方案已经被成功编译:
双击打开IoCFactory.cs文件,我们发现,代码中已经使用了正确的命名空间,整个解决方案的$safeprojectname$已经保持一致:
|
1
2
3
4
5
6
7
8
9
10
11
|
namespace CMSTest1.Infrastructure{ public static class IoCFactory { public static T GetObject<T>() { // TODO: Implement the IoC/DI logic here. return default(T); } }} |
至此,我们事实上已经成功地创建了一个多项目解决方案的模板,用户已经可以开始使用这个模板来新建一个类似RainbowCMS的解决方案了。
Template Wizard的高级应用
现在,让我们看看Template Wizard的几个高级应用的例子以及使用中需要注意的问题。
场景一:通过Template Wizard向CMSProjectTemplate传递自定义参数
这个应用场景比较简单,假设我们需要通过Template Wizard向CMSProjectTemplate传递一个名为$nowyear$的参数,表示当前日期的年份,基本步骤如下:
- 在RootWizardImpl的RunStarted方法中,向replacementsDictionary中添加一个$nowyear$的项,值为DateTime.Now.Year.ToString()
- 在RootWizardImpl的RunStarted方法中,同样向globalParameters中添加一个$nowyear$的项,值为DateTime.Now.Year.ToString()
- 在ChildWizardImpl的RunStarted方法中,通过RootWizardImpl从GlobalParameters中取得$nowyear$的值,并将其赋给replacementsDictionary
现在就可以在CMSProjectTemplate的任意地方使用$nowyear$参数,当项目被创建时,该参数会被当前日期的年份替换。
场景二:为用户提供“创建解决方案后编译”的选项
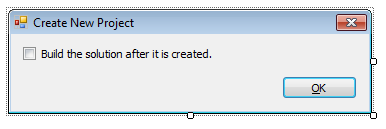
在CMSProjectTemplateWizard中,新建一个Windows Form,然后在这个Form上添加一个复选框,设置其文本为“Build the solution after it is created.”,表示当用户选中这个复选框时,在完成解决方案创建之后,需要Visual Studio 2010立即对该解决方案进行编译。这个Form的布局大致如下:
修改窗体的后台代码,添加一个BuildSolutionRequired属性,代码如下:
|
1
2
3
4
|
public bool BuildSolutionRequired{ get { return this.chkBuild.Checked; }} |
向CMSProjectTemplateWizard项目添加EnvDTE80的引用,修改RootWizardImpl类,将其改为:
|
1
2
3
4
5
6
7
8
9
10
11
12
13
14
15
16
17
18
19
20
21
22
23
24
25
26
27
28
29
30
31
32
33
34
35
36
37
38
39
40
41
42
43
44
45
46
47
48
49
50
|
public class RootWizardImpl : IWizard{ private bool buildSolutionRequired; private string safeprojectname; private EnvDTE80.DTE2 dteObject; private static Dictionary<string, string> globalParameters = new Dictionary<string, string>(); public static IEnumerable<KeyValuePair<string, string>> GlobalParameters { get { return globalParameters; } } #region IWizard Members public void BeforeOpeningFile(EnvDTE.ProjectItem projectItem) { } public void ProjectFinishedGenerating(EnvDTE.Project project) { } public void ProjectItemFinishedGenerating(EnvDTE.ProjectItem projectItem) { } public void RunFinished() { EnvDTE80.Solution2 solution = (EnvDTE80.Solution2)dteObject.Solution; if (buildSolutionRequired) solution.SolutionBuild.Build(); } public void RunStarted(object automationObject, Dictionary<string, string> replacementsDictionary, WizardRunKind runKind, object[] customParams) { try { dteObject = (automationObject as EnvDTE80.DTE2); safeprojectname = replacementsDictionary["$safeprojectname$"]; globalParameters["$safeprojectname$"] = safeprojectname; frmOptions options = new frmOptions(); if (options.ShowDialog() == DialogResult.OK) { buildSolutionRequired = options.BuildSolutionRequired; } } catch (Exception ex) { MessageBox.Show(ex.ToString()); } } public bool ShouldAddProjectItem(string filePath) { return true; } #endregion} |
重新编译CMSProjectTemplateWizard,并将其重装到GAC,然后尝试新建一个CMSProjectTemplate的项目,Visual Studio在创建项目之前会给出一个对话框,提示用户是否需要立即编译:
细心的朋友会发现,结合场景一和场景二的应用,我们就可以为用户提供一个动态参数输入的界面,而在项目模板中使用这个参数。
场景三:动态创建解决方案文件夹(Solution Folder)
通常,我们都会在Template Wizard执行完成之后,动态创建解决方案文件夹(Solution Folder)。假设我们需要在解决方案中添加一个名为ReferencedProjects文件夹,我们可以在 RootWizardImpl.RunFinished方法中添加如下代码:
|
1
2
3
4
5
|
public void RunFinished(){ EnvDTE80.Solution2 solution = (EnvDTE80.Solution2)dteObject.Solution; Project refProjectsFolderProject = solution.AddSolutionFolder("ReferencedProjects");} |
场景四:在解决方案文件夹下引用已经存在的项目文件
在场景三中,我们已经在解决方案下创建了一个ReferencedProjects文件夹,现在更进一步,将一个已存在于C:\Test目录下的C#项目文件Test.csproj添加到这个文件夹下。基于场景三中的代码,我们修改RunFinished方法如下:
|
1
2
3
4
5
6
7
8
9
|
public void RunFinished(){ EnvDTE80.Solution2 solution = (EnvDTE80.Solution2)dteObject.Solution; Project refProjectsFolderProject = solution.AddSolutionFolder("ReferencedProjects"); EnvDTE80.SolutionFolder refProjectsSolutionFolder = (EnvDTE80.SolutionFolder)refProjectsFolderProject.Object; string csprojFileName = @"C:\Test\Test.csproj"; refProjectsSolutionFolder.AddFromFile(csprojFileName);} |
场景五:Project GUID问题的解决
这个问题描述起来有点点复杂,总的来说,虽然我们可以在CMSProjectTemplate项目中,在所包含的csproj文件中将 ProjectGuid节点的值设置为$guid1$等,但在最终产生的项目文件上,我们发现,Visual Studio 2010会自动重新生成一个GUID来覆盖我们所指定的这个。换句话说,即使是在RootWizardImpl.RunFinished方法中,也得不到 这个最终的Project GUID。通常情况下,这不是什么大问题,因为一般我们也不太关心这个ProjectGuid究竟用什么值,因为项目之间的引用也是通过项目名称实现的。 比如在我们的CMSProjectTemplate中就不存在这样的问题。然而有些第三方的项目类型或许就会使用Project GUID来实现项目引用,比如大名鼎鼎的Windows Installer XML Toolset(WiX),它就是根据Project GUID来决定其所关联的项目的,这样就出现问题了:在WiX项目的模板中,我们可以给定其引用的项目的GUID,但在最后生成的解决方案中,被引用的这 个项目的GUID发生了变化,导致WiX项目无法对所需的项目进行引用,用户需要手动地重新添加项目引用,这样做就达不到自动化项目创建的目的。
这个问题我上网研究了很长时间,网上也没有找到合适的办法,很多国外技术社区的朋友也在一直抱怨为什么Visual Studio 2010在创建解决方案的时候需要重新产生Project GUID。最后经过我的反复试验,我找到了解决这个问题的办法。既然我们无法修改被引用项目的Project GUID,那么我们就直接在WiX项目上动手,在WiX项目中将它所设置的Project GUID替换为被引用项目的最终Project GUID。如何确定这个被引用项目的最终的Project GUID呢?只需要在解决方案资源管理器中找到这个被引用的项目,然后执行Save操作,项目的Project GUID就会被确定下来,然后再使用文本读取等手段获得这个最终的Project GUID即可。详细代码如下:
|
1
2
3
4
5
6
7
8
9
10
11
12
13
14
15
16
17
18
19
20
21
22
23
24
25
26
27
28
29
30
31
32
33
34
35
36
37
38
39
40
41
42
43
44
45
46
47
48
49
50
51
52
53
54
55
56
57
58
59
60
61
62
63
64
65
66
67
68
69
70
71
72
73
74
75
76
77
78
79
80
81
|
using System;using System.Collections.Generic;using System.IO;using System.Windows.Forms;using System.Xml;using EnvDTE;using Microsoft.VisualStudio.TemplateWizard;public void RunFinished(){ // 获取Solution对象 EnvDTE80.Solution2 solution = (EnvDTE80.Solution2)dteObject.Solution; Project webProject = null; Project wixProject = null; foreach (Project p in solution.Projects) { if (p.Name == string.Format("{0}.Web", safeprojectname)) { webProject = p; } if (p.Name == string.Format("{0}.Wix", safeprojectname)) { wixProject = p; } } // 保存web项目,使得其Project GUID能够被最终确定下来. webProject.Save(); // 保存需要修改的WiX项目,以确保“保存项目”对话框不会弹出. wixProject.Save(); // 在解决方案资源管理器中定位WiX项目 Window solutionExplorerWindow = dteObject.ToolWindows.SolutionExplorer.Parent as Window; solutionExplorerWindow.Activate(); UIHierarchyItem solutionHier = dteObject.ToolWindows.SolutionExplorer.UIHierarchyItems.Item(1); UIHierarchyItem wixProjectHier = null; foreach (UIHierarchyItem item in solutionHier.UIHierarchyItems) { if (item.Name == string.Format("{0}.Wix", safeprojectname)) { wixProjectHier = item; break; } } if (wixProjectHier != null) { // 在解决方案资源管理器中将WiX项目选中 wixProjectHier.Select(vsUISelectionType.vsUISelectionTypeSelect); // 将WiX项目从解决方案中卸载(Unload) dteObject.ExecuteCommand("Project.UnloadProject"); // 调用ReplaceProjectGuid方法,修改WiX项目中对web项目 // 的引用Guid ReplaceProjectGuid(webProject, wixProject); // 稍等片刻... System.Threading.Thread.Sleep(500); // 重新加载WiX项目 dteObject.ExecuteCommand("Project.ReloadProject"); }}private void ReplaceProjectGuid(Project webProject, Project wixProject){ var webProjectFullName = webProject.FullName; var webProjectText = File.ReadAllText(webProjectFullName); int pos = webProjectText.IndexOf("<ProjectGuid>", StringComparison.InvariantCultureIgnoreCase); var guid = webProjectText.Substring(pos + "<ProjectGuid>".Length, 38); var wixProjectFullName = wixProject.FullName; XmlDocument xmlDoc = new XmlDocument(); XmlNamespaceManager namespaceMgr = new XmlNamespaceManager(xmlDoc.NameTable); xmlDoc.Load(wixProjectFullName); XmlNode node = xmlDoc.SelectSingleNode("//ns:Project//ns:ItemGroup[3]//ns:ProjectReference[2]//ns:Project", namespaceMgr); node.InnerText = guid; xmlDoc.Save(wixProjectFullName);} |
总结
至此,我们已经成功地借助Template Wizard创建了一个多项目解决方案的模板,我们还学习了Template Wizard的一些高级应用。但我们的CMSProjectTemplate还没有全部完成,我们还需要为其提供一个更好听的名字、更好看的图标,而且我 们还希望能够通过Visual Studio 2010 Extension来实现一个安装包,以便用户能够直接安装并使用我们的模板。这部分内容我会在下一篇文章中重点介绍。
本文案例下载
- CMSProjectTemplate(至目前为止,未完成)
原文地址:http://www.cnblogs.com/daxnet/archive/2012/01/18/2325928.html


 浙公网安备 33010602011771号